Table of Contents >> Show >> Hide
- What counts as “under cabinet lighting,” anyway?
- Pick your lighting style: the best option for your kitchen
- Plan first, drill later: layout tips that make it look professional
- Tools and materials checklist
- DIY Option #1: Install plug-in under cabinet light bars (fastest win)
- DIY Option #2: Install low-voltage LED tape lights (the “built-in” look without hardwiring)
- Step 1: Plan the run (including corners and breaks)
- Step 2: Confirm your power supply capacity
- Step 3: Prep the cabinet underside
- Step 4: Mount the channel (optional, but worth it)
- Step 5: Cut tape only at marked cut points
- Step 6: Connect corners and extensions
- Step 7: Mount the tape and secure it
- Step 8: Place the driver and controls where you can access them
- Hardwired under cabinet lighting (cleanest look, but treat this as “advanced”)
- Dimming and controls: avoid flicker, buzzing, and “why is it strobing?”
- Kitchen safety notes you should not skip
- Troubleshooting: common problems and quick fixes
- FAQ
- Real-world experiences & lessons DIYers share (read this before you start drilling)
- 1) Your kitchen is not a clean-room labadhesive needs help
- 2) The prettiest installs are planned around hiding the power supply
- 3) Dimmer placement matters more than you think
- 4) Corners are where good installs go to cry (unless you prep)
- 5) Diffusers are the unsung heroes on shiny countertops
- 6) Not all “white” light matches
- 7) The best time to do cable management is right away
- 8) Test everything before final mounting
- 9) Low-voltage DIY is friendly; line-voltage DIY needs respect
- 10) The “perfect” install is the one you’ll actually use
- Wrap-up
If your kitchen has ever made you chop onions in the shadow of your own head, you already understand the mission.
Under cabinet lighting puts bright, focused light exactly where you workon the countertopso you can see what
you’re doing (and stop accidentally “mincing” your thumb).
The good news: most under cabinet lighting installs are very DIY-friendlyespecially plug-in light bars and low-voltage LED tape.
The not-so-fun news: anything involving household (line-voltage) wiring can be dangerous and may require permits.
This guide covers all the options, with extra emphasis on the safer DIY paths and the planning details that make the finished result look
clean instead of “temporary holiday lights, but make it kitchen.”
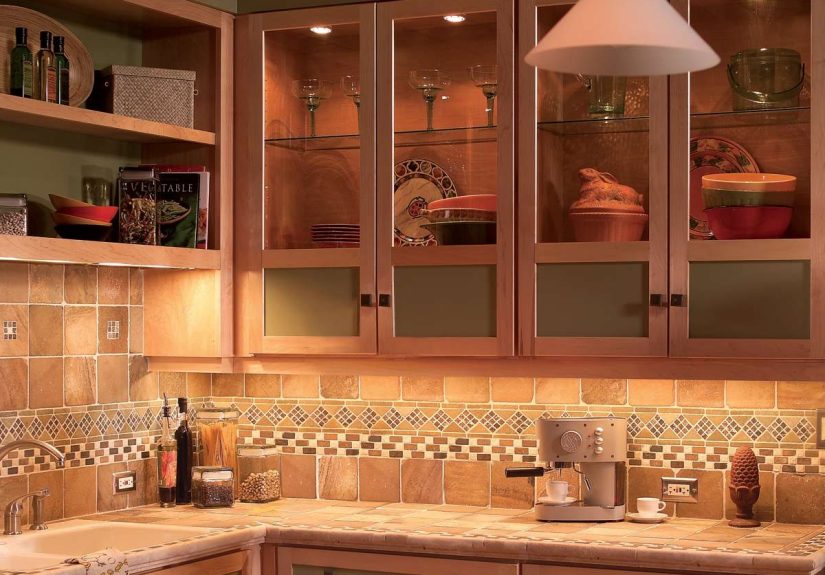
What counts as “under cabinet lighting,” anyway?
Under cabinet lighting is any fixture mounted beneath your upper cabinets to illuminate counters, backsplashes, and prep areas.
In modern kitchens, that usually means LEDs (light bars, puck lights, or LED tape/strip lights) because they’re efficient, long-lasting,
and stay relatively cool.
Pick your lighting style: the best option for your kitchen
Before you buy anything, decide what you want most: the fastest install, the cleanest look, the smoothest light, or the smartest controls.
Here’s a quick comparison to help you choose.
| Type | Best For | Pros | Cons | DIY Difficulty |
|---|---|---|---|---|
| Plug-in light bars | Quick countertop task lighting | Fast install, bright, many are linkable | Cord management matters (a lot) | Easy |
| Low-voltage LED tape (plug-in driver) | Most “built-in” look without hardwiring | Even light, flexible, great for long runs | Needs planning for power supply, corners, connectors | Easy–Moderate |
| Puck lights (plug-in or battery) | Small areas or spot lighting | Simple, focused beams | Can create “polka-dot” light pools if spaced poorly | Easy |
| Hardwired fixtures | Cleanest install (no visible cords) | Permanent, sleek, often switch-controlled | Electrical work can be hazardous; may need a pro | Advanced / Pro recommended |
Plan first, drill later: layout tips that make it look professional
1) Measure your cabinet runs (and map your power source)
Start by measuring the underside length of each upper cabinet run you want to light. Note any breaks (stove hood, window, tall pantry),
and mark where you can realistically get poweran existing outlet, a hidden outlet inside a cabinet, or (for remodels) a new switched feed.
2) Decide where the light should sit under the cabinet
Placement affects glare, reflections, and whether you see individual “hot spots.”
A common strategy is mounting LED tape toward the front or slightly back depending on your surfaces and goals.
If your countertop is reflective, shifting placement can reduce bright reflections.
If you want to light both the work surface and backsplash, placement about an inch or two back from the cabinet front often helps.
3) Choose color temperature and color quality (CRI)
For most kitchens, you’ll see under cabinet LEDs offered in ranges like warm/soft white through bright white.
Warm whites can feel cozy; brighter whites can feel crisp for food prep.
Also look for higher CRI (color rendering) if you care about food colors looking natural (because “is this chicken done?” is not a fun guessing game).
4) Pick a brightness goal
Packaging may list lumens (brightness). Bigger kitchens, darker countertops, and deeper cabinets usually need more light.
If you’re unsure, choose a dimmable setupextra brightness is easy to dial down, but not easy to conjure from thin air.
5) Make sure it’s safety listed
Kitchens have moisture, heat, and cleaning chemicals. Choose fixtures and power supplies that are properly safety certified for home use
(and avoid mystery no-name power bricks that get hotter than your cast iron).
Tools and materials checklist
Your exact list depends on your lighting type, but here’s a practical starter kit for most DIY under cabinet lighting installs.
Tools
- Measuring tape and pencil (or painter’s tape for marking)
- Drill/driver + small drill bits
- Scissors (for cuttable LED tape)
- Level or straightedge (optional but helpful)
- Cleaning supplies (mild cleaner, microfiber cloth, rubbing alcohol for final wipe)
- Cable/cord clips or adhesive cable raceway for a tidy finish
- For any electrical work: voltage tester and proper safety gear
Materials (choose based on your system)
- Under cabinet light bars or LED tape light kit
- Power supply/driver (included with many tape kits)
- Connectors (straight, corner, T-splitters) if your run changes direction
- Aluminum channel + diffuser (optional, but highly recommended for tape lights to soften “dots”)
- Mounting screws or clips (even if your lights include adhesivebelt and suspenders is a good look in kitchens)
DIY Option #1: Install plug-in under cabinet light bars (fastest win)
Plug-in bars are the “I want better lighting by dinner” option. Many are linkable, so one outlet can feed multiple fixtures.
Your main job is: mount them straight, hide the cord, and avoid turning your backsplash into a wire exhibit.
Step 1: Dry fit and mark the positions
- Hold each bar under the cabinet and check that the light won’t hit cabinet doors or trim.
- Mark the centerline or mounting hole locations with pencil or painter’s tape.
- Decide where the cord will run (toward the back is usually easiest to hide).
Step 2: Clean the mounting surface
Grease and dust are the natural enemies of adhesive. Even if you’re screwing the fixtures in,
cleaning helps mounting tape, clips, and cable raceways stick properly.
Wipe, dry, then do a final wipe with rubbing alcohol if the manufacturer allows.
Step 3: Mount the fixtures
- If the fixture uses screws: pre-drill shallow pilot holes to avoid splitting the cabinet bottom.
- Use screws that are short enough not to poke into the cabinet interior.
- If the fixture uses adhesive: press firmly and follow cure-time guidance. Add clips if you can.
Step 4: Link fixtures (if your system supports it)
For linkable bars, connect the linking cords between fixtures. Keep cords snug to cabinet corners and edges,
and use clips so the cords don’t sag into view.
Step 5: Handle cord management like you actually live there
- Use cord clips under the cabinet to route the cord neatly.
- If you have multiple cabinet sections, drill small pass-through holes near back corners to hide wiring between sections.
- If the outlet is visible, consider a paintable cord cover/raceway to keep things clean.
Step 6: Plug in, test, and adjust
Turn the lights on, confirm all sections illuminate, and verify dimming (if included) works smoothly.
If the dimmer control is on a cord, put it somewhere you can actually reachbecause “hidden dimmer” sounds great until you want to use it.
DIY Option #2: Install low-voltage LED tape lights (the “built-in” look without hardwiring)
LED tape is the secret behind that smooth, continuous glow you see in magazine kitchens.
It’s still DIY-friendly because the system is typically low-voltage (powered by a plug-in driver),
but the finished look can feel customespecially with a diffuser channel.
Step 1: Plan the run (including corners and breaks)
- Measure each cabinet run where tape will go.
- Identify where the power supply/driver will live (often on top of upper cabinets or inside a cabinet).
- Decide if one continuous run works, or if you’ll split into zones.
Step 2: Confirm your power supply capacity
LED tape is usually rated by watts per foot (or per meter). Multiply that by your total length, then add headroom
(a buffer helps reliability and reduces overheating). If you’re adding dimming, confirm the driver and dimmer are compatible.
Step 3: Prep the cabinet underside
- Clean thoroughly and let it dry.
- If using an aluminum channel, mark where the channel will mount.
- Decide whether you’ll drill pass-through holes between cabinet sections for a continuous look.
Step 4: Mount the channel (optional, but worth it)
A channel with a diffuser cover helps in three ways: it straightens the run, hides the strip, and smooths out hot spots.
If your countertop is glossy or reflective, a diffuser can also reduce glare.
Step 5: Cut tape only at marked cut points
- Test the strip first by plugging it in briefly.
- Measure twice. Cut once. Then measure again, because kitchens are humbling.
- Cut only where the strip indicates (often with a scissor icon or copper pad area).
Step 6: Connect corners and extensions
Use the connectors designed for your tape width and voltage. For L-shaped kitchens,
it’s common to run wiring from a central connection point and branch in two directions.
Secure wires neatly under cabinets with staples or clips (appropriate for low-voltage wiring) so nothing droops into view.
Step 7: Mount the tape and secure it
- Peel the backing gradually (don’t expose the entire adhesive at once).
- Press the tape firmly into place along the channel (or cabinet underside).
- Add mounting clips at ends and stress points for long-term hold.
Step 8: Place the driver and controls where you can access them
Put the power supply somewhere ventilated and reachable (top of cabinets, a cabinet interior, or a dedicated hidden shelf).
If you’re using a wireless dimmer or smart controller, pair and test everything before final cable management.
Hardwired under cabinet lighting (cleanest look, but treat this as “advanced”)
Hardwired under cabinet lighting can look incredible: no cords, no visible plugs, and it can be controlled from a wall switch.
But it also involves household wiring, which can be dangerous. If you’re not experienced with electrical work,
this is the moment to bring in a licensed electricianespecially in a kitchen where code requirements and safety matter.
If you’re planning a remodel, here’s the smart way to think about hardwired lighting
- Plan power early: Decide whether under cabinet lights are on their own switch, tied to other kitchen lighting, or controlled with smart switches.
- Hide wiring paths: Remodels allow wiring behind walls and through cabinets, keeping everything invisible.
- Use proper junction boxes and listed components: Kitchens are not the place for improvisation.
- Permit and inspection: Many areas require permits for new circuits or modified wiring. Don’t skip the boring steps; they’re the ones that prevent fires.
Dimming and controls: avoid flicker, buzzing, and “why is it strobing?”
Dimming under cabinet lighting is fantasticuntil it isn’t. Flicker and buzzing usually come from compatibility issues between
LEDs, drivers (power supplies), and dimmer switches.
Match the dimmer to the driver type
- Line-voltage LED fixtures: Often dim with standard LED-compatible dimmers (but check the manufacturer).
- Low-voltage tape with a driver: The driver must be dimmable and compatible with your dimmer type (TRIAC/MLV/ELV varies by system).
- Important safety note: Manufacturers commonly warn that electronic low-voltage dimmers should be connected only on the primary (high-voltage) side of an electronic low-voltage transformer.
Use compatibility tools when you can
Major lighting control brands publish compatibility resources for LEDs. If you want smooth dimming,
it’s worth checking compatibility before you buy a dimmer and driver combo.
Don’t hide the dimmer where nobody can reach it
Some under cabinet systems put a small dimmer on the cord. That’s fineuntil it ends up behind a coffee maker,
a cookbook stack, and a fruit bowl that never moves. Put controls where you’ll actually use them.
Kitchen safety notes you should not skip
Turn off power before doing anything electrical
If your project involves opening boxes, modifying wiring, or installing new outlets/switches, shut off power at the breaker
and verify with a voltage tester. Treat “I’m pretty sure it’s off” as the beginning of a horror movie.
GFCI protection matters in kitchens
Kitchen receptacles often require GFCI protection (and requirements have expanded in newer code cycles).
If your under cabinet lights plug into an outlet, that outlet may need to be GFCI-protected depending on local rules.
When in doubt, ask a qualified electrician or your local building department.
Keep wires and heat sources separated
Whether you’re installing older-style fixtures with ballasts or modern drivers, follow manufacturer spacing guidance so wiring
doesn’t sit against hot components.
Troubleshooting: common problems and quick fixes
Problem: My LED tape won’t stick (it falls down overnight like a sad noodle)
- Clean better (kitchen grease is sneaky).
- Warm the adhesive slightly (room temperature helps).
- Add mounting clips or move to a channel with screws.
Problem: The counter has bright spots or glare
- Use a diffuser channel.
- Adjust placement (closer to cabinet lip, or toward backsplash depending on reflections).
- Choose a tape with higher LED density (more LEDs per foot often looks smoother).
Problem: Lights flicker when dimmed
- Confirm the driver is dimmable and the dimmer type matches the driver.
- Try a different compatible dimmer (brand compatibility lists can help).
- Ensure connections are tight and polarity is correct (for low-voltage tape).
Problem: One section is dark
- Check connectors (they can look “connected” but not actually bite into contacts).
- Look for a cut made off the marked cut line.
- Test the strip in a shorter configuration to isolate the bad segment.
FAQ
Is under cabinet lighting worth it?
If you prep food, read recipes, or just want your kitchen to feel more polished, yes.
It improves task lighting and can add a warm “layered lighting” vibe that overhead lights alone rarely achieve.
Should I use light bars or LED tape?
Choose light bars if you want maximum brightness with minimal planning.
Choose LED tape if you want the most seamless look and flexibilityespecially for longer runs or tricky layouts.
What color temperature is best for kitchens?
Many people prefer warm-to-neutral whites for a welcoming kitchen, while others prefer a brighter, crisper white for food prep.
If you can, choose tunable or dimmable lighting so you can adjust for time of day and mood.
Real-world experiences & lessons DIYers share (read this before you start drilling)
The internet is full of “10-minute installs” that mysteriously skip the part where you spend 45 minutes deciding where the cord should go.
Here are the practical, real-life lessons homeowners and DIYers tend to learn while installing under cabinet lightingso you can learn them
the easy way (by reading) instead of the hard way (by redoing).
1) Your kitchen is not a clean-room labadhesive needs help
Under cabinet surfaces collect cooking residue. Even when they look clean, they can be slightly oily.
DIYers often find that tape lights stick beautifully on day one and peel off by day three.
The fix is simple: clean thoroughly, do a final alcohol wipe if allowed, let it dry fully, and use mounting clips or channels.
Think of adhesive as “initial positioning,” not the only thing holding your lighting up forever.
2) The prettiest installs are planned around hiding the power supply
Low-voltage systems look high-end when the driver and extra wiring are tucked above cabinets or inside a cabinet.
People who plan this early end up with a clean, custom look. People who don’t plan it early end up creatively stacking cereal boxes
to hide a power brick (and then pretending it was always the plan).
3) Dimmer placement matters more than you think
A cord dimmer buried behind a toaster is basically a decorative object.
DIYers who love their results usually place controls where they naturally reachnear the main work zone, at the cabinet edge,
or integrated into a wall switch via a compatible system.
4) Corners are where good installs go to cry (unless you prep)
L-shaped kitchens and cabinet breaks are common trouble spots.
The smoothest projects use the right connectors (or short jumper wires) and test-fit corner routing before sticking anything down.
A quick “bench test” on the counterconnecting everything while it’s easy to reachsaves a lot of under-cabinet frustration.
5) Diffusers are the unsung heroes on shiny countertops
If you have quartz, polished granite, or glossy tile, exposed LED tape can reflect as bright dots.
DIYers who add diffuser channels often report the biggest “wow” improvement for the least added effort.
It’s a small upgrade that makes the lighting feel intentional and comfortable.
6) Not all “white” light matches
Mix a warm under cabinet strip with cool overhead bulbs and your kitchen can look visually confusedlike it’s wearing two different socks.
DIYers who love the final look usually coordinate color temperature across layers (overhead, under cabinet, and pendants),
or choose adjustable/tunable fixtures.
7) The best time to do cable management is right away
It’s tempting to say, “I’ll tidy cords later,” but later often becomes never.
Installers who clip cords neatly as they go end up with a finish that looks built-in rather than temporary.
Simple cord clips and small pass-through holes (placed thoughtfully) make a huge difference.
8) Test everything before final mounting
DIYers frequently recommend plugging in and testing the entire system before permanently mounting strips or channels.
This catches dead segments, loose connectors, or a finicky controller while everything is still accessible.
Five minutes of testing can prevent an hour of rework.
9) Low-voltage DIY is friendly; line-voltage DIY needs respect
Plenty of people successfully install plug-in and low-voltage systems on their own.
But when a project crosses into opening electrical boxes, adding outlets, or running new cable, the risk goes up quickly.
Homeowners with the best outcomes tend to recognize the boundary: DIY the lighting hardware and layout,
hire a licensed electrician for the wiring if there’s any doubt.
10) The “perfect” install is the one you’ll actually use
The goal isn’t to impress a lighting designer who lives in your walls.
It’s to make your kitchen easier to usebrighter for chopping, softer for late-night water runs, and flexible for everyday life.
If you choose a system with the right brightness, a pleasant color, and convenient controls, you’ll use it constantly.
And that’s the real win.
Wrap-up
Installing under cabinet lighting is one of the highest-impact kitchen upgrades you can do without ripping anything apart.
Choose your system (light bars for speed, LED tape for a custom look), plan your layout, manage cords like a tidy wizard,
and prioritize safetyespecially in a kitchen environment.


