Table of Contents >> Show >> Hide
- Freezing 101: What’s Actually Going On in There?
- Before You Freeze Anything: The Golden Rules
- How to Freeze Fruits
- How to Freeze Vegetables
- How to Freeze Herbs (Without Turning Them Into Sad Green Confetti)
- How Long Can You Keep Frozen Produce?
- Thawing and Using Frozen Fruits, Vegetables, and Herbs
- Power Outage Reality Check (Because Life Happens)
- Conclusion: Freeze Smarter, Eat Better, Waste Less
- Freezer Field Notes: 10 Real-World Experiences and Lessons (The Extra Stuff That Makes It Click)
- 1) The “one big bag” trap is real
- 2) Portion sizes are your future happiness
- 3) Label like a slightly intense librarian
- 4) Herbs want protection
- 5) Onion and pepper freezer packs become weeknight gold
- 6) People underestimate draining (and regret it later)
- 7) Freezer placement changes results
- 8) “Best for smoothies” is not an insult
- 9) A tiny freezer inventory prevents duplicate chaos
- 10) The first win creates the habit
- SEO Tags
Your freezer is basically a tiny time machine. You toss in peak-summer berries, and months laterboomJanuary smoothie that tastes like you didn’t just
spend the morning scraping ice off your windshield. The trick is doing it the right way, so you get bright flavor and good texture instead of
“mysterious icy brick” and the faint sadness of freezer burn.
This guide to how to freeze fruits, vegetables and herbs covers the why and the how (with plenty of real-life examples), plus the
small habits that make frozen produce taste surprisingly close to fresh. Let’s turn “I’ll deal with it later” into “future me is going to be thrilled.”
Freezing 101: What’s Actually Going On in There?
Freezing doesn’t “improve” food; it simply pauses it. But it pauses some things better than others. Produce contains water, and water turns into
ice crystals. The faster you freeze, the smaller those crystals tend to be, which usually means better texture when you thaw or cook.
Quality vs. safety (a quick sanity check)
At 0°F (-18°C) and below, food stays safe for a long time; the main thing that changes over months is qualityflavor,
texture, and that “fresh” vibe. So the goal is to freeze fast, package well, and avoid air exposure.
Meet the enemies: air, enzymes, and time
- Air causes dehydration and oxidation. Translation: freezer burn and stale flavors.
- Enzymes keep working (slowly) even in the cold, especially in vegetablesleading to dull color and off texture.
- Time magnifies everything. A great pack job buys you months of “still awesome.” A sloppy one buys you regret.
Your “freeze like a pro” toolkit
- Sheet pans for tray freezing (aka “freeze individually, then bag”).
- Freezer bags or freezer-safe containers (look for “freezer” or “heavy-duty”).
- A permanent marker (the real MVP).
- Ice cube trays (for herbs and saucestiny flavor grenades).
- Optional but dreamy: a vacuum sealer.
Before You Freeze Anything: The Golden Rules
1) Start with good produce
Freezing is a preservation method, not a glow-up. If the strawberries are already mushy or the broccoli smells like it’s making life choices, freezing
won’t save it. Freeze produce at peak ripeness and freshness for the best results.
2) Dry matters more than you think
Excess water turns into excess ice. After washing, dry thoroughly (especially berries, herbs, and sliced fruit). Less surface moisture
means less clumping and better texture later.
3) Freeze fast, don’t overcrowd
Spread items in a single layer during the initial freeze. Once solid, consolidate into bags or containers. This helps you avoid the dreaded
“one mega-clump” problem and improves freezing speed.
4) Package like air is your sworn enemy
Squeeze out air from freezer bags, use containers with minimal headspace where appropriate, and label everything with
what it is and the date. Future you should not have to play “Is this mango or butternut squash?” at 10 p.m.
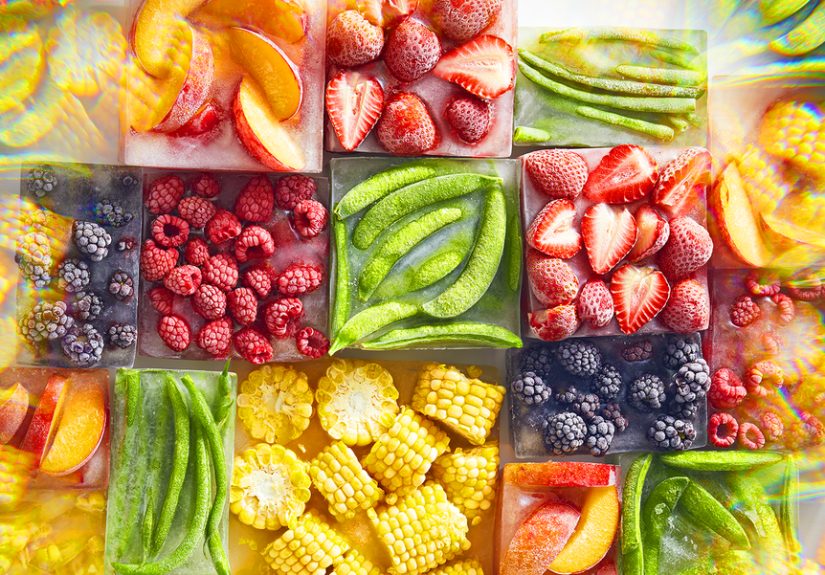
How to Freeze Fruits
Fruits are generally easier than vegetables because most don’t require blanching. The big issues are
browning (apples, peaches, pears) and texture (many fruits soften after freezing).
Pick your packing style: dry pack, tray pack, or syrup pack
-
Tray pack (best for berries, mango cubes, sliced bananas): Freeze pieces on a sheet pan first, then bag. You’ll get scoopable,
pourable fruit instead of a single frozen asteroid. - Dry pack (simple and fast): Pack fruit into bags/containers without added liquid. Great for fruit headed to smoothies or baking.
-
Syrup pack (best “dessert-ready” texture): Fruit covered in syrup tends to keep better color and texture. It’s especially useful for
peaches, pears, and fruit you want to serve as-is.
Step-by-step: the “tray freeze” method (your everyday hero)
- Wash fruit gently; don’t soak delicate berries.
- Dry very well (paper towels + patience).
- Prep for use: hull strawberries, peel and slice bananas, cube mango, etc.
- Optional anti-browning dip for apples/peaches/pears: toss with lemon juice or an ascorbic acid solution.
- Arrange in a single layer on a parchment-lined sheet pan. Freeze until solid.
- Transfer to a freezer bag, press out air, label, and return to the freezer.
Anti-browning that actually works (without turning fruit into “lemon candy”)
Light-colored fruits can brown when exposed to air. A small amount of ascorbic acid (vitamin C) is a classic solution; lemon juice can
also help. The goal is a gentle coat, not a citrus bath. If you’re using syrup packs, you can also add anti-browning treatment to the syrup.
Fruit examples (because “just freeze it” is not a plan)
Berries (strawberries, blueberries, raspberries)
Berries shine with tray freezing. Once frozen, they pour like marbles (delicious marbles). Use straight from frozen for smoothies, oatmeal, and baking.
If you plan to thaw for topping yogurt, expect softer texturebest served while still a little icy.
Bananas
Peel first (future you will not enjoy peeling a frozen banana). Slice into coins for smoothies, or freeze chunks for “nice cream.”
For quick baking prep, mash bananas and freeze in measured portions (like 1-cup blobs in freezer bags).
Apples
Apples freeze best for cooking (pies, crisps, sauce). Slice and treat for browning, then tray freeze. If you want dessert-style apples,
a syrup pack helps maintain color and texture.
Peaches and pears
These are prime candidates for syrup pack. Pack tightly, cover with syrup, and keep fruit submerged (a small piece of waxed paper on top can help).
Leave a bit of headspace for expansion, seal, label, freeze.
Citrus
Citrus segments can be tray frozen, but texture changes are real. A better move: freeze juice in small containers or ice cube trays
for cooking and cocktails. (Yes, even “responsible” cocktails. They exist in theory.)
How to Freeze Vegetables
Vegetables usually need one extra step: blanching. It’s quick, it’s worth it, and it keeps your veggies from turning into dull,
limp versions of themselves.
Blanching: the 2-minute (sometimes 3-minute) secret weapon
Blanching is a short dip in boiling water or steam, followed by rapid cooling in ice water. It slows enzyme activity that affects
flavor, color, and texture. It also cleans the surface and helps vegetables pack better.
How to blanch vegetables the right way
- Prep vegetables: wash, trim, cut into the size you’ll actually use.
- Boil a large pot of water. A good rule of thumb is plenty of water so it returns to a boil quickly after adding vegetables.
- Blanch for the recommended time (varies by vegetable and size). Start timing when the water returns to a boil.
- Shock in ice water immediately to stop cooking.
- Drain thoroughly. Water left on vegetables becomes ice… and then becomes clumps.
- Pack (dry pack or tray pack), remove air, label, freeze.
Sample blanching times (so you can feel like a wizard)
- Green beans: about 3 minutes
- Broccoli florets: about 3 minutes (water blanching), longer for steam blanching
- Asparagus: roughly 2–4 minutes depending on thickness
- Corn on the cob (for kernels later): blanch, cool, then cut kernels off
These are examplesalways match times to the specific vegetable and cut size you’re freezing. Under-blanching can lead to quality issues later, and
over-blanching can make vegetables too soft.
Dry pack vs. tray pack (vegetable edition)
- Dry pack: Put blanched, drained vegetables directly into bags/containers. Press out air. Great for mixed veg, chopped broccoli, etc.
-
Tray pack: Freeze pieces on a tray first, then bag. Excellent for peas, corn kernels, diced carrots, green beansanything you want
to pour out by the handful.
Vegetables that don’t always need blanching
Some vegetables can be frozen without blanchingoften because they’re typically used cooked, or their texture changes anyway. Common examples include
onions and peppers. You can chop/slice, tray freeze, then bag. They won’t be crisp after thawing, but they’re perfect
for sautés, soups, fajitas, and casseroles.
Vegetable examples that save weeknight dinners
Leafy greens (spinach, kale)
Blanch briefly, squeeze out excess water, then portion into “pucks” in bags. Toss frozen greens straight into soups, pasta, eggs, and smoothies.
(No one needs to know your smoothie contains kale. It can be our secret.)
Broccoli and cauliflower
Cut into florets, blanch, cool, drain, then tray freeze for maximum flexibility. Use from frozen in stir-fries, sheet-pan meals, and roasted veggie
situations where you pretend you planned ahead.
Carrots
Sliced carrots freeze beautifully after blanching. Tray freeze for “grab a handful” convenience.
Tomatoes
Tomatoes are a special case: texture turns soft, so freeze for sauces, soups, and cooking. You can freeze whole or in pieces, and peeling is easier if
you briefly dip in boiling water first. For maximum practicality, freeze crushed tomatoes or sauce in recipe-sized portions.
How to Freeze Herbs (Without Turning Them Into Sad Green Confetti)
Herbs are flavor powerhouses… and also drama queens. Freeze them wrong and they blacken, bruise, or lose aroma. Freeze them right and you get
instant upgrades for soups, sauces, eggs, roasted veggiesbasically everything that wants to taste like you own a garden (even if you own one basil plant
that’s barely hanging on).
Method 1: Herb ice cubes (the “drop-in flavor” move)
- Wash herbs gently and dry well.
- Chop (or lightly tear) leaves. Remove tough stems.
- Fill an ice cube tray partway with water, add herbs, top off, and freeze solid.
- Pop cubes out and store in a labeled freezer bag.
Use herb cubes directly from frozen in soups, stews, sauces, and grains. It’s like having a tiny sous-chef living in your freezer.
Method 2: Freeze herbs in oil (best for sautéing)
Mix chopped herbs with olive oil (or another cooking oil), portion into ice cube trays, and freeze. These are ideal for starting a pan sauce, sautéing
onions, or building flavor in a skillet.
Important safety note: Herb-and-garlic mixtures in oil should not be stored at room temperature. Keep them refrigerated for short use or
freeze for longer storage.
Method 3: Herb puree (for basil, parsley, chives, etc.)
Blend tender herbs with a small amount of water (or oil), then freeze in cubes. This works especially well when you have a lot of herbs and want a fast,
compact storage method.
Method 4: Pesto portions
Make pesto, freeze it in ice cube trays, then store cubes in a freezer container or bag. Toss a cube into hot pasta, soup, or a pan sauce. Peak flavor,
zero effort, and suddenly you look suspiciously competent.
How Long Can You Keep Frozen Produce?
Frozen food can stay safe a long time when kept at 0°F, but quality is the reason to use it within reasonable windows. For best flavor and texture:
- Fruits: often best within about 8–12 months (some are better sooner, especially delicate berries).
- Vegetables: commonly best within about 8–12 months when blanched and packed well.
- Herbs: best within about 6–12 months for strongest aroma.
The more air exposure (or the more often your freezer warms up from frequent door opening), the faster quality drops. If you see freezer burn, it’s not
automatically unsafeit’s usually just dried-out and less tasty. Trim it off or use it in cooked dishes where texture matters less.
Thawing and Using Frozen Fruits, Vegetables, and Herbs
Fruits
- Smoothies: use straight from frozen.
- Baking: usually straight from frozen works great (toss berries with a little flour to reduce bleeding).
- Toppings: thaw in the fridge for best control; serve while still slightly icy for better texture.
Vegetables
- Stir-fries and roasting: cook from frozen. Thawing often makes veggies watery.
- Soups and stews: straight in, no thaw needed.
- Steaming/microwaving: quick and easy; drain any excess water afterward.
Herbs
- Herb cubes: drop into hot dishes; no thawing needed.
- Whole frozen sprigs: best for stocks, soups, and long simmers.
- Frozen pesto: melt into pasta, sauces, eggs, or roasted vegetables.
Power Outage Reality Check (Because Life Happens)
If the power goes out, keep freezer doors closed as much as possible. A full freezer can hold a safe temperature for roughly
about 48 hours (and a half-full freezer about 24 hours) if unopened. If food still contains ice crystals or is at
40°F or below, it can be safe to refreeze (quality may suffer).
Conclusion: Freeze Smarter, Eat Better, Waste Less
If you remember just three things: freeze at peak quality, blanch most vegetables, and keep air out.
Do that, and you’ll build a freezer stash that makes weeknights easier, grocery bills calmer, and future you mildly obsessed with past you (in a healthy
way).
Start small: tray freeze a bag of berries, blanch and freeze green beans, make a few herb cubes. Once you taste the difference, you’ll never go back to
“shove it in a random bag and hope for the best.” Your freezer can do better. So can you.
Freezer Field Notes: 10 Real-World Experiences and Lessons (The Extra Stuff That Makes It Click)
Here’s what tends to happen in actual kitchensespecially when people are freezing produce after a big grocery haul, a farmers’ market spree, or a garden
that suddenly decides to produce zucchini like it’s being paid commission.
1) The “one big bag” trap is real
People often dump chopped fruit into a bag and call it a day. Then they discover the bag has become a single fruit boulder. The fix is simple:
tray freeze first when you want grab-and-go pieces. It feels like an extra step, but it saves you from trying to karate-chop frozen
pineapple at 7 a.m.
2) Portion sizes are your future happiness
Freeze in the amounts you actually use: 1-cup berry portions for smoothies, 2-cup mixed vegetables for stir-fry, 1/2-cup chopped onions for soup bases.
This one change turns frozen produce from “ingredient” into “instant dinner helper.”
3) Label like a slightly intense librarian
The marker is not optional. A bag of “green stuff” could be pesto… or it could be pureed spinach. Both are useful. Only one belongs in your lasagna.
Write the item and date. Bonus points for adding intended use: “peaches (pie)” or “tomatoes (sauce).”
4) Herbs want protection
Lots of home cooks discover that frozen basil leaves can darken and look a little dramatic. That’s why the cube method (water, broth,
oil, or butter) is so popular. The herbs are protected, portioned, and ready to drop into hot foodwhere nobody judges their appearance anyway.
5) Onion and pepper freezer packs become weeknight gold
A “fajita mix” bagsliced onions and peppersshows up in a shocking number of successful meal-prep systems. You can toss it into a skillet from frozen
and be halfway to tacos, omelets, pasta, or sheet-pan chicken without chopping a thing.
6) People underestimate draining (and regret it later)
After blanching vegetables, rushing the drain step is a common mistake. The leftover water becomes ice, which becomes clumps, which becomes “why is my
broccoli snowy?” Drain well, pat dry if needed, and your vegetables will stay looser and cook better.
7) Freezer placement changes results
The fastest freeze typically happens where cold air circulates well. People who stack warm containers tightly (or cram the freezer) often notice softer
texture later. A little breathing room during the initial freeze helps food firm up quickly; once solid, you can stack neatly.
8) “Best for smoothies” is not an insult
Some fruits get softer after freezing. That’s normal. Instead of being disappointed, successful freezer folks assign jobs:
soft fruit goes to smoothies, sauces, jams, and baking; firmer fruit (like tray-frozen berries) can be used as toppings when partially thawed.
Matching the frozen texture to the right use is the difference between “meh” and “wow.”
9) A tiny freezer inventory prevents duplicate chaos
One of the most practical habits is a simple list on the freezer door: “berries x2, spinach x3, pesto cubes, corn, onions.” It takes 30 seconds to
update and saves money by preventing accidental “buy more of what you already have” moments.
10) The first win creates the habit
Most people stick with freezing when they experience the payoff: a Tuesday night dinner that comes together fast, a smoothie that tastes fresh in winter,
or a sauce that starts with “drop in a herb cube” instead of “chop everything while hungry.” Start with one item you lovemaybe strawberries, green beans,
or basiland build from there.
That’s the real magic: freezing isn’t just storage. It’s a plan for future meals, future budgets, and future you. And unlike most plans,
this one lives next to the ice cream.


