Table of Contents >> Show >> Hide
- Table of Contents
- What Makes This Recipe So Good
- Ingredients for Triple-Cheese Skillet Shells
- Equipment You’ll Need
- Step-by-Step: How to Make Triple-Cheese Skillet Shells
- Pro Tips for a Smooth, Non-Grainy Cheese Sauce
- Tasty Variations and Add-Ins
- What to Serve with Cheesy Skillet Shells
- Storage, Reheating, and Make-Ahead
- FAQ
- of Real-World Skillet Shells Experiences
- SEO Tags (JSON)
If “comfort food” had a love language, it would be cheeseand if cheese had a favorite outfit, it would be
a cozy little pasta shell that holds onto sauce like it pays rent.
These triple-cheese skillet shells are weeknight-easy, dinner-party-impressive, and dangerously good
in the “just one more bite” way that turns into “why is the pan empty?”.
This recipe is built for real life: one skillet for the sauce, one pot for boiling shells (unless you enjoy living on the edge
and cooking pasta in a skilletmore on that option later). The result is a silky, creamy, clingy cheese sauce with
a crispy panko finish that tastes like your favorite mac and cheese grew up, got a job, and bought better cheese.
What Makes This Recipe So Good
“Triple-cheese” isn’t just a marketing flexit’s a strategy. Each cheese plays a role:
- Sharp cheddar brings bold flavor and that classic mac-and-cheese attitude.
- Gruyère melts like a dream and adds a nutty, slightly sweet depth.
- Cream cheese makes the sauce extra smooth, creamy, and harder to break (a.k.a. less likely to turn grainy).
Add a quick onion-garlic base, a simple flour-and-milk thickener, and a crunchy panko topping, and you’ve got a skillet pasta
that tastes like a “special occasion” mealwithout requiring special occasion patience.
Ingredients for Triple-Cheese Skillet Shells
The Pasta
- 12 ounces medium pasta shells (the sauce-hugging champions)
- Salt (for the pasta waterdon’t be shy)
The Skillet Sauce Base
- 1 tablespoon olive oil
- 1 small onion, finely chopped
- 1 garlic clove, finely chopped (or 2 if your heart says so)
- 1 tablespoon all-purpose flour (thickens the sauce)
- 1 1/2 cups whole milk (for creamy, stable texture)
- 4 ounces cream cheese, softened (full-fat is richest; low-fat still works)
- Pinch of cayenne (optional, but it wakes up the cheese)
- Pinch of freshly grated nutmeg (optional, but it makes the sauce taste “fancy”)
- Kosher salt and black pepper
The “Triple Cheese”
- 6 ounces Gruyère, coarsely grated
- 6 ounces extra-sharp cheddar, coarsely grated
- Cream cheese above counts as the third cheese (yes, it absolutely earns its badge)
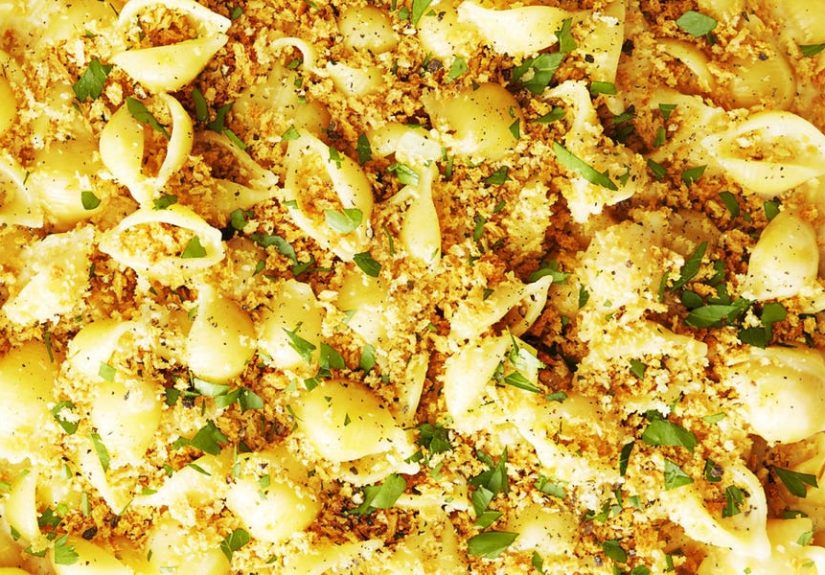
The Crunchy Finish
- Toasted panko breadcrumbs (about 1/4 cup)
- Chopped parsley (optional, but it makes the bowl look like it has a skincare routine)
Ingredient note: For the best melt, grate cheese from a block. Pre-shredded cheese can melt less smoothly because of anti-caking agents.
It will still work in a pinch, but freshly grated gives you that glossy, restaurant-style sauce.
Equipment You’ll Need
- Large pot for boiling pasta
- Large skillet (12-inch is ideal)
- Whisk (your sauce’s best friend)
- Box grater (or food processor) for shredding cheese
- Fine grater for nutmeg (optional)
Step-by-Step: How to Make Triple-Cheese Skillet Shells
Step 1: Boil the shells
- Bring a large pot of water to a boil. Salt it well (the pasta should taste seasoned, not like it took a vow of blandness).
- Cook 12 oz medium shells until just al dente per package directions.
- Before draining, save about 1/2 cup of pasta water. Drain the shells and set aside.
Step 2: Cook the onion (aka flavor insurance)
- Heat 1 Tbsp olive oil in a large skillet over medium heat.
- Add the chopped onion with a pinch of salt and pepper.
- Cover and cook, stirring occasionally, until soft and tenderabout 8–10 minutes.
Step 3: Add garlic, then build a quick thickener
- Stir in the garlic and cook about 1 minute (just until fragrant).
- Sprinkle in 1 Tbsp flour and cook, stirring, for 1 minute to remove the raw flour taste.
- Slowly whisk in 1 1/2 cups whole milk. Bring to a gentle simmer, whisking so it stays smooth.
Step 4: Melt in cream cheese + seasonings
- Whisk in the softened cream cheese until smooth.
- Add a pinch of cayenne and a pinch of nutmeg (optional), plus salt and pepper to taste.
- Keep the heat low to medium-low. You want warm and steamynot boiling like it’s mad at you.
Step 5: Add the grated cheeses (the “don’t rush me” moment)
- Reduce heat to low. Add the Gruyère and cheddar in handfuls, stirring until each addition melts before adding more.
- Stir until the sauce looks glossy and thickabout 1–2 minutes.
- If it feels too thick, loosen it with a splash of the reserved pasta water (a tablespoon at a time).
Step 6: Toss with shells
- Add the cooked shells to the skillet.
- Toss until every shell is coated in sauce (and you start considering hiding the skillet from your household).
Step 7: Finish with crunchy panko + parsley
- Sprinkle toasted panko over the top.
- Finish with parsley if you want a pop of color and a tiny hint of freshness.
- Serve immediately while the sauce is at peak silkiness.
Pro Tips for a Smooth, Non-Grainy Cheese Sauce
Cheese sauce can go from “velvety” to “why is it sandy?” fast. Here’s how to keep it creamy:
1) Keep the heat gentle
Most grainy sauces happen when cheese gets too hot and separates. Once your milk base is hot and thickened, keep the heat low
while melting the cheese. If you’re nervous, take the skillet off the heat for 30–60 seconds before stirring in the cheese.
2) Grate your own cheese
Pre-shredded cheese is convenient, but it’s often coated to prevent clumping, which can make sauces less smooth. If you want a
glossy finish, shred from a block. (Your grater will forgive you. Eventually.)
3) Add cheese gradually
Dumping all the cheese in at once can shock the sauce and encourage clumping. Handful-by-handful is the move.
Yes, it’s slower. No, you won’t regret it.
4) Use pasta water like a pro
That reserved starchy water is liquid gold. It helps loosen the sauce without watering it down, and it helps the sauce cling to the shells.
Start with 1–2 tablespoons and add more only if needed.
5) Want extra insurance? Try a stabilizer (optional)
If you’re making this for a crowd or planning leftovers, a tiny bit of starch can help keep the sauce smooth when reheating.
Options include a touch of cornstarch in the cheese blend, or using evaporated milk in some recipes. Not required herebut useful knowledge
if you’re aiming for “always flawless” cheese vibes.
Tasty Variations and Add-Ins
Once you nail the base, you can remix it endlessly. Here are crowd-pleasers that don’t mess with the sauce:
Protein upgrades
- Crispy bacon: Stir in chopped bacon and use a teaspoon of bacon fat to toast your panko.
- Rotisserie chicken: Fold in shredded chicken at the end for an easy “complete meal” moment.
- Sausage: Brown Italian sausage, remove, then build the sauce in the same skillet and stir the sausage back in.
Veggie add-ins
- Broccoli: Steam or microwave florets and stir in with the shells.
- Spinach: Toss in a few big handfuls at the end until wilted.
- Peas: Stir in frozen peas for the last minute of cooking (easy, sweet, and oddly elegant).
Spice + flavor twists
- Mustard powder: Add 1/2 teaspoon to the milk base for extra “cheddar pop.”
- Jalapeños: Fold in diced pickled jalapeños for tangy heat.
- Smoky vibe: Add a pinch of smoked paprika and swap half the cheddar for smoked cheddar.
Want it baked?
Transfer the finished shells to an oven-safe skillet or baking dish, top with extra panko, and broil 1–3 minutes until golden.
Watch closelybroilers turn “golden” into “regret” in about 14 seconds.
What to Serve with Cheesy Skillet Shells
This dish is rich, so pairing it with something crisp, tangy, or fresh is basically culinary balance… and also makes you feel like an adult.
- Big green salad with a sharp vinaigrette
- Roasted broccoli or asparagus with lemon
- Tomato salad (acid + cheese = best friends)
- Garlic bread (because carbs deserve emotional support too)
Storage, Reheating, and Make-Ahead
Storage
Cool leftovers, then store in an airtight container in the fridge for up to 3–4 days.
The sauce will thicken as it chillsthat’s normal.
Reheating
Reheat gently on the stovetop or in the microwave. Add a splash of milk (or water) and stir well to bring the sauce back to life.
Low and slow is the rulehigh heat can make the sauce separate.
Make-ahead tip
If you’re prepping ahead, shred cheeses and chop onion/garlic earlier in the day. When dinner time hits, you’ll feel like a magician.
A cheesy, slightly chaotic magicianbut still.
FAQ
Can I swap the cheeses?
Yeskeep the idea the same: one bold cheese (cheddar), one super-melter (Gruyère, fontina, Monterey Jack), and one creamy stabilizer (cream cheese).
Avoid using only aged hard cheeses, which can make sauces more prone to breaking.
Why shells instead of elbows?
Shells scoop up sauce inside and hold it outside. It’s like giving your cheese sauce two opportunities to be delicious. Efficient!
My sauce got thick fastdid I mess up?
Probably not. Cheese sauces tighten as they cool. Loosen with reserved pasta water or a splash of milk and stir until glossy again.
How do I toast panko quickly?
Toss panko in a dry skillet over medium heat, stirring until golden. For extra flavor, add a teaspoon of butter or olive oil.
Don’t walk awaybreadcrumbs are tiny and dramatic.
of Real-World Skillet Shells Experiences
Triple-cheese skillet shells aren’t just a recipethey’re a reliable little life event. The kind that shows up when the day has been long,
the fridge looks unmotivated, and everyone in the house suddenly remembers they have to eat right now.
In that moment, this dish is basically a culinary group hug.
One of the most common “experiences” people have with cheesy skillet pasta is the timing illusion.
You think, “It’s pasta, how hard can it be?” and then you realize the onion needs a few minutes to soften properly, and the cheese needs a gentle hand.
The trick is treating the sauce like it’s on a spa day: low heat, no yelling, no boiling, and definitely no rushing.
When you do that, the sauce turns glossy and calmlike it’s been meditating.
Another real-world scenario: the cheese-grating debate. Someone always asks, “Can we use bagged shredded cheese?”
And the honest answer is: yes, you can. You’ll still get a good dinner. But when you shred from a block, you’ll notice the sauce melts smoother
and feels more “restaurant” than “cafeteria nostalgia.” It’s one of those tiny upgrades that feels annoyingly worth itlike folding your laundry
while it’s still warm. No one loves doing it, but the result is kind of elite.
Then there’s the leftover reality. Fresh off the stove, the sauce is silky and loose. The next day, it’s thicker, because cheese sauce
firms up as it cools. This is not failure; it’s physics. The best experience-based fix is also the simplest:
reheat gently and add a splash of milk while stirring. Suddenly, the sauce relaxes, turns creamy again, and you remember why you made this in the first place.
(Also: if you reheat too aggressively, the sauce can separateso think “warm it,” not “punish it.”)
Finally, there’s the crowd-pleaser momentwhen you serve it to kids, roommates, friends, or that one person who says,
“I don’t really like mac and cheese,” as if that’s a personality trait. Shells convert skeptics because they’re fun to eat, and the sauce tastes layered:
sharp cheddar for punch, Gruyère for richness, cream cheese for that ultra-creamy finish. Add crunchy panko on top and suddenly you’ve got contrast:
creamy + crisp, soft + toasty, cozy + exciting. That combo is why people go back for seconds.
If you take anything from these shared, very human skillet-shells experiences, let it be this:
keep the heat gentle, keep a splash of milk nearby, and don’t skip the crunchy topping.
You’re not just making dinneryou’re making a tiny, cheesy win for your future self.


