Table of Contents >> Show >> Hide
- What Makes These Pies “Australian” (and Why Potato on Top Works)
- Recipe Card: Australian Individual Potato-Meat Pies
- Ingredients
- Equipment You’ll Want (No Fancy Gadgets Required)
- Step-by-Step: How to Make Individual Potato-Meat Pies
- How to Know You Nailed the Texture
- Make-Ahead, Storage, Freezing, and Reheating
- Flavor Variations (Still Aussie at Heart)
- Common Mistakes (and How to Avoid Them)
- What to Serve With Australian Potato-Meat Pies
- FAQ
- Food Safety Notes (Quick, Important, No Drama)
- Kitchen Experiences: What You’ll Learn After a Few Batches
If comfort food had a passport, the Australian meat pie would show up at the airport wearing sunglasses, carrying
a tiny suitcase, and confidently cutting the security line. In Australia, meat pies are the grab-and-go snack of
choicesold in bakeries, eaten at “footy” games, and discussed with the seriousness some people reserve for
retirement accounts.
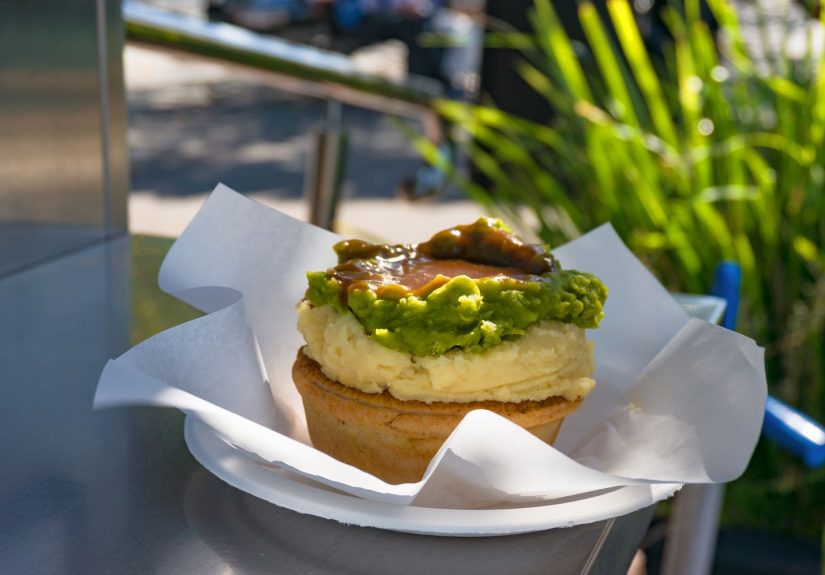
This version is the “potato-top” twist: individual pies with a flaky bottom crust, a thick savory beef-and-gravy
filling, and a cloud of mashed potatoes on top instead of a second pastry lid. It’s part meat pie, part shepherd’s
pie, and 100% the kind of meal that makes you want to wear sweatpants on purpose.
Below you’ll get an in-depth, step-by-step method, smart shortcuts, make-ahead tips, and a few “pie shop”
flavor trickswithout turning your kitchen into a science fair. Let’s bake.
What Makes These Pies “Australian” (and Why Potato on Top Works)
Traditional Aussie meat pies usually feature a sturdy shortcrust base and a top layer (often puff pastry), with a
rich, brown gravy-style filling that’s thick enough to stay put when you bite in. The key isn’t fancy ingredients
it’s texture and balance: deeply savory beef, a glossy gravy, and pastry that’s crisp rather than soggy.
The potato-top approach keeps the “handheld comfort” vibe but adds a creamy, cozy lid. Mashed potatoes seal in
moisture, give you that golden-toasty top, and make the pies feel like a complete dinner in one neat little package.
It’s also forgiving: even if your pastry edges get a bit rustic, the potatoes show up like, “Don’t worry. I’m the
main character.”
Recipe Card: Australian Individual Potato-Meat Pies
Yield: 6 individual pies (muffin-tin size) or 4 larger mini pies
Total Time: About 70–90 minutes (faster with shortcuts)
Skill Level: Cozy Intermediate (a.k.a. “I can stir and I own an oven”)
Main Keyword: Australian individual potato-meat pies recipe
Ingredients
For the Meat Filling (Thick Beef Gravy)
- 1 tablespoon neutral oil (or butter)
- 1 medium yellow onion, finely diced
- 2 cloves garlic, minced
- 1 pound ground beef (80–90% lean)
- 2 tablespoons tomato paste
- 2 tablespoons ketchup (Aussie “tomato sauce” vibe)
- 1 tablespoon Worcestershire sauce
- 2 tablespoons all-purpose flour (or 1 tablespoon cornstarch slurrysee notes)
- 1 1/4 cups beef broth (low-sodium recommended)
- 1/2 teaspoon dried thyme (or 1 teaspoon fresh)
- 1/2 teaspoon black pepper
- Salt to taste
- 1/2 cup frozen peas (optional)
- 1/2 cup finely diced carrots (or a frozen peas-and-carrots mix)
- Optional “Aussie bakery” booster: 1/2 teaspoon Vegemite (tiny amount, big umami)
For the Mashed Potato Topping
- 1 1/2 to 2 pounds russet or Yukon Gold potatoes, peeled and chunked
- 4 tablespoons butter
- 1/3 to 1/2 cup warm milk (add gradually)
- Salt and pepper to taste
- Optional: 1/2 cup shredded cheddar (for that golden “pie shop” finish)
For the Crust + Finishing
- 1 package refrigerated pie dough (2 rounds) OR homemade shortcrust
- 1 egg, beaten with 1 tablespoon water (egg wash, optional but great for shine)
- Nonstick spray or butter for the pan
Equipment You’ll Want (No Fancy Gadgets Required)
- Standard muffin tin (for 6–8 smaller pies) or 4 mini pie tins
- Large skillet
- Medium pot for potatoes
- Potato masher (or ricer/food mill if you want extra-fluffy results)
- Round cutter (about 4 inches for muffin tin; a bowl works too)
- Piping bag or zip-top bag (optional, for pretty potato swirls)
Step-by-Step: How to Make Individual Potato-Meat Pies
Step 1: Build a Thick, Savory Beef Gravy Filling
-
Sauté the aromatics: Heat oil in a skillet over medium heat. Add onion and cook 4–5 minutes
until softened. Add garlic and cook 30 seconds (just until fragrantdon’t let it burn and get dramatic). -
Brown the beef: Add ground beef. Cook until no longer pink, breaking it up into small crumbles.
Browning matters: no color, no flavor. -
Toast the tomato paste: Stir in tomato paste and cook 1 minute. This quick “toast” deepens
flavor so your filling tastes slow-cooked even if you’re not. -
Season like a pie shop: Add ketchup, Worcestershire, thyme, pepper, and the optional tiny dab
of Vegemite. Stir well. -
Thicken it: Sprinkle flour over the mixture. Stir for 1 minute so the flour coats the meat and
loses its raw taste. -
Add broth and simmer: Pour in broth while stirring. Bring to a gentle simmer and cook
6–10 minutes until thick, glossy, and spoon-coating. If it looks too thin, simmer a bit longer; if it gets too
thick, add a splash of broth. -
Add veg (optional): Stir in peas/carrots near the end so they stay bright and don’t turn to
mush. Taste and adjust salt. -
Cool it down: Turn off heat and let the filling cool while you prep crust and potatoes. This is
not just patienceit prevents soggy crust.
Step 2: Prep and Par-Bake the Bottom Crust (Soggy-Bottom Insurance)
- Preheat oven to 400°F. Grease your muffin tin (or mini tins).
-
Roll out pie dough and cut circles:
- Muffin tin: about 4-inch circles (you want dough to come up the sides)
- Mini pie tins: size to fit with a little overhang
- Press dough into each cup. Dock (poke) the bottoms lightly with a fork.
-
Par-bake for 8 minutes. If the centers puff, just press them down gently with the back of a spoon.
This quick bake helps the crust stay flaky once the filling goes in.
Step 3: Make Creamy Mashed Potatoes That Won’t Turn Gluey
- Place potatoes in a pot, cover with cold water, and add a generous pinch of salt.
- Bring to a boil, then simmer until very tender, about 12–15 minutes.
- Drain well. Return potatoes to the pot for 30 seconds over low heat to steam off extra moisture.
-
Mash (or rice) the potatoes. Add butter first, then slowly add warm milk until creamy and spreadable.
Season with salt and pepper. If using cheddar, stir it in now. -
For a bakery-style top, aim for a mash that’s soft enough to pipe but stiff enough to hold peaks.
Think: “soft-serve,” not “soup.”
Step 4: Assemble, Bake, and Get That Golden Top
- Fill each par-baked crust about 3/4 full with the cooled meat mixture.
-
Spoon or pipe mashed potatoes on top. If you pipe, swirl from the outside in like you’re frosting a cupcake that
has excellent life choices. - Optional: brush exposed crust edges with egg wash for shine and color. (Skip if you want, but it’s a nice touch.)
-
Bake at 400°F for 15–18 minutes, or until the crust edges are golden and the potato top has
little toasted peaks. -
If you want extra browning, broil for 1–2 minutes at the endwatch closely. Broilers turn “golden”
into “oops” faster than you can say “Where’s the smoke alarm battery?” - Cool 10 minutes before serving so the filling sets and doesn’t lava-launch out of the pie.
How to Know You Nailed the Texture
- Filling: thick enough to mound on a spoon, not pour like soup
- Crust: firm and flaky at the bottom (par-bake helps)
- Potato top: creamy inside, lightly browned on the tips
Make-Ahead, Storage, Freezing, and Reheating
Make-Ahead Options
-
Best workflow: Make the filling up to 2 days ahead and refrigerate. Make potatoes day-of for
best texture. - Faster weeknight: Use store-bought pie dough and a frozen peas-and-carrots mix.
Storing Leftovers
- Refrigerate in an airtight container for up to 3–4 days.
- Reheat in a 350°F oven until hot to keep crust crisp (microwave works, but crust will soften).
Freezing Tips (Meal-Prep Friendly)
- Freeze baked pies once fully cooled. Wrap individually and store in a freezer bag for up to 2–3 months.
-
Reheat from thawed at 350°F until hot, or from frozen at 350°F a bit longer. Cover loosely with foil if the potato
top browns too fast.
Flavor Variations (Still Aussie at Heart)
The classic vibe is beef + gravy + potato, but you can absolutely riff without getting your passport revoked.
Try one of these:
- Mushroom boost: sauté chopped mushrooms with the onion for deeper savory flavor.
- Cheddar crown: add cheddar to the mash or sprinkle on top for a golden, melty finish.
- Herby bakery style: add rosemary or thyme to the filling; finish with chopped parsley.
- Heat: a pinch of black pepper plus a tiny pinch of chili flakes (keep it subtle).
- Extra umami: that small smear of Vegemite (optional) is surprisingly effective.
Common Mistakes (and How to Avoid Them)
1) “My crust is soggy”
The usual culprit is wet filling meeting raw dough. Par-bake the crust, cool the filling before assembling, and
keep the filling thick (not brothy). If you want to be extra, you can brush the par-baked crust with a little egg
wash and bake 1 minute more to help “seal” it.
2) “My filling is watery”
Simmer longer to reduce, or thicken properly. Flour works when cooked briefly in the fat/meat before broth is
added. If you prefer cornstarch, mix 1 tablespoon cornstarch with 1 tablespoon cool water, then stir into simmering
filling until glossy and thick.
3) “My mashed potatoes turned gluey”
Overworking potatoes releases too much starch. Mash gently, don’t whip aggressively, and add warm dairy gradually.
Using a ricer or food mill helps you get fluffy texture without overmixing.
4) “My pies fell apart when I removed them”
Give them a rest. Ten minutes of cooling time lets the filling set and the crust firm up. If you’re using a muffin
tin, loosen edges with a butter knife and lift carefully.
What to Serve With Australian Potato-Meat Pies
In Australia, meat pies are famously served with “tomato sauce” (think ketchup). For a full meal, pair them with:
- A crisp green salad with a tangy vinaigrette
- Steamed peas (or mushy peas if you want the classic pub vibe)
- Roasted green beans or broccoli for balance
- A simple gravy drizzle if you’re living your best comfort-food life
FAQ
Can I use puff pastry instead of pie dough?
Puff pastry is great, but it shines as a top crust more than a base. For these potato-top pies, pie dough/shortcrust
works better on the bottom because it’s sturdier. If you only have puff pastry, you can still use itjust expect a
lighter, flakier base that may be more delicate.
Can I make these in ramekins instead of a muffin tin?
Absolutely. Line ramekins with dough, par-bake, fill, top with mash, and bake until browned. You may need a few
extra minutes depending on size.
How do I make them more “bakery-style”?
Three easy upgrades: (1) keep the filling thick and glossy, (2) use a piping bag for the potato top, and (3) add a
little cheddar to the mash for browning and flavor.
Food Safety Notes (Quick, Important, No Drama)
Ground beef should be cooked to a safe internal temperature. In this recipe, you fully cook the beef during the
filling step, and the final bake reheats everything thoroughly. If you ever check with a thermometer, aim for
160°F for ground beef.
Kitchen Experiences: What You’ll Learn After a Few Batches
Home cooks who start making Australian-style potato-meat pies often discover something funny: the first batch is
“Wow, I made pies!” and the second batch is “Okay, I’m basically a bakery now.” The learning curve is quick, and
most of it comes down to tiny, practical habits that make a big difference.
One of the first “aha” moments is realizing how much the filling texture controls everything. If the filling is
thin, the crust absorbs liquid and loses its crispness. But when the filling is thickspoon-coating, glossy, and
cohesiveit behaves like it was born to live inside pastry. Many cooks end up simmering just a few minutes longer
than they think they need, then feeling extremely pleased with themselves when the pie slices cleanly instead of
slumping.
The second big experience lesson is timing. Letting the filling cool a bit before assembly sounds like optional
advice until someone skips it and wonders why their crust looks like it had a rough day. Cooling isn’t about being
fancyit’s about keeping the fat in the crust from melting too early and preventing steam from turning the bottom
into soft dough. Once people build that short cooling window into their routine, the pies start coming out more
consistent, and “soggy bottom” becomes something you joke about instead of something you endure.
Then there’s the potato topping, which can be surprisingly personal. Some households love it ultra-creamy and
smooth, piped into dramatic swirls like a savory cupcake. Others prefer rustic, spooned-on mash with little
peaksbecause those peaks brown beautifully and deliver the best bite. After a couple of batches, most cooks
naturally adjust the milk and butter to hit their ideal texture, learning that the mash should be soft enough to
spread but not so loose it slides off the filling. The “right” consistency is the one that makes you want to steal
a spoonful before it ever touches a pie.
People also tend to develop strong opinions about add-ins. A little cheddar in the mash becomes a favorite because
it boosts browning and adds savory depth without changing the identity of the pie. Vegetables in the filling become
a practical movepeas and carrots add color, stretch the beef, and make the pies feel like a real dinner rather
than just a snack that accidentally became a meal. And for those who try the tiny dab of Vegemite (optional), it
often lands as “I don’t know what this is doing, but I want it doing it again,” which is the highest compliment a
secret ingredient can receive.
Finally, there’s the “serving experience” factor. These pies tend to become a repeat request because they’re neat,
satisfying, and easy to pair with a simple salad. They’re also the kind of food that makes people hover in the
kitchen while the oven finishes, asking, “How long left?” as if the pies are a blockbuster movie premiere. After a
few rounds, many cooks start doubling the recipe just to freeze extrasbecause reheating a homemade potato-meat pie
on a busy day feels like doing a favor for your future self. And honestly, future-you deserves it.


