Table of Contents >> Show >> Hide
- What Counts as a “Seashell Driveway”?
- Plan First: Sourcing, Rules, and Layout
- Materials and Tools Checklist
- Step-by-Step: How to Install a Seashell Driveway
- Step 1: Mark the driveway and confirm utilities
- Step 2: Excavate and shape the subgrade
- Step 3: Compact the soil and fix drainage problems now (not later)
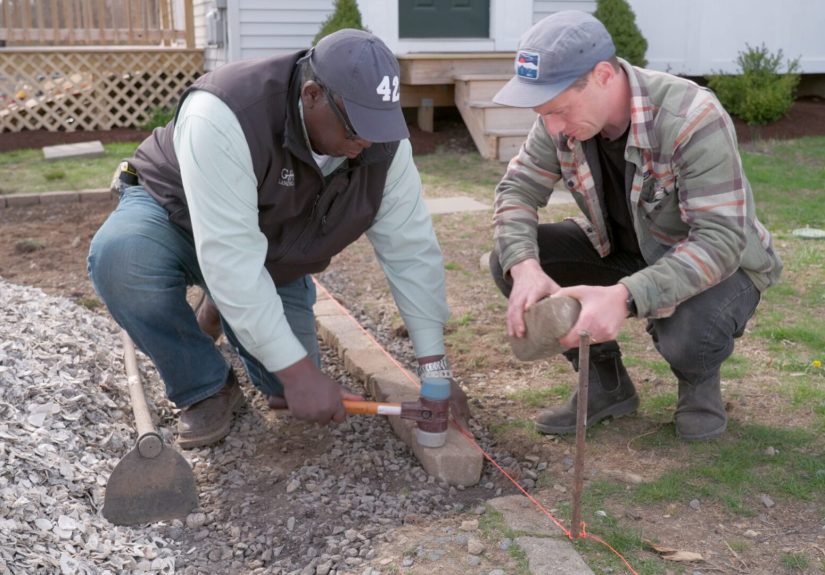
- Step 4: Install edging/containment
- Step 5: Lay geotextile fabric
- Step 6: Build the base in compacted lifts
- Step 7: Add (and compact) the crushed shell surface
- Step 8: Final grooming
- How Much Crushed Shell Do You Need?
- Maintenance: Keeping Your Shell Driveway Looking Sharp
- Common Problems (and Fixes)
- Environmental Notes: The “Please Don’t Accidentally Start a Shell War” Section
- FAQ
- Real-World Experiences and Lessons People Commonly Report (500+ Words)
- Conclusion
A seashell driveway is basically the coastal cousin of a gravel drive: same practical job (carry cars, drain rain),
but it shows up wearing linen and sunglasses. If you’ve ever admired those bright, beachy driveways in coastal towns
and thought, “Yep, that’s the vibe,” you’re in the right place.
The good news: a seashell driveway (often made from crushed shell,
oyster shell, or coquina) can be durable, permeable, and easier on the eyes than a
plain rock lot. The “not-so-good” news: the magic is in the prep. If you skip the base and just sprinkle shells on
dirt, you’ll end up with a driveway that looks great for approximately one weekend… and then starts behaving like a
sandbox with commitment issues.
What Counts as a “Seashell Driveway”?
Most shell driveways use washed, crushed shells (commonly oyster shells or shell-rich coquina) as
the top layer. Under that, you’ll typically install a compacted stone basesimilar to a gravel drivewayplus a
separation layer (often geotextile fabric) to keep soil and stone from mixing.
Why people love them
- Drainage: Shell surfaces can shed water well when properly graded and compacted.
- Looks: Bright, coastal color that pairs nicely with cottages, modern farmhouses, and “I swear I’m relaxed” landscaping.
- No cracking: You don’t get asphalt-style cracks.
- Comfort: In hot climates, light-colored shells can feel cooler than dark pavement.
When they’re not the best idea
- Steep slopes: Shells can migrate downhill (gravity is rude like that).
- Snow country: Plowing can scrape shell away and mix it with snow piles.
- High-speed, heavy traffic: If you’re regularly parking heavy equipment, you’ll want a beefier engineered baseor a different surface.
Plan First: Sourcing, Rules, and Layout
1) Source shells the smart (and legal) way
For most homeowners, the simplest route is buying bulk crushed shell from a landscape supplier.
It’s typically screened and washed, which matters for cleanliness and odor.
Can you “collect shells yourself”? Sometimes in small amountsbut rules vary widely. Some protected areas cap how
much you can take (for example, certain national seashore rules can limit daily collection). And many places
prohibit taking live shellfish or shells with living organisms. Bottom line: check local and site-specific regulations
before you treat the beach like a free driveway store.
2) Decide size, shape, and drainage
A comfortable single-lane residential driveway is often around 10–12 feet wide, with wider areas
for passing, parking pads, or a turnaround. Think through:
- Where water goes: You want runoff directed away from buildings and not pooling in low spots.
- A crown or gentle slope: Many unpaved drives use a slight crown (higher in the middle) so water drains off the sides.
- Edging/containment: Shells look neatest (and behave best) with a defined border.
3) Safety and “who should do what”
Shell driveways involve excavation, hauling heavy material, and compaction. If you’re not comfortable doing
physically demanding workor if you’re not trained to use powered equipmentbring in a pro for the digging and
base installation. You can still handle finishing steps like raking and top dressing.
Materials and Tools Checklist
Materials
- Geotextile fabric (driveway-rated) to separate soil from base stone
- Base aggregate (crushed stone/road base) for structure and drainage
- Crushed shell (washed oyster shell/coquina/shell blend) for the top layer
- Edging/containment (steel, aluminum, pressure-treated timber, stone, or pavers)
- Optional: a stabilizer grid designed for permeable driveways (helps reduce rutting and migration)
Tools
- Measuring tape, stakes, string, marking paint
- Shovel, metal rake, wheelbarrow (or delivery spread option)
- Hand tamper (small areas) or rented compaction equipment (often best handled by an experienced adult/pro)
- Garden hose/sprayer for light misting during compaction
- Utility knife and landscape staples/pins for fabric
Step-by-Step: How to Install a Seashell Driveway
Step 1: Mark the driveway and confirm utilities
Mark your driveway outline with stakes and string (straight lines are forgiving; fancy curves are pretty but take
longer). Before you dig, contact your local utility locating service (in the U.S., this is commonly done via 811)
so underground lines can be identified.
Step 2: Excavate and shape the subgrade
Remove vegetation and topsoil along the driveway footprint. For a driveway that holds up, you typically excavate
deep enough to fit your base plus your shell surface:
- Light residential use: often a total of ~8–10 inches (varies by soil and climate)
- Clay soil/heavier use: sometimes deeper, with more base material
As you excavate, shape the ground for drainage: a gentle slope away from structures and/or a slight crown
down the center helps prevent standing water.
Step 3: Compact the soil and fix drainage problems now (not later)
A shell driveway is only as stable as what’s underneath. If the subgrade is soft, saturated, or full of organic
material, it will settleand your beautiful shell surface will follow it down like a sad elevator.
- Remove soft spots and replace with compactable base material.
- If water naturally funnels across the driveway, consider a culvert or drainage channel (a good moment to call a pro).
Step 4: Install edging/containment
Containment is key. Without a border, shells creep into lawns, beds, and shoes. Install edging along both sides of
the driveway. Options include steel edging, paver borders, stone, or timberschoose what matches your landscape and
budget.
Step 5: Lay geotextile fabric
Roll out geotextile fabric over the compacted subgrade. Overlap seams and secure it so it stays flat. This layer
helps prevent the base stone from sinking into soil and helps reduce weeds pushing up from below.
Step 6: Build the base in compacted lifts
The base is the “boring” part that decides whether your driveway lasts 10 years or 10 months. Spread your crushed
stone/road base in thin lifts (layers), then compact each lift before adding the next.
- For many residential driveways, the base is commonly several inches thick, depending on conditions.
- Keep checking grade and crown so you don’t accidentally build a shallow swimming pool.
Step 7: Add (and compact) the crushed shell surface
Once the base is solid and graded, spread your crushed shell driveway layer. A common approach is:
- First shell lift: about 2 inches
- Second shell lift: another 1–2 inches after compaction
Lightly mist the shells (don’t flood them) and compact to help them knit together. Shell pieces tend to break down
slightly under compaction, creating a tighter, more stable surface.
Step 8: Final grooming
Rake the surface smooth, tidy the edges, and do a final check for low spots. If you can, let the driveway “settle”
for a few days before heavy use. The first few drive-overs also help seat the surfacethink of it as gentle
training, not a monster-truck audition.
How Much Crushed Shell Do You Need?
The easiest way is to calculate volume, then add a little extra for compaction and touch-ups.
The simple formula
Volume (cubic feet) = length (ft) × width (ft) × depth (ft)
Cubic yards = cubic feet ÷ 27
Example: a 12′ × 60′ driveway with a 2.5″ shell layer
- Area: 12 × 60 = 720 sq ft
- Depth: 2.5 inches = 0.208 ft
- Volume: 720 × 0.208 = ~150 cu ft
- Cubic yards: 150 ÷ 27 = ~5.6 cu yd
- Add ~10% extra: ~6.2 cu yd
For the base layer, you’ll typically need more volume because it’s thicker. Many suppliers sell shells by cubic
yard; stone may be sold by ton. Ask your supplier what the material’s coverage is at your planned depth.
Maintenance: Keeping Your Shell Driveway Looking Sharp
Rake and refresh
Every so often, rake the surface back into placeespecially near turns and parking areas where tires push material
outward. Over time, compaction and minor breakdown can mean you’ll add a thin top-up layer. One nice perk of shell
surfaces is that they don’t “crack,” so you’re mostly doing light touch-ups.
Weed control without drama
A good fabric layer helps, but wind-blown seeds are still a thing. Pull small weeds early, and consider a
driveway-appropriate pre-emergent if weeds are a recurring problem (follow label directions and local rules).
Edge policing
Most “messy driveway” complaints are really “no edging” complaints. If shells keep escaping, raise your border
slightly or reinforce turns with a wider edge treatment.
Common Problems (and Fixes)
Problem: The driveway is sinking or getting ruts
- Cause: Base too thin, poor compaction, soft subgrade, or drainage problems.
- Fix: Add base material and re-compact (sometimes you must excavate the problem area and rebuild).
Problem: Shells are migrating into the yard
- Cause: No containment, not enough edge height, tight turns, or steep grade.
- Fix: Add edging, widen borders, or use a stabilizer grid in high-traffic spots.
Problem: Funky odor
- Cause: Using uncured shells (often from restaurants) or shells that weren’t washed.
- Fix: Buy washed shell from a supplier. If you’re using recycled shells, they typically need a long curing period before reuse.
Problem: Puddles
- Cause: Low spots or insufficient slope/crown.
- Fix: Re-grade and compact; add shell to low areas and rebuild the crown.
Environmental Notes: The “Please Don’t Accidentally Start a Shell War” Section
In many coastal areas, oyster shells are valuable for habitat restoration. Some communities run shell recycling
programs that cure shells and return them to the water to rebuild reefs and protect shorelines. If your area has a
local program, it may be better to buy commercially processed shell rather than pulling shells from restoration
pipelines.
Also remember: shells are largely calcium carbonate. In beds next to your driveway, repeated shell dust can
gradually nudge soil pH upward over timegreat for some plants, not great for others. If you garden right beside
the driveway, keep an eye on plant performance and consider a soil test if anything starts looking unhappy.
FAQ
Is a seashell driveway cheaper than asphalt?
It can be, especially in coastal regions where shell material is locally available. Costs depend heavily on
excavation, base depth, delivery distance, and whether you hire labor.
Will it hurt car tires?
When you use properly crushed, screened shell and compact it well, it’s typically fine for standard vehicles. If
the shell is overly sharp, too chunky, or not compacted, it can be uncomfortable to walk on and may scatter more.
How long does a shell driveway last?
With a solid base, good drainage, and occasional top-ups, a shell driveway can last many years. The surface is
maintained more like gravelperiodic raking and refresh layersrather than “set it and forget it” pavement.
Real-World Experiences and Lessons People Commonly Report (500+ Words)
Because shell driveways look so effortless in photos, many first-timers assume the install is basically: “dump
shells, vibe, done.” The most common real-world lesson is that the driveway doesn’t care about vibesit cares about
base prep. Homeowners who love their finished result almost always mention one turning point: the moment
they stopped thinking of shells as décor and started treating them like a serious driveway surface.
A frequent “aha” story happens after the first big rain. Even when shells drain well, rain reveals grading mistakes
instantly. People often notice one low spot where water slows down and hangs out. The fix usually isn’t dramatic:
rake shell away, add a little base (or compact what’s there), then re-top with shell and re-form the crown. But it
teaches a useful habit: do a slow walk-through after storms and correct tiny issues earlybecause tiny issues become
tire ruts later.
Another common experience is shell migration at turns. Straight sections behave nicely, but the first time someone
turns the steering wheel while barely moving (think: three-point turns, backing trailers, or “I forgot my coffee,
let me swing back”), shells get pushed sideways. Folks who planned for this usually installed sturdier edging or a
slightly wider border in turning areas. Folks who didn’t plan for it typically tell a version of the same joke:
“I accidentally installed a shell driveway and a shell lawn at the same time.”
Many people report that compaction is the difference between “crunchy beach path” and “surprisingly firm driveway.”
When shells are compacted properly over a stable base, they knit together into a surface that feels cohesive under
tires. When they aren’t, the driveway feels loose, the shells scatter, and you get uneven tracks. A popular
practical tip is to add the shell surface in two thinner lifts instead of one thick dumpbecause it compacts more
evenly and gives you better control over the final grade.
There are also lifestyle “surprises.” Kids on scooters and bikes usually have a strong opinion about shell texture.
Some families end up adding a paver strip or a stepping-stone line along one side for smoother rolling. Pet owners
sometimes mention that shells can be rough on sensitive paws if the material is too sharp, so they choose a more
finely crushed, screened product for areas with frequent foot traffic. And almost everyone notices the aesthetic
payoff: shells reflect light beautifully, especially in the evening, and the driveway can make the whole front yard
feel brighter without adding a single landscape light.
Finally, there’s the “sourcing reality check.” People who considered beach-collecting usually realize quickly that
it’s impractical, often restricted, and wildly inefficient for driveway quantities. The experience tends to steer
them toward bulk delivery from a supplierfaster, cleaner, and typically washed/screened for consistent performance.
The best long-term stories come from homeowners who treated shells as one part of a system: good drainage, solid
base, defined edges, and a little seasonal maintenance. In other words, they installed a drivewaynot just a pretty
pile of shells.
Conclusion
A seashell driveway can be a smart, good-looking alternative to gravelespecially if you love a coastal aesthetic
and want a permeable surface that won’t crack like pavement. The secret is simple (but not optional): build a
stable, well-draining base, separate it from the soil with geotextile fabric, contain the edges, and compact the
shell surface in manageable lifts. Do that, and your driveway will look like a magazine photo for yearswithout
turning into a high-maintenance shell scavenger hunt.


