Table of Contents >> Show >> Hide
- First, the Not-Fun-But-Nonnegotiable Stuff: Soup Canning Safety
- What Makes Home-Canned Soup Taste Better Than Store-Bought?
- Pressure Canning Workflow (So You Don’t End Up Crying Into a Jar Funnel)
- 7 Pressure Canning Soup Recipes (and Bases) That Beat Store-Bought
- Recipe 1: Classic Chicken & Vegetable “Weeknight Hero” Soup Base
- Recipe 2: Beef & Mushroom Soup (Add Barley Later)
- Recipe 3: Smoky Ham & White Bean Soup Base (Cream Optional at Serving)
- Recipe 4: Garden Minestrone Base (No Pasta in the Jar)
- Recipe 5: Southwest Chicken Tortilla Soup Starter (Toppings Make It)
- Recipe 6: “Sunday Roast” Vegetable Beef Soup (Comfort Food Without the Couch Nap)
- Recipe 7: Tomato-Basil Vegetable Soup Base (Blend After Opening)
- Soup “Do Not Can” List (Because Some Soups Are Just Not Built for This)
- Troubleshooting: The Three Most Common “Why Did This Happen?” Moments
- How to Serve Home-Canned Soup Like It’s a Cheat Code
- Experience Notes: What It’s Actually Like to Build a “Soup Pantry” (The Extra )
- Conclusion
Store-bought soup has its place. It’s dependable, it’s shelf-stable, and it will never judge you for eating it straight from the pot at 9:47 p.m.
But let’s be honest: a lot of canned soup tastes like someone described vegetables to a committee, and the committee responded with “make it beige.”
Pressure canning soup at home is how you get the convenience of a pantry stash without the “mystery softness” and sodium levels that could preserve a small canoe.
Done rightwith tested guidelines and smart ingredient choiceshome-canned soup can taste brighter, meatier, more “real,” and more customizable than anything you’ll find in aisle 6.
This guide gives you a set of pressure canning soup recipes (and soup “bases”) designed to beat store-bought on flavor, texture, and flexibilitywhile staying rooted in safe, research-based home canning practices.
You’ll end up with jars that are basically future-you’s love letters: “Dear me, I knew you’d be tired. Here’s soup.”
First, the Not-Fun-But-Nonnegotiable Stuff: Soup Canning Safety
Soup is usually packed with low-acid ingredients (meat, beans, vegetables), which means pressure canning is requiredwater-bath canning isn’t a substitute, and a pressure cooker isn’t the same thing as a pressure canner.
The goal is reaching temperatures high enough for safe processing of low-acid foods.
The big rules that keep soup safe (and still delicious)
- No thickeners in the jar: Skip flour, cornstarch, roux, cream, milk, cheese, and “but it’s just a little.” Thicken after opening.
- No pasta, rice, barley, dumplings, or other starchy add-ins in the jar: Add those when reheating for serving.
- Beans and peas must be fully rehydrated first: No tossing dry beans into jars and hoping for the best.
- Don’t puree soups before canning: Keep it brothy/chunky for safe heat flow. Blend after opening if you want.
- Use the right jar sizes: Stick to pint or quart jars for soupskip half-gallons.
- Respect solids-to-liquid balance: A good home-canned soup jar is typically “half solids, then top with liquid,” not a jar packed like a veggie Tetris championship.
One more safety habit that’s easy to love: when you open a jar of low-acid home-canned food, many food-safety authorities recommend boiling it for a set time as an added precautionespecially if there’s ever a question about how it was processed.
(If that feels like overkill, think of it as giving your soup a quick “security scan” before it hits the bowl.)
What Makes Home-Canned Soup Taste Better Than Store-Bought?
Store-bought soup is engineered for mass production, long storage, and consistency. Home-canned soup is engineered for one thing: making you happy.
Here’s how to tilt the flavor scale in your favor without breaking canning rules.
Flavor upgrades that still play nice with pressure canning
- Brown the meat (or roast bones) first: You’re building real depth, not just “salt + onion powder” vibes.
- Go heavy on aromatics: Onion, garlic, celery, carrotsyour “mirepoix starter pack.”
- Use a clean, assertive broth: Homemade stock is ideal, but a good low-sodium broth works too.
- Save the delicate stuff for serving: Lemon, fresh herbs, cream, grated cheese, crunchy toppingsthese are your “wow” finishes.
- Season smart: Keep salt moderate in the jar. You can always add more later; you can’t subtract “ocean.”
Pressure Canning Workflow (So You Don’t End Up Crying Into a Jar Funnel)
- Choose a tested approach. Stick to recognized soup-canning guidance: chunky, no thickeners, fully rehydrated beans, proper headspace, proper processing.
- Cook your soup ingredients. Many soup-canning directions have you combine solids with broth/water, bring to a boil briefly, and hot-pack.
- Fill hot jars. Fill jars about halfway with solids, then top with hot liquid, leaving 1 inch headspace. Remove bubbles; re-check headspace; wipe rims; apply lids.
- Vent the canner. Heat until steam vents steadily, then vent for the recommended time before pressurizing.
- Process at the correct time and pressure. Maintain steady pressure for the full processing time.
- Cool naturally. Let pressure return to zero on its own; wait before opening the lid. (Fast-cooling is how siphoning and seal failures happen.)
- Check seals and store. After cooling, remove bands, check seals, label, and store in a cool, dark place.
Common processing targets for soup (always verify for your recipe)
Many research-based soup directions use 60 minutes for pints and 75 minutes for quarts for non-seafood soups, with pressure adjusted for your canner type and altitude.
Some tested recipes (especially thicker stews or specific formulations) may require longerso follow the instructions for the specific, tested recipe you’re using.
| Jar Size | Typical Soup Processing Time | Weighted-Gauge Pressure | Dial-Gauge Pressure |
|---|---|---|---|
| Pint | 60 minutes (common guidance) | 10 lb (low altitude); 15 lb (higher altitude) | Often 11 lb at low altitude; increase with altitude |
| Quart | 75 minutes (common guidance) | 10 lb (low altitude); 15 lb (higher altitude) | Often 11 lb at low altitude; increase with altitude |
Altitude matters because water boils at a lower temperature as elevation increases. That’s why pressure adjustments existand why “it worked for my cousin in Florida” doesn’t help your jars in Denver.
7 Pressure Canning Soup Recipes (and Bases) That Beat Store-Bought
These recipes are written as brothy, chunky soups or soup basesthe style that fits widely published safe soup-canning guidance.
The serving instructions are where you add the “forbidden-in-the-jar” ingredients like noodles, rice, dairy, and thickening.
Recipe 1: Classic Chicken & Vegetable “Weeknight Hero” Soup Base
Why it’s better: Real chicken flavor, real vegetables, and you control the salt. Also: it doesn’t taste like a seasoning packet had a midlife crisis.
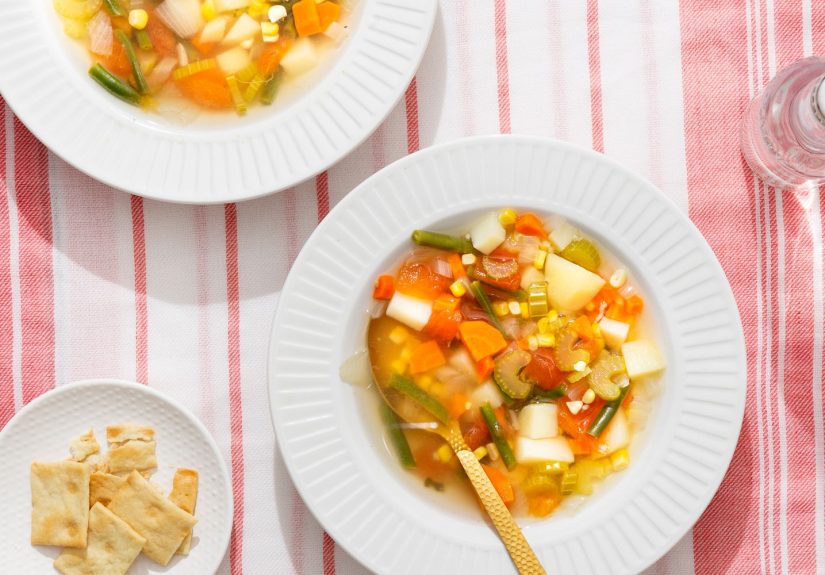
- Soup pot ingredients: chicken (cooked, diced), carrots, celery, onion, garlic, green beans, corn (optional), bay leaf, black pepper, broth/stock to cover.
- Cook: Sauté aromatics, add vegetables, add chicken and broth, bring to a brief boil, keep it brothy (no thickening).
- Jar it: Fill jars halfway with solids; top with hot broth; 1″ headspace.
- Serve like a pro: Add cooked egg noodles or rice while reheating. Finish with lemon juice and chopped parsley.
Recipe 2: Beef & Mushroom Soup (Add Barley Later)
Why it’s better: Beefy depth plus mushrooms for that “restaurant soup” vibewithout canning barley in the jar.
- Soup pot ingredients: browned beef chunks, mushrooms, onion, carrots, celery, garlic, thyme, pepper, beef broth.
- Cook: Brown beef, sauté vegetables, add broth and simmer until flavors come together. Skim excess fat.
- Jar it: Half solids, half liquid; 1″ headspace.
- Serve like a pro: Stir in cooked barley (or wild rice) after opening, plus a splash of Worcestershire and fresh thyme.
Recipe 3: Smoky Ham & White Bean Soup Base (Cream Optional at Serving)
Why it’s better: Smoke + bean richness tastes slow-cooked, but opens in 30 seconds.
- Soup pot ingredients: fully rehydrated and cooked white beans, diced ham, onion, carrots, celery, garlic, smoked paprika, pepper, broth.
- Cook: Sauté aromatics, add ham, beans, broth; bring to a brief boil.
- Jar it: Keep beans to a sensible amount; don’t pack jars too dense. 1″ headspace.
- Serve like a pro: Blend a small portion after opening for thickness, or add a splash of cream. Finish with chives.
Recipe 4: Garden Minestrone Base (No Pasta in the Jar)
Why it’s better: Tastes fresh and bright, and you get to pick your veggies instead of accepting the store’s “carrots or nothing” policy.
- Soup pot ingredients: onions, carrots, celery, zucchini, green beans, diced tomatoes (optional), kidney beans (fully cooked), Italian herbs, garlic, broth.
- Cook: Sauté aromatics, add vegetables and broth, boil briefly.
- Jar it: Half solids, top with liquid; 1″ headspace.
- Serve like a pro: Add cooked small pasta (ditalini) while reheating; finish with parmesan and basil.
Recipe 5: Southwest Chicken Tortilla Soup Starter (Toppings Make It)
Why it’s better: Punchy spices, real chicken, and you add crunchy toppings at the finishso nothing turns to mush in the jar.
- Soup pot ingredients: chicken, onions, garlic, peppers, corn, black beans (fully cooked), tomatoes (optional), cumin, chili powder, broth.
- Cook: Sauté aromatics and spices, add remaining ingredients, boil briefly.
- Jar it: Half solids; 1″ headspace.
- Serve like a pro: Top with tortilla strips, avocado, cilantro, lime. Optional: a dollop of sour cream after opening.
Recipe 6: “Sunday Roast” Vegetable Beef Soup (Comfort Food Without the Couch Nap)
Why it’s better: Hearty, balanced, and it tastes like it simmered all daybecause you built the base properly.
- Soup pot ingredients: beef, potatoes (optional), carrots, celery, onions, peas (optional), tomatoes (optional), broth, bay leaf, pepper.
- Cook: Brown beef; add vegetables and broth; bring to a brief boil. Keep it brothy.
- Jar it: Avoid overfilling with potatoes; leave room for liquid. 1″ headspace.
- Serve like a pro: Add a quick slurry-thickened gravy effect only after opening (or mash a few potatoes in the bowl).
Recipe 7: Tomato-Basil Vegetable Soup Base (Blend After Opening)
Why it’s better: You get the cozy tomato soup experience, but you can keep the jar safely chunky and blend later.
- Soup pot ingredients: onions, carrots, garlic, tomatoes, celery (optional), basil (use dried in the jar; fresh at serving), broth.
- Cook: Sauté aromatics, add tomatoes and broth, brief boil.
- Jar it: Half solids; 1″ headspace.
- Serve like a pro: Blend smooth after opening; add cream or butter after heating; grilled cheese highly encouraged.
Soup “Do Not Can” List (Because Some Soups Are Just Not Built for This)
Some soups are better preserved by freezing. In particular, avoid canning:
- Cream soups (dairy + thickening issues)
- Soups thickened with flour/cornstarch
- Soups with pasta/rice/barley already in them
- Pureed pumpkin/squash soup and certain dense purees
- Broccoli/cauliflower soups (often flagged as not having tested home-canning recipes)
Troubleshooting: The Three Most Common “Why Did This Happen?” Moments
1) “My jars siphoned and now there’s soup on the counter.”
Siphoning usually happens when temperature/pressure changes too fast (or jars are overfilled). Let the canner depressurize naturally, give it a brief rest before opening, and keep that 1″ headspace.
Minor siphoning happens sometimes; major siphoning can compromise seals.
2) “All my solids floated to the top.”
Totally normal with soups. Keep solids evenly cooked (not crunchy), don’t pack jars too tight, and aim for that half-solids/half-liquid fill. The soup will still eat finejust shake the jar after opening (not before).
3) “It tastes a little flat.”
Easy fix: add brightness after opening. A squeeze of lemon or lime, a splash of vinegar, fresh herbs, grated cheese, or a spoon of pesto can make a jar taste like it came from a bistro instead of your pantry.
Salt last.
How to Serve Home-Canned Soup Like It’s a Cheat Code
- Make it creamy after opening: stir in cream, milk, or coconut milk while reheating.
- Add starch at serving: cooked noodles, rice, barley, or dumplings go in the bowl, not the jar.
- Boost umami: a dash of soy sauce, Worcestershire, miso, or a parmesan rind while reheating (remove before eating).
- Texture toppings: croutons, tortilla strips, toasted nuts, crispy onions.
- Fresh finish: herbs, citrus zest, chili oil, cracked pepper.
Experience Notes: What It’s Actually Like to Build a “Soup Pantry” (The Extra )
The first time people try pressure canning soup, it usually starts with peak optimism: a clean kitchen, a playlist, and the belief that 10 jars will be “quick.”
Then reality shows up wearing an apron that says, “So… did you prep enough lids? Also, the dog needs to go out.”
The most common lesson learned the very first day is that soup canning isn’t a “dump everything in a jar” situationit’s a systems situation.
When you treat it like a little assembly line (wash jars, heat broth, keep ingredients hot, fill consistently), your results improve fast.
When you treat it like improvisational jazz, you’ll still get soup… but you might also get siphoning, floating solids, and a kitchen that looks like it hosted a broth-themed slip-and-slide.
Another real-world discovery: the jars that get eaten first are rarely the fanciest ones.
They’re the “plain” jarschicken-veg base, beef-mushroom basebecause they’re endlessly flexible.
A simple jar can become noodle soup, pot pie filling, tortilla soup, or a quick stew, depending on what you add after opening.
It’s the pantry version of owning a good pair of jeans: not dramatic, but constantly useful.
Flavor-wise, home canners often realize they’ve been chasing the wrong finish line.
The goal isn’t to can the perfect, fully finished soup the way a factory does.
The goal is to can a safe, brothy, flavorful base, and then make it spectacular in the last five minutes on the stove.
That’s why the “no dairy/no noodles/no thickening” rule is less of a heartbreak and more of a strategy.
When you add cream at the end, it tastes fresh. When you add noodles at the end, they stay bouncy. When you thicken at the end, you control the texture instead of praying the jar behaves.
The pantry habit that separates “this is neat” from “I am never going back to store-bought” is labeling like a responsible adult:
soup name, jar size, date, and a quick note like “add noodles” or “finish with lime.”
Those little notes matter on a busy night when you’re hungry and your brain is running on 3% battery.
One more experience-based truth: the best soup-canning days are the ones that start with realistic expectations.
Plan for a chunk of time, keep your heat steady, and don’t schedule anything that requires emotional stability afterward.
But the payoff is enormous.
On a cold weeknight, popping a seal and heating a jar that tastes like something you’d proudly serve to company is a tiny kind of magic.
It feels like you hacked timebecause you did.
Conclusion
Pressure canning soup is the sweet spot between convenience and quality: you get shelf-stable meals that taste homemade, with the freedom to finish them your way.
Keep soups brothy and chunky for safety, follow tested guidance for times/pressures and altitude adjustments, and save starches, dairy, and thickening for the moment you serve.
Do that, and your pantry won’t just hold foodit’ll hold future comfort.


