Table of Contents >> Show >> Hide
- Quick Win: What “Brand New” Actually Means
- Table of Contents
- Know Your Vent Type (Because Not All Vents Want the Same Spa Day)
- Safety First: Dust, Lead Paint, and Spray Fumes
- Tools & Materials Checklist
- Step-by-Step: Transform Old Floor Vents
- Step 1: Remove the vent and clean what’s underneath
- Step 2: Degrease like paint depends on it (because it does)
- Step 3: Remove rust (or at least remove loose rust)
- Step 4: Scuff-sand for adhesion
- Step 5: Prime (don’t skip this unless you love repainting)
- Step 6: Paint in thin coats (your louvers will thank you)
- Step 7: Cure fully before reinstalling
- Step 8: Reinstall with a “new build” finish
- Time, Cost, and Effort (Realistic Expectations)
- Special Cases: Vintage Cast Iron, Brass, Wood, and Plastic
- When Replacing Is the Smarter Flex
- Keep Them Looking New
- FAQs
- Conclusion
- Real-World Experiences (500+ Words): What People Learn After Restoring Floor Vents
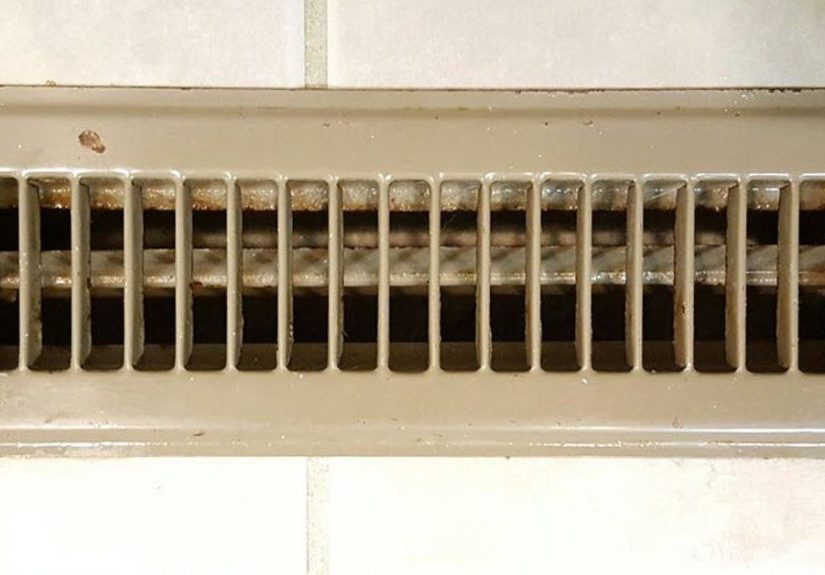
Old floor vents (aka registers) have an unfair job: they sit where shoes, pets, dust bunnies, and the occasional LEGO ambush
happen… and they’re expected to look “decorative.” The good news? You don’t need a metal shop or a reality-TV budget to make
tired-looking floor vents look freshly installed. With smart prep, the right primer/paint, and a few “don’t skip this” steps,
you can go from rusty and crusty to crisp and classy in an afternoon.
This guide covers the easiest, most reliable ways to restore floor ventscleaning, de-rusting, repainting, and (when it’s worth it)
replacing. It’s written for real homes, real messes, and real people who have better things to do than hand-sand tiny vent slats
for eight hours.
Quick Win: What “Brand New” Actually Means
- Clean + de-greased so paint can bond (not peel like a sunburn).
- Rust handled so it doesn’t creep back under the finish.
- Surface scuffed so primer grabs instead of skating.
- Thin, even coats so louvers still move and airflow isn’t restricted.
- Fully cured so it resists scratches and shoe traffic.
Table of Contents
- Know Your Vent Type (Because Not All Vents Want the Same Spa Day)
- Safety First: Dust, Lead Paint, and Spray Fumes
- Tools & Materials Checklist
- Step-by-Step: Transform Old Floor Vents
- Special Cases: Vintage Cast Iron, Brass, Wood, and Plastic
- When Replacing Is the Smarter Flex
- Keep Them Looking New
- FAQs
- Conclusion
- Real-World Experiences (500+ Words)
Know Your Vent Type (Because Not All Vents Want the Same Spa Day)
Before you start, figure out what you’re working with. The “easy transform” method depends on material and location:
Floor register vs. return grille
Most floor vents are supply registers (air blows out), sometimes with a damper lever. Returns usually pull air in
and may be larger. Either way, you want a finish that doesn’t flake into the ductwork and doesn’t interfere with moving parts.
Common materials
- Steel (most common): easy to clean and paint; may rust.
- Cast iron (often vintage/ornate): heavier; great candidates for restoration.
- Brass (decorative): can be stripped and polished or painted.
- Wood (matches flooring): usually refinish, don’t soak.
- Plastic/resin: needs the right bonding primer or paint will scratch off.
Safety First: Dust, Lead Paint, and Spray Fumes
Refinishing vents is pretty low dramaunless your home is older or you rush prep. A few safety habits keep this project “fun DIY”
instead of “why is everything dusty and my throat angry.”
If your home was built before 1978, treat old paint like it could contain lead
Vents in older homes are often painted (sometimes many times). Disturbing old paint through scraping or sanding can create dust.
If you suspect lead-based paint, use lead-safe practices and consider hiring a certified pro for paint removal. If you DIY, avoid
aggressive dry-sanding and keep dust contained.
Ventilate and protect yourself when painting
- Paint outdoors or in an open garage with airflow.
- Wear gloves and eye protection; use a well-fitted mask/respirator rated for paint fumes if spraying.
- Keep kids/pets away from the work area until everything is dry and cured.
Don’t block airflow when you reinstall
Rugs and furniture shoved over vents can reduce airflow and comfort. Also be careful with “designer” covers that look amazing but
restrict air too muchyour HVAC system is not a fan of fashion over function.
Tools & Materials Checklist
You can do this with basic supplies. Choose the “level” that matches your vent condition:
Must-haves (for most vents)
- Screwdriver (or drill) for removing vents
- Vacuum + crevice tool
- Degreaser or dish soap, warm water, scrub brush/toothbrush
- Microfiber cloths / paper towels
- Sandpaper (120–220 grit) or a sanding sponge
- Rust-inhibiting metal primer (spray or brush)
- Durable topcoat (spray enamel, appliance epoxy, or a hard-wearing metal paint)
- Drop cloth / cardboard spray booth
Nice-to-have (for rusty or heavily painted vents)
- Wire brush or wire wheel (for stubborn rust)
- Rust remover (commercial or vinegar-based method) and a stiff brush
- Paint stripper (for thick, goopy paint layersuse with ventilation)
- Filler/epoxy (for small chips) and a putty knife
- Painter’s tape (for the surrounding floor and for labeling vents)
Optional “pro finish” upgrades
- Self-etching primer (great for bare metal adhesion)
- Powder coating (best durability, usually done by a shop)
- Replacement screws (fresh hardware makes everything look newer)
Step-by-Step: Transform Old Floor Vents
Step 1: Remove the vent and clean what’s underneath
Unscrew (if needed) and lift the vent straight out. If it’s painted in place, gently score the paint line around the edge with a
utility knife so you don’t peel wall/floor paint when lifting.
Quick bonus upgrade: Vacuum the visible duct opening below the register. You’re aiming for the obvious dust and
debrisnot deep duct cleaning. Keep it gentle and surface-level.
Step 2: Degrease like paint depends on it (because it does)
Wash the vent in warm soapy water or with a degreaser. Use a toothbrush for slats. Rinse and dry completely.
Any grease, wax, or cleaner residue will cause fish-eyes, peeling, or “mystery texture.”
Shortcut for metal vents: Some homeowners run metal vents through a dishwasher cycle (no heat-dry and nothing with
wood or delicate coatings). If you do this, make sure they’re fully dry before primer.
Step 3: Remove rust (or at least remove loose rust)
If the vent has rust, don’t paint over flaky areas. Scrub with a wire brush and sand until the surface feels solid.
For light rust, a vinegar-based method can help loosen oxidation, followed by a good scrub and rinse.
Step 4: Scuff-sand for adhesion
Even if the vent isn’t rusty, scuffing helps primer bite. Use 120–220 grit sandpaper or a sanding sponge.
Focus on glossy paint, edges, and high-touch spots. Wipe off dust afterward.
Step 5: Prime (don’t skip this unless you love repainting)
Primer is the difference between “nice” and “nice for two weeks.” Use a primer meant for metal and rust prevention.
Apply thin coats. Let it dry as directed.
- Lightly rusted metal: Rust-inhibiting “clean metal” primer works well.
- Bare metal: A quality metal primer (or self-etching primer) improves bonding.
- High-heat areas: Use products labeled for high heat if you’re concerned (especially near heat sources).
Step 6: Paint in thin coats (your louvers will thank you)
Spray paint is usually the smoothest for vents because it reaches into slats without leaving brush marks. Use multiple light coats
instead of one heavy coat. Heavy paint can clog openings, create drips, and glue moving dampers shut.
Step 7: Cure fully before reinstalling
Dry-to-touch isn’t the same as cured. Give the paint time to harden so it doesn’t scratch the first time someone slides a chair or
steps on it. Follow the can directionstemperature and humidity matter.
Step 8: Reinstall with a “new build” finish
- Vacuum the surrounding floor area.
- Replace old stripped screws with matching new ones.
- Make sure the damper lever (if present) moves freely.
- Keep rugs from fully covering the ventleave breathing room for airflow.
Time, Cost, and Effort (Realistic Expectations)
| Vent Condition | DIY Time (Active) | Dry/Cure Time | Typical DIY Cost |
|---|---|---|---|
| Dusty but not rusty | 20–40 minutes | Overnight recommended | $10–$25 (shared supplies) |
| Light rust + old paint | 45–90 minutes | 24–48 hours recommended | $15–$40 |
| Heavy paint layers + rust | 2–4 hours | 48+ hours recommended | $25–$80 |
Special Cases: Vintage Cast Iron, Brass, Wood, and Plastic
Vintage cast iron registers (ornate beauties)
These are often worth restoring because they’re sturdier and more detailed than modern stamped vents. The big caution is old paint.
If you need to strip them, consider lead-safe practices and a method that controls dust. After stripping and cleaning, you can
prime and paintor go the premium route with powder coating for a near-indestructible finish.
Brass vents
Brass can be painted, but it can also be stripped and polished if you want that classic look. If polishing, protect it afterward
(wax or clear coat) to slow tarnish. If painting, use a primer designed to bond well.
Wood floor registers
Don’t soak wood vents. Clean gently, then sand and refinish like trim: stain, polyurethane, or floor-compatible finish.
If the wood is cracked or warped, replacement often looks better and seals more cleanly.
Plastic/resin vents
Plastic needs a bonding primer or paint formulated for plastic. Otherwise, it scratches off easily. Clean thoroughly, scuff lightly,
prime appropriately, then paint in thin coats.
When Replacing Is the Smarter Flex
Restoration is awesomeuntil it’s not. Consider replacing your vent if:
- It’s bent and won’t sit flat (trip hazard).
- Louvers are broken or the damper is jammed beyond easy repair.
- Rust has eaten through the metal.
- You need a different size because of flooring changes or remodeling.
If you replace, measure the duct opening (not just the outside face size). Getting the right size keeps it snug, quiet, and
better-lookingand avoids airflow issues that come with poorly fitting covers.
Keep Them Looking New
- Monthly: Vacuum the vent face and surrounding floor.
- Seasonally: Remove and vacuum the visible duct area below (just what you can reach safely).
- As needed: Wipe with a damp clothskip harsh abrasives that scratch paint.
- Always: Don’t bury vents under thick rugs or furniture.
FAQs
Can I paint vents while they’re installed?
You can, but it’s rarely the best result. Overspray happens, edges look messy, and you’re painting around dust. Removing them makes
cleaning easier and the finish more even.
Do I need “high-heat” paint for floor vents?
Many people use durable enamel or appliance-style spray paint successfully. If the vent gets very warm (or you want extra insurance),
choose products labeled for heat and follow curing instructions.
Will paint smell when the heat turns on?
If you reinstall before the coating cures, yesyour house can smell like “freshly painted spaceship.” Let paint cure fully and run
ventilation. The smell is usually temporary when products are used correctly.
What color looks most “brand new”?
The classics are satin white, matte black, and oil-rubbed bronze. For a seamless look, match the trim color. For a modern pop,
matte black against light floors looks intentional (not accidental).
Conclusion
Transforming old floor vents to look brand new is mostly about prep: clean thoroughly, remove loose rust, scuff for adhesion,
prime like a pro, and paint in thin coats. Finish with patience (curing time) and a couple of small “new install” touches like
fresh screws and a clean duct opening. Do it once, do it right, and your vents can stop stealing attention from your actual decor.
Real-World Experiences (500+ Words): What People Learn After Restoring Floor Vents
If you ask a handful of homeowners about restoring floor vents, you’ll hear the same theme: the project looks “too small to matter”
right up until the moment it’s donethen it suddenly makes the whole room feel cleaner. That’s because vents sit in the visual
“ground level” of a space. When they’re rusty, chipped, or painted shut, your brain reads the room as older and dingier than it is.
Once they’re crisp again, it’s like swapping out a scuffed pair of shoes for a new pair: same outfit, dramatically better vibe.
One common experience is the surprise-gunk factor. People remove the register expecting a little dust, then discover a
compacted layer of debris just below the opening. The easy win isn’t deep duct cleaningit’s simply vacuuming what you can see and
reach. That small cleanup often reduces that “why does this room smell a little dusty when the air turns on?” feeling. It also
makes reinstalling the vent more satisfying because it sits in a cleaner frame.
Another frequent lesson: paint doesn’t fix rust; it just hides it temporarily. Homeowners who skip rust removal often
report the same outcomewithin a season or two, little orange freckles show up through the new finish. The vents might still look
better than before, but that “brand new” look doesn’t last. The people happiest with the results tend to do one extra step:
removing loose rust and using a primer meant for metal. It’s not glamorous work, but it keeps the makeover from turning into a
repeating calendar event.
Then there’s the patience tax: reinstalling too soon. A vent can feel dry in an hour and still be soft enough to scratch
when you set it on the floor, tighten screws, orclassic movestep on it to “see if it’s solid.” Folks who let the finish cure
longer usually describe the difference as “surprisingly tough,” especially with thin coats. If you’re doing multiple vents, many
people find it easiest to restore them in batches: paint today, cure overnight, reinstall tomorrow, repeat.
You’ll also hear about the color confidence moment. Some homeowners play it safe with white, then wish they’d gone
bolder. Others choose matte black and realize it looks intentional and modern, even in older homesespecially when paired with
black hardware or light fixtures. A common compromise is choosing a neutral “disappear” color that matches trim, so vents blend in
instead of shouting, “Hello, I am a rectangle from 1993.”
Finally, people often discover that vent makeovers have a weird domino effect: once vents look fresh, the baseboards look a little
dusty, the door hardware looks a little tired, and suddenly you’re cleaning like you’re expecting guests from the Home Design
Olympics. The upside is that vent restoration is one of those rare DIY tasks where the effort-to-impact ratio is genuinely
satisfying. You’re not remodeling the roomyou’re removing a small visual “downer” that drags the whole space down.
If you want the simplest path to a “brand new” look, the real-world takeaway is this: prep beats perfection. Clean
thoroughly, scuff enough for adhesion, prime correctly, paint lightly, and give it time to cure. Do those basics and your vents
will look like you replaced themwithout the “how did a piece of metal cost that much?” feeling at the checkout.


