Table of Contents >> Show >> Hide
- Before You Start: Plan Like a Pro, Not Like a Weekend Daredevil
- Tools and Materials You’ll Want Within Arm’s Reach
- Step-by-Step: How to Install Kitchen Cabinets
- Step 1: Mark layout and find the high point of the floor
- Step 2: Install a temporary ledger for upper cabinets
- Step 3: Start with the first wall cabinet (usually a corner)
- Step 4: Add neighboring wall cabinets and align face frames
- Step 5: Remove ledger and verify upper run
- Step 6: Install base cabinets from the high point outward
- Step 7: Handle walls that are not straight (because they rarely are)
- Step 8: Reinstall doors, drawers, and shelves
- Step 9: Final checks before countertop templating
- Common Cabinet Installation Mistakes (and How to Avoid Them)
- Pro-Level Finishing Touches That Make Cabinets Look Custom
- Experience-Based Lessons: 500+ Words of Real-World Cabinet Install Insights
- Conclusion
Installing kitchen cabinets looks intimidating until you realize it’s really a sequence of small, precise moves:
map your layout, find your high point, hang upper cabinets first, shim everything to level, and tighten only after
everything lines up. That’s it. Okay, that’s not allyou’ll still break a sweat, say “where did my level go?”
seven times, and discover your wall is less “flat” and more “modern sculpture.” But with the right plan, a few key
tools, and careful measurements, this is absolutely a doable DIY project.
In this guide, you’ll learn a pro-style workflow for installing wall and base cabinets so they look straight, work
smoothly, and support your countertop without drama. We’ll cover layout lines, stud fastening, ledger boards, shimming,
face-frame alignment, filler strips, and final door/drawer adjustments. You’ll also get practical troubleshooting advice
and a long “experience section” at the end that walks through real-world scenarios so you can avoid classic cabinet
installation mistakes before they happen.
Before You Start: Plan Like a Pro, Not Like a Weekend Daredevil
1) Confirm your finished floor height first
Cabinet layout depends on the highest point of the floor. If the floor is out of level (many are), you set your
base cabinet reference line from that high spot. If you skip this, your countertop can end up sloping, and nothing ruins
your morning coffee like watching it migrate across the counter by itself.
2) Verify rough-ins and appliance dimensions
Check plumbing, electrical, gas, and appliance specs before hanging anything. Dishwashers, ranges, fridge clearances,
and hood locations should be finalized early. Even a small mismatch can force major rework once cabinets are fixed in place.
3) Inspect every cabinet before installation
Open each box, compare every unit to your layout plan, and check for shipping damage, wrong sizes, or missing parts.
Do a dry fit on the floor if possible. Catching mistakes now is cheap; catching them after screws are buried in studs is
expensive and character-building in the worst way.
4) Work safely around utilities
Before drilling, verify what’s behind the wall. Electrical lines, plumbing, and gas are often in cabinet zones.
If there’s any uncertainty, pause and bring in a licensed pro. DIY pride is great; DIY emergency calls are not.
Tools and Materials You’ll Want Within Arm’s Reach
- 4-foot level (and ideally a laser level)
- Stud finder
- Tape measure and pencil
- Chalk line
- Drill/driver + pilot and countersink bits
- Cabinet screws (per cabinet manufacturer specs)
- Wood shims
- Clamps (at least 2–4, more is better)
- Straight ledger board (often 1×4)
- Square
- Safety glasses and hearing protection
Pro tip: remove doors, drawers, and shelves before lifting cabinets. It reduces weight, prevents damage, and makes
alignment easier.
Step-by-Step: How to Install Kitchen Cabinets
Step 1: Mark layout and find the high point of the floor
Start with a level reference line around the room. Then measure down to the floor in several locations. The shortest
measurement identifies the floor’s high point. From there:
- Mark the top-of-base-cabinet line (often around 34 1/2 inches from the high point, depending on cabinet system).
- Mark the bottom-of-wall-cabinet line (commonly around 54 inches from finished floor in many standard layouts).
- Mark stud locations on the wall and extend those marks where you can still see them after cabinets are in place.
Always cross-check your specific cabinet manufacturer’s install specs. “Standard” is common, but not universal.
Step 2: Install a temporary ledger for upper cabinets
Screw a straight ledger board into studs just below the wall-cabinet reference line. The ledger acts as a temporary
shelf so you’re not holding a heavy cabinet with one hand while trying to drill with the other. (That move belongs in a
blooper reel, not your kitchen.)
Step 3: Start with the first wall cabinet (usually a corner)
- Lift the first cabinet onto the ledger board.
- Check for level and plumb.
- Shim behind the cabinet where needed.
- Predrill pilot holes at stud locations through the cabinet back/rail.
- Drive cabinet screws into studs, but keep them slightly loose until neighboring units are aligned.
If you’re fastening to masonry or conditions without direct stud access, use approved anchors/hardware for that wall type
and follow manufacturer guidance exactly.
Step 4: Add neighboring wall cabinets and align face frames
Set the next wall cabinet on the ledger, clamp face frames flush, then predrill and screw cabinets together through the
face-frame area (or designated join zones, depending on style). Keep checking:
- Level across cabinet tops
- Flush alignment at front faces
- Plumb at cabinet sides
Once alignment is perfect, tighten wall fasteners. Do not overtighten screws to the point that you crush cabinet backs.
Step 5: Remove ledger and verify upper run
When all wall cabinets are joined and secured, remove the ledger board. Recheck the run with a long level or straightedge.
This is your last easy moment to correct subtle waves before base cabinets and countertops lock in the geometry.
Step 6: Install base cabinets from the high point outward
Begin at a corner or at the cabinet that controls the most important focal alignment. Set the first base cabinet in place,
align it to your base reference line, and shim as needed under the box and/or behind the back.
- Fasten lightly to studs first.
- Add adjacent base cabinets one by one.
- Clamp face frames flush, predrill, and screw cabinets together.
- Recheck level front-to-back and side-to-side after every cabinet.
- Tighten all fasteners after the full run is aligned.
Step 7: Handle walls that are not straight (because they rarely are)
If a wall bows or leans, use shims behind cabinet attachment points to keep faces straight. Then trim excess shim material.
For end gaps, install filler strips instead of forcing cabinet boxes out of square. A neat filler strip looks intentional;
a forced cabinet line looks haunted.
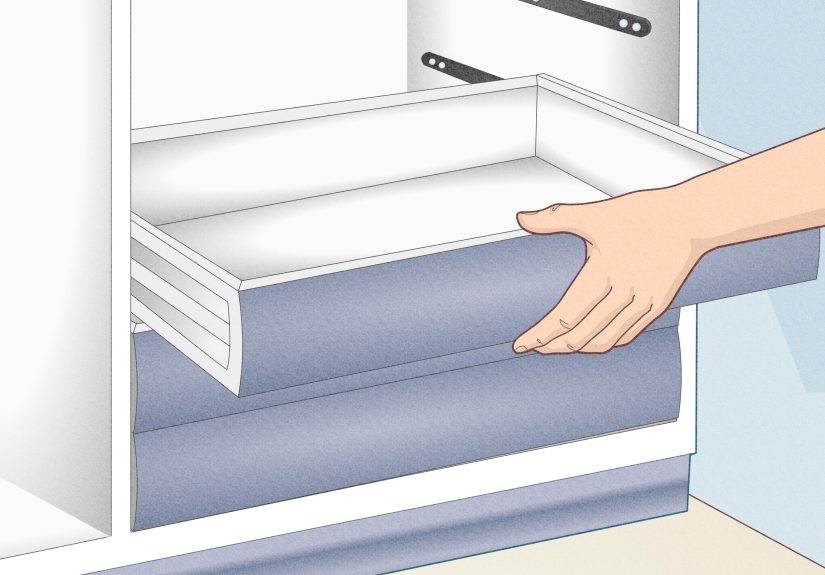
Step 8: Reinstall doors, drawers, and shelves
Rehang doors and insert drawers only after boxes are fixed and aligned. Adjust hinges in small increments:
up/down, left/right, and in/out. Modern hinges can usually dial in reveal and overlay very precisely.
Step 9: Final checks before countertop templating
- All base cabinets level across the run
- No rocking cabinet boxes
- Face frames aligned and tight
- Fasteners seated correctly into studs/approved anchors
- Appliance openings match required dimensions
- Plumb where it matters for tall units and side panels
Countertop installers love level cabinets. Countertop installers charge extra when cabinets are not level.
This is one of life’s few reliable constants.
Common Cabinet Installation Mistakes (and How to Avoid Them)
Mistake 1: Trusting the floor is level
Fix: Always locate the high point first and build your base layout from it.
Mistake 2: Fastening before full alignment
Fix: Snug screws first, align and shim, then final-tighten. This prevents crooked runs and twisted faces.
Mistake 3: Skipping clamps between cabinets
Fix: Clamp face frames before joining. Predrill and countersink to avoid splitting and to keep fronts flush.
Mistake 4: Using the wrong fasteners
Fix: Use cabinet screws and wall-appropriate hardware. Many manufacturer guides specifically warn against nails.
Mistake 5: Ignoring utility lines behind walls
Fix: Locate utilities before drilling. If uncertain, hire licensed help for safe verification.
Mistake 6: Forgetting to label doors and drawers
Fix: Tape and label every removed component. Reassembly becomes dramatically easier and less “guess-and-hope.”
Pro-Level Finishing Touches That Make Cabinets Look Custom
- Use filler strips intentionally: Better than squeezing a cabinet into a bad fit.
- Keep reveals consistent: Tiny hinge tweaks create a huge visual upgrade.
- Plan hardware placement: Jigs help keep pulls and knobs perfectly aligned.
- Install trim last: Scribe moldings and toe-kick pieces after final box alignment.
- Take photos behind cabinets: Useful reference for future plumbing/electrical work.
Experience-Based Lessons: 500+ Words of Real-World Cabinet Install Insights
The fastest way to get good at cabinet installation is to learn from situations that happen in actual homesnot perfect
showroom walls. Below are composite, real-world-style experiences gathered from common DIY and contractor workflows.
Think of these as field notes you can borrow before your drill battery meets drywall.
Experience #1: The floor that “looked” level.
In one typical weekend remodel scenario, the homeowner measured the room and began setting base cabinets from the left wall.
Everything seemed fine until cabinet four, where a visible dip appeared and the countertop line started to drift. The cause:
no high-point check at the start. The fix required loosening cabinets, adding shims, and resetting the run from the true high point.
The lesson is simple: the first 20 minutes of layout can save 6 hours of rework.
Experience #2: The one-person upper cabinet lift.
Another common scenario is trying to install upper cabinets solo without a ledger board. The installer gets one screw in, the
cabinet shifts, and now there’s a tiny but visible misalignment that multiplies down the wall. A temporary ledger board changes
everything: cabinets rest securely, alignment stays calm, and you can focus on precision instead of arm wrestling a box at shoulder
height. Even pros use support systems because gravity does not negotiate.
Experience #3: The bowed wall surprise.
A classic issue appears in older homes: the wall bows outward near mid-run. If you force every cabinet back to touch drywall, the
front faces snake in and out. The better approach is to keep front faces straight and true, shim attachment points behind the cabinet,
and treat the wall as a background actor, not the lead role. Straight cabinet faces matter more than perfect contact with an imperfect wall.
Experience #4: Fastening too early.
Many first-time installers lock each cabinet down tight as they go. Then cabinet three needs a tiny adjustment, but cabinet one is
already immovable, so alignment turns into a puzzle with no happy ending. A smoother method is “lightly fasten, align, clamp, join, check,
then tighten.” That sequence keeps options open and preserves accuracy.
Experience #5: Face-frame frustration solved by clamps and pilot holes.
Without clamps, face frames drift while screws go in. Without pilot holes, hardwood frames can split. Combine the two mistakes and your
reveal lines become inconsistent. In successful installs, clamps hold frames flush, pilot holes guide screws cleanly, and a countersink
prevents screw-head bulges. The visual difference is huge, and it’s one of those details people notice even if they can’t explain why.
Experience #6: Utility-line anxiety behind the wall.
Drilling into walls without checking utility paths is one of the few cabinet mistakes that can become dangerous fast. Smart installers
pause before drilling near sink runs, range areas, and islands where electrical is common. When uncertainty exists, they verify and call
licensed help. The best cabinet install is the one that ends with all cabinets secure and all utilities intact.
Experience #7: Door alignment drama after a perfect install.
Even perfectly mounted boxes can look “off” if hinges and drawer fronts are not tuned. In practical jobs, the final 45–90 minutes often
go to hinge adjustments and reveal balancing. This is normal. Tiny in/out and left/right tweaks create that clean, custom appearance people
assume cost a fortune.
Experience #8: The confidence curve is real.
Most installers report the same pattern: first cabinet feels stressful, second feels manageable, and by cabinet five the process clicks.
That doesn’t mean rushingit means your system is working. Measure, mark, verify, shim, clamp, predrill, fasten, recheck. Repeat.
Cabinets reward patience more than speed.
If you remember only one thing, make it this: cabinet installation is less about brute force and more about geometry and sequence.
The best-looking kitchens are built by people who keep checking level, plumb, and alignmentthen check once more before the final tighten.
That habit is the difference between “good enough” and “who installed theseyour contractor?”
Conclusion
Learning how to install kitchen cabinets is one of the highest-value DIY skills in a kitchen remodel. Done right,
you can save serious labor costs, improve fit and function, and create a layout that feels truly custom. The core strategy is consistent
across most reputable installation methods: find the high point, mark accurate level lines, hang uppers with support, align and clamp
adjacent cabinets, shim for plumb and level, then tighten in final sequence.
Take your time, follow your cabinet manufacturer’s fastener and spacing requirements, and don’t hesitate to bring in licensed help when
utilities or structural questions appear. Precision beats speed every single time.


