Table of Contents >> Show >> Hide
- Why Bother With a Custom Ceiling Light Cover?
- Safety First: What You Must Know Before You DIY
- Planning Your Custom Ceiling Light Cover
- DIY Project 1: Custom Drum Shade Ceiling Light Cover
- DIY Project 2: Basket Ceiling Light Cover (Boho on a Budget)
- DIY Project 3: Soft Fabric Diffuser (For Harsh Ceiling Lights)
- Renter-Friendly Tricks and No-Tools Options
- Styling Ideas: Match Your Cover to Your Room
- Common Questions About Custom Ceiling Light Covers
- Real-Life DIY Experiences & Pro Tips (500+ Words of “I Tried It So You Don’t Have To”)
- Conclusion: A Quick, Happy Glow-Up for Your Ceiling
If you’ve ever looked up at your ceiling and thought, “Wow, that light fixture is really… existing,”
this guide is for you. Standard “boob lights” and builder-grade domes are famous for making even a cute
room feel like a dated rental. The good news? You don’t need an electrician, a giant budget, or
a full remodel to fix it. A custom ceiling light cover can turn that blah fixture into a clever focal point
and you can do it in an afternoon, on a shoestring budget.
DIYers across the U.S. are hiding old flush-mount fixtures with drum shades, baskets, fabric diffusers,
and renter-friendly conversion kits that slip right over existing hardwareno rewiring required.
With a few smart safety checks and the right materials, you can hack your own stylish custom ceiling
light cover that looks designer but costs big-box money (or less).
Why Bother With a Custom Ceiling Light Cover?
Upgrading trim or flooring is expensive. Upgrading a ceiling light cover? That’s one of the cheapest
ways to make a room feel intentional and modern. Designers and bloggers have been waging war on
“boob lights” for years, swapping them for drum shades, basket pendants, and sculptural flush mounts
that add warmth and personality to a space.
Benefits of a DIY Ceiling Light Cover
- Budget-friendly: Many projects cost under $30 using baskets, thrifted lampshades, or basic fabric.
- Renter-friendly: You can design covers that leave the original fixture intact and easily removable when you move out.
- Custom style: Match your decorScandi, boho, farmhouse, minimalistjust by changing shade shape, color, or texture.
- Better light: A diffuser or light-colored shade can soften harsh light and reduce glare while still keeping the room bright.
In other words, a custom ceiling light cover gives you maximum visual impact with minimal commitment.
It’s like putting your light fixture in a very fashionable outfit.
Safety First: What You Must Know Before You DIY
Before you grab a basket and start zip-tying it to your ceiling, let’s talk safety. Every light fixture
produces heat, and anything you put over or around it can trap that heat. Electrical pros and lighting
guides emphasize a few non-negotiables: keep flammable materials away from hot bulbs, don’t block
ventilation, and don’t DIY anything that requires electrical work unless you’re qualified.
Basic Safety Guidelines
- Turn off the power. Always switch off the light at the wall and breaker before touching the fixture.
- Use LED bulbs. They run much cooler than incandescent or halogen bulbs, reducing heat buildup in your cover.
-
Keep a gap around the bulb. Electricians generally recommend keeping flammable materials several inches
away from the bulb and not enclosing it tightly, especially with fabric. -
Don’t cap off hot fixtures completely. Covering the top of a shade or fixture with solid material can trap
heat and increase fire risk. -
Consider fire-retardant products. Some DIYers use certified fire-retardant sprays on fabric to slow flame
spreadalways follow manufacturer directions and safety data. -
Avoid rewiring if you’re not trained. If your project involves changing the fixture itself, hire a licensed
electrician.
The projects below focus on decorative covers that attach to or sit around existing fixtures, so you
can transform the look without messing with the wiring.
Planning Your Custom Ceiling Light Cover
Step 1: Decide What You’re Covering
Take a look at your existing ceiling light. Is it:
- A classic dome or “boob light” flush mount?
- A small builder-grade flush mount in a hallway?
- A bare bulb or simple socket with no shade?
Different shapes work better for different fixtures. Dome-style boob lights pair well with drum shades,
baskets, or ready-made conversion kits that slip over the original base.
Step 2: Measure, Then Measure Again
Grab a tape measure and note:
- Fixture diameter (or width and length if rectangular)
- Distance from ceiling to bottom of the light
- Distance to nearby doors or cabinet doors (so your new cover doesn’t get whacked every time you open one)
These measurements will help you pick a cover that’s large enough to hide the old fixture but not so big
that it feels heavy or gets in the way.
Step 3: Choose a Style and Material
Popular, budget-friendly options that show up over and over in DIY tutorials include:
- Drum lampshades: Clean, modern, and easy to attach over existing fixtures.
- Woven baskets: Perfect for boho or coastal style; they cast pretty shadows on the ceiling.
- Fabric diffusers + frames: Great for softening harsh light (especially over workspaces or dining tables).
- Ready-made conversion kits: These are designed to sit over existing flush mounts with simple hardwareno wiring.
Aim for lightweight materialswire, rattan, thin wood, or lampshade framesso you’re not stressing the
original fixture.
DIY Project 1: Custom Drum Shade Ceiling Light Cover
A drum shade is one of the easiest ways to disguise a dated ceiling light. Many bloggers have used large
drum shades paired with a simple diffuser to turn standard fixtures into custom “designer” pieces.
Materials
- Large drum lampshade (wider than your existing light)
- LED bulbs in your existing fixture
- Short threaded rod, nut, and decorative finial (or a conversion kit that works with your fixture)
- Lightweight acrylic or polystyrene diffuser cut to fit inside the shade (optional)
- Cardboard and pencil for tracing (if making a diffuser)
General Steps (Conceptual Only)
- Turn off the power at the breaker and let bulbs cool.
- Remove the original glass dome or shade, keeping any center screw and decorative cap.
-
Use hardware designed for drum-shade conversions or a short threaded rod and nut to secure the shade
to the existing mounting point at the center of the fixture. The shade should sit level and not rub
against the bulbs. -
If you want a diffuser, trace the inside of the shade onto cardboard, then onto acrylic, and cut a disc
that can sit on an inner lip or rest on small brackets inside the shade. - Install cool-running LED bulbs, restore power, and test that the shade doesn’t wobble or overheat.
The result: a simple, modern ceiling “drum” that hides your old fixture and gives you soft, flattering light.
DIY Project 2: Basket Ceiling Light Cover (Boho on a Budget)
One of the most beloved hacks is the basket ceiling light cover: you literally use a basket as a shade.
Designers and DIY bloggers have traced their existing glass domes to cut an opening in the bottom of a
basket, then attach it using the same center screw or a conversion kit.
What You’ll Need
- Lightweight woven basket (wider than the original fixture)
- Marker and scissors or a utility knife (for cutting the opening)
- Existing fixture hardware or a no-wiring conversion kit
- LED bulbs (againcooler is safer)
How It Comes Together (High-Level)
- Turn off power and remove the glass dome, saving the center screw and cap.
-
Use the old shade as a template to mark a circle on the bottom of your basketthis helps your basket
sit snugly around the fixture. - Cut the opening so it’s just large enough for the base or hardware to fit through.
- Attach the basket where the old dome used to sit, making sure it’s secure and doesn’t touch the bulbs.
- Install LED bulbs and check for clearance between basket and bulbs when the light is on.
This trick works beautifully in hallways, bedrooms, or breakfast nooks where you want texture, warmth,
and those cool basket-shadow patterns on the ceiling.
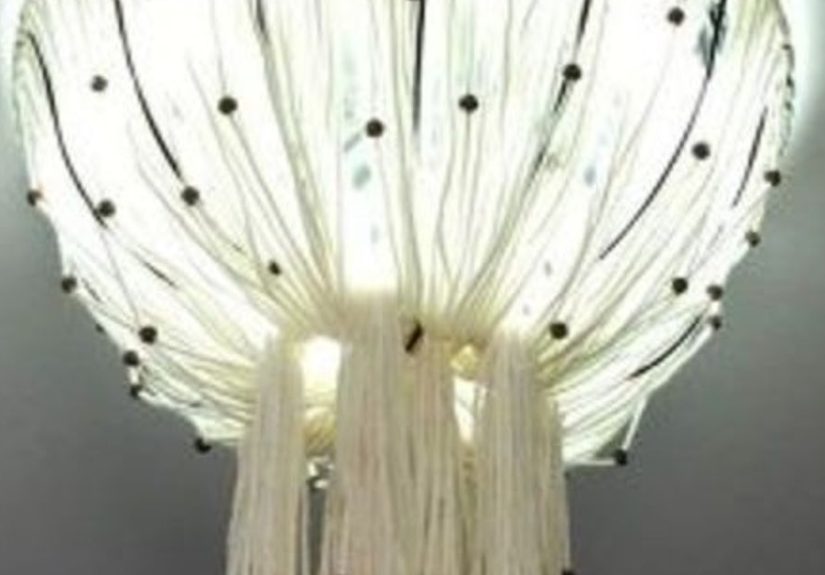
DIY Project 3: Soft Fabric Diffuser (For Harsh Ceiling Lights)
Fluorescent and bright overhead lights can be tough on the eyes. DIY diffusers that hang below or around
the fixture can soften light dramaticallybut they must be installed with safety in mind. Tutorials for
covering fluorescent lights with fabric emphasize keeping fabric away from bulbs, leaving space for air,
and using lightweight materials.
Concept and Materials
- Metal or wooden frame (an embroidery hoop, light frame, or lightweight grid)
- Sheer, light-colored fabric (cotton blend, linen, or specialty diffuser fabric)
- Heat-safe mounting method like chains, hooks, or small brackets that attach to the ceilingnot the bulb
- LED bulbs in the existing fixture
- Optional: certified fire-retardant spray formulated for fabrics
General Approach
- Turn off power and let bulbs cool.
- Wrap your fabric loosely around the frame and secure it so it’s smooth but not stretched tight.
-
Mount the frame a few inches below the light source so the fabric diffuses light but doesn’t touch or
trap heat around the bulbs. - Check that heat can escape and that there’s plenty of airflow around the fixture.
- Turn the light on for a short period and monitor for excessive warmth.
The effect is like putting a soft filter on your whole roomespecially nice over kitchen islands,
office spaces, or dining tables where light comfort really matters.
Renter-Friendly Tricks and No-Tools Options
Not everyone wants to juggle threaded rods, baskets, and power tools. Luckily, there’s a growing market
for renter-friendly light covers that clip on, magnetize, or slip over existing fixtures without any
permanent changes.
Ideas to Consider
-
Conversion drum kits: These include a shade plus hardware that attaches to your existing
base or bulbsno drilling, no rewiring. -
Magnetic covers: Some covers for fluorescent panels and drop ceilings use magnets to hold
lightweight diffusers in place (often used in classrooms and offices). -
Clip-on shades: Certain lampshades are designed to clip directly onto bulbs (typically
for table lamps), and similar concepts are being adapted for small ceiling fixtures. -
Pre-made decorative covers: Online marketplaces sell ready-to-hang decorative covers branded
as renter-friendly, often in fabric, metal, or acrylic.
For any of these, always double-check the product specs: look for UL listings, fire-safety notes, and
compatibility with LED bulbs.
Styling Ideas: Match Your Cover to Your Room
Scandi & Minimalist
Opt for a simple white or cream drum shade with a diffuser to create a soft, even glow. Pair it with
neutral walls, pale wood furniture, and clean lines. This look mirrors the understated ceiling fixtures
often featured in minimalist and Scandinavian-inspired interiors.
Boho & Eclectic
Go with a woven basket in natural rattan or seagrass. The texture warms up the room and adds instant
personality. Combine with layered textiles, plants, and vintage finds to tie everything together.
Modern Farmhouse
Try a black or bronze metal drum shade, or a fabric shade in ticking stripe. Pair with shiplap, warm wood
tones, and simple black hardware for a cohesive farmhouse-modern vibe.
Colorful & Fun
Love color? Use a solid white shade or basket as a base and add interest with patterned walls, bold rugs,
or even a color-changing LED bulb. Many DIYers use soft white or warm white settings for everyday life and
then switch to color for parties.
Common Questions About Custom Ceiling Light Covers
Will a DIY cover make my room darker?
It depends on your materials. A dense basket or dark fabric will absorb more light, while a light-colored
drum shade with a translucent diffuser will spread light more evenly. If you’re worried, choose a larger
shade, a white interior, and bright (but still safe) LED bulbs.
Can I use fabric near my ceiling light?
You can, but you must be cautious. Professionals strongly advise against tightly covering the top of a
fixture and warn that fabric directly against a hot bulb is a fire hazard.
If you use fabric, keep it away from the bulb, allow airflow, use LED bulbs, and consider a fire-retardant
treatment designed for textiles.
Is this reversible if I’m renting?
Yesif you use options that attach to existing hardware or use non-permanent methods (like conversion kits,
magnets, or simple hardware that uses the original mounting point). When you move out, you can just reinstall
the original cover.
Real-Life DIY Experiences & Pro Tips (500+ Words of “I Tried It So You Don’t Have To”)
People don’t start caring about ceiling lights because they love electricitythey start caring because
one day they look up and realize the “temporary” fixture has survived three paint colors and two couches.
Online DIY communities are full of stories that all sound suspiciously similar: “I moved into my new place,
there were boob lights everywhere, and I couldn’t un-see them.”
One common journey starts in the hallway. The fixture is right there, dead center in every photo you take.
Instead of replacing the whole thing, a lot of DIYers begin with a $10 thrift-store drum shade. After
confirming the fixture uses standard sockets and LED bulbs, they dry-fit the shade to see how it hangs.
The first lesson they share afterward: buy bigger than you think you need. A too-small drum shade
can make the fixture look like it’s wearing a tiny hat. A slightly oversized shade, on the other hand,
suddenly makes the ceiling feel higher and the whole hallway more intentional.
Another popular story line: the basket experiment. Someone spots a cute woven basket at a big-box store
or thrift shop and thinks, “That would make a great pendant.” They measure their old dome, trace a circle
onto the bottom of the basket, and cut out an opening. The first try is often a little crooked. The second
try is much better. The big takeaway from these attempts is to make small cuts and test oftenonce you cut
too much, you can’t put the basket back together. DIY bloggers who’ve perfected the trick suggest using the
original glass shade as a template so the basket sits level and hides all the metal hardware.
Then there are the DIYers who share cautionary tales. A frequent theme: fabric projects that looked dreamy
in inspiration photos but felt risky in real life. Some tried draping scarves or thin cotton directly over
hot fixtures and quickly noticed how warm the fabric got. That’s usually the moment they head to electrician
forums and learn that tightly wrapped fabric is a no-go. Electricians warn that fabric too close to a bulb,
especially incandescent bulbs, can overheat and become a fire hazard.
The “happy ending” version of this story is when the DIYer swaps the fabric for a purpose-made diffuser or
mounts it on a separate frame with plenty of breathing room.
Renter-friendly solutions also show up again and again in shared experiences. Many renters don’t want to
store bulky glass domes or worry about damaging the existing fixtures. So they search out conversion kits
that let a drum shade or decorative cover sit over the base with a simple bracket or rod. Users report that
these kits feel surprisingly sturdy when installed correctly and love that they can take their custom shade
with them to the next apartment.
Another recurring tip from seasoned DIYers: upgrade the bulb while you’re up there. Swapping a harsh,
cool-white bulb for a warm-white, dimmable LED can change the mood of a room just as much as the new cover
itself. People who pair their new shade with dimmable bulbs often say the room suddenly feels “finished”
in the eveningcozy, flattering, and restful instead of glaring and clinical.
Perhaps the biggest shared experience, though, is that once you upgrade one ceiling light, you start spotting
opportunities everywhere else. A basket in the entryway leads to a drum shade in the bedroom, a soft fabric
diffuser in the office, and maybe a more sculptural flush mount in the dining area. People who thought of
themselves as “not handy” discover that with a little measuring, a few safety basics, and some patience,
they can dramatically improve how their home feelswithout a renovation crew or a designer budget.
So if you’re staring down a dated ceiling light and feeling mildly personally attacked by it, you’re in
excellent company. A custom ceiling light cover is one of those joyfully achievable projects: it’s small,
contained, affordable, and high impact. And every time you flip that switch afterward, you get a tiny
shot of satisfaction that says, “I did that.”
Conclusion: A Quick, Happy Glow-Up for Your Ceiling
You don’t need a full remodelor even a ladder taller than you areto make your ceiling lights look good.
With a custom ceiling light cover, you can hide an outdated fixture, soften harsh light, and add serious
personality to any room. Whether you choose a simple drum shade, a textural basket, or a renter-friendly
conversion kit, the key is the same: respect basic safety rules, measure carefully, and work with
lightweight, breathable materials.
Once you’ve done it once, you may never look at “standard issue” ceiling lights the same way again.
And that’s the whole pointyour home deserves better than a bare-bones builder fixture. A fun, budget-friendly
custom ceiling light cover is your shortcut to a room that finally looks as good as it feels.


