Table of Contents >> Show >> Hide
- What the Numerär Double-Sided Countertop Is (and Why It Was Different)
- Why Double-Sided Laminate Was a Big Deal
- Laminate Countertops, Decoded: What You’re Actually Buying
- Planning Your Numerär (or Similar) Install: Measure Like You Mean It
- Cutting a Double-Sided Worktop: Keep It Clean, Keep It Calm
- Sink and Cooktop Cutouts: Where Most DIY Installs Go Sideways
- Joining Countertop Pieces: Seams, Miter Bolts, and the “Keep Water Out” Rule
- Finishing the Edges: The Make-or-Break Detail
- Cleaning and Care: Keep Laminate Looking New Without Scratching It
- Should You Choose Numerär (or a Similar Double-Sided Laminate) Today?
- Conclusion
- Real-World Experiences With Numerär-Style Double-Sided Countertops (500+ Words)
Some kitchen decisions feel suspiciously permanent. Like choosing a backsplash you’ll still love after your third “I’m totally a sourdough person now” phase. The Numerär Countertop, Double-Sided took the opposite approach: it basically said, “Relax. Pick a side later.” With two different laminate faces on one worktop, you could flip it and choose the look you like bestno time machine required.
This guide breaks down what Numerär is, what laminate actually does well (and where it will absolutely humble you), and how people typically plan, cut, install, and care for a pre-cut IKEA-style laminate worktopespecially one that’s double-sided. You’ll also find practical examples, common pitfalls, and a “learn-from-other-people’s-mistakes” section so your countertop doesn’t become a cautionary tale at your next dinner party.
What the Numerär Double-Sided Countertop Is (and Why It Was Different)
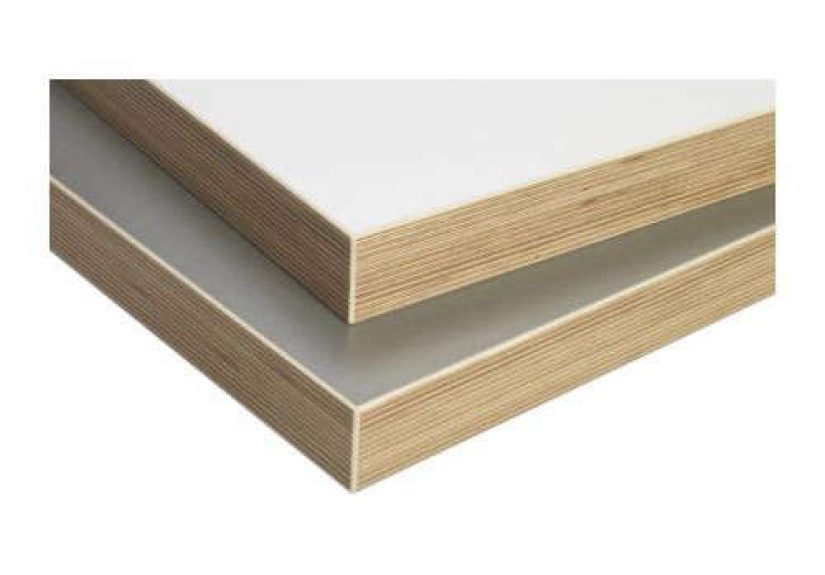
Numerär’s signature trick was simple and clever: two laminate finishes on one countertop. If one side read as bright and clean (think “Sunday open house”), the other could be moodier or more textured (think “weekday real life”). You installed it with the preferred face up, and the “backup” finish stayed hidden underneath.
Snapshot: Typical specs you’ll see referenced for Numerär double-sided
- Format: Pre-cut countertop / worktop
- Key feature: Different laminate color/finish on each side (choose the top face)
- Approx. size: 73 1/4″ long × 25 5/8″ deep × 1 1/2″ thick
- DIY-friendly detail: Can be cut to length; edging strips included for cut edges
- Positioning: Depth works well over standard base cabinets with a practical front overhang
If you’re shopping today, you may not see “Numerär” on the current IKEA lineup in every market. But the ideadurable laminate, budget-friendly, pre-cut sizes, and easy maintenancevery much lives on in modern laminate worktops. So even if you’re researching Numerär for a replacement, a match, a resale listing, or just kitchen archaeology, the planning and care rules still apply.
Why Double-Sided Laminate Was a Big Deal
In a normal countertop purchase, you commit. In a double-sided setup, you get a little breathing room:
- Style insurance: If your cabinets or wall color change later, you’re not automatically trapped in a bad combo. (Kitchen trends move faster than your motivation to paint.)
- Less stress in planning: You can decide the “top face” once you see everything together in the actual lighting of your home, not the fluorescent lighting of a warehouse.
- Same core performance: You’re still getting laminate’s biggest winseasy wipe-downs and solid daily durabilitywithout paying stone-slab prices.
The tradeoff is that double-sided doesn’t magically make laminate invincible. It just makes your aesthetic decision more flexible. You still want to treat laminate like laminate: protect it from heat, use cutting boards, and keep water from sneaking into seams and cutouts.
Laminate Countertops, Decoded: What You’re Actually Buying
“Laminate” often gets described as “plastic,” but the good versions are engineered on purpose. High-pressure laminate (HPL) is typically made by pressing multiple layers of paper saturated with resins under heat and high pressure, creating a tough decorative surface that gets bonded to a wood-based substrate (commonly MDF or particleboard).
Where laminate shines
- Everyday stain resistance: Most kitchen messes wipe up without drama.
- Budget power: You can refresh a kitchen or laundry room without refinancing your life.
- Looks for days: Modern laminates can mimic stone, wood, and concrete surprisingly well.
- DIY friendliness: Pre-cut lengths and standard depths make it approachable for careful beginners.
Where laminate needs respect
- Heat sensitivity: Hot pans can discolor or damage the surface. Trivets aren’t optional.
- Seams are the weak spot: Water that sneaks into joints can cause swelling or delamination over time.
- Deep damage is hard to hide: Big chips or burns usually don’t “buff out.”
The practical takeaway: laminate rewards people who are consistent, not precious. You don’t have to baby itjust avoid the handful of things that laminate hates with the passion of a cat hates a closed door.
Planning Your Numerär (or Similar) Install: Measure Like You Mean It
Pre-cut countertops are designed around standard kitchen geometry: base cabinets are typically about 24 inches deep, and the countertop depth usually adds a small overhang for comfort and spill protection. Numerär’s depth (about 25 5/8″) lands right in that “works with standard bases” sweet spot.
Simple measurement example
If your base cabinet box is ~24″ deep, a 25 5/8″ countertop gives you roughly a 1 5/8″ front overhang. That overhang helps keep drips off cabinet faces and gives your fingers a little clearance when you open doors and drawers.
Before you cut anything, confirm three things
- Walls aren’t straight: Old kitchens curve. Measure at multiple points along the run.
- Appliances need breathing room: Verify ranges, dishwashers, and fridge clearances.
- Seam placement matters: If you’re joining pieces, plan seams away from heavy water exposure when possible.
Cutting a Double-Sided Worktop: Keep It Clean, Keep It Calm
Cutting laminate is mostly about preventing chipping and protecting the core from moisture afterward. The good news: you do not need a cabinetmaker’s workshop. You need patience, the right blade, and the willingness to measure twice. The bad news: you do need patience. (Yes, again.)
Tools that make life easier
- Measuring tape, straightedge, and clamps
- Circular saw with a fine-tooth blade (for straight cuts)
- Jigsaw (for sink/cooktop cutouts)
- Painter’s tape or masking tape (for marking and chip control)
- Sandpaper or a file (for easing rough edges)
- Sealant for cut edges (especially near sinks and dishwashers)
Chipping prevention, in plain English
- Support the worktop: Sawhorses are your friend. Unsupported cuts lead to tear-out and regret.
- Use tape: Mark your cut line on tape to reduce surface chipping and improve visibility.
- Use a sharp, fine-tooth blade: A dull blade is basically a tiny angry beaver.
- Cut steadily: Too slow can chew the laminate; too fast can wander off-line.
For a double-sided top, be extra intentional about which face you’re protecting during cuts. Decide your “top face” early in the process and keep that finish as pristine as possible while you work. Even if the underside is hidden, avoid tearing it upbecause hidden damage can become moisture access later.
Sink and Cooktop Cutouts: Where Most DIY Installs Go Sideways
The sink area is the countertop’s stress test: water, cleaning chemicals, temperature changes, and daily impact all happen there. A clean cutout and sealed edges are what separate “this looks great” from “why is my countertop bubbling.”
A practical cutout workflow
- Dry fit: Place the countertop where it will live and mark alignment points.
- Trace the cutout carefully: Many people trace on tape for visibility and cleaner edges.
- Drill starter holes at inside corners: This helps the jigsaw turn without overcutting.
- Cut with a jigsaw: Work slowly and support the waste piece so it doesn’t tear out at the end.
- Seal every exposed core edge: Especially near sinks. Water is relentless and does not negotiate.
If you’re installing a dishwasher under a laminate top, add moisture protection underneath the countertop in that area. Steam and humidity can be a slow-motion problem that shows up months laterright when you’ve stopped thinking about the install.
Joining Countertop Pieces: Seams, Miter Bolts, and the “Keep Water Out” Rule
If your kitchen run is longer than one piece, you’ll likely join sections. This is where many installers use miter bolts to pull the joint tight from below, plus a bead of appropriate caulk or sealant at the seam. The goal is a snug join that doesn’t trap water.
Seam best practices
- Dry fit first: Confirm alignment before adding any adhesive or sealant.
- Don’t overtighten: Overzealous torque can crack the substrate or distort the seam.
- Seal smart: Keep water from wicking into the coreespecially near sinks and dishwashers.
- Clean squeeze-out immediately: Dried sealant on laminate is not “patina.” It’s just annoying.
Finishing the Edges: The Make-or-Break Detail
Numerär was commonly described as cut-to-length friendly and supplied with edging strips for finished sides. Edging matters because exposed core material is the #1 place water wants to move in and start causing swelling.
- Apply edging exactly as instructed: Some edging is iron-on; some uses contact adhesive; some is pre-glued.
- Trim carefully: A sharp blade and light passes beat one aggressive hack.
- Seal vulnerable areas: Especially anywhere near plumbing, seams, or appliance steam.
Cleaning and Care: Keep Laminate Looking New Without Scratching It
Laminate is famously low-maintenance, but it’s not “use every cleaning product in the garage and see what happens” low-maintenance. A few habits go a long way:
Daily care that actually works
- Wipe spills sooner rather than later: Especially around seams and cutouts.
- Use mild soap and water: Often all you need.
- Skip harsh abrasives: Scrub powders, scouring pads, and overly aggressive “magic” sponges can dull or scratch finishes.
- Avoid bleach unless the manufacturer says it’s safe: Some laminate finishes can discolor.
- Use cutting boards and trivets: This is the laminate tax. Pay it gladly.
Stain or scuff? Try this first
- Grease film: Warm water + a small amount of dish soap, then rinse and dry.
- Stubborn spots: A gentle, non-abrasive cleaner (test in a hidden spot first).
- Marker/ink: A mild household cleaner may work; avoid harsh solvents unless the manufacturer allows it.
The “big picture” rule: laminate looks best when you clean it with soft tools and a light touch. If you’re scrubbing like you’re trying to erase your browser history, you’re probably overdoing it.
Should You Choose Numerär (or a Similar Double-Sided Laminate) Today?
If you can still source Numerär in your area (or you’re matching an existing kitchen), the concept is strong: affordable, durable, easy-care, with a built-in option to change the look by flipping the face. That’s a great fit for:
- Budget kitchen refreshes where you want a clean upgrade without stone prices
- Rental-friendly updates (where durability and easy cleaning matter more than bragging rights)
- Basement bars, laundry rooms, and workshops where you want “tough and tidy”
- Style indecision (which is not a flaw, it’s a personality trait)
If your household is hard on surfaceslots of hot pans, lots of chopping directly on counters, lots of water sitting aroundconsider whether a different material (like quartz, solid surface, or properly sealed wood) fits your routine better. The best countertop is the one that works with how you actually live, not how you imagine you’ll live after you buy matching glass jars for everything.
Conclusion
The Numerär Countertop, Double-Sided earned its reputation by making laminate feel a little smarter: durable enough for daily use, approachable for DIY installs, and flexible in style thanks to that flip-and-choose design. Whether you’re tracking down Numerär specifically or using it as a blueprint for a modern laminate worktop, the winning formula stays the same: plan carefully, cut cleanly, seal exposed edges, protect seams, and treat heat like it’s a rumor laminate refuses to believe.
Real-World Experiences With Numerär-Style Double-Sided Countertops (500+ Words)
In the real world, double-sided countertops tend to attract a specific kind of person: the practical optimizer. Not the “I must have imported stone quarried under a full moon” crowdmore the “I want my kitchen to look good, clean easily, and not require a second job” crowd. And honestly? That’s most people.
One common experience is the decision delayin a good way. People often bring the worktop home thinking they’ll choose the brighter side, then do a dry layout in their kitchen and realize their lighting runs warm, their walls lean creamy, and suddenly the “bright white” option feels a bit too clinical. Flip it, and the darker or more textured side makes everything feel grounded. Double-sided turns what could be a stressful commitment into a calm, in-home comparison. It’s the countertop equivalent of trying on outfits under your own mirror instead of a dressing room spotlight designed by chaos.
Another very real experience: the sink cutout teaches humility. Plenty of DIYers do great on straight cuts and then get to the sink opening and realize corners are not theoreticalthey are physical, measurable, and totally capable of exposing the core if you drift off the line. The successful installs usually have the same pattern: people take time to tape the cut lines, drill starter holes, support the waste piece, and seal the exposed edges right away. The “I’ll seal it later” installs are the ones that tend to develop swelling or bubbling in the months that follow, often starting at the back edge where splashes live and nobody notices until they’re already emotionally attached.
Then there’s the seam reality check. In kitchens that need more than one piece, the seam becomes the star of the show whether you invited it or not. People who place seams away from the sink area (when possible), pull joints tight with the right hardware, and seal thoughtfully tend to report years of normal use without issues. People who rush seamsor place them exactly where water drips every dayoften learn the same lesson: laminate doesn’t fail loudly. It fails quietly, slowly, and expensively… like a car that never gets oil changes.
Maintenance experiences are usually positive, with one recurring “oops”: over-cleaning. Laminate owners sometimes assume they need intense disinfectants or abrasive tools to get a “deep clean.” In practice, gentle daily wipe-downs keep it looking sharp, while aggressive scrubbers can dull the surface over time. A lot of people also discover that “miracle” cleaning sponges can leave the finish looking slightly hazyespecially on darker laminate. The happiest long-term owners tend to be the ones who use simple cleaners, soft cloths, and quick spill response, especially around seams and the sink.
Finally, there’s the most relatable experience of all: the countertop becomes the project that restores confidence. For many homeowners, swapping counters feels like “real renovation,” but a pre-cut laminate worktop makes it approachable. People often describe the satisfaction of seeing the kitchen look updated in a weekend, the pride of getting a clean edge banding line, and the joy of having a surface that looks intentional instead of “temporary.” And if the style mood changes later? Well, double-sided means you can at least daydream about a flip which is more than most countertops ever offer.


