Table of Contents >> Show >> Hide
- Why Hang a Wheelbarrow on the Wall?
- What You’ll Need
- How to Hang a Wheelbarrow on the Wall: 11 Steps
- Step 1: Empty the Wheelbarrow Completely
- Step 2: Clean and Dry It Before Storage
- Step 3: Choose the Right Wall and Height
- Step 4: Measure the Wheelbarrow
- Step 5: Find and Mark the Wall Studs
- Step 6: Do a Dry Fit Against the Wall
- Step 7: Choose Hardware Rated for the Load
- Step 8: Drill Pilot Holes and Install the Hooks
- Step 9: Lift and Hang the Wheelbarrow Carefully
- Step 10: Test Stability Before Calling It Done
- Step 11: Keep the Setup Safe and Maintain It Seasonally
- Common Mistakes to Avoid
- Real-World Experiences and Lessons From Hanging a Wheelbarrow on the Wall
- Final Thoughts
Wheelbarrows are incredibly useful outside and hilariously inconvenient inside. The moment one rolls into your garage, it somehow claims the exact square footage needed for your feet, your mower, and your last bit of patience. The good news? A smart wheelbarrow wall storage setup can reclaim floor space, reduce clutter, and make your garage feel less like a tool avalanche waiting to happen.
If you’ve been searching for how to hang a wheelbarrow on the wall, you do not need a miracle, a custom metal rack, or the upper-body strength of a comic-book hero. You just need the right wall, the right hardware, and a method that respects gravity instead of arguing with it. In most garages, the safest approach is to mount the storage hardware into wall studs, use hooks or a track system rated for the load, and make sure the wheelbarrow is clean, dry, and stable before it goes up.
This guide walks you through the full process in 11 practical steps. Along the way, you’ll also pick up a few garage organization tricks, common mistakes to avoid, and real-world lessons that make this project smoother the first time around.
Why Hang a Wheelbarrow on the Wall?
A wall-mounted wheelbarrow rack is one of those small upgrades that makes a garage feel dramatically more organized. Instead of leaving a bulky tool in the middle of the room like it pays rent, you move it into vertical storage. That opens up valuable floor space for cars, bins, lawn equipment, and actual walking.
Wall storage also helps keep your wheelbarrow in better condition. When you store it neatly, it is less likely to collect puddles, get buried under random junk, or become the unofficial shelf for broken flowerpots, old extension cords, and that one mystery board nobody remembers buying.
What You’ll Need
Before you start, gather your tools and materials. A basic setup usually includes:
- Stud finder
- Tape measure
- Pencil or painter’s tape for marking
- Level
- Drill/driver
- Drill bits for pilot holes
- Heavy-duty utility hooks, ladder hooks, or a garage storage rail system
- Screws appropriate for the hook system and wall type
- Safety glasses and work gloves
- An extra pair of hands for lifting, if your wheelbarrow is large or awkward
If your garage wall is standard drywall over wood studs, this project is very DIY-friendly. If your wall is concrete, brick, plaster, or built with metal studs, you may need different anchors or hardware. In that case, follow the wall type and hardware manufacturer instructions closely.
How to Hang a Wheelbarrow on the Wall: 11 Steps
Step 1: Empty the Wheelbarrow Completely
This sounds obvious, but wheelbarrows are notorious for carrying surprise cargo. Dirt, gravel, wet leaves, hand tools, and one lonely glove with no future can all add unnecessary weight. Before you even think about hanging it, empty everything out.
A lighter wheelbarrow is easier to measure, easier to lift, and safer to mount. It also gives you a more accurate sense of the actual load your wall hardware needs to support.
Step 2: Clean and Dry It Before Storage
If your wheelbarrow has been hauling mulch, soil, compost, or concrete mix, give it a quick cleanup. Scrape out packed debris, wipe away moisture, and let the tub dry fully. This matters more than many people realize. Storing a dirty, damp wheelbarrow encourages rust, grime buildup, and that general “abandoned behind the shed” look.
If you want bonus points, wipe the metal parts with a light protective oil and check the wooden handles for rough spots or splinters. Your future self will appreciate this when spring arrives and the wheelbarrow is ready to work instead of auditioning for a junkyard scene.
Step 3: Choose the Right Wall and Height
Not every wall deserves the honor of holding your wheelbarrow. Pick a garage or shed wall with enough vertical clearance and enough open space around it for safe lifting and easy access. Avoid placing it where it blocks doors, walkways, electrical panels, or shelves you use constantly.
Think about how you want the wheelbarrow to sit. Some people prefer a fully suspended position; others like the lower wheel to lightly touch the floor for extra stability. Either method can work, but the key is making sure the handles, tub, and wheel do not create a tripping hazard or force you into an awkward lift every time you take it down.
As a rule, place the storage point high enough to free up floor space, but not so high that retrieving the wheelbarrow turns into an Olympic event. This is garage storage, not Cirque du Soleil.
Step 4: Measure the Wheelbarrow
Take a few quick measurements before you mark the wall. Measure the overall height, the width of the tub, and the points where the frame, bucket lip, or handles could safely rest on hooks. This helps you avoid installing hardware in the wrong spot and then discovering that your wheelbarrow is somehow too tall, too wide, or too weirdly shaped for your beautiful new setup.
This is also the moment to notice whether your wheelbarrow has a metal tray, plastic tray, single wheel, dual wheels, or a bulky support frame. The exact shape affects where the hooks should go and what type of heavy-duty utility hooks make the most sense.
Step 5: Find and Mark the Wall Studs
This is the most important part of the project. If you are hanging something as bulky and awkward as a wheelbarrow, mounting into studs is the smart move. Use a stud finder to locate the studs, then mark the edges and center. If needed, confirm spacing by checking for typical stud intervals.
No stud finder? You may still be able to locate studs by looking near outlets, switches, trim, or previous nail lines. Still, a stud finder makes life much easier, especially when you want a storage setup that does not come crashing down in the middle of the night and convince everyone the garage is haunted.
Step 6: Do a Dry Fit Against the Wall
Before drilling anything, test the wheelbarrow position against the wall. A simple trick is to set a board, like a scrap 1×4, on the floor as a temporary spacer and lean the wheelbarrow into the position you want. Then mark where the bucket lip or frame naturally lands.
This dry fit tells you where the hooks should actually go in the real world, not just where your measuring tape thinks they belong. It also helps you decide whether you need one main hook point, a pair of hooks, or a hook-and-stabilizer combination.
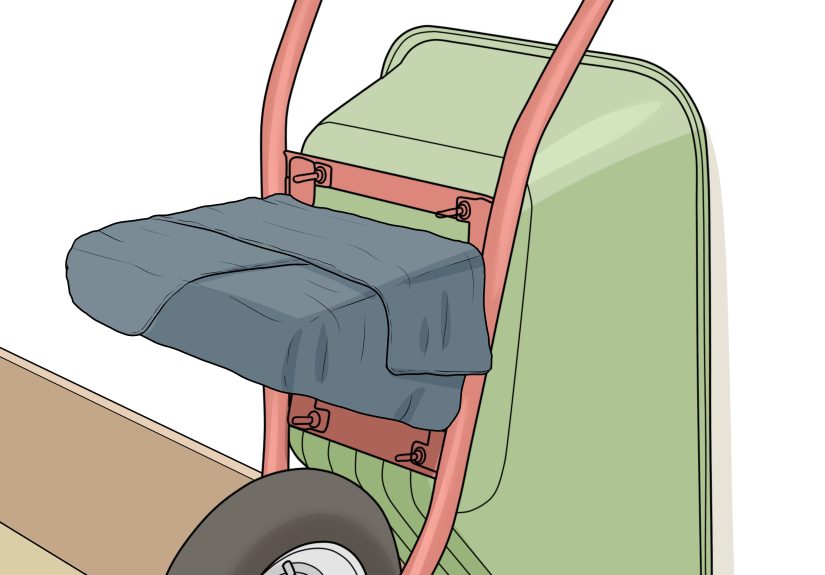
For many wheelbarrows, two heavy-duty wall hooks mounted into studs work well. For others, a garage storage rail or slatwall-compatible hook system offers more flexibility, especially if you may rearrange your storage later.
Step 7: Choose Hardware Rated for the Load
Now pick the actual hardware. You want hooks, brackets, or a rail system that is designed for larger garage items and rated for more than the load you expect. Do not assume a random decorative hook or light-duty drywall fastener is “probably fine.” That phrase has launched many avoidable disasters.
Look for:
- Heavy-duty steel construction
- Protective rubber or vinyl coating to reduce scratches
- Clear load ratings
- Stud-mount installation
- Enough depth and shape to hold the wheelbarrow securely
If you cannot hit studs exactly where you want the hooks, consider a track system or a mounting board fastened across multiple studs. For very heavy or awkward storage situations, a French cleat-style approach or a multi-point bracket system can spread weight more evenly across the wall.
Step 8: Drill Pilot Holes and Install the Hooks
Once your marks are final, drill pilot holes into the studs. Pilot holes help prevent splitting and make screw installation cleaner and more accurate. Then install the hooks, bracket board, or rail according to the manufacturer instructions.
Use a level while mounting so the hardware sits straight. A slightly crooked setup may not seem like a huge deal at first, but it can make the wheelbarrow lean oddly, sit unevenly, or shift in ways that make the whole arrangement less secure. Tighten all hardware firmly, but do not overtighten to the point of stripping the screws.
Step 9: Lift and Hang the Wheelbarrow Carefully
With the hardware in place, it is time for the actual hang. Lift the wheelbarrow slowly and guide the frame, tub lip, or designated contact points onto the hooks. If the wheelbarrow is large, oddly balanced, or just plain stubborn, grab a helper. There is no award for trying to solo-lift an awkward garden tool while twisting sideways in a garage corner.
As you place it, make sure the load is seated fully on the hooks and not just barely catching on an edge. If the wheelbarrow has shifting contact points, reposition it until it rests naturally and securely.
Step 10: Test Stability Before Calling It Done
Give the wheelbarrow a careful shake test. Not a dramatic wrestling match, just a firm stability check. You want to know whether the hooks hold the load without flexing, whether the wheelbarrow shifts, and whether anything rubs the wall in a damaging way.
If it feels wobbly, fix it now. Common solutions include moving the hooks wider apart, lowering the setup slightly, adding a secondary stabilizer, or using a strap to prevent sway. If the wall or hardware shows any signs of stress, take the wheelbarrow down and upgrade the mounting method. A secure system should feel boringly solid. Boring is excellent here.
Step 11: Keep the Setup Safe and Maintain It Seasonally
Once the wheelbarrow is mounted, make the system part of your regular garage wall storage routine. Check the screws occasionally, especially after heavy use or seasonal temperature changes. Wipe the wheelbarrow down before returning it to the wall, and inspect the hooks for wear, bending, or loose fasteners.
If you also store shovels, rakes, hoses, or ladders nearby, organize them so nothing snags the wheelbarrow during removal. A neat wall system is not just about saving space; it makes your tools easier to grab, easier to return, and less likely to turn the garage into an obstacle course.
Common Mistakes to Avoid
Even a simple wall-mounted wheelbarrow rack can go sideways if you rush it. Watch out for these common problems:
- Mounting only into drywall: Fine for lightweight decor, not ideal for an awkward, heavy garden tool.
- Skipping the dry fit: Measurements help, but a test position tells the truth.
- Using undersized hooks: Choose hardware built for bulky garage storage, not tiny household items.
- Ignoring wall type: Concrete, plaster, wood studs, and metal studs all need different hardware strategies.
- Storing it dirty and wet: Rust loves laziness.
- Mounting too high: If you need a ladder, a pep talk, and a prayer every time you take it down, rethink the height.
Real-World Experiences and Lessons From Hanging a Wheelbarrow on the Wall
In real garages, this project usually starts with annoyance. Someone gets tired of bumping into the wheelbarrow, tired of moving it to reach the mower, or tired of watching it slowly collect half the neighborhood’s dust. That frustration is often what makes wall storage feel so satisfying once it is done. A wheelbarrow is awkward by design. It is built to move loose material, not to sit politely in a corner. So the biggest lesson many DIYers learn is that this is less about “decorating” a garage wall and more about taming a large, clumsy tool with a system that makes sense.
One common experience is underestimating just how useful a simple dry fit can be. On paper, the hooks seem easy to place. In practice, the wheelbarrow may tilt differently than expected, the handles may sit wider than they looked, and the tray lip may not land where your first marks say it should. People often discover that two extra minutes of test positioning save them from drilling twice, patching holes, and pretending that was the plan all along.
Another lesson is that “heavy enough” hardware is not the same thing as “appropriate” hardware. Many first attempts fail because the hook shape is wrong, not just because the load rating is too low. A deep, rubber-coated utility hook can cradle a frame much better than a shallow generic hook. A rail or track system can also make a big difference in garages where stud placement and storage layout do not cooperate. Flexibility matters when the object you are hanging looks like a garden tool crossed with a shopping cart.
Height is another thing people learn by living with the setup. A wheelbarrow mounted too low still eats floor space. Mounted too high, it becomes a workout every time you need it. The sweet spot is usually the one that frees the floor while still allowing you to lift, hook, and remove the wheelbarrow without twisting your back. In other words, the best storage setup is not the one that looks most dramatic. It is the one you will actually use without muttering at it.
There is also the maintenance lesson. Once a wheelbarrow is off the floor and hanging neatly, people tend to take better care of it. They rinse it out more often. They dry it before storage. They notice loose bolts earlier. They stop using it as a temporary junk bowl for bricks, gloves, pruners, and mysterious bits of wire. A proper storage space changes behavior. The wheelbarrow stops being random clutter and starts being a tool with a home.
And finally, there is the surprisingly nice emotional payoff. A wall-mounted wheelbarrow does not sound glamorous, but it is one of those practical upgrades that instantly makes a garage feel more intentional. You gain floor space, reduce tripping hazards, and make the entire area easier to clean and navigate. The result is not just a tidier garage; it is a workspace that feels more usable. That is the real win. Not that your wheelbarrow is hanging on the wall like a museum exhibit, but that your garage suddenly works better for real life.
Final Thoughts
Learning how to hang a wheelbarrow on the wall is really about combining three simple ideas: store bulky tools vertically, mount hardware securely, and make the setup easy enough that you will actually use it. When you choose the right location, fasten into studs, and test the load carefully, a wheelbarrow can move from “garage nuisance” to “beautifully behaved yard equipment” in a single afternoon.
Take your time, use hardware meant for the job, and do not skip the test fit. Your garage will feel bigger, safer, and less chaotic. And your shins may finally know peace.


