Table of Contents >> Show >> Hide
- Why Make Homemade Garlic Powder?
- What You’ll Need
- Step 1: Choose Fresh, Firm Garlic
- Step 2: Separate and Peel the Cloves
- Step 3: Slice the Garlic Evenly
- Step 4: Arrange the Slices in a Single Layer
- Step 5: Dry Low and Slow
- Step 6: Cool the Garlic Completely
- Step 7: Grind into Powder
- Step 8: Store It the Right Way
- Common Mistakes to Avoid
- How to Use Homemade Garlic Powder
- Can You Make Garlic Salt Too?
- How Long Does Homemade Garlic Powder Last?
- Is a Dehydrator Better Than an Oven?
- Final Thoughts
- Kitchen Experiences and Real-Life Lessons From Making Garlic Powder
If your spice cabinet has ever stared back at you with one sad, half-empty bottle of garlic powder, this article is your sign to level up. Homemade garlic powder is bold, fragrant, and surprisingly easy to make. It also gives you bragging rights, which is the unofficial ninth step.
Making garlic powder at home is really just a three-part process: slice, dry, and grind. The trick is doing each part well so you end up with a powder that tastes rich and savory instead of stale, clumpy, or weirdly chewy. Yes, chewy garlic powder is a thing, and yes, we are here to avoid it.
In this guide, you’ll learn exactly how to make garlic powder in 8 simple steps, plus how to store it, how to keep it from clumping, and what mistakes to avoid. Whether you use a dehydrator or a low oven, the goal is the same: turn fresh garlic cloves into a shelf-stable seasoning that makes soups, rubs, marinades, roasted vegetables, and popcorn far more exciting.
Why Make Homemade Garlic Powder?
Store-bought garlic powder is convenient, but homemade garlic powder has a fresher aroma and a cleaner, punchier taste. It is also a smart way to preserve extra garlic before it sprouts or softens. If you bought a giant bag at the market because it was a “good deal,” this is how you turn that deal into kitchen glory instead of compost.
Another bonus is control. You decide how fine the powder should be, whether you want it ultra-smooth or slightly rustic, and how much to make at once. You also skip fillers, anti-caking agents, and mystery spice-cabinet age.
What You’ll Need
- Fresh garlic bulbs
- A sharp knife or mandoline
- A cutting board
- A food dehydrator or an oven that can hold a low temperature
- Parchment paper or tray liners if needed
- A spice grinder, coffee grinder, blender, or food processor
- An airtight glass jar or spice container
That’s it. No wizard robe required.
Step 1: Choose Fresh, Firm Garlic
The quality of your garlic powder starts with the garlic itself. Pick bulbs that feel firm and heavy, with dry papery skins and no soft spots. Avoid cloves that are bruised, shriveled, moldy, or already sprouting green shoots. If the garlic looks tired, your powder will taste tired too.
Fresh garlic has the strongest flavor and dries more evenly. Standard grocery store garlic works fine, but if you can get locally grown garlic, even better. Different varieties may taste slightly different, so this is one of those fun kitchen projects where “research” means making another batch later.
Step 2: Separate and Peel the Cloves
Break the bulb into individual cloves and peel off the papery skins. This part is mildly annoying, but it goes faster if you smash each clove gently with the side of a knife or soak the separated cloves in warm water for a few minutes to loosen the skins.
Trim off any hard root ends and inspect the cloves as you go. If one clove looks off, toss it. Homemade seasoning should be flavorful, not adventurous in the wrong way.
Step 3: Slice the Garlic Evenly
Uniform slices are the secret to even drying. Slice small cloves in half or cut larger cloves into thin, even pieces. Aim for consistency more than perfection. If some slices are thick and some are paper-thin, the little ones may over-dry while the thick ones stay damp in the middle.
A mandoline can speed this up, but a knife works just fine. Keep your fingers intact; garlic powder is not worth a dramatic trip to urgent care.
Thin slices dry faster and more consistently, which helps preserve flavor and reduces the chance of moisture lingering in the finished product.
Step 4: Arrange the Slices in a Single Layer
Lay the garlic slices in a single layer on your dehydrator trays or on a parchment-lined baking sheet if using the oven. Do not pile them up. Do not let them overlap. This is not a garlic cuddle puddle. Air needs to move around each slice so the moisture can escape.
If you are using a dehydrator, follow the manufacturer’s instructions for tray spacing and airflow. If you are using an oven, choose a low setting and make sure your oven can actually hold a gentle drying temperature rather than quietly roasting the garlic into sadness.
Step 5: Dry Low and Slow
Dry the garlic at a low temperature until the slices are fully crisp. This is the step where patience earns its keep. In a dehydrator, garlic commonly dries at around 140°F, though the total drying time can vary based on slice thickness, humidity, and your machine. In some home setups it may dry in just a few hours, while other batches can take longer.
If using an oven, keep the temperature as low as possible without cooking the garlic. Some ovens run too hot for true dehydration, so watch carefully. If the garlic starts browning, the temperature is too high. Browning means the flavor shifts from clean and savory to bitter and roasted, which is a different ingredient entirely.
You’ll know the garlic is ready when the pieces feel completely dry, brittle, and crisp. They should snap rather than bend. Any softness means there is still moisture inside, and moisture is the enemy of smooth, shelf-stable garlic powder.
One more practical note: drying garlic smells strong. Not “oh, that’s nice” strong. More like “the whole house knows what’s happening” strong. Good ventilation helps a lot.
Step 6: Cool the Garlic Completely
Once the garlic is dry, let it cool fully before grinding. This matters more than people think. Warm dried food can create condensation when sealed or ground, and condensation is a direct route to clumps, lost flavor, and shortened shelf life.
Spread the slices out and give them a little time to reach room temperature. If you rush this step, your future self may open the jar and discover a sad garlic pebble instead of a powder.
Step 7: Grind into Powder
Transfer the cooled garlic pieces to a spice grinder, coffee grinder, blender, or small food processor. Grind until you reach your preferred texture. For true garlic powder, keep going until it is very fine. For granulated garlic, stop earlier and leave it a bit coarser.
If the powder is uneven, sift it through a fine mesh strainer and grind the larger bits again. This extra step is worth it if you want a more polished, store-bought texture.
Be careful when you open the grinder lid. Garlic dust rises fast and hits hard. It is a tiny flavor cloud with big opinions.
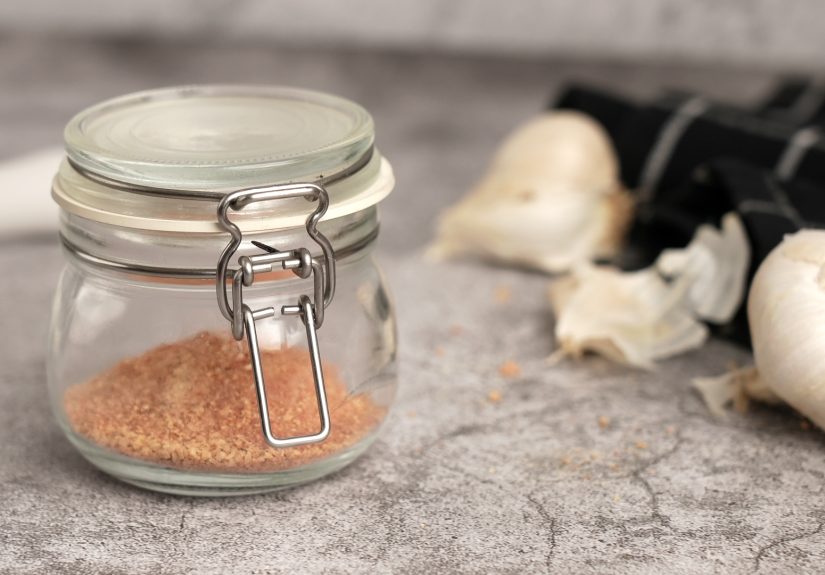
Step 8: Store It the Right Way
Spoon the finished garlic powder into a clean, dry, airtight container. Glass spice jars work beautifully. Store the jar in a cool, dark, dry place away from heat, light, and steam. A cabinet is good. Right next to the stove is not.
If you made a large batch, divide it into smaller jars. That way, the main supply stays sealed while you use a smaller everyday jar for cooking. Less air exposure means better flavor for longer.
If the powder ever looks damp, clumpy beyond normal settling, or develops an off smell, discard it. Properly dried and stored garlic powder should stay fragrant and free-flowing, not suspicious.
Common Mistakes to Avoid
Using garlic that is old or soft
Starting with poor-quality garlic gives you poor-quality powder. Home drying preserves what is already there; it does not perform miracles.
Slicing unevenly
Random slice sizes lead to uneven drying. Some pieces will turn into tiny flavor chips while others stay damp. Neither outcome is ideal.
Grinding before the garlic is fully dry
This is the fastest path to clumpy powder. If the slices do not snap cleanly, keep drying.
Skipping the cooling step
Residual heat can trap moisture in the container. Cool first, then grind, then store.
Storing near moisture or heat
Your spice jar does not want to live over a steaming pot of pasta water. Keep it somewhere dry and dark.
How to Use Homemade Garlic Powder
Now for the fun part. Homemade garlic powder is excellent in:
- Dry rubs for chicken, beef, pork, and seafood
- Soups, stews, and sauces
- Roasted potatoes and vegetables
- Salad dressings and marinades
- Homemade popcorn seasoning
- Garlic bread spread mixes
- Pasta, pizza, and egg dishes
Because homemade garlic powder can be more aromatic than some store brands, start with a smaller amount than you think you need, then taste and adjust. It is easier to add more than to explain why the dip tastes like a vampire deterrent.
Can You Make Garlic Salt Too?
Absolutely. Once you have garlic powder, you can make garlic salt by mixing it with salt. A common approach is four parts salt to one part garlic powder. Stir or pulse it very briefly if you want an even blend, but avoid overprocessing or the salt can become too fine and cake more easily.
That said, plain garlic powder is often more versatile because it lets you control the salt separately in recipes.
How Long Does Homemade Garlic Powder Last?
Homemade garlic powder is best when used while the flavor is still vibrant. In practical kitchen terms, that usually means using it within several months for peak punch, though properly dried seasonings can keep longer when stored well. The biggest factors are dryness, airtight packaging, and protection from heat, humidity, and light.
Label the jar with the date. You may think you’ll remember when you made it, but your future self has other plans.
Is a Dehydrator Better Than an Oven?
Usually, yes. A dehydrator is designed to move warm air efficiently at a controlled low temperature, which makes it more reliable for drying garlic without browning it. An oven can work, but only if it can stay low enough. Some ovens simply do not love subtlety.
If you plan to make garlic powder, onion powder, dried herbs, fruit chips, or jerky more than once in a blue moon, a dehydrator earns its counter space.
Final Thoughts
Learning how to make garlic powder is one of those kitchen skills that feels oddly impressive for how simple it is. With a few bulbs of garlic, a low drying temperature, and a grinder, you can make a seasoning that tastes fresher, smells stronger, and works in just about everything savory.
The biggest lessons are simple: start with good garlic, slice it evenly, dry it completely, and store it carefully. Do that, and you’ll have homemade garlic powder ready whenever dinner needs a little backup.
And honestly, dinner usually does.
Kitchen Experiences and Real-Life Lessons From Making Garlic Powder
The first time I made garlic powder, I treated it like a casual side quest. I thought I would peel a few cloves, dry them for a bit, buzz them in a grinder, and casually become the kind of person who says things like, “Oh, this? It’s my homemade garlic powder.” What actually happened was a full sensory event.
First, the peeling. It always starts innocent enough. One bulb becomes three. Three become seven because you suddenly decide it makes no sense to “go through all this effort” for a tiny batch. Before long, your cutting board looks like a garlic blizzard hit it. Your fingers smell like garlic, your counter smells like garlic, and somehow your soul smells like garlic too.
Then comes the drying stage, which teaches patience in a very specific way. Garlic does not care about your schedule. It dries when it dries. Some slices look done early and others act like they are on island time. This is when you learn the value of uniform slicing, because if your pieces are all different sizes, your batch becomes a little reality show called Who’s Actually Dry?
I also learned that the smell is no joke. Homemade garlic powder announces itself to the household with tremendous confidence. If you use a dehydrator in the kitchen, expect comments. Some people will say it smells amazing. Others will ask whether you are preparing enough pasta for an army. Both reactions are normal.
The grinding step is where things get dramatic again. The dried garlic goes into the grinder looking harmless, and then the lid comes off and suddenly there is a spicy garlic cloud headed straight for your face. It is deeply satisfying, but also humbling. I now open the grinder lid like I am disarming a tiny flavor bomb.
One of the best parts of making your own garlic powder is how customizable it is. Some batches come out super fine and fluffy, perfect for soups, sauces, and dressing mixes. Other times I leave it a little coarser for rubs and roasted vegetables. It feels a bit like making your own signature seasoning, except the signature is “I really, really like garlic.”
There is also something satisfying about using a homemade staple in everyday cooking. You sprinkle it into scrambled eggs, taco meat, marinades, garlic bread butter, or roasted potatoes, and suddenly your pantry feels more capable. It is a small project, but it has big “I have my life together” energy.
What surprised me most is that making garlic powder changes the way you notice freshness. Once you smell a batch you made yourself, the older jar in the back of the cabinet can seem a little flat by comparison. Not useless, just less lively. Homemade powder has a fuller aroma and a warmer, sharper character that makes simple food taste more complete.
If I had to give one real-life tip beyond the official steps, it would be this: make enough to be worth the effort, but not so much that it sits around forever. A moderate batch is the sweet spot. You get that wonderful fresh flavor, you actually use it up, and you can make more later without turning your kitchen into a permanent garlic processing plant.
So yes, homemade garlic powder takes a little time. But it is easy, practical, and strangely fun. It turns a basic ingredient into something that feels personal, useful, and just a little bit fancy. And when someone asks why your roasted potatoes taste so good, you get to shrug modestly and say, “Probably the garlic powder.”


