Table of Contents >> Show >> Hide
- What Makes a Dinner Roll “Classic”?
- Ingredients You’ll Need (and Why They Matter)
- Equipment (Keep It Simple)
- Classic Dinner Roll Recipe (Step-by-Step)
- Printable-Style Recipe
- Pro Tips for Fluffy Rolls (Because You Deserve Nice Things)
- Troubleshooting (Roll Rescue Hotline)
- Make-Ahead Options (Future You Will Send Thank-You Notes)
- Variations That Still Feel Classic
- Serving Ideas (Beyond “Put Them in a Basket”)
- Storage and Reheating
- Kitchen Experiences: The Real-Life Joy (and Drama) of Classic Dinner Rolls
There are a lot of things in life you can buy pre-made and feel perfectly fine about. Paper towels. Batteries. A tiny screwdriver you will lose within 48 minutes.
Dinner rolls? Not on my watch. A truly classic dinner roll recipe is one of those small kitchen flexes that makes the whole table feel like it’s winning.
Soft, fluffy, lightly sweet, and shiny with butterthese rolls are basically edible applause.
This guide walks you through a reliable batch of homemade dinner rolls with the kind of cozy texture people associate with holidays, Sunday suppers,
and “who brought these?” moments. You’ll get the how, the why, the troubleshooting, and the make-ahead tricksbecause dinner rolls should be comforting, not stressful.
What Makes a Dinner Roll “Classic”?
A classic roll is an enriched yeast dough. “Enriched” just means we add a few ingredientsmilk, butter, and eggthat make the crumb softer,
the flavor richer, and the vibes more “warm basket at a steakhouse.” The result is a soft dinner roll that pulls apart easily and doesn’t taste like
a bland sponge that’s auditioning to be a kitchen scrubber.
Ingredients You’ll Need (and Why They Matter)
Flour
All-purpose flour keeps these rolls tender and approachable. Bread flour can work too, but it may give you a slightly chewier roll. “Classic” leans soft, not athletic.
Yeast
Active dry yeast or instant yeast both work. If you’re not sure your yeast is alive, proof it in warm milk with a little sugar and watch for foamlike a tiny bread science fair.
Milk
Warm milk adds richness and softness. Aim for warm, not hotthink “nice bath,” not “lava.”
Butter
Butter brings flavor and tenderness. Also: butter on top is the roll equivalent of a good haircuteverything looks better.
Egg
Egg adds structure and a plush crumb. Optional egg wash on top gives a glossy, bakery-style finish.
Sugar
A little sugar feeds the yeast and adds that subtle classic sweetness. This is not dessertjust a gentle nudge toward happiness.
Salt
Salt is non-negotiable for flavor. Without it, bread tastes like regret.
Equipment (Keep It Simple)
- Large mixing bowl (or stand mixer with dough hook)
- Measuring cups/spoons or a kitchen scale (recommended)
- 9×13-inch baking pan (or two 9-inch round pans)
- Clean kitchen towel or plastic wrap
- Instant-read thermometer (optional, but very helpful)
Classic Dinner Roll Recipe (Step-by-Step)
Step 1: Warm the milk and wake up the yeast
Warm the milk to about 100–110°Fwarm enough to encourage yeast, not so hot it sends it to an early retirement. Stir in the sugar, then sprinkle the yeast over the top.
Let it sit 5–10 minutes until foamy. No foam? Your yeast might be inactive, or the milk might’ve been too hot/cold.
Step 2: Mix the dough
Add the melted (but not scorching) butter, egg, and salt to the yeast mixture. Stir in flour gradually until you get a soft dough that’s slightly tacky but manageable.
If it’s sticking to everything like it’s paying rent, add a tablespoon of flour at a timeslowly. Dough is a relationship: add flour too fast and it gets dry and distant.
Step 3: Knead until smooth and stretchy
Knead by hand 8–10 minutes or in a mixer 6–8 minutes, until the dough is smooth, elastic, and springs back when poked.
If you can stretch a small piece thin enough to see light through it (the “windowpane” test), you’re in business.
Step 4: First rise (aka: dough’s nap time)
Place dough in a lightly greased bowl, cover, and let rise in a warm spot until doubledabout 60–90 minutes.
Your kitchen temperature matters. If it’s chilly, rise time stretches.
Step 5: Shape the rolls like a pro (or at least like a confident amateur)
Punch down the dough (gentlythis is not a grudge match). Divide into 15–16 equal pieces.
Shape each into a smooth ball by tucking edges underneath and rolling lightly against the counter.
Arrange in a greased 9×13 pan for pull-apart rolls.
Step 6: Second rise
Cover and let the rolls rise until puffy and nearly doubled, about 30–45 minutes. They should look like they’re ready to cuddle.
Step 7: Bake
Preheat oven to 375°F. If you want that glossy bakery look, brush with egg wash (1 egg beaten with 1 tablespoon water or milk).
Bake 15–20 minutes until golden brown. If you’re using a thermometer, aim for about 190°F in the center of a roll.
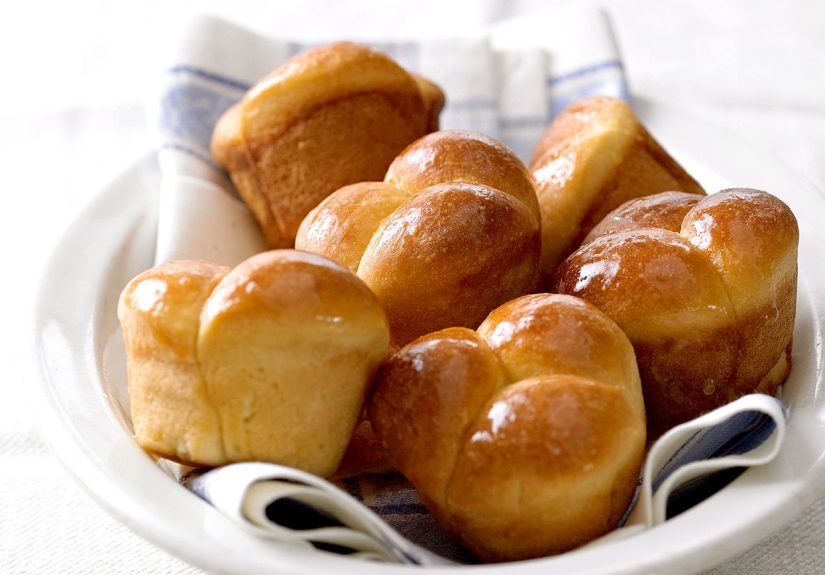
Step 8: Butter finish
Brush warm rolls with melted butter. This is not optional. This is the law of deliciousness.
Printable-Style Recipe
Ingredients (Makes 15–16 rolls)
- 1 cup whole milk (warm, about 100–110°F)
- 2 1/4 teaspoons yeast (1 packet active dry or instant)
- 3 tablespoons granulated sugar
- 1 large egg (room temp is nice, but not mandatory)
- 4 tablespoons unsalted butter, melted and cooled slightly (plus more for brushing)
- 1 teaspoon fine salt
- 3 1/2 to 4 cups all-purpose flour (start with 3 1/2; add as needed)
- Optional: egg wash for shiny tops
Instructions
- Combine warm milk + sugar, sprinkle yeast on top, rest 5–10 minutes until foamy.
- Stir in egg, melted butter, and salt.
- Add 3 1/2 cups flour. Mix until a soft dough forms; add more flour 1 tbsp at a time if needed.
- Knead until smooth and elastic (8–10 minutes by hand or 6–8 minutes mixer).
- Rise covered in greased bowl until doubled (60–90 minutes).
- Divide into 15–16 pieces, shape into balls, place in greased 9×13 pan.
- Rise again until puffy (30–45 minutes). Preheat oven to 375°F.
- Optional: brush with egg wash. Bake 15–20 minutes until golden (about 190°F inside).
- Brush with melted butter. Serve warm and accept compliments with humility (or not).
Pro Tips for Fluffy Rolls (Because You Deserve Nice Things)
1) Don’t drown the dough in flour
A slightly tacky dough bakes up softer. Too much flour is the #1 reason rolls turn dense. Add flour slowly and stop as soon as the dough is workable.
2) Watch the dough, not the clock
Rise times depend on temperature. “Doubled” and “puffy” are better cues than “exactly 60 minutes.”
3) Make a cozy proofing spot
If your kitchen is cold, create gentle warmth: an oven that’s turned off with the light on, or a warm spot away from drafts.
Some bakers use a pre-warmed cast iron skillet in the oven to help stabilize proofing temperatureespecially useful in cooler homes.
4) Don’t overproof
If the rolls rise too long, they can collapse or bake up dry. The dough should feel airy and spring back slowly when pressed.
Troubleshooting (Roll Rescue Hotline)
My rolls are dense
- Too much flour: next time keep the dough softer.
- Not enough kneading: gluten needs development to trap gas.
- Underproofed: give the dough more time to rise in a warm spot.
My dough didn’t rise
- Yeast may be inactive (expired or killed by hot liquid).
- Room too coldmove to a warmer proofing spot.
- Salt was added directly onto yeast before mixing (salt can inhibit yeast).
My rolls browned too fast
- Oven may run hotuse an oven thermometer if possible.
- Cover loosely with foil for the last few minutes if tops darken early.
Make-Ahead Options (Future You Will Send Thank-You Notes)
Option A: Refrigerate shaped rolls overnight
Shape the rolls, place in the baking pan, cover well, and refrigerate 8–24 hours. The next day, let them sit at room temperature until puffy (timing varies),
then bake. This is great for holiday dinners when oven space and sanity are limited.
Option B: Freeze unbaked rolls
Shape rolls, freeze on a sheet until firm, then transfer to a freezer bag. To bake, place in a greased pan, cover, and let thaw and rise until puffy
(it can take several hours), then bake as directed.
Option C: Par-bake and finish later
Bake rolls most of the way, cool, then freeze. Reheat in the oven to finish and serve warm with butter. It’s the “brown-and-serve” strategy, but homemade.
Variations That Still Feel Classic
- Honey-butter rolls: swap 1 tablespoon sugar for honey; brush baked rolls with honey-butter.
- Garlic-herb rolls: add 1 teaspoon garlic powder and chopped herbs; brush with garlic butter after baking.
- Buttermilk rolls: replace milk with buttermilk for a gentle tang and tender crumb.
Serving Ideas (Beyond “Put Them in a Basket”)
- Slide one open and add turkey + gravy for a mini sandwich situation.
- Use leftover rolls for breakfast sliders (egg + cheese + whatever makes mornings tolerable).
- Turn day-old rolls into croutons or a savory bread pudding.
Storage and Reheating
Store cooled rolls in an airtight container at room temperature for up to 2 days. For longer storage, freeze.
To reheat: wrap in foil and warm at 350°F for about 5–7 minutes, or microwave briefly. Brush with a tiny bit of butter if you want them to taste freshly baked.
Kitchen Experiences: The Real-Life Joy (and Drama) of Classic Dinner Rolls
If you’ve ever made yeast rolls at home, you already know the emotional arc: optimism, mild doubt, intense staring, sudden pride.
There’s something uniquely satisfying about taking a bowl of soft dough and watching it grow like it has a secret mission.
And thenwhen you pull a pan of fluffy dinner rolls from the ovenyour kitchen smells like a memory you didn’t know you had.
In a typical home kitchen, the first “experience” people report is how much proofing depends on your space. On a warm day, dough can double faster than you expected.
On a cold day, it may sit there looking unimpressed. That’s not failurethat’s fermentation being honest. Many bakers end up creating a “roll spa”:
a warm corner, a turned-off oven with the light on, or a cozy spot near (not on) the stove. The moment you stop treating rise time like a stopwatch
and start treating it like a living process, rolls get easierand way less dramatic.
Then there’s shaping: the part that seems intimidating until you realize perfection is optional and butter exists.
The first time you divide dough into equal pieces, you might feel like a contestant on a baking show with imaginary judges.
But here’s what happens in real life: even if one roll is slightly larger, everyone still eats it. (Sometimes first.)
Over time, you start noticing small winslike how tucking the dough underneath creates a smoother top, or how placing rolls closer together in the pan
makes them bake into pull-apart clouds with soft sides. Those little details are the difference between “nice bread” and “where did you buy these?”
Another classic dinner-roll moment is the “is it done?” debate. You see golden tops, but you want soft centers.
This is where an instant-read thermometer can feel like a cheat code: around 190°F in the center is a strong indicator the rolls are baked through.
Without one, you’ll learn to read signstops browned, edges pulling slightly from the pan, and a roll that sounds faintly hollow when tapped.
(Not a full drum solojust a gentle thump of confidence.)
And let’s talk about the butter brushbecause this is the part that turns a solid roll into a legendary one.
The first brush right out of the oven soaks into the crust and keeps it tender. The second brush (yes, some people do two) is pure joy.
This is the moment when the rolls go from “freshly baked” to “someone in this house is about to be asked to bring bread to every gathering forever.”
Finally, there’s the social experience of dinner rolls: they disappear. Quietly. Efficiently.
You set the basket down andsomehowhalf are gone before the main dish is plated. That’s not because people are rude.
It’s because warm rolls create a brief, universal agreement: everything else can wait.
And when you make them yourself, you’re not just serving breadyou’re creating that little pause at the table where everyone gets happier at the same time.
Which, honestly, is a pretty great reason to keep a classic dinner roll recipe in your back pocket.


