Table of Contents >> Show >> Hide
- Why a DIY Fireplace Makeover Is Worth It
- Start With Safety Before Style
- 1. Paint a Brick Fireplace for Instant Drama
- 2. Limewash Brick for a Soft, Old-World Finish
- 3. Retile the Fireplace Surround
- 4. Add a Chunky Wood Mantel
- 5. Create a Fireplace Feature Wall
- 6. Refresh the Hearth
- 7. Build Shelving Around the Fireplace
- 8. Use Stone Veneer for Texture
- 9. Update Fireplace Doors and Screens
- 10. Style the Mantel Like a Designer
- Budget-Friendly DIY Fireplace Makeover Plan
- Common DIY Fireplace Makeover Mistakes to Avoid
- Real-World Experience: What Actually Makes a DIY Fireplace Makeover Feel Expensive
- Conclusion
Note: This article synthesizes practical fireplace design ideas, DIY remodeling guidance, and U.S. fire-safety best practices from reputable home improvement, decorating, building supply, and fire-safety resources.
A fireplace has a funny way of acting like the main character in a room. When it looks good, the whole space feels cozy, polished, and expensive. When it looks bad, it quietly screams “1987 basement rec room” every time someone walks past it. The good news? You do not always need a sledgehammer, a contractor, or a bank account with superhero powers to give your hearth a glow-up.
DIY fireplace makeovers can range from a weekend paint refresh to a dramatic tile surround, a chunky wood mantel, built-in shelves, limewashed brick, or a full floor-to-ceiling feature wall. The trick is choosing the right update for your fireplace type, your skill level, and your safety needs. A fireplace is not just decor; it is a working heat source, which means “cute” must shake hands with “code-compliant.”
Below, you will find stylish, realistic, and genuinely impressive fireplace makeover ideas that can transform a tired hearth into the focal point your living room has been begging for. No design degree required. A tape measure, patience, and a healthy respect for heat will do nicely.
Why a DIY Fireplace Makeover Is Worth It
A fireplace makeover delivers one of the biggest visual payoffs in a living room, family room, bedroom, or den. Unlike changing throw pillows or swapping a lamp, updating the fireplace changes the architecture of the space. It gives the room a clear anchor, improves the backdrop for furniture, and often makes the home feel more custom.
Even better, many DIY fireplace updates are budget-friendly. Paint, limewash, peel-and-stick products for non-working or low-heat areas, mantel wraps, trim, tile, and strategic styling can make a fireplace look brand-new without removing the entire surround. For homeowners who want a modern fireplace makeover without major demolition, that is excellent news.
Start With Safety Before Style
Before you fall in love with black tile, creamy limewash, or a rustic reclaimed mantel, take a close look at the fireplace itself. If it is wood-burning, the chimney and flue should be inspected regularly, and any buildup, cracks, or ventilation issues should be handled before cosmetic work begins. Creosote, damaged mortar, loose brick, and poor airflow are not charming vintage features; they are problems.
For gas fireplaces, check the manufacturer’s manual before painting, tiling, or covering any surround. Gas units often have required clearances around vents, glass fronts, and louvers. Electric fireplaces also have clearance rules, especially around heat outlets. In short: do not block vents, do not cover access panels, and do not assume every material near a fireplace is safe because it looks pretty on social media.
Fireplace Makeover Safety Checklist
- Confirm whether your fireplace is wood-burning, gas, electric, or decorative only.
- Inspect brick, stone, tile, mortar, and the hearth for loose or damaged areas.
- Use heat-resistant materials where heat exposure is possible.
- Keep combustible materials away from the firebox according to local code and manufacturer instructions.
- Never paint inside an active firebox with standard wall paint.
- Install and maintain smoke and carbon monoxide detectors in the home.
1. Paint a Brick Fireplace for Instant Drama
Painting brick is one of the most popular DIY fireplace makeover ideas because it can completely change the room in a single weekend. Red or orange brick can feel heavy, especially in rooms with low ceilings or limited natural light. A coat of white, cream, soft gray, charcoal, or even deep green can make the fireplace feel intentional instead of inherited.
Preparation matters more than the paint color. Brick is porous and often dusty, so clean it thoroughly with a stiff brush and a suitable cleaner. Remove soot, vacuum the joints, repair crumbling mortar, and let everything dry completely. Then use a masonry primer before applying paint. Skipping primer is how a “quick refresh” becomes a peeling, patchy reminder of impatience.
For a bright farmhouse look, white painted brick still works beautifully. For a modern fireplace makeover, matte black or charcoal can create a sleek, gallery-like effect. If you want warmth without darkness, try mushroom, greige, clay, or soft taupe. These colors tone down aggressive brick while keeping the room cozy.
2. Limewash Brick for a Soft, Old-World Finish
If painting brick feels too permanent, limewash may be your new best friend. Limewash gives brick a breathable, chalky, slightly weathered finish that looks relaxed rather than painted-on. It is especially effective for fireplaces where you want to soften the color but still see texture and variation.
Unlike standard paint, limewash can be partially wiped back during application, allowing some original brick color to peek through. That makes it ideal for homeowners who want a European cottage, modern rustic, or historic look. It also helps avoid the “flat white rectangle” effect that sometimes happens when brick is painted too heavily.
Use limewash on masonry surfaces only, follow product directions carefully, and test a small area first. The magic of limewash is its imperfection. If you are the kind of person who needs every brushstroke to behave like a spreadsheet, take a deep breath. This finish is supposed to look lived-in.
3. Retile the Fireplace Surround
Tile can turn a basic fireplace surround into a showpiece. Whether you choose handmade zellige-style tile, marble-look porcelain, geometric cement-look tile, slate, ceramic subway tile, or large-format stone-look panels, the right tile can make your fireplace look custom and expensive.
For a beginner-friendly project, keep the tile area simple: just the surround or hearth. More advanced DIYers may carry tile from the hearth to the ceiling for a dramatic feature wall. This works especially well in rooms with vaulted ceilings, minimalist furniture, or an open-concept layout where the fireplace needs visual weight.
Use materials appropriate for fireplace surrounds and follow mortar, backer board, and grout recommendations. Tile over existing tile or brick only if the current surface is secure, clean, flat enough, and structurally sound. Loose tile underneath new tile is like wearing fancy shoes over roller skates: technically possible, but disaster is waiting.
Fireplace Tile Ideas That Always Look Sharp
- Black-and-white geometric tile: Great for modern, transitional, and vintage-inspired rooms.
- Marble-look porcelain: Elegant without the maintenance and cost of real marble.
- Handmade-look ceramic tile: Adds texture, movement, and character.
- Slate or stone-look tile: Ideal for rustic, lodge, and organic modern spaces.
- Vertical stacked subway tile: A fresh twist on a classic format.
4. Add a Chunky Wood Mantel
A mantel can change the entire personality of a fireplace. Without one, the firebox may look unfinished or lonely. With the right mantel, the fireplace instantly gains structure, warmth, and styling potential. A chunky floating mantel is especially popular because it works with rustic, farmhouse, transitional, and modern designs.
You can build a hollow box mantel from wood boards, stain it to look like a solid beam, and mount it securely according to the fireplace type and wall structure. For a cleaner look, use mitered corners and wood veneer to hide seams. For a rustic look, embrace knots, grain, and imperfect texture.
Always check clearance requirements before installing a wood mantel. Wood is combustible, and a mantel placed too close to the firebox can be unsafe. When in doubt, consult local code, the appliance manual, or a qualified fireplace professional.
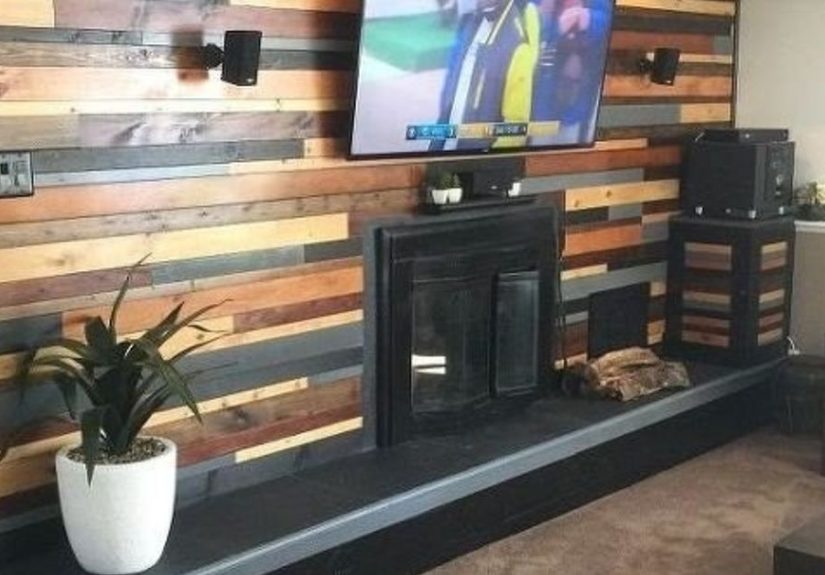
5. Create a Fireplace Feature Wall
If your fireplace looks small or disconnected from the room, turn it into a full feature wall. This can be done with shiplap, vertical paneling, board and batten, picture-frame molding, tile, stone veneer, or painted drywall. The goal is to visually connect the firebox, mantel, and wall above into one cohesive design.
Vertical paneling can make ceilings look taller. Board and batten adds architectural detail. Shiplap gives casual texture, especially when paired with a simple mantel and neutral paint. For a more elevated look, paint the entire feature wall, trim, and mantel the same color. This creates a built-in effect without the built-in price tag.
Be careful with wood paneling around active fireplaces. Use noncombustible materials in required clearance zones and keep combustible trim far enough from heat sources. A feature wall should impress guests, not make the smoke detector audition for opera.
6. Refresh the Hearth
The hearth is easy to overlook, but it has a huge impact on the finished look. A dated hearth can make even a freshly painted fireplace feel unfinished. Depending on your existing surface, you may be able to paint tile, install new tile, add a stone slab, or rebuild the hearth face.
For a modern fireplace makeover, consider a low-profile hearth in dark stone, concrete-look tile, or large-format porcelain. For traditional homes, a slightly raised hearth with classic tile or natural stone can feel timeless. If the fireplace is purely decorative, you have more flexibility. If it is active, use noncombustible materials and maintain proper dimensions.
7. Build Shelving Around the Fireplace
Built-ins make a fireplace look intentional, especially when it sits on a large blank wall. You can create the look of custom built-ins using stock bookcases, base cabinets, floating shelves, or DIY frames. Once painted to match the wall or trim, even budget-friendly components can look surprisingly high-end.
Balance is key. If your fireplace is centered, symmetrical shelves on both sides create a classic look. If your fireplace is off-center, asymmetrical shelving can make the layout feel designed rather than awkward. Add closed storage at the bottom for board games, blankets, and the mysterious collection of remote controls every household seems to grow.
8. Use Stone Veneer for Texture
Stone veneer can make a plain fireplace feel substantial and architectural. It works especially well in cabins, modern rustic homes, mountain-inspired interiors, and family rooms that need texture. Manufactured stone veneer is lighter than full-depth stone and is often more DIY-friendly, though installation still requires careful prep.
Choose stone color based on your room’s undertones. Cool gray stone pairs well with black, white, and blue accents. Warm beige or cream stone works beautifully with wood floors, leather furniture, and natural textiles. Avoid choosing stone from a tiny sample alone; large areas can look much busier once installed.
9. Update Fireplace Doors and Screens
Sometimes the fireplace surround is not the problem. Sometimes the brass doors are. Swapping outdated fireplace doors or adding a modern screen can instantly refresh the hearth. Matte black, antique bronze, and simple glass-and-metal designs tend to look more current than shiny yellow brass.
If you have a gas fireplace, do not replace doors or fronts unless the new product is approved for your specific unit. Gas fireplaces are engineered systems, and random decorative parts can interfere with airflow, heat management, or safety features. For wood-burning fireplaces, measure carefully and choose a screen or door set designed for your opening size.
10. Style the Mantel Like a Designer
After the paint dries and the tile is grouted, styling brings the makeover home. A mantel should feel layered but not cluttered. Start with one large anchor piece, such as a mirror, framed artwork, or sculptural wall decor. Then add objects of varying heights: candlesticks, vases, small plants, books, or pottery.
Use odd numbers, repeat materials, and leave breathing room. A mantel packed edge to edge with tiny objects can look more like a gift shop shelf than a design moment. If you have a TV above the fireplace, keep mantel decor low and simple. The goal is visual balance, not a competition between the remote and a eucalyptus branch.
Budget-Friendly DIY Fireplace Makeover Plan
If you want an impressive update without a major renovation, use this practical weekend plan:
Day 1: Clean, Repair, and Prime
Remove decor, clean the brick or tile, vacuum dust, scrub soot, patch gaps, tape edges, and apply primer if painting. If you are adding tile, spend this day checking layout, cutting pieces, and preparing the surface.
Day 2: Paint, Tile, or Install Trim
Apply paint or limewash, install tile, attach trim, or build the mantel. Work slowly and let products cure as directed. Rushing drying times is the DIY version of taking cookies out of the oven early: disappointing and avoidable.
Day 3: Finish and Style
Grout tile, caulk edges, touch up paint, install the mantel, clean the hearth, and style the finished fireplace. Take before-and-after photos, because you deserve proof that your living room just leveled up.
Common DIY Fireplace Makeover Mistakes to Avoid
The biggest mistake is treating a working fireplace like a regular wall. Heat, airflow, clearance, and access panels matter. Do not cover vents, use flammable materials too close to the firebox, or paint surfaces with products that cannot handle heat.
Another mistake is choosing finishes without considering the rest of the room. A bold patterned tile may be gorgeous, but if your rug, curtains, and furniture are already busy, the fireplace can become visual chaos. On the other hand, a plain white fireplace in an all-white room may need texture to avoid looking flat.
Finally, do not underestimate prep work. Most failed DIY fireplace makeovers are not caused by bad ideas; they are caused by dirty brick, loose tile, skipped primer, rushed grout, poor measurements, or using the wrong adhesive. Measure twice, shop once, and read the label like your weekend depends on itbecause it does.
Real-World Experience: What Actually Makes a DIY Fireplace Makeover Feel Expensive
After seeing many fireplace updates succeed or stumble, one lesson becomes obvious: the most impressive makeovers are not always the most expensive. They are the ones that look planned. A painted brick fireplace with a properly scaled mantel, clean hearth, and thoughtful styling can look better than a pricey tile job that clashes with the flooring. Design confidence comes from editing, not from buying every trendy material in aisle seven.
The first practical experience to remember is that color changes everything. A dark brick fireplace can make a room feel smaller, especially if the brick has strong red or orange tones. Soft white, warm gray, or limewash can brighten the space almost instantly. However, dark colors can be equally impressive when used intentionally. A black fireplace surround in a room with light walls, warm wood, and simple furniture can feel bold and sophisticated. The difference is contrast. If everything in the room is dark, a black fireplace may disappear. If the room has balance, it becomes a statement.
The second experience is that scale matters more than most beginners expect. A skinny mantel on a massive brick wall can look timid. A huge rustic beam over a small firebox can look top-heavy. Before building or buying anything, tape the shape on the wall with painter’s tape. Step back. Sit on the sofa. Look from the doorway. If the proportions feel odd in tape, they will not magically become perfect in wood.
The third experience is that texture saves neutral designs from boredom. If your palette is white, cream, beige, or gray, add interest through handmade-look tile, visible brick texture, natural wood grain, stone, woven baskets, or layered mantel decor. Neutral does not have to mean plain. It simply means the details have to work a little harder.
The fourth experience is to avoid copying a fireplace makeover without adapting it to your home. A floor-to-ceiling tile fireplace may look stunning in a room with tall ceilings, but it can overwhelm a compact living room. Shiplap may look charming in a farmhouse-style house, but it may feel forced in a sleek midcentury space. The best DIY fireplace makeover respects the bones of the home.
The fifth experience is that finishing touches are not optional. Caulk lines, clean grout, straight trim, filled nail holes, and smooth paint edges are what separate “weekend warrior victory” from “we tried.” Do not stop when the big pieces are installed. The last 10 percent of the project is what people notice first.
Finally, remember that safety is part of beauty. A fireplace that looks amazing but uses the wrong materials near heat is not a successful makeover. Choose finishes that fit the fireplace type, keep clearances in mind, and bring in a professional when the project moves beyond cosmetic updates. The goal is a fireplace that impresses guests, photographs beautifully, and lets you enjoy a cozy evening without wondering whether that mantel is getting a little too spicy.
Conclusion
A DIY fireplace makeover can completely change the mood of your home. Whether you paint tired brick, add stylish tile, build a chunky mantel, create a dramatic feature wall, refresh the hearth, or simply upgrade the screen and decor, the fireplace can become the star of the room again. The best projects combine style, proportion, preparation, and safety. In other words, make it beautifulbut make it smart.
You do not need a luxury renovation budget to create a fireplace that looks custom. Start with what you have, choose one strong design direction, use the right materials, and take your time with the details. Soon, that forgotten fireplace can become the place where everyone wants to gatherand yes, where you casually say, “Oh, that? I did it myself.”


