Table of Contents >> Show >> Hide
- What Is BootQT?
- Why Use BootQT Instead of the Terminal?
- BootQT Features at a Glance
- Before You Create a Bootable Drive
- How to Install BootQT on Linux
- How to Create a Bootable USB Drive with BootQT
- BootQT vs. Other Linux Bootable USB Tools
- Safety Tips When Writing Bootable Drives
- Common Problems and Quick Fixes
- Who Should Use BootQT?
- Practical Example: Making an Ubuntu USB with BootQT
- Hands-On Experience: What Creating Bootable Drives with BootQT Feels Like
- Conclusion
Creating a bootable USB drive on Linux should not feel like defusing a movie bomb while someone yells, “Cut the red wire!” Yet for many users, that is exactly what happens the first time they meet tools like dd, device names such as /dev/sdb, and warnings that one wrong move can wipe the wrong disk. BootQT, also written as Bootqt by its developer, exists for a much friendlier reason: it gives Linux users a simple graphical way to write ISO and IMG files to a USB drive without memorizing command-line spells.
This guide explains how BootQT works, why it is useful, how to install it, and how to safely create bootable drives on Linux. Whether you want to test Ubuntu, install Fedora, rescue a broken system, or keep a “just in case” USB in your laptop bag, BootQT can make the process feel less like a risky sysadmin ritual and more like a normal desktop task.
What Is BootQT?
BootQT is a lightweight Linux application designed to create bootable USB drives from image files such as ISO and IMG. It is written in Python and uses Qt technologies, which makes it a natural fit for Linux desktopsespecially KDE Plasma, where Qt-based apps often feel right at home. Under the hood, BootQT uses the classic Linux imaging approach: it writes the selected image directly to the target drive, similar to what the dd command does.
The big difference is that BootQT wraps that process in a straightforward graphical interface. Instead of manually listing disks, copying device paths, and typing a command that could ruin your afternoon if you choose the wrong destination, you select a USB drive from a menu, choose an image file, and click a button. That is not just convenient; it is also less intimidating for new Linux users.
Why Use BootQT Instead of the Terminal?
Linux veterans often recommend dd because it is powerful, universal, and available on nearly every distribution. They are not wrong. The problem is that dd is famously unforgiving. If you accidentally write an ISO to your internal drive instead of your USB stick, Linux will not pause to ask if you are having a bad day. It will simply do what you told it to do.
BootQT is useful because it gives you a cleaner, more beginner-friendly workflow. It does not try to be a giant Swiss Army knife. It focuses on one job: writing bootable images to removable drives. That makes it a good choice when you want a fast, simple Linux USB creator without extra menus, operating-system downloaders, or advanced partition options.
BootQT Is Best For
- Creating Linux installation USB drives from ISO files
- Writing IMG files to USB drives or removable media
- Testing Linux distributions without burning DVDs like it is 2007
- Making recovery drives for troubleshooting systems
- Users who prefer a graphical interface over command-line disk writing
BootQT Features at a Glance
BootQT keeps things refreshingly simple. It is not trying to compete with every advanced USB utility on the planet. Instead, it gives you the basics that matter most when creating bootable drives on Linux.
- ISO and IMG support: BootQT can write common operating system image formats to USB drives.
- Simple Qt interface: The app provides a clean graphical layout with a drive selector, image picker, and preparation button.
- Linux-focused design: BootQT is made for Linux systems and integrates especially well with Qt-friendly environments.
- Flatpak availability: The easiest installation method is through Flathub, making it accessible across many distributions.
- Open-source availability: The source code is publicly available, which is always nice when a tool handles your storage devices.
Before You Create a Bootable Drive
Before you open BootQT and start clicking buttons with heroic confidence, prepare a few things first. A bootable USB process is simple, but it is also destructive. The target USB drive will be overwritten. Translation: if your flash drive contains vacation photos, tax documents, or that mysterious folder called “important-final-final-real,” back it up before continuing.
What You Need
- A Linux computer
- A USB flash drive, usually 4 GB or larger for modern Linux distributions
- An ISO or IMG file from a trusted source
- BootQT installed on your system
- A few minutes of patience while the image is written
For best results, use a decent USB 3.0 drive. Old promotional flash drives from conference swag bags may technically work, but they can be painfully slow. A modern ISO file can be several gigabytes, and a slow drive turns a quick task into a coffee break, a lunch break, and possibly a small identity crisis.
How to Install BootQT on Linux
The easiest way to install BootQT on most Linux distributions is through Flatpak. Flatpak is popular because it lets developers distribute applications in a format that works across many distros, including Ubuntu, Fedora, Debian, Linux Mint, openSUSE, Arch-based systems, and more.
Install BootQT with Flatpak
If Flatpak is already enabled on your system, you can install BootQT from Flathub using this command:
If Flathub is not enabled yet, add it first:
Then run the installation command again. After installation, you can launch BootQT from your application menu. On KDE Plasma, GNOME, Cinnamon, Xfce, and most other desktop environments, it should appear like any normal desktop app.
Install BootQT from Source
Advanced users can also run BootQT from its source code. This method is helpful if you like testing software directly from GitHub, want to inspect the code, or simply enjoy the strange thrill of building things yourself.
A typical source-based setup involves installing Python, Git, and the required Qt/Python dependency, then cloning the BootQT repository and running the script. For most everyday users, however, the Flatpak version is cleaner and easier to maintain.
How to Create a Bootable USB Drive with BootQT
Once BootQT is installed, the actual process is beautifully direct. Here is the step-by-step version.
Step 1: Download a Trusted ISO or IMG File
Download the operating system image you want to write. For example, you might download an Ubuntu ISO, Fedora Workstation ISO, Linux Mint ISO, Debian image, or a rescue tool image. Always download from the official project website when possible. Random ISO files from random corners of the internet are how computers end up with trust issues.
If the distribution provides checksums or signatures, verify the file before writing it. This confirms that the download is complete and has not been altered. Verification may sound boring, but it is much less boring than troubleshooting a corrupted installer at midnight.
Step 2: Insert Your USB Drive
Plug the USB drive into your Linux computer. Make sure it is the drive you are willing to erase. If you have several external drives connected, disconnect the ones you do not need. This reduces the risk of selecting the wrong target.
Step 3: Open BootQT
Launch BootQT from your application menu. If the USB drive does not appear immediately, unplug it, plug it back in, or restart the app. Recent BootQT updates have improved USB detection logic, but drive detection can still depend on your desktop environment, permissions, and how the device was mounted.
Step 4: Select the Correct USB Drive
Use the drive selection menu to choose your USB device. Look carefully at the drive name and capacity. If your USB stick is 16 GB and the selected device looks like a 1 TB drive, stop. That is not your flash drive; that is a disaster wearing a fake mustache.
Step 5: Choose the ISO or IMG File
Click the image selection button and browse to the ISO or IMG file you downloaded. BootQT will use this file as the source image and write it to the selected USB drive.
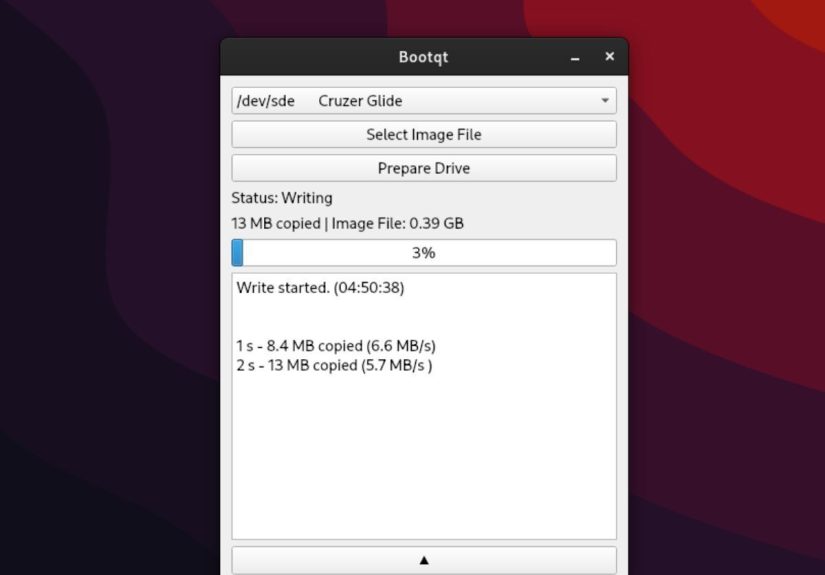
Step 6: Prepare the Drive
Click the “Prepare Drive” button. BootQT will begin writing the image. Do not remove the USB drive while the process is running. Depending on the size of the image and the speed of your USB stick, this can take anywhere from a couple of minutes to much longer.
Step 7: Boot from the USB Drive
When BootQT finishes, safely remove the USB drive. Insert it into the computer where you want to use it, then open that machine’s boot menu or firmware settings. Common boot menu keys include F12, F10, F9, Esc, or Del, depending on the manufacturer. Choose the USB drive, and the system should boot into the installer or live environment.
BootQT vs. Other Linux Bootable USB Tools
BootQT is not the only option for creating bootable drives on Linux. Popular alternatives include Fedora Media Writer, balenaEtcher, GNOME Disks, KDE ISO Image Writer, Ventoy, Raspberry Pi Imager, and the command-line dd utility. Each tool has its own personality.
Fedora Media Writer is excellent if you want to download and write Fedora images. GNOME Disks is often already installed on GNOME-based systems and can restore disk images to USB drives. KDE ISO Image Writer fits nicely into Plasma environments and focuses on writing ISO files. Ventoy is different: it lets you place multiple ISO files on one USB drive and choose between them at boot. That makes it fantastic for technicians, distro-hoppers, and anyone who treats Linux ISOs like collectible trading cards.
BootQT’s strength is simplicity. It is not loaded with features, and that is the point. If you already have an ISO or IMG file and just want to write it to a USB drive with a clean Qt interface, BootQT is a practical choice.
Safety Tips When Writing Bootable Drives
Any tool that writes directly to storage deserves respect. BootQT makes the process easier, but it cannot magically protect you from every mistake. Use these safety habits every time:
- Back up the USB drive first: Writing an image erases existing data.
- Disconnect extra drives: Fewer connected drives means fewer chances to select the wrong one.
- Check the drive size: Confirm the selected device matches your USB stick’s capacity.
- Verify the ISO: Use checksums when provided by the distribution.
- Wait for completion: Removing the drive early can corrupt the bootable media.
- Use quality USB drives: Cheap or failing drives can cause weird boot errors.
Common Problems and Quick Fixes
BootQT Does Not Detect the USB Drive
Try unplugging and reconnecting the USB drive. If that does not work, restart BootQT. You can also check whether your system sees the drive using a disk utility or the terminal command lsblk. If Linux itself does not detect the device, BootQT cannot write to it.
The USB Drive Does Not Boot
First, confirm that your computer is set to boot from USB. Then check whether Secure Boot is blocking the image. Some Linux distributions support Secure Boot; others may require you to disable it. Also make sure the ISO is meant to be bootable and was downloaded completely.
The Writing Process Seems Slow
Slow writing usually comes down to USB drive speed, port speed, or image size. A USB 2.0 flash drive can be surprisingly sluggish. If possible, use a USB 3.0 drive in a USB 3.0 port.
The USB Looks “Broken” After Writing
After writing a bootable image, your file manager may show strange partitions or reduced space. That is normal. The image has replaced the drive’s previous partition layout. To reuse the USB as a normal storage drive later, reformat it with GNOME Disks, KDE Partition Manager, GParted, or another disk utility.
Who Should Use BootQT?
BootQT is ideal for Linux users who want a minimal, graphical bootable USB creator. It is especially appealing if you use KDE Plasma or another Qt-friendly desktop and prefer apps that feel lightweight rather than oversized. It is also useful for beginners who are not ready to use dd and for experienced users who simply want to avoid typing the same disk-writing command for the hundredth time.
However, BootQT may not be the best tool if you need advanced features such as persistent live storage, multi-boot USB menus, automatic ISO downloading, Windows installer customization, or detailed verification workflows. In those cases, tools like Ventoy, Fedora Media Writer, or distro-specific utilities may be a better fit.
Practical Example: Making an Ubuntu USB with BootQT
Imagine you want to install Ubuntu on an older laptop. First, you download the Ubuntu Desktop ISO from the official Ubuntu site. Next, you plug in a 16 GB USB drive. You open BootQT, choose the USB drive from the drop-down list, select the Ubuntu ISO, and click “Prepare Drive.” After the process finishes, you eject the USB, plug it into the old laptop, and open the boot menu. Select the USB drive, and Ubuntu’s live environment should appear.
From there, you can test hardware support, check Wi-Fi, explore the desktop, or start the installer. That is the beauty of a bootable Linux USB: it gives you a portable test lab in your pocket.
Hands-On Experience: What Creating Bootable Drives with BootQT Feels Like
The best thing about using BootQT is that it removes the little moments of tension that usually come with creating bootable drives on Linux. Anyone who has used the terminal method knows the ritual: run lsblk, stare at device names, unplug the USB, run lsblk again, compare the output, squint dramatically, then type a dd command while hoping your fingers do not betray you. It works, but it is not exactly relaxing.
With BootQT, the experience feels more like using a focused desktop utility. You open the app, select the drive, select the image, and start. There is still responsibility involved because the target drive will be erased, but the workflow is less stressful. The interface gives you a visual checkpoint before you commit. That alone makes it valuable for newer Linux users and for anyone who writes bootable drives often enough to appreciate convenience.
In real-world use, BootQT is especially nice when you already have the ISO downloaded. Some tools try to help by offering built-in operating system downloads, edition selectors, or extra configuration screens. Those features can be useful, but they can also slow things down when your goal is simple: “Put this image on that USB drive.” BootQT respects that goal. It does not ask you to create an account, pick a mirror, rate your emotional readiness, or solve a puzzle. It just writes the image.
Another practical advantage is consistency. If you test Linux distributions regularly, you may move between Ubuntu, Fedora, Debian, Linux Mint, openSUSE, EndeavourOS, or smaller rescue images. A simple ISO/IMG writer works across those situations as long as the image is designed to be written directly to USB. BootQT fits that pattern well. It is not tied to one distribution’s ecosystem, which makes it useful on mixed Linux setups.
The main habit to build is careful drive selection. Even with a friendly interface, disk writing is still disk writing. Before clicking the final button, check the drive size and label. If you are working on a machine with multiple external drives, remove anything you do not want touched. This habit is not paranoia; it is wisdom wearing sensible shoes.
One small lesson from repeated bootable USB creation is that not all flash drives are equal. A cheap drive may write slowly, boot inconsistently, or fail at the worst possible time. If you create bootable drives often, keep one or two reliable USB 3.0 drives dedicated to the job. Label them clearly. You will thank yourself later when you are fixing a machine and do not have to wonder which mystery stick contains the installer.
Overall, BootQT feels like the right kind of Linux tool: simple, direct, and respectful of the user’s time. It does not replace every advanced utility, and it does not need to. For everyday bootable USB creation on Linux, especially when you want a clean graphical workflow, BootQT is easy to recommend.
Conclusion
BootQT makes it easy to create bootable drives on Linux without leaning on risky command-line guesswork. It takes the proven idea behind direct image writing and gives it a clean graphical interface. For users who want to install Linux, test distributions, prepare rescue media, or write ISO and IMG files quickly, BootQT is a simple and practical option.
The key is to use it carefully: download images from trusted sources, verify files when possible, choose the correct USB drive, and remember that the target drive will be erased. Do that, and BootQT becomes one of those small Linux utilities that quietly saves time, reduces stress, and keeps you from accidentally turning your storage device into a cautionary tale.
Note: Always back up important files before writing a bootable image to a USB drive. BootQT is simple to use, but the imaging process is intentionally destructive to the selected target drive.


