Table of Contents >> Show >> Hide
- What “Bleach Dye” Actually Does (and Why Your Black Hoodie Might Turn Orange)
- Before You Start: Pick the Right Sweatshirt
- The 13 Steps (Design-First, Safety-First)
- Step 1: Choose your “vibe” before your pattern
- Step 2: Read the care label like it’s the sweatshirt’s instruction manual
- Step 3: Do a tiny hidden test
- Step 4: Set up a real workspace (not your bedroom carpet)
- Step 5: Suit up with basic protective gear
- Step 6: Pre-wash the sweatshirt (skip fabric softener)
- Step 7: Pick one pattern method (keep it simple your first time)
- Step 8: Bind the sweatshirt so it holds its shape
- Step 9: Decide on chlorine bleach vs. a safer “reverse dye” alternative
- Step 10: Apply the discharge method carefully (adult-handled for bleach)
- Step 11: Stop the reaction at the right time
- Step 12: Wash separately, then dry gently
- Step 13: Add finishing touches (the “this looks store-bought” step)
- Easy Pattern Ideas That Look Impressive Without Being Fussy
- Troubleshooting: When Your Sweatshirt Has Other Plans
- Safer Alternatives for a Similar Look (If You’d Rather Skip Chlorine Bleach)
- FAQ: Quick Answers People Actually Google
- Conclusion
- Experiences & Lessons Learned (The “What I Wish I Knew” Section)
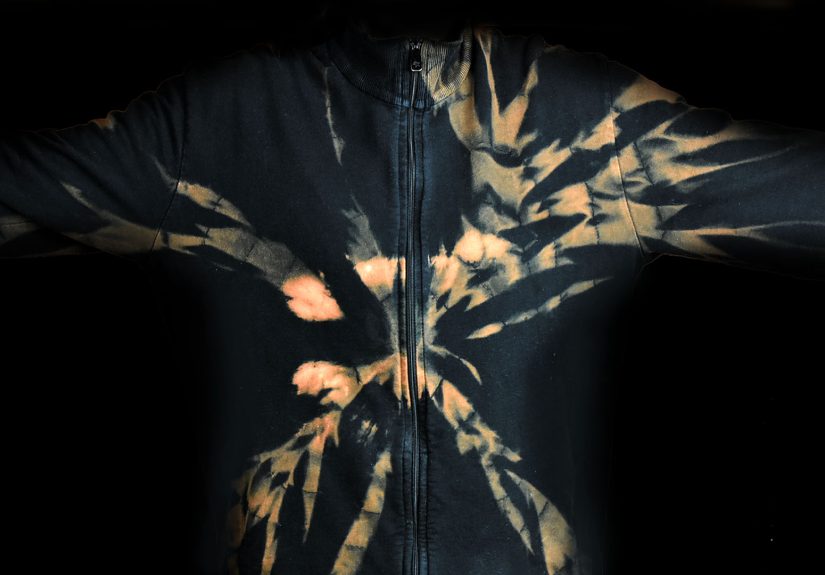
Bleach-dye sweatshirts (aka “reverse tie-dye”) are the quickest way to turn a plain hoodie into something that looks like it wandered out of a festival, a skate video, and a craft store aisleall at once. You’re not adding color like traditional tie-dye; you’re removing it to reveal a new pattern underneath.
Important safety note: Chlorine bleach is a hazardous chemical. If you’re under 18, do this only with a parent/guardian or another responsible adult handling the bleach steps. This guide focuses on design, prep, and safe decision-makingplus safer alternatives that can create a similar “reverse dye” look without relying on chlorine bleach.
What “Bleach Dye” Actually Does (and Why Your Black Hoodie Might Turn Orange)
Most dark sweatshirts are dyed with pigments that don’t simply fade to “white.” Bleach breaks down dye molecules, and the undertone that shows up depends on the original dye recipe. That’s why black can lift to warm copper/orange, navy can go sandy or peachy, and forest green can become neon-lime-ish. The surprise is part of the funlike a mystery flavor jelly bean, but for clothes.
Before You Start: Pick the Right Sweatshirt
Fabric matters more than your pattern idea
- Best: Mostly cotton (the results are usually more dramatic and consistent).
- Trickier: Cotton/poly blends (sometimes lighter, sometimes stubborndepends on the dye and blend).
- Avoid for chlorine bleach effects: Items with spandex/elastane (and delicate fibers). They can degrade or react poorly.
Color matters, too
- Dark solids give high-contrast patterns.
- Heathered colors can create a speckled “storm cloud” look (cool, but less predictable).
- Printed graphics may lift unevenly or not at allexpect surprises.
The 13 Steps (Design-First, Safety-First)
-
Step 1: Choose your “vibe” before your pattern
Decide the final look you want: bold lightning bolts, soft cloudy fades, crisp stripes, or a centered burst. This keeps you from doing the craft equivalent of “winging eyeliner” on a moving bus.
-
Step 2: Read the care label like it’s the sweatshirt’s instruction manual
Check fiber content and any “do not bleach” guidance. If the label suggests avoiding bleach, switch to a safer alternative method (see the alternatives section below) or pick another sweatshirt.
-
Step 3: Do a tiny hidden test
In a hidden spot (inside seam or hem), have an adult test a small area to see how the color lifts. This tells you whether your “galaxy hoodie” dream will become a “pumpkin spice hoodie” reality.
-
Step 4: Set up a real workspace (not your bedroom carpet)
Work outdoors or in a very well-ventilated area. Cover surfaces with plastic sheeting or a trash bag layer. Keep paper towels and a water source nearby for quick cleanup.
-
Step 5: Suit up with basic protective gear
At minimum: gloves and eye protection for the person handling bleach. Old clothes are a must, unless you’re aiming for “accidental abstract art” on your outfit.
-
Step 6: Pre-wash the sweatshirt (skip fabric softener)
Pre-washing removes finishes and oils that can block even lifting. Let the sweatshirt dry or keep it slightly damp depending on the effect you’re going for (damp can soften transitions).
-
Step 7: Pick one pattern method (keep it simple your first time)
- Scrunch: Random clouds, smoky texture.
- Spiral-ish twist: Centered burst (less precise on thick sweatshirts, still fun).
- Shibori folds: Crisp stripes and geometric repeats.
- Rubber-band “zones”: Creates white(ish) lines where dye removal is blocked.
Pro tip: Sweatshirt fabric is thicker than tees, so patterns can look bolder but also develop more slowly and unevenly.
-
Step 8: Bind the sweatshirt so it holds its shape
Use rubber bands, string, or clips. Keep pressure consistent. Tight binds usually create sharper lines; looser binds create softer transitions.
-
Step 9: Decide on chlorine bleach vs. a safer “reverse dye” alternative
If you want the classic bleach-dye look, have an adult handle bleach steps and follow the product label exactly. If you’d rather avoid chlorine bleach, use a color remover product designed for fabric or try the non-bleach alternatives listed later.
-
Step 10: Apply the discharge method carefully (adult-handled for bleach)
For bleach projects, the adult should apply and monitor the lift, keeping exposure limited and controlled. For color remover alternatives, follow the manufacturer’s directions closely. Either way: go slow. It’s easier to lighten more than to un-lighten (tragically, science has not invented “un-bleach”).
-
Step 11: Stop the reaction at the right time
Once the color reaches the level you like, the process needs to be stopped promptly. This generally involves thorough rinsing and proper laundering, and some makers use neutralizing methods recommended by manufacturers. For safety, don’t improvise chemical mixturesfollow trusted label guidance.
-
Step 12: Wash separately, then dry gently
Wash the sweatshirt by itself the first time. Use a normal detergent and follow the care label. Avoid high heat if you want to preserve softness and reduce fading.
-
Step 13: Add finishing touches (the “this looks store-bought” step)
Once dry, you can level it up:
- Overdye the lightened areas with fabric dye (for a two-tone effect).
- Add details with fabric paint markers (stars, outlines, doodles).
- Distress lightly (if that’s your style) using non-chemical methods like gentle sanding on seams.
Easy Pattern Ideas That Look Impressive Without Being Fussy
1) “Storm Cloud” Scrunch
Scrunch the sweatshirt into a loose mound and bind it in 3–5 places. The result looks organic and intentionallike you planned it, even if you absolutely did not.
2) “Geometric Stripe” Fold
Accordion-fold the sweatshirt and bind evenly. This tends to create sharper, more graphic linesgreat if you want something that reads as “streetwear” instead of “science experiment.”
3) “Halo Burst” Center Focus
Bind tighter near the center and looser toward the outside. It creates a bright focal point without requiring perfect spirals (because sweatshirts don’t always cooperate).
Troubleshooting: When Your Sweatshirt Has Other Plans
“It barely changed color.”
- Likely a dye/fabric blend issue. Some blends and heathers lift slowly or unpredictably.
- Try a different garment or switch to a fabric color remover designed for reverse dyeing.
“It turned orange and I wanted white.”
- That orange/copper lift is common with black dyes. If you want a cooler result, consider over-dyeing the lifted areas with a color you like (charcoal, indigo, or violet can look great).
“My lines look blurry.”
- Thicker fabric + moisture can soften edges. If you want crisp lines, choose a fold method and bind firmly.
“The fabric feels rough or weak.”
- That can happen when bleach exposure isn’t stopped promptly or is too strong. Next time, use a safer color remover product, keep exposure controlled, and follow neutralizing/laundering guidance closely.
Safer Alternatives for a Similar Look (If You’d Rather Skip Chlorine Bleach)
- Fabric color remover (non-chlorine): Products designed for reverse dyeing can create high-contrast patterns with less risk of fiber damage when used as directed.
- Oxygen bleach for soft fades: Good for gently shifting color (not as dramatic, but more forgiving).
- Fabric paint or spray fabric color: If you want the “tie-dye energy” without chemical discharge, paint and spray techniques can mimic the look.
- Iron-on vinyl + dye/paint: Use stencils and overlays to get crisp shapes without bleach.
FAQ: Quick Answers People Actually Google
How long does bleach-dye last?
If the process is done safely (and the reaction is stopped properly), the design holds up like normal color fading would. Wash inside-out in cool water to reduce wear and keep the contrast looking sharp.
Can I bleach-dye a colored sweatshirt?
You can, but the final color depends on the dye underneath. Always test firstespecially on brights and heathers.
Will it ruin my sweatshirt?
It can if bleach is misused or left active too long. That’s why adult handling, proper ventilation, and following product directions matterplus why non-chlorine alternatives can be a smart choice.
Conclusion
Bleach dyeing a sweatshirt can be a fun, high-impact DIYwhen it’s done thoughtfully and safely. The secret isn’t “more bleach.” It’s smarter prep: choose the right fabric, test first, plan a pattern that matches your skill level, and stop the reaction properly so your hoodie doesn’t slowly turn into Swiss cheese.
If chlorine bleach feels like too much risk (especially for teens), you can still get that reverse-dye vibe with color remover products and non-bleach techniques that keep the project creative without turning your workspace into a chemistry lab. Either way, you end up with a sweatshirt that’s one-of-a-kindbecause nobody else will accidentally lift their black dye into the exact same shade of toasted marshmallow.
Experiences & Lessons Learned (The “What I Wish I Knew” Section)
The first time I saw a bleach-dyed sweatshirt in real life, I assumed it came from a boutique where everything costs $68 and the cashier calls you “bestie.” Then I learned it was made at home with a basic reverse-dye techniqueand I also learned that the results are equal parts planning and surprise. If you like crafts where you can control every millimeter, bleach dyeing will humble you (politely, but firmly). If you like crafts where “happy accidents” count as a design feature, you’re going to have a great time.
Lesson #1: Your sweatshirt’s dye has its own personality. Two black sweatshirts can lift totally differently. One might shift toward a warm copper, another might go sandy beige, and a third might act like it’s offended you even asked. That’s why the hidden test spot is so valuablebecause it gives you a preview of the “undertone story” before you commit to the full novel.
Lesson #2: Sweatshirts are thicker than tees, so patience matters. With thicker fabric, the lift can look uneven at firstespecially if the garment has multiple layers (hood, pockets, cuffs). That doesn’t always mean it’s ruined; it often means the fabric is developing at different speeds. The best results I’ve seen come from treating the sweatshirt like a slow cooker recipe, not a microwave snack: check progress, keep it controlled, and don’t rush the finish.
Lesson #3: Simple patterns beat complicated onesespecially on your first try. Everyone wants the perfect spiral. But sweatshirt material doesn’t always twist neatly, and that’s okay. Scrunch patterns are underrated because they look intentional even when they’re random. Shibori-style folds are also surprisingly “beginner-friendly” because the structure of the fold does most of the design work for you. If you want maximum “wow” with minimum stress, go scrunch or fold.
Lesson #4: The best-looking pieces usually have contrast + breathing room. It’s tempting to cover the whole sweatshirt in effects. But leaving some darker “rest areas” makes the lighter pattern pop. Think of it like eyeliner: a little strategic placement can look sharp, while going full raccoon tends to be… a choice.
Lesson #5: Finishing touches are what make it look expensive. After the main pattern is done and the sweatshirt is fully washed and dried, tiny upgrades can transform it: a subtle overdye on the lifted areas, a few fabric-marker details, or even just a clean hemline and a lint roll. The difference between “DIY” and “designer-inspired DIY” is often five minutes of cleanup and one good idea at the end.
Overall, bleach dyeing is one of those projects where the process teaches you as much as the result does. You learn to test first, to embrace undertones, and to plan around fabric reality. And when you finally put the sweatshirt on, it feels less like “I bought this” and more like “I made thisand it turned out cooler than I expected.” Which is, honestly, the best kind of craft win.


