Table of Contents >> Show >> Hide
- The Big Idea: Grilling Is Heat Management, Not Vibes (Okay, Also Vibes)
- Pick Your Grill: Gas, Charcoal, Pellet, or Electric
- Direct vs. Indirect Heat: The Two Languages of the Grill
- Fire, Fuel, and Temperature: How to Control the Chaos
- Your Grilling Toolkit: 8 Essentials That Actually Matter
- Prep Like a Pro: Seasoning, Moisture, and Why Food Sticks
- Doneness: Stop Trusting Time. Trust Temperature.
- How to Grill the Classics (With Specific, Repeatable Moves)
- Sauce, Smoke, and the “Last 5 Minutes” Rule
- Troubleshooting: 10 Common Grilling Problems (and Fixes)
- Cleaning & Maintenance: The 3-Minute Habit That Saves Your Next Cook
- Conclusion: Your New Grilling “Default Settings”
- Real-World Grilling Experiences (500-ish Words of “Yep, Been There” Moments)
Grilling is basically outdoor cooking with attitude: you apply heat, manage smoke, and try not to set your eyebrows on a separate “high” setting.
The good news? Once you understand a few fundamentalsheat zones, timing vs. temperature, and how to keep food from welding itself to the grateyou can grill
everything from weeknight chicken to “I invited friends so now I must perform” steaks.
The Big Idea: Grilling Is Heat Management, Not Vibes (Okay, Also Vibes)
Great grilling isn’t about fancy rubs or the world’s most dramatic grill marks. It’s about controlling where the heat is, how intense it is,
and how long the food stays in that situation. If you can set up a hot side and a cooler side, you’re already ahead of a shocking number of adults.
Pick Your Grill: Gas, Charcoal, Pellet, or Electric
Gas grills
Fast start, easy temperature control, and perfect for “it’s Tuesday and I want burgers, not a life lesson.” Gas excels at quick cooking and weeknight reliability.
The main skill is learning burner zones (hot side / cool side) and resisting the urge to keep lifting the lid like you’re checking if cookies are still cookies.
Charcoal grills
Charcoal gives you that classic barbecue aroma and a punchier sear. It also asks you to become part-time fire manager. The payoff is real flavor and excellent
high-heat cookingonce you learn vents and two-zone setups. Think of charcoal as a manual transmission: more control, more fun, slightly more “why did I do this?”
until you practice.
Pellet grills
Pellet grills are the “set it and forget it” cousins of grilling: you dial a temperature, pellets feed automatically, and you get steady heat plus smoke.
They’re amazing for low-and-slow cooking and surprisingly good for weeknight meals. Some models sear well; others prefer a reverse-sear approach (cook gently,
then finish hot).
Electric grills
Great when flames aren’t allowed (apartments, balconies, rules written by people who hate fun). You’ll get less smoke flavor, but you can still nail texture and
doneness with solid preheating and smart timing.
Direct vs. Indirect Heat: The Two Languages of the Grill
Most “how to grill” confusion disappears when you realize there are only two main modesplus a combo move that solves most problems.
Direct heat (fast, hot, dramatic)
Food sits over the heat source. Use this for thin cuts and quick-cooking foods: burgers, hot dogs, shrimp, thin steaks, sliced vegetables, tortillas, and anything
that should be done before your guests finish their first drink.
Indirect heat (gentle, even, quietly powerful)
Food sits away from the flame/coals while the lid is closed. Indirect heat is your “outdoor oven” mode and is perfect for thicker cuts and foods that need time:
bone-in chicken, pork tenderloin, thick steaks after searing, ribs, and anything you’d rather not carbonize.
Two-zone setup (the cheat code)
Two-zone grilling means you create a hot zone and a cooler zone at the same time. On charcoal: pile coals on one side. On gas: turn on burners on one side and
leave the other side off (or very low). This gives you a built-in escape route when flare-ups happen or when the outside is perfect but the inside is still auditioning
for “raw.”
The combo method (sear, then finish)
Sear over direct heat for flavor and color, then move to indirect to finish to the right internal temperature. This is how you avoid the classic tragedy:
“Beautiful on the outside, surprisingly not food-safe on the inside.”
Fire, Fuel, and Temperature: How to Control the Chaos
Charcoal basics (without turning this into a survival documentary)
- Use a chimney starter: It’s the easiest way to light coals evenly without drowning them in lighter fluid perfume.
- Wait for “ashed over” coals: You want coals glowing with a light gray coating before dumping them into the grill.
- Vents are your thermostat: More air = hotter fire. Less air = cooler fire. Make small changes and give them time to work.
- Lid down = control: With charcoal, the lid helps regulate airflow and temperature and prevents heat from wandering off to start a new life.
Gas basics (simple, but don’t skip the boring steps)
- Preheat: A properly preheated grill sears better and sticks less. Give it time to get the grates hot.
- Know your hot spots: Many gas grills run unevenly. Learn where it’s hottest and use that for searing.
- Build zones: Use burner control to create high heat and low heat areas.
- Propane reality check: Nothing builds character like running out mid-steak. Keep a backup tank if you grill often.
Pellet basics (steady heat, sneaky smoke)
- Lower temps = more smoke: Many pellet grills produce more noticeable smoke flavor at lower settings.
- High heat needs preheating: For searing, let the grill fully heat soakmetal needs time to get ripping hot.
- Reverse sear is your friend: Cook thick cuts gently, then finish hot for a great crust without overcooking the center.
Your Grilling Toolkit: 8 Essentials That Actually Matter
- Instant-read thermometer: The fastest upgrade to better results (and safer chicken).
- Long tongs: If your tool requires you to put your hand near the fire, it’s a bad tool.
- Sturdy spatula: Especially for burgers and delicate fish.
- Grill brush or scraper: Clean grates = less sticking.
- High-heat oil: Neutral oil with a high smoke point (use it sparingly).
- Heat-resistant gloves: Because grabbing a hot vent “real quick” is a universal regret.
- Two platters: One for raw, one for cooked. This is non-negotiable.
- Timer: Not because you can’t countbecause grills are distracting and you will start telling a story mid-cook.
Prep Like a Pro: Seasoning, Moisture, and Why Food Sticks
Seasoning that works (and doesn’t taste like salt panic)
Start simple: salt + pepper goes a long way. Add garlic powder, smoked paprika, or chili powder for depth. For bigger flavor, try a dry brine:
salt the meat ahead of time and let it rest uncovered in the fridge. That helps seasoning penetrate and improves browning.
Marinades: flavor boost with a few rules
Marinades add flavor, but they can also add sugarwhich burns at high heat. If your marinade is sweet (honey, brown sugar, teriyaki), cook more on indirect heat
and save extra sauce for the last few minutes. Always marinate in the refrigerator, and never reuse marinade that touched raw meat unless you boil it.
The #1 anti-sticking move: dry surface + hot grate
Wet food steams instead of sears. Pat proteins dry before grilling. Preheat until the grates are hot, then lightly oil the grates (or the food) to reduce sticking.
If food clings at first, don’t panicgive it time. Once a proper crust forms, it usually releases.
Doneness: Stop Trusting Time. Trust Temperature.
Thickness, starting temperature, wind, grill type, and how often someone “just checks it” all change cooking time. Internal temperature is the only reliable finish line.
Use a thermometer and you’ll immediately cook juicier food because you’ll stop overcooking out of fear.
Safe minimum internal temperatures (quick guide)
- Poultry (chicken/turkey): 165°F
- Ground meats (beef, pork, etc.): 160°F
- Steaks/roasts/chops (beef, pork, lamb): 145°F + rest time (often 3 minutes)
- Fish: 145°F
Where to probe: aim for the thickest part, avoiding bone. For burgers, insert the probe sideways into the center. For chicken thighs, probe near (not touching) the bone.
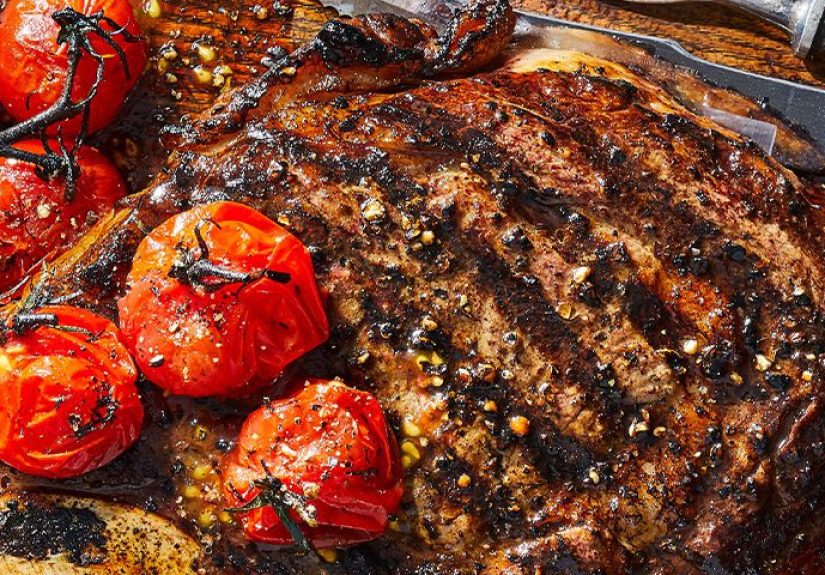
How to Grill the Classics (With Specific, Repeatable Moves)
1) Juicy chicken thighs (the confidence builder)
- Set up two zones: hot side for searing, cool side for finishing.
- Season simply (salt, pepper, garlic powder). Pat dry.
- Sear skin-side down (or presentation-side down) on the hot zone until browned.
- Move to indirect, close the lid, and cook until the thickest part hits 165°F.
- Rest 5 minutes, then serve. Bonus: thighs forgive mistakes. They’re basically the “practice mode” of grilling.
2) Steak (sear + finish without sacrificing the center)
- Choose a steak at least 1-inch thick for best results.
- Preheat and create two zones.
- Sear over direct heat to build a crust.
- Move to indirect heat to finish to your target doneness (use a thermometer).
- Rest before slicing so juices redistribute instead of running away like they heard a rumor.
If you love precision, try a reverse sear: cook gently on indirect heat first, then finish with a quick sear. It’s especially great on thicker cuts.
3) Burgers (brown outside, juicy inside)
- Don’t overwork the meatmixing too much makes burgers dense.
- Salt the outside, not the whole bowl, for a better texture.
- Sear over direct heat, then move to indirect if flare-ups get wild or if you’re melting cheese.
- Cook ground beef to 160°F for food safety.
4) Vegetables that people actually want to eat
Vegetables love high heat. Toss with a little oil and salt. Grill peppers, onions, zucchini, asparagus, and mushrooms over direct heat. For corn: grill in the husk
(steamy and sweet) or shucked (charred and smoky). Either way, turn occasionally and don’t chase perfect grill marks like they’re a social media requirement.
Sauce, Smoke, and the “Last 5 Minutes” Rule
Sugary sauces burn fast, so apply them near the end. If you want smoke flavor, add wood chunks (charcoal) or lean into lower-and-slower temps (pellet).
Remember: smoke should smell good. If it smells harsh and bitter, you’re probably smoldering, not burning cleanly.
Troubleshooting: 10 Common Grilling Problems (and Fixes)
- Food sticks: Preheat longer, clean grates, oil lightly, and don’t flip too early.
- Flare-ups: Move food to indirect, close the lid briefly, trim excess fat, and avoid flooding the grates with oil.
- Outside burns before inside cooks: Two-zone cook; sear first, finish indirect.
- Dry chicken breast: Use indirect heat and pull at the right temperature; consider brining.
- Burgers fall apart: Chill patties briefly and use a confident flip (hesitation is how burgers sense fear).
- Uneven cooking: Rotate food and learn hot spots; use indirect zone to stabilize.
- Rub tastes burnt: Too much sugar too earlyuse indirect heat or add sweet elements late.
- No smoke flavor: Cook a bit longer at moderate heat, add wood on charcoal, or choose more naturally smoky proteins (thighs, ribs).
- Grill marks but bland food: Season properly and rest; marks are cosmetic, flavor is the point.
- “It’s done… I think?” Thermometer. Every time. Guessing is for game shows.
Cleaning & Maintenance: The 3-Minute Habit That Saves Your Next Cook
Cleaning is easiest while the grill is hot. After cooking, turn the heat up for a few minutes to burn off residue, then brush the grates.
For a deeper clean, periodically scrape the grease tray (gas), empty ash (charcoal), and wipe down interior surfaces. A covered grill lasts longer and behaves better
kind of like humans.
Conclusion: Your New Grilling “Default Settings”
If you remember nothing else: preheat, use two zones, pat food dry, don’t flip too early, and cook to temperature.
Grilling basics aren’t complicatedthey’re just easy to ignore when your neighbor’s lawn smells like victory and your guests are watching.
Build the habit, and you’ll cook with confidence all season long.
Real-World Grilling Experiences (500-ish Words of “Yep, Been There” Moments)
Every griller has that first cook where optimism meets physics. You season your steaks, stride outside like a backyard hero, and then realize the grill is still
lukewarm because you got distracted telling someone about “the perfect sear.” Ten minutes later, you’re not grillingyou’re gently warming meat while silently
negotiating with time. The fix is boring but magical: preheat like you mean it. When the grate is truly hot, food stops sticking, browning happens faster,
and your dinner develops that grilled flavor instead of that “I cooked this near a grill” vibe.
Then there’s the classic lid-lifting habit. People treat the grill like it’s a surprise party: they keep opening it to see if the surprise is ready. But every lift
dumps heat and extends cooking time. The moment you learn to trust the lidespecially for thicker cutsyour results level up. Indirect heat with the lid closed
turns your grill into an outdoor oven, and suddenly chicken pieces cook through without the outside turning into a charcoal audition tape.
Flare-ups are another rite of passage. The first time fat drips, flames jump, and you instinctively poke at the fire with tongs like that’s a known firefighting
technique. What actually works is calmer: slide the food to the cool zone, close the lid briefly, and let the fire settle. Most flare-ups are temporary tantrums.
If it keeps happening, it’s usually too much fat, too much oil, or too much sugar too early. Which brings us to sauce: everyone wants to paint ribs like it’s
an art project at the start. But sugary sauce burns fast. Once you learn the “last few minutes” rule, you get glossy, sticky, caramelized goodness instead of
a blackened shell that tastes like regret.
Thermometer moments are the most humblingand the most empowering. Many people overcook chicken because they’re terrified of undercooking it. So they keep it on
until it’s “definitely done,” which is code for “dry.” The thermometer flips the script: you cook to a number, rest briefly, and serve juicy chicken with actual
flavor. Same with steaks: without a thermometer, you can nail medium-rare once and then spend the next three weekends chasing that high like it’s a myth.
With a thermometer, you repeat success on purpose, which is basically adulthood.
And finally: the two-plate lesson. Almost everyone has, at some point, put cooked food back onto the “raw” plate because it was the closest one. This is how
food safety becomes a group project you don’t want. The habit that fixes it is almost comically simple: one plate for raw, one plate for cooked. If you do only
two thingsuse two zones and use two platesyou’ll avoid most grilling disasters and a lot of preventable “weird stomach” stories the next day.
Grilling is practice, not perfection. The best cooks aren’t the ones who never mess upthey’re the ones who can rescue a flare-up, move to indirect heat, and
still serve dinner like it was the plan all along. Which, honestly, is the true grilling flex.


