Table of Contents >> Show >> Hide
- Before You Start: Your “No Panic” Beginner Makeup Kit
- Step 0: Skin Prep (Makeup’s Best Friend)
- The Beginner-Proof Order of Makeup Application
- Step-by-Step: A Simple Everyday Beginner Makeup Routine
- 1) Primer (Optional, but helpful)
- 2) Foundation or Tinted Moisturizer (Your “Base”)
- 3) Concealer (Brighten + Spot-Fix)
- 4) Powder (Optional, but useful for shine control)
- 5) Brows (The Frame of Your Face)
- 6) Eyes in Two Minutes (Beginner Mode)
- 7) Blush, Bronzer, and Highlighter (Color + Dimension)
- 8) Lips (The Easiest Way to Look Finished)
- 9) Set It (Optional) + Touch-Up Strategy
- Common Beginner Mistakes (And the Quick Fixes)
- Makeup Hygiene & Safety (Especially for Eyes)
- Two Fast Beginner Routines (Because Life Is Busy)
- Videos: Beginner-Friendly Tutorials to Watch While You Practice
- Beginner Makeup FAQ
- Conclusion: Keep It Simple, Keep It Yours
- Real-Life Beginner Makeup Experiences (The “I Learned This So You Don’t Have To” Edition)
If you’re new to makeup, the internet makes it look like you need a ring light, 47 brushes, and a minor in architecture just to apply blush.
You don’t. You need a simple order, a few forgiving products, and the confidence to blend like you mean it.
This guide walks you through a beginner-friendly routine (with videos), plus the “oops” fixes that save you from starting over and dramatically staring at yourself in the mirror like it’s a season finale.
Main goal: even out the complexion, add healthy color, define eyes/brows, and finish with a lipwithout looking cakey, streaky, or “why is my face two different seasons?”
Before You Start: Your “No Panic” Beginner Makeup Kit
Beginners do best with products that blend easily and don’t punish small mistakes. Think: creamy, buildable, and “I can fix this with a sponge.”
Starter products (pick 6–9, not all 6–9 at once)
- Moisturizer + sunscreen (SPF 30+) makeup looks better on hydrated skin.
- Primer (optional) helpful for smoothing texture or controlling shine.
- Tinted moisturizer or light foundation the easiest “base” for beginners.
- Concealer one that matches your skin for spots, and (optionally) a slightly lighter one for under-eyes.
- Powder (optional) translucent or lightly tinted to reduce shine.
- Blush cream blush is extremely beginner-friendly.
- Mascara instant definition with minimal effort.
- Brow pencil or tinted brow gel brows frame the face fast.
- Tinted lip balm or gloss low-commitment, high reward.
Starter tools (you can absolutely keep it simple)
- Damp makeup sponge (for blending base + concealer)
- Small fluffy brush (for powder or blush if you prefer powder products)
- Angled brow brush (optional, helpful for brows/liner)
- Clean fingers (yes, they countespecially for cream blush and tinted moisturizer)
Beginner rule that saves money: start with fewer products, upgrade later. Your technique matters more than the “viral” product of the week.
Step 0: Skin Prep (Makeup’s Best Friend)
Makeup sits on top of skin. If skin is dry, flaky, or thirsty, makeup will cling like it’s auditioning for a drama role.
A simple prep makes everything smoother and more natural-looking.
Quick prep routine (3 minutes)
- Cleanse: remove oil/sweat so products grip evenly.
- Moisturize: apply to slightly damp skin, then give it a minute to settle.
- Sunscreen: apply after moisturizer and before makeup. Use enough for real protection (many people under-apply). Let it set 5–10 minutes before foundation so it doesn’t pill.
Pro-but-still-beginner-friendly tip: If your base “pills” (tiny product balls rolling off),
you’re usually layering too fast or using formulas that don’t play nicely together. Slow down and let each layer set.
The Beginner-Proof Order of Makeup Application
There’s more than one “right” order, but beginners need a dependable sequence that minimizes mess and maximizes blendability.
Here’s the easy flow (and yes, you can tweak it later when you feel fancy).
- Primer (optional)
- Base: tinted moisturizer / foundation
- Concealer
- Powder (optional)
- Brows
- Eyes: shadow (optional) + liner (optional) + mascara
- Cheeks: blush + bronzer (optional) + highlight (optional)
- Lips
- Setting spray (optional)
Alternative that many makeup artists love: do eyes first, then base, so you can clean up fallout without ruining foundation.
If you’re using dark shadow or glitter, “eyes first” is your stress-free friend.
Step-by-Step: A Simple Everyday Beginner Makeup Routine
This is the routine you can repeat until your hands learn it automaticallylike muscle memory, but for eyeliner panic.
We’ll keep everything buildable and forgiving.
1) Primer (Optional, but helpful)
Primer isn’t mandatory, but it can make makeup last longer and look smoother.
Choose based on your skin’s vibe:
- Dry skin: hydrating or “glow” primer
- Oily skin: mattifying primer (use mainly in the T-zone)
- Texture/pores: blurring primer (use sparingly where needed)
Apply a thin layer. Primer is not frosting. If it feels slippery like you could ski down your forehead, you used too much.
2) Foundation or Tinted Moisturizer (Your “Base”)
Beginners usually look best with a light-to-medium base. It’s easier to blend, easier to fix, and less likely to go cakey.
If your skin is already pretty even, tinted moisturizer or a skin tint can be the perfect starting point.
Shade match: the quickest way to avoid “floating head”
- Test on your jawline (not your wrist). Your face and body can be different tones.
- Check in natural light if possible.
- If you’re between shades, go slightly lighter and warm it up with bronzer lateror mix shades if you have them.
How to apply (beginner method)
- Start with less than you think you need.
- Dot product on the center of the face (cheeks, nose, forehead, chin).
- Blend outward using a damp sponge (bounce, don’t drag) or a brush.
- Add a second thin layer only where you need more coverage.
Beginner win: If your base looks heavy, you can “sheer it out” by bouncing a clean damp sponge over everything.
It removes excess while keeping coverage where it belongs.
Video: Foundation for Beginners (Sephora)
Watch this when you want a clear demo on picking a primer + applying foundation in thin, even layers.
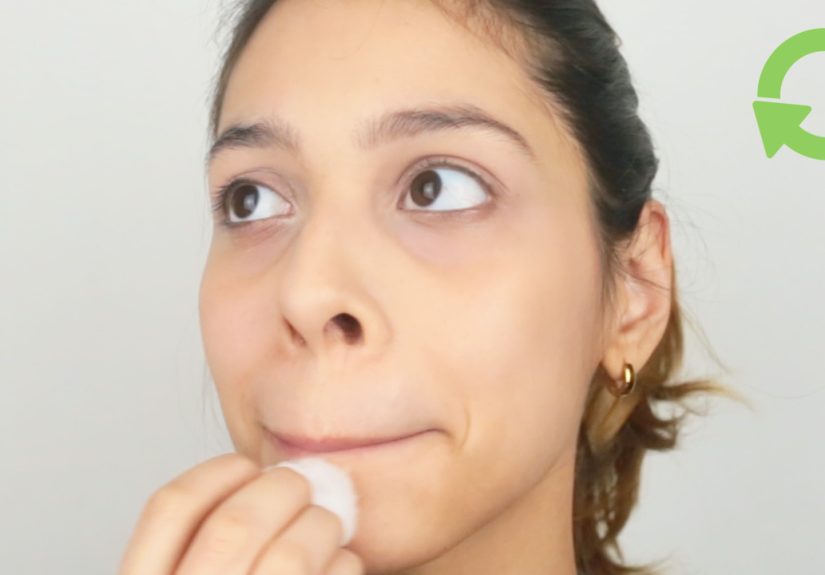
3) Concealer (Brighten + Spot-Fix)
Concealer has two jobs: brighten under-eyes and pinpoint blemishes/redness.
The trick is using the right amount in the right places.
Under-eyes (don’t paint the whole area)
- Use a shade one shade lighter than your skin for brightening.
- Apply small dots at the inner corner and outer corner, then blend toward the center.
- If you have darkness, add a tiny bit more where the shadow actually is (often the inner corner).
Spots and redness (the “tap, wait, tap” method)
- Use a concealer that matches your skin/foundation.
- Tap it directly on the spot.
- Wait 10–20 seconds (let it set a bit).
- Blend the edges gently, leaving the center covered.
Setting tip: If concealer creases, you probably used too much. Use a smaller amount, blend well, then set lightly with powder.
Video: Concealer for Beginners (Sephora)
Great for learning placement (where concealer helps vs where it just adds texture).
4) Powder (Optional, but useful for shine control)
Powder is a tool, not a requirement. If your skin is dry, you might skip itor use it only on the T-zone.
If you get shiny quickly, powder helps your makeup last longer.
Beginner powder technique
- Use a small amount, especially under the eyes.
- Press powder in (with a puff/sponge) for longevity, or sweep lightly (with a fluffy brush) for a softer finish.
- Focus on: sides of nose, center forehead, chin.
Video: Powder Foundation 101 (Sephora)
Helpful if you prefer powder base products or want a quick, low-mess routine.
5) Brows (The Frame of Your Face)
Brows can change your whole face in about 30 seconds. The beginner goal is simple:
shape, fill sparsely, and setnot “new eyebrows who dis?”
Three-step beginner brow
- Brush up with a spoolie.
- Fill gaps with light, hair-like strokes (concentrate on the tail).
- Set with clear/tinted brow gel.
Easy fix: If you overfill, soften by brushing through againor tap a tiny bit of foundation/concealer on the brow with your finger to tone it down.
Video: Full Brow Tutorial for Beginners (Sephora)
Perfect if brows feel intimidating. You’ll learn a clean, repeatable method.
6) Eyes in Two Minutes (Beginner Mode)
If you’re just starting, you don’t need a complicated cut-crease situation.
You need definition that makes you look awake, alive, and like you definitely drink water.
Option A: One-shadow eye (fast + foolproof)
- Use a neutral shade close to your skin tone (or slightly deeper).
- Sweep across the lid and slightly into the crease.
- Blend edges with a clean brush (or your fingergently).
Option B: Soft definition (still simple)
- Use a medium brown in the outer corner, blend inward.
- Add a lighter shimmer to the center of the lid if you want a “bright” effect.
- Skip liquid liner at first; use a pencil and smudge it for an easy, forgiving line.
Mascara (instant payoff)
- Wiggle at the base of lashes, then sweep up.
- One coat for natural, two for more definition.
- If you get mascara on your lid, let it dry fully, then flick it off with a clean spoolie or cotton swab. (Don’t smear it while wetask me how I know.)
7) Blush, Bronzer, and Highlighter (Color + Dimension)
This is where your face goes from “even” to “alive.” The beginner secret is placement and restraint.
Start with blush; bronzer/highlighter are optional.
Blush placement that looks natural
- For a lifted look: apply on the upper cheek and blend toward the temple.
- For a youthful flush: tap on the apples of the cheeks, then blend upward slightly.
- Cream blush blends easiest with fingers or a spongetap, don’t rub.
Bronzer (optional)
Use bronzer where the sun naturally hits: around the perimeter of the forehead, cheekbones, and jawline.
Start lightbronzer is a “build slowly” product unless you’re going for “spent a week on a yacht” (respect).
Highlighter (optional)
Tap onto high points: tops of cheekbones, brow bone, and a tiny bit on the cupid’s bow.
If you have texture, keep highlight subtle so it doesn’t spotlight every pore like an investigative documentary.
8) Lips (The Easiest Way to Look Finished)
Lips are the quickest “polished” stepespecially if you keep it simple.
- Tinted balm: easiest, most forgiving option.
- Gloss: makes lips look fuller with minimal effort.
- Lip liner trick: outline softly and fill in a bit, then top with balm. Looks like you tried harder than you did.
9) Set It (Optional) + Touch-Up Strategy
Setting spray can offer a more natural finish (less powdery) and help longevity.
If you get oily during the day, blot first, then touch updon’t keep stacking powder on top of oil.
- Oily midday: blot paper → tiny bit of powder
- Dry patches: tap a bit of moisturizer on the area (yes, over makeup) and bounce with a sponge
Common Beginner Mistakes (And the Quick Fixes)
Mistake: Your foundation looks cakey
- Fix: Use less product and apply in thin layers.
- Fix: Bounce a clean damp sponge over the face to lift excess.
- Fix: Make sure skin is moisturized and sunscreen has set before base.
Mistake: Concealer creases under your eyes
- Fix: Apply less concealer and blend thoroughly.
- Fix: Set lightly with powder (a tiny amount).
- Fix: Smooth creases with a fingertip before setting.
Mistake: Blush is too intense
- Fix: Tap over it with your sponge (it will diffuse color).
- Fix: Add a touch of foundation on top (lightly) to soften.
Mistake: Your makeup separates or “pills”
- Fix: Let skincare/sunscreen dry down longer.
- Fix: Use fewer layers or switch one product (silicone-heavy primer + incompatible sunscreen can cause pilling).
Makeup Hygiene & Safety (Especially for Eyes)
Beginner makeup isn’t just about looking goodit’s also about keeping your skin and eyes happy.
The eye area is extra sensitive, and liquid/cream products can pick up bacteria over time.
Beginner hygiene rules that are actually worth following
- Replace mascara regularly (many experts recommend around 3 months for eye products, especially mascara).
- Don’t share eye makeup (mascara, liner, anything near the eye).
- Don’t “revive” mascara with water or saliva (please, for the love of your eyeballs).
- Wash brushes/sponges regularlyespecially anything used with liquids/creams.
- Remove makeup before bed, particularly eye makeup.
If you’ve had an eye infection: replace products used during that time (mascara/liner). Better safe than itchy.
Two Fast Beginner Routines (Because Life Is Busy)
The 5-minute “No-Makeup Makeup”
- Moisturizer + SPF
- Tinted moisturizer (or spot concealer only)
- Cream blush (tap and go)
- Brow gel
- Mascara + tinted lip balm
The 10-minute “Ready for Anything”
- Moisturizer + SPF + primer (optional)
- Light foundation
- Concealer (under-eyes + spots)
- Powder (T-zone)
- Brows (fill lightly + gel)
- One-shadow eye + mascara
- Blush + a touch of bronzer
- Lip liner + balm/gloss
- Setting spray (optional)
Videos: Beginner-Friendly Tutorials to Watch While You Practice
The fastest way to improve is to watch a technique once, then try it immediately.
Tell yourself it’s “practice,” not “performance,” and suddenly your hands stop shaking like you’re defusing a bomb.
Everyday Makeup Routine Essentials (Sephora)
Great overview for building a routine you can repeat without overthinking.
Foundation for Beginners (Sephora)
Watch for technique: thin layers, center-out blending, and how primer changes finish.
Concealer for Beginners (Sephora)
Perfect for learning placement and avoiding “too much concealer” texture.
Full Brow Tutorial for Beginners (Sephora)
Brows made simple: brush, fill, setdone.
Defined Brows Tutorial (Ulta Beauty)
Helpful if you want clean, crisp brows without going overboard.
Powder Foundation Basics (Sephora)
A great option if you want a faster routine or prefer powder products.
Beginner Makeup FAQ
Do I put concealer on before or after foundation?
Most beginners find it easiest to apply foundation first, then use concealer only where needed.
That way you don’t over-apply and accidentally build a concealer “mask.”
If you’re doing spot-concealing only (no foundation), concealer can go directly on bare skin.
How do I stop makeup from looking dry or patchy?
Hydrate first (moisturizer), let sunscreen set, and use thin layers.
Cream products (cream blush, hydrating concealer) usually look more natural on dry skin.
Avoid heavy powder everywhereuse it only where you actually get shiny.
What’s the easiest beginner eye look?
A one-shadow lid, a soft smudged pencil liner (optional), and mascara.
If you can blend a single neutral shade, you can look put-together in under two minutes.
Conclusion: Keep It Simple, Keep It Yours
The best beginner makeup routine is the one you’ll actually do. Start with the basics: skin prep, a light base, concealer where needed,
brows, mascara, blush, and lips. Then repeat it enough times that it stops feeling like a complicated science project.
Once you’re comfortable, you can experimentone new thing at a time.
Remember: makeup is supposed to be fun. If it’s not fun today, do the 5-minute routine and go live your life anyway.
You’re allowed to be both a beginner and a legend in progress.
Real-Life Beginner Makeup Experiences (The “I Learned This So You Don’t Have To” Edition)
The first time I tried doing a “full face,” I learned an important lesson: the mirror is honest, but bathroom lighting is a liar with a great PR team.
Inside, my foundation looked flawless. Outside, I looked like I’d applied makeup with a paint roller and optimism. Since then, I’ve developed a few
beginner survival strategies that make makeup feel less like a test and more like a routine.
Experience #1: Less product beats better product. I used to think my makeup looked bad because I didn’t own the “right” foundation.
Plot twist: I was using way too much. Once I switched to thin layersstarting at the center of my face and blending outwardeverything immediately
looked more natural. The best part? I stopped feeling like I needed to “fix” my face. I was just evening things out.
Experience #2: Waiting is a skill. Not a glamorous one, but a powerful one. I’d slap on moisturizer, sunscreen, primer, foundationbam bam bam
and then wonder why my base pilled. Turns out, products need time to settle. When I started giving sunscreen a few minutes to set, my foundation stopped
sliding around like it was trying to escape.
Experience #3: The sponge is basically a tiny peace treaty. If I overdid blush, the damp sponge fixed it. If my foundation looked heavy, the
sponge softened it. If I got harsh edges anywhere, the sponge negotiated them into something wearable. I now consider a clean damp sponge the MVP of
beginner makeup because it turns “I ruined it” into “Wait… this is actually cute.”
Experience #4: Brows are emotional. Some days they cooperate. Some days they look like they’re in a feud. The biggest improvement came when I
stopped trying to redraw my entire brow and started filling only sparse areasespecially the tail. A light hand plus brow gel made everything look more
like “my brows but better” instead of “my brows got recast.”
Experience #5: Mascara mistakes are temporary if you stop panicking. I used to smear mascara dots all over my lid trying to wipe them off
immediately. Then I learned the trick: let it dry completely and flick it away. This single piece of knowledge saved me at least 40 minutes of my life
and approximately 12 existential crises.
Experience #6: Practice is easier at night. The pressure of “I have to leave the house” makes your hands clumsy. Practicing before bedor on a
weekend when you have nowhere to belets you mess up in peace. You learn faster when you’re not racing the clock.
If you’re a beginner, give yourself permission to be “in progress.” Your routine will get smoother, faster, and more personalized each week. One day you’ll
realize you can do your face in 10 minutes while holding a conversationand that’s when you’ll know you’ve leveled up. Until then, keep it simple, keep it
clean, and keep blending.


