Table of Contents >> Show >> Hide
- Cleaning vs. Sanitizing: What’s the Difference (and Do You Need Both)?
- First: Identify What Your Earrings Are Made Of
- Your Simple At-Home Earring Cleaning Kit
- The Safest “Default” Method: Mild Soap + Warm Water
- How to Sanitize Earrings (Without Turning Them Ugly)
- Metal-by-Metal Cleaning Guide
- Stone-by-Stone: What’s Safe and What’s Not
- The Gross Truth: Earring Backs Need More Attention Than the Front
- How Often Should You Clean and Sanitize Earrings?
- Storage Habits That Keep Earrings Shiny Longer
- Troubleshooting: Common Earring Problems (and What They Usually Mean)
- When to Stop DIY and Visit a Jeweler
- Conclusion: A Simple Routine That Keeps Earrings Shiny (and Your Ears Happy)
- Real-World Experiences: What People Learn After Living With Earrings
Earrings are tiny overachievers. They sparkle, they accessorize, they make you look put-together even when your hair is doing its own indie film.
And then… they collect a greatest-hits album of skin oil, sweat, hairspray, makeup, lotion, dust, and whatever the inside of a gym bag is made of.
The good news: with the right method (and a little restraint), you can clean and sanitize earrings so they stay shiny and feel comfortable to wear.
This guide walks you through safe, practical steps for cleaning earrings at home, plus material-specific tips (gold, sterling silver, plated metals, costume jewelry),
and gem-specific warnings (pearls and opals are basically the “don’t put me in the dishwasher” crowd). You’ll get a simple routine you can repeat without turning
your bathroom sink into a chemistry lab.
Cleaning vs. Sanitizing: What’s the Difference (and Do You Need Both)?
Cleaning removes grimethink oils, makeup, dead-skin residue, and the general “why is this sticky?” factor.
Sanitizing reduces germs on the parts that touch your skin (mainly posts and backs).
If you wear earrings daily, sweat in them, share storage with other jewelry, or buy secondhand earrings, doing both is a smart move.
One important nuance: sanitizing earrings is not the same thing as treating a piercing. If your ears are newly pierced or irritated,
be extra gentle with the skin and follow professional aftercare guidance. (We’ll cover that without getting preachy.)
First: Identify What Your Earrings Are Made Of
Before you clean anything, take 30 seconds to identify the materials. This determines what’s safe.
Different metals and stones react differently to water, friction, and cleaners.
- Solid metals: 14k/18k gold, platinum, sterling silver, stainless steel, titanium, niobium
- Plated metals: gold-plated, rhodium-plated (common on white gold), vermeil
- Stones: diamonds, cubic zirconia, sapphires, rubies, emeralds, opals, pearls, turquoise, etc.
- Construction: glued-in stones, pavé settings, delicate filigree, snap closures, screw-backs
If you’re not sure, default to the gentlest method: mild soap + warm water + soft brush, and avoid soaking anything that looks delicate, plated, or glued.
Your Simple At-Home Earring Cleaning Kit
You don’t need a “professional jewelry spa.” You need a small, boring kit that works every time.
Keep these items in a zip pouch so you’re not hunting for them mid-clean:
- Gentle dish soap (no bleach, no “degreaser power of a thousand suns” formulas)
- Warm water (not hot)
- A soft toothbrush (ideally new or reserved for jewelry)
- Microfiber cloth or a very soft lint-free cloth
- Cotton swabs for tight areas and earring backs
- Two small bowls/cups (one for washing, one for rinsing)
- 70% isopropyl alcohol wipes or liquid + cotton pad (for sanitizing metal posts and backs)
- A small strainer or a towel over the sink drain (because gravity is rude)
The Safest “Default” Method: Mild Soap + Warm Water
This is the best starting point for most earringsespecially solid gold, platinum, stainless steel, titanium, and many stone-set pieces.
It’s also the method least likely to cause accidental damage.
Step-by-step: Basic cleaning for most earrings
-
Prep your workspace. Plug the sink or work over a bowl/towel.
Small jewelry loves to do disappearing acts. - Mix your solution. Add a few drops of gentle dish soap to warm water in a bowl.
-
Soak briefly (if safe). For sturdy, non-plated earrings, soak 5–15 minutes.
If your earrings are plated, glued, or costume jewelry, skip soaking and go straight to gentle wiping. -
Brush gently. Use a soft toothbrush to clean crevices, prongs, and the area behind settings.
Don’t scrub like you’re erasing your browsing historylight pressure is plenty. - Rinse in a bowl, not under a running faucet. This reduces the chance of losing earrings down the drain.
-
Dry completely. Pat with a soft cloth and air-dry for a few minutes.
Moisture trapped in backs and hinges can cause tarnish or funky smells.
Pro tip: Remove backs and clean them separately. Earring backs are where residue likes to set up a timeshare.
How to Sanitize Earrings (Without Turning Them Ugly)
Sanitizing is most important for the parts that touch your skin: posts, hooks, and backs.
You want germ reduction without damaging metal finishes or stones.
Best practice: Sanitize posts and backs after cleaning
- Clean first. Sanitizer works better on a clean surface. Grime acts like a shield for germs.
-
Use 70% isopropyl alcohol on metal parts.
Wipe posts and backs with an alcohol pad, or dampen a cotton pad and wipe thoroughly.
Let air-dry completely. -
Avoid soaking delicate pieces.
If earrings are plated, have glued stones, or include porous gems, don’t submerge the whole piece in alcohol.
Just wipe the metal parts that touch skin.
Skip bleach and harsh disinfectants. They can discolor metals, degrade finishes, and irritate skin later.
A note about piercings and irritated ears
If your piercing is new or your ear is irritated, don’t use harsh products on the skin.
Gentle cleansing and following reputable aftercare guidance matters more than “nuking it from orbit.”
If you see spreading redness, significant swelling, pus, fever, or worsening pain, contact a clinician.
Metal-by-Metal Cleaning Guide
Solid gold (10k/14k/18k), platinum, stainless steel, titanium
These metals generally do well with the soap-and-water method. They’re durable, but your settings might not be.
Always inspect for loose stones before soaking or brushing.
- Soak 5–15 minutes (if there are no glued components)
- Soft brush for crevices
- Rinse in a bowl and dry thoroughly
- Sanitize posts and backs with alcohol after cleaning
Gold-plated, vermeil, and rhodium-plated (white gold)
Plated jewelry is beautiful… and sensitive. Over-scrubbing or using abrasive cleaners can thin the plating over time.
Treat it like a nice sweater: gentle, quick, and no harsh chemicals.
- Skip long soaks; instead, wipe with a damp cloth and a tiny drop of mild soap
- Use a very soft brush only where needed, with light pressure
- Rinse quickly and dry immediately
- Avoid abrasives (including “toothpaste hacks”)
If rhodium-plated pieces start looking warmer or slightly yellow, that may be wear through the platingcleaning won’t fix that.
A jeweler can re-plate it.
Sterling silver
Sterling silver tarnishes when it reacts with sulfur and moisture in the air (and sometimes from lotions, sweat, and storage conditions).
The best approach depends on whether you’re dealing with light dullness or full-on “vintage pirate treasure.”
- Light tarnish: Use a silver polishing cloth, then rinse and dry
- Heavier tarnish: Use a reputable silver polish designed for jewelry, following directions carefully
- Avoid harsh dip polishes and aggressive DIY methods that can be too strong for certain finishes or details
If your silver earrings have intentional dark “patina” details, polishing too hard can remove the contrast.
In that case, spot-clean only the raised shiny areas and leave the patina alone like it’s part of the design (because it is).
Costume jewelry and fashion earrings
Costume jewelry can include plated metals, glued stones, and materials that do not love water.
The goal is to remove surface grime without loosening glue or clouding finishes.
- Skip soaking entirely
- Wipe with a barely damp cloth + a tiny drop of mild soap
- Use cotton swabs for crevices
- Dry immediately and thoroughly
- Sanitize only the posts/hooks with alcohol (wipe, don’t soak)
Stone-by-Stone: What’s Safe and What’s Not
Diamonds, sapphires, rubies, and most cubic zirconia
These are typically sturdy enough for the soap-and-water method. The sparkle killer is usually oil buildupnot the stone itself.
Focus on the underside of settings where lotions and soap residue can hide.
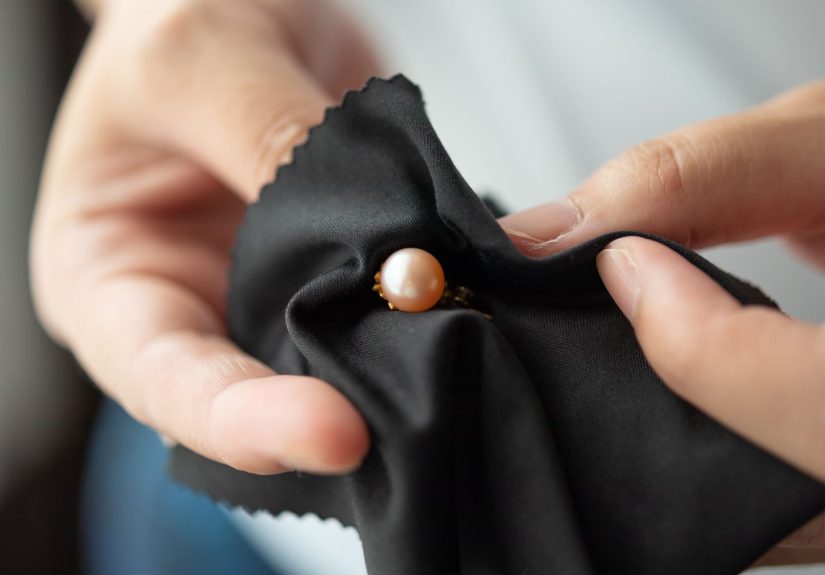
Emeralds, opals, pearls, turquoise, amber, coral (porous or soft stones)
These stones are more sensitive to chemicals, prolonged soaking, heat, and ultrasonic cleaners.
For these, keep it simple:
- Wipe gently with a soft, slightly damp cloth
- Avoid soaking
- Avoid alcohol on the stone surface (wipe posts only)
- Dry immediately
Pearls in particular: They’re organic and can lose luster if exposed to harsh cleaners.
Wipe them gently after wearing and store them away from scratchy jewelry.
The Gross Truth: Earring Backs Need More Attention Than the Front
The front of your earring gets compliments. The back does the dirty work.
Backs collect residue because they sit tight against skin, hair products, and natural oils.
How to clean common earring backs
- Butterfly backs: Soak (if metal and sturdy), brush with a soft toothbrush, then sanitize with alcohol
- Screw backs: Use a cotton swab to clean grooves; dry thoroughly so threads don’t trap moisture
- Silicone backs: Wash with mild soap and warm water, rinse well, and air-dry completely
If backs are discolored, bent, or won’t grip properly, replace them. It’s cheaper than losing an earring you actually like.
How Often Should You Clean and Sanitize Earrings?
Frequency depends on how you wear them. Here’s a realistic schedule that keeps things shiny without becoming your new full-time job:
- Daily-wear studs or hoops: quick wipe weekly + deeper clean monthly
- After sweaty days (workouts, hot weather, long travel): clean and sanitize ASAP
- Occasional statement earrings: clean before storing if they’ve been worn around hairspray/perfume
- Secondhand earrings: clean + sanitize before first wear, then follow your normal routine
Storage Habits That Keep Earrings Shiny Longer
Cleaning helps, but storage is the “prevent the mess” part of the plan.
If your earrings tarnish quickly, the culprit is often moisture, air exposure, or jewelry rubbing against jewelry.
- Store pieces separately so they don’t scratch each other
- Keep jewelry dry (bathrooms are humid; humidity loves tarnish)
- Use pouches or anti-tarnish strips for sterling silver
- Wipe after wearing to remove oils before storage
Also: put on earrings after perfume, hairspray, and lotion. Your jewelry doesn’t need a skincare routine.
Troubleshooting: Common Earring Problems (and What They Usually Mean)
“My earrings look dull even after cleaning.”
Dullness can come from residue trapped behind stones or in tiny crevices. Try a longer soak (if the piece is sturdy),
and use a soft brush under the setting. If it’s plated, keep brushing gentle and focus on wiping instead.
“My sterling silver tarnishes overnight. Is it mad at me?”
Not madreactive. Humidity, sulfur exposure, and storage are big factors. Store silver in a pouch and keep it dry.
Frequent light polishing is usually better than occasional aggressive polishing.
“My ears get itchy or red.”
This can be irritation from residue, but it can also be a metal sensitivity (nickel is a common culprit).
Consider hypoallergenic metals like titanium, niobium, or high-quality stainless steel.
If irritation persists or worsens, stop wearing the earrings and consult a clinician.
When to Stop DIY and Visit a Jeweler
Home cleaning is great, but some situations deserve professional help:
- Loose stones or wobbly settings
- Antique or heirloom pieces
- Pearls or delicate/porous gems you’re afraid to damage
- Severe tarnish or discoloration that keeps returning
Conclusion: A Simple Routine That Keeps Earrings Shiny (and Your Ears Happy)
If you remember nothing else, remember this:
clean first with mild soap and warm water, dry completely, then sanitize posts and backs.
Go gentler for plated metals, glued stones, and porous gems. Store earrings dry and separately.
Your earrings will stay shiny longerand you’ll spend less time wondering why your “cute studs” smell like a forgotten gym towel.
Real-World Experiences: What People Learn After Living With Earrings
In the real world, most people don’t start cleaning earrings because they woke up feeling responsible. They start because something happens.
Here are common “experience-based” scenariosand what usually fixes themso you can skip the trial-and-error phase.
Experience #1: The “Why do my favorite studs look cloudy?” moment.
This happens all the time with daily-wear studsespecially those worn with moisturizer, sunscreen, or foundation.
The front looks fine from a distance, but up close the stone (or CZ) seems foggy. What people discover is that the stone isn’t ruined;
the underside of the setting is coated in residue. A short soak in warm soapy water (for sturdy pieces) followed by gentle brushing
behind the stone restores the sparkle fast. The “aha” moment is realizing cleaning the top isn’t enoughyour earrings need a little attention
where no one can see, like vacuuming under the couch.
Experience #2: The gym-hoops situation.
People who wear hoops or huggies while working out often notice two things: dullness and a faint odor (not exactly “luxury fragrance”).
Sweat + hair products + friction creates buildup quickly. The fix is not complicated: clean weekly, and after especially sweaty sessions,
wash and dry them promptly. Sanitizing the posts and backs makes a noticeable difference for comfortespecially for anyone prone to irritation.
The takeaway: earrings can be “waterproof,” but that doesn’t mean they’re “never-clean-me” proof.
Experience #3: The secondhand earring confidence test.
Thrifted or vintage earrings are adorableuntil you remember they had a previous life. Most people feel better after a two-step routine:
(1) a gentle clean to remove oils and old residue, then (2) sanitizing only the metal parts that touch skin (posts, hooks, backs).
It’s also common to replace earring backs entirely because they’re inexpensive and, frankly, have seen too much.
The confidence boost comes from knowing you’re wearing the style, not the germs.
Experience #4: The sterling silver “tarnish returns in a week” complaint.
People often assume tarnish means their jewelry is low quality. In reality, sterling silver naturally tarnishes, and storage habits matter.
One common pattern: storing silver in a humid bathroom or tossing it into a jewelry dish with other pieces.
The fix is surprisingly boring: keep it dry, use a pouch, separate pieces, and do quick light polishing regularly.
Once storage improves, the “why does this keep happening?” frustration usually drops dramatically.
Experience #5: The plated jewelry heartbreak.
Someone buys gold-plated or rhodium-plated earrings, loves them, then scrubs them aggressively with an abrasive “hack” (often toothpaste).
The shine changes, the color shifts, and panic ensues. The lesson learned is that plated jewelry needs gentle cleaning and minimal friction.
If the plating wears down, it’s not the end of the worldmany pieces can be re-plated by a jewelerbut prevention is far cheaper than repair.
The new rule becomes: wipe more, scrub less.
Experience #6: The “my ears are angry” wake-up call.
People sometimes assume discomfort means infection, but irritation can come from residue, overwearing, or metal sensitivity.
Cleaning the earrings (especially backs), switching to hypoallergenic metals, and giving the ears a break often helps.
For new piercings, many learn the hard way that harsh products can irritate healing skinso they switch to gentler care, keep hands off,
and focus on clean jewelry plus calm skin. The biggest insight is that shiny earrings are great, but comfortable ears are the real flex.


