Table of Contents >> Show >> Hide
- Table of Contents
- Quick Snapshot: What You’re Building
- A Fast (Not-Too-Spooky) History Minute
- Materials & Tools
- Design Basics: Layout That Actually Works
- Step-by-Step: Build the Board
- Step 1: Choose your board size and cut the base
- Step 2: Sand like you mean it (but not like you’re punishing the wood)
- Step 3: Decide your background look (stain, paint, or “moody vintage”)
- Step 4: Transfer your design (4 reliable methods)
- Step 5: Add your letters, numbers, and icons
- Step 6: Seal the board so it’s smooth, durable, and glide-friendly
- Make a Planchette That Glides Like Butter
- Customization Ideas (Vintage, Gothic, or Glow)
- Common Mistakes & Fixes
- Care & Storage
- FAQs
- Maker Experiences: 10 Real-World Lessons (About )
- Conclusion
Want to make your own Ouija board? (Also called a spirit board or talking boardbecause “Ouija” is famously a brand name.) Whether you’re crafting a spooky-looking décor piece, building a party game prop, or just itching to do a wood project that feels like it should come with fog machines, this guide walks you through how to create a Ouija board step by stepwithout turning your garage into a haunted house.
Quick disclaimer, delivered with love and a flashlight-under-the-chin grin: people have all sorts of beliefs about these boards. This article focuses on the craftdesign, layout, paint, sealing, and making a planchette that glides smoothly. Make it respectful, make it safe, and maybe don’t blame the board if your handwriting looks like a raccoon tried calligraphy.
Quick Snapshot: What You’re Building
A classic Ouija-style setup has two parts:
- The board: letters A–Z, numbers 0–9, “YES,” “NO,” and “GOODBYE” (sometimes “HELLO”), plus decorative icons.
- The planchette: a small pointer with a window/hole that slides to indicate characters.
A practical DIY size is 12" × 18" (easy to store, big enough to read). If you want a dramatic “movie prop” look, go bigger: 16" × 24" feels delightfully extra.
A Fast (Not-Too-Spooky) History Minute
Talking boards took off in the U.S. in the late 1800s, when Spiritualism was popular and parlor games were basically the Netflix of their day. The “Ouija” name is tied to Baltimore in the 1890s, and the board later became a mass-market gameeventually owned and sold by major toy companies. By the mid-1960s it was firmly in the “family game” world (even if horror movies later did… a lot with that).
Translation: your DIY version can be whatever you want it to bean art piece, a Halloween build, a game-night novelty, or a beautifully finished woodworking project that just happens to have the alphabet on it.
Materials & Tools
Board Base Options (Choose Your Adventure)
- Beginner-friendly: 1/4" or 1/2" birch plywood (smooth, stable, affordable)
- Fancy: solid hardwood panel (maple, birch, walnut) for a premium feel
- Ultra-budget: MDF (very smooth, but seal edges well and avoid moisture)
- Temporary / kid-safe craft: sturdy foam board or thick cardboard (seal with clear coat for durability)
Basic Supplies
- Sandpaper (120–150 grit, then 220 grit)
- Tack cloth or microfiber cloth (for dust removal)
- Wood stain or acrylic paint (or both, if you’re feeling rebellious)
- Painter’s tape
- Ruler, pencil, compass or a large plate/bowl for arcs
- Design transfer method (pick one): carbon paper, vinyl stencil, printed template, or freehand
- Clear protective finish: water-based polyurethane or a water-based clear coat (great for smooth glide)
Optional (But Nice)
- Spray primer or sanding sealer (helps prevent paint bleed on porous wood)
- Gold paint pen for accents
- Rubber feet (keeps the board from scooting around)
- Paste wax (adds an extra slick glide once finish is fully cured)
- Laser engraver or wood-burning tool (pyrography) for permanent lettering
Design Basics: Layout That Actually Works
A Ouija board is basically typography + ergonomics. If it looks cool but is hard to read, your planchette will spend the night wandering around like it’s lost in a grocery store. Here are layout rules that make the board usable:
1) Letter and number sizing
- For a 12" × 18" board: aim for 0.75"–1" tall letters and numbers.
- Keep consistent spacing so the planchette window can “land” cleanly on each character.
2) Classic arrangement (easy and familiar)
- YES top left, NO top right
- Alphabet in two gentle arcs across the middle
- Numbers 0–9 near the bottom center
- GOODBYE centered at the bottom (it’s the “exit sign”)
3) Planchette window size
Make the planchette’s viewing window large enough to frame a single character without covering neighboring letters. For most boards, a window roughly 1" × 1.25" (oval or rounded rectangle) works well.
4) Make it glide
The smoother your topcoat, the better the experience. A properly sealed board turns the planchette from “scraping chair on tile” into “air hockey puck energy.”
Step-by-Step: Build the Board
Step 1: Choose your board size and cut the base
Pick your dimensions and cut your panel. If you’re buying pre-cut craft wood, awesomeyour future self thanks you. Lightly round over corners with sandpaper (or a router, if you have one) so the board feels finished and doesn’t catch sleeves.
Step 2: Sand like you mean it (but not like you’re punishing the wood)
Sanding is the difference between “handmade heirloom” and “I made this in a hurry right before the Halloween party.” Start around 120–150 grit to level the surface, then move to 220 grit for smoothness. Always sand with the grain when possible.
Then remove dust thoroughly (vacuum + tack cloth or microfiber). Dust left behind becomes little bumps under paint and clear coataka speed bumps for your planchette.
Step 3: Decide your background look (stain, paint, or “moody vintage”)
- Stained wood: gives a classic, antique vibe. Great for gothic or Victorian-inspired designs.
- Painted base: high contrast, easy to read, and perfect for bold graphics.
- Layered look: stain first, then paint letters and icons on top.
Let stain or base paint dry completely before you do anything else. Rushing this step is how you accidentally create “abstract expressionist smears,” which is a valid art movement, just not always the vibe you were going for.
Step 4: Transfer your design (4 reliable methods)
Method A: Print a template + carbon paper (fast and forgiving)
- Print your layout to scale (tape sheets together if needed).
- Place carbon paper between the printout and the wood.
- Trace letters/icons with a pencil or stylus to transfer outlines.
- Remove paper and refine lines lightly with pencil.
Method B: Vinyl stencil (clean edges, great for beginners)
Cut your design from stencil vinyl (or buy letters), apply it to the board, and burnish edges firmly so paint can’t sneak under. Use a dry-brush or light dabbing motion with minimal paint.
Method C: Mod Podge-style image transfer (great for ornate designs)
If you want elaborate flourishes, moons, suns, or vintage typography, a transfer method can be a lifesaver. You print the design and transfer it to wood, then seal it. This is especially handy when you want crisp detail without freehand painting.
Method D: Engraving or wood burning (permanent and dramatic)
Wood burning or laser engraving makes lettering durable and gives a “real artifact” look. After burning/engraving, you can rub paint into grooves, wipe the surface clean, and seal everything under a clear coat for a professional finish.
Step 5: Add your letters, numbers, and icons
Use acrylic paint, paint markers, or stain for the graphics. For stencils, remember: less paint is more. Load your brush, then offload most of it onto a paper towel before touching the stencil. Multiple light passes beat one heavy coat every time.
If you’re freehanding, outline lightly in pencil first, then paint. A simple trick for steadier lines: rest the side of your hand on a clean scrap of paper so your skin doesn’t stick to the surface.
Step 6: Seal the board so it’s smooth, durable, and glide-friendly
A clear coat protects your design and makes the planchette slide. Water-based clear coats are popular for crafts because they’re low-odor and dry clear. Apply thin coats and avoid shaking the can (shaking can introduce bubblesnobody wants “bubble texture” unless you’re going for a very specific soup aesthetic).
A simple, reliable sealing routine
- Apply a thin coat with a synthetic brush or foam applicator, following the grain.
- Let dry thoroughly.
- Lightly sand with 220 grit between coats to keep it glassy-smooth.
- Repeat for 3 coats (or more if you want extra protection).
- Let the board cure before heavy use (dry ≠ fully cured).
Optional upgrade: once fully cured, buff a tiny amount of paste wax on top for a silky glide. (Test on a corner first.)
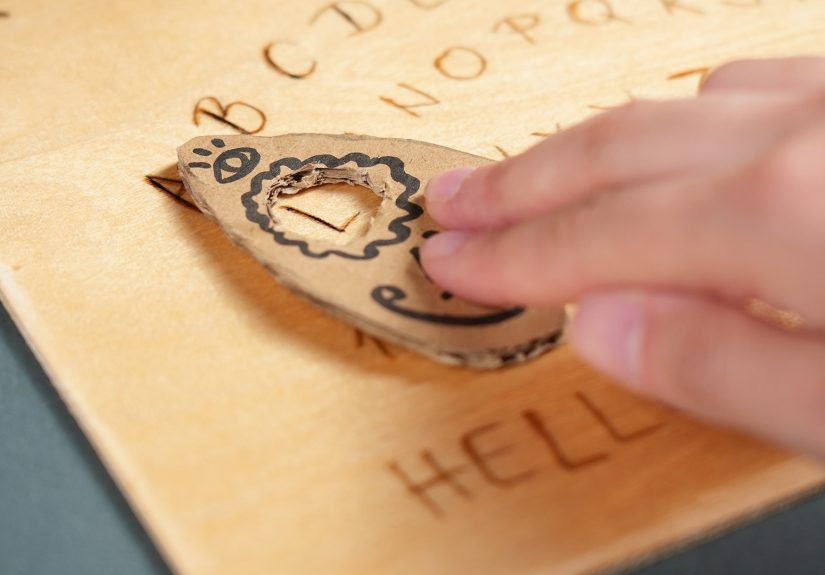
Make a Planchette That Glides Like Butter
The planchette is where DIY builds often go wrong. A gorgeous board with a scratchy planchette feels like driving a sports car with square wheels. Here’s how to make one that moves smoothly.
Planchette materials
- 1/4" wood (birch ply works well)
- Small piece of clear plastic (optional, for a window “lens”)
- Felt pads or small furniture sliders (your secret weapon)
- Glue and/or small screws for the window lens (optional)
Planchette shape (classic + easy)
- Draw a rounded triangle or heart-like planchette shape about 4"–5" wide.
- Cut it out (jigsaw, scroll saw, or careful utility-knife work on thinner material).
- Sand edges smooth and slightly rounded.
- Cut a viewing window/hole near the top center.
Add glide feet
Put three pads underneath (a stable tripod) so it won’t wobble: two near the wider bottom corners, one near the top. Smaller pads reduce friction; big chunky pads can feel sticky.
Seal the planchette too
Seal the top and edges so it matches the board. Keep the underside smoothavoid thick drips of finish near the feet. If you add a lens, sand edges and keep glue neat so it doesn’t snag.
Customization Ideas (Vintage, Gothic, or Glow)
Here are ways to make your DIY Ouija board look like it has a backstory (without actually needing one):
- Vintage typography: choose a serif font for letters and a bold, old-timey “GOODBYE.”
- Celestial theme: add sun/moon icons, stars, constellations, or a subtle compass rose.
- Gold accents: use a metallic paint pen to highlight borders and symbols.
- Distressed finish: lightly sand edges after painting, then seal for an aged look.
- Glow effects: glow-in-the-dark paint on key icons or the planchette window for night play.
- Inlay look (without real inlay): paint thin “inlay lines,” then clear coatinstant fancy.
Common Mistakes & Fixes
Paint bleed under stencils
- Cause: too much paint, stencil not sealed to wood grain, or porous surface.
- Fix: use a drier brush (offload paint), burnish stencil edges, and consider a light sealing coat before stenciling.
- Rescue: once dry, lightly sand fuzz/bleed and touch up with a fine brush or paint pen.
Bubbles or brush marks in clear coat
- Cause: overbrushing, shaking the finish, or applying too thick.
- Fix: apply thin coats, stir gently, and don’t “work” the finish too long.
- Rescue: let dry, sand smooth with 220, then recoat.
Planchette drags or chatters
- Cause: rough finish, finish not cured, feet too large, or uneven pads.
- Fix: add another clear coat and sand between coats; use three small pads; ensure pads are level.
Care & Storage
- Store flat to prevent warping (especially for thin plywood).
- Avoid extreme heat or humidity (wood has feelings).
- Clean with a dry microfiber cloth; avoid harsh cleaners on clear coat.
- If glide decreases, buff lightly with a soft cloth; re-wax only if you used wax originally.
FAQs
Is it okay to call it a “Ouija board” if I’m making my own?
In everyday conversation, people often use “Ouija board” generically, but it’s historically associated with a brand name. If you want to be precise on your blog or product listing, “spirit board” or “talking board” is a safe, descriptive alternative.
What’s the easiest version for beginners?
Use a pre-cut birch plywood panel, stain it, trace a printed template with carbon paper, paint letters with a paint pen, and seal with three thin clear coats. Simple, clean, and very hard to mess up.
Can I make one without power tools?
Absolutely. Buy a pre-cut panel, use sandpaper by hand, and cut the planchette from thin craft wood (or even thick cardboard for a temporary version). The secret sauce is still the same: clean layout + smooth sealing.
Maker Experiences: 10 Real-World Lessons (About )
Instead of pretending every DIY build goes perfectly (LOL), here are common “in-the-trenches” experiences makers report when building a homemade Ouija board plus what those moments teach you. Think of this section as the part where the craft quietly leans in and whispers, “You’re going to want to do a test piece.”
- The first draft looks amazing… on paper. Many builders start with a gorgeous digital design, then realize the letters are too small once transferred to wood. The fix is simple: print a full-size paper mockup and place your hand on it like you’re actually using the board. If your fingers cover half the alphabet, scale up before you paint.
- Paint bleed is everyone’s origin story. The most common beginner shock is how easily paint creeps under stencils on wood grain. Makers who get crisp results usually do two things: (1) burnish stencil edges like they’re sealing an envelope full of secrets, and (2) use a nearly-dry brush with light passes. Some also seal the surface first so paint can’t wick into raw fibers.
- “Dry” isn’t the same as “ready.” A board can feel dry to the touch but still be soft underneath. People discover this when the planchette leaves faint tracks or the finish feels tacky. The lesson: let the clear coat cure. If you can, give it at least overnightand longer for thicker buildsbefore you start sliding anything on it.
- One coat of clear finish is never enough. Makers who stop after one coat often say the board feels “grabby.” The smooth, glide-friendly builds usually have multiple thin coats with a light sanding between them. It’s boring, yesbut it’s the kind of boring that pays off like a good retirement plan.
- The planchette is the true main character. Many people spend 90% of their energy on the board art and 10% on the planchettethen wonder why it drags. The best DIY planchettes tend to use three small felt pads (tripod stability), and makers keep the underside clean and flat so it doesn’t snag.
- Sharp corners feel “cheap” faster than you’d expect. Even a beautiful design can feel unfinished if edges are sharp. Makers who slightly round corners and edges say the board immediately feels more “store-bought” (in the good way, not the mass-produced way).
- High contrast beats “moody” for usability. A dark stain with dark paint looks dramaticuntil you try to read it in low light. Builders often end up highlighting letters with lighter paint or metallic accents so the board stays legible. Spooky is great; readable spooky is better.
- Testing on scrap saves sanity. People who test stain color, paint opacity, and clear coat on a scrap piece avoid most heartbreak. People who don’t… learn new words. Testing helps you see whether your marker bleeds, whether your stencil lifts fibers, and how your topcoat changes color.
- “Perfect symmetry” is optional; clean spacing isn’t. Makers often stress about exact arcs and decorations. The boards that feel best in use aren’t always the most ornatethey’re the ones where spacing is consistent, characters are aligned, and the planchette window frames one thing at a time.
- The finished board becomes a conversation pieceeven if you never “play.” A common experience is that the board ends up displayed like art: leaned on a shelf, hung on a wall, or used as Halloween décor. Makers say the fun is as much in the buildchoosing fonts, adding a celestial theme, sealing it glossyas in anything that happens afterward.
Conclusion
Creating a Ouija board is a satisfying blend of design and woodworking: choose a stable base, lay out clean typography, apply your graphics with a reliable transfer method, and seal it with multiple thin coats for a smooth glide. The “secret” isn’t spooky at allit’s craftsmanship. Take your time on sanding and finishing, build a planchette with balanced feet, and you’ll end up with a DIY spirit board that looks sharp, feels professional, and holds up for years.


