Table of Contents >> Show >> Hide
- Why Turn a Rug into Wall Art?
- What You’ll Need to Frame a Rug
- Step 1: Plan the Design and Prep the Rug
- Step 2: Mount the Rug to the Backing
- Step 3: Frame, Hang, and Style Your New Wall Art
- Common Mistakes to Avoid
- FAQ: Framing Rugs as DIY Wall Art
- Real-Life Experiences and Extra Tips for Framing Rugs
- Conclusion
Rugs on the floor? Classic. Rugs on the wall, framed like museum pieces? That’s where the magic (and the compliments) really start rolling in. If you’ve ever fallen in love with a small rug or textured mat but didn’t want to walk all over it, turning it into framed rug wall art is the perfect DIY project.
This guide walks you through exactly how to frame a rug in three easy steps. We’ll talk about how to choose the right rug, what kind of frame will actually support the weight, and the best way to mount everything so it looks polished, not like a craft project that escaped from the basement.
Think of this as the Hometalk-style approach: budget-friendly, beginner-friendly, and very forgiving if you prefer coffee to perfectionism. Let’s get that rug off the floor and onto the wall.
Why Turn a Rug into Wall Art?
Before we pull out the tools, it helps to know why framed rug wall art is such a design win:
- Texture without clutter: Rugs add dimension and softness in a way flat prints never can. They instantly warm up blank walls.
- Budget-friendly “gallery” look: A small rug or runner is often cheaper than a large piece of art but fills a similar amount of visual space.
- Preserves special textiles: Vintage, handwoven, or sentimental rugs are safer on the wall than under muddy shoes.
- Sound softening: Textiles absorb echo, which is especially nice in apartments with hard floors.
- Huge style range: Boho, minimalist, traditional, global, Scandinavian there’s a rug for every aesthetic.
The key is choosing the right rug and framing method so your piece looks intentional and stays safely on the wall.
What You’ll Need to Frame a Rug
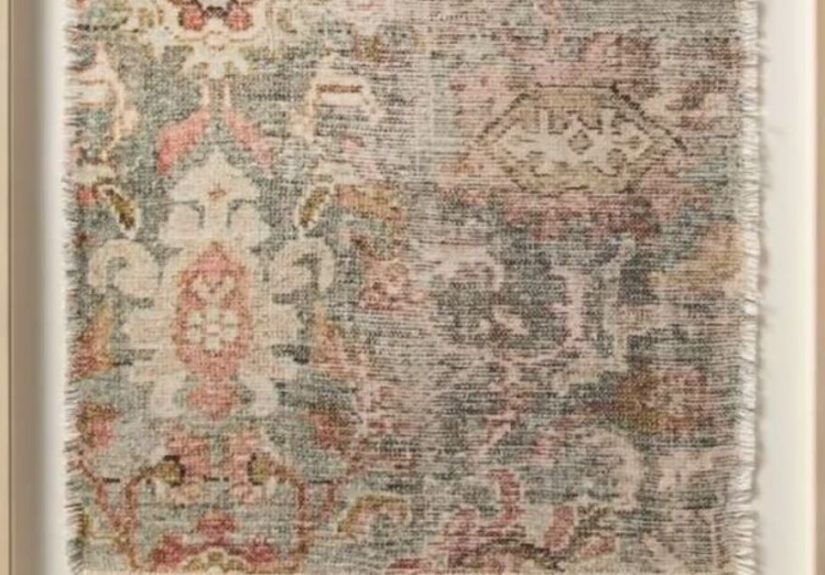
1. Choose the Right Rug
Not every rug is thrilled to become wall art. For this project, look for:
- Size: Small to medium rugs (2′ × 3′, 3′ × 5′, runners, bath mats, and flatwoven mats) are ideal.
- Weight: Flatwoven, low-pile rugs are much easier to frame than thick shag or heavy wool.
- Pattern placement: Center motifs, borders, and medallions will look best when framed.
- Condition: Rugs with a small stain or damaged corner can still shine when trimmed and framed.
2. Frame and Backing
For a simple three-step project, you have two main options:
- Ready-made floating frame: A large photo or poster frame with a sturdy backing (MDF or hardboard) works beautifully for lightweight rugs.
- DIY frame with plywood: For bulkier rugs, use a sheet of thin plywood as backing and build a simple frame with molding.
Make sure the backing is strong enough to carry the rug’s weight and the frame has solid corners. You don’t want your art quietly disassembling itself at 2 a.m.
3. Tools and Supplies
- Fabric scissors or a sharp utility knife
- Measuring tape and pencil
- Ruler or straightedge
- Heavy-duty hot glue gun or strong fabric adhesive
- Staple gun (for attaching rug to backing from the back side, if needed)
- Hanging hardware (D-rings, wire, or French cleat)
- Optional: neutral fabric or matboard to create a border behind the rug
Step 1: Plan the Design and Prep the Rug
This is where you prevent all the annoying mistakes crooked patterns, chopped-off borders, and frames that are just slightly too small.
Measure Twice (or Three Times), Cut Once
- Measure your frame’s visible opening. Ignore the total outer frame size and focus on the inside opening you’ll actually see.
- Lay your rug flat. Smooth out wrinkles and check which orientation looks best vertical, horizontal, or even diagonal for some patterned rugs.
- Mark your “crop” area. Use painter’s tape or pins to mark the rectangle that will show inside the frame. Make sure key motifs stay centered.
Decide Whether to Trim the Rug
You have two options:
- No-cut method: Fold excess rug neatly behind the backing. Great for preserving vintage or special pieces.
- Trimmed method: Carefully cut the rug to fit the backing, leaving a small margin if you plan to wrap and staple it around the back.
If you plan to cut the rug, use sharp fabric scissors or a utility knife with a fresh blade. Cut slowly along a straightedge, working from the back of the rug to keep the front fibers clean.
Clean and Stabilize
- Vacuum the rug well to remove dust and loose fibers.
- If it’s slightly curled, gently steam or lightly mist with water and lay flat under books overnight.
- For very loosely woven pieces, consider applying a thin line of fabric glue along the cut edges to prevent fraying.
Step 2: Mount the Rug to the Backing
This is the heart of the project. The goal: a rug that looks flat and intentional, with no sagging, warping, or “wavy” corners.
Option A: Glue Method (Best for Lightweight Rugs)
- Place your backing on a flat surface. If you’re using a frame’s original backing, remove it from the frame first.
- Dry-fit the rug. Center the rug on the backing. Adjust until you like the spacing around all edges.
- Mark light guide lines. Use a pencil to outline the rug’s position on the backing.
- Apply adhesive in sections. Starting at the center, apply hot glue or fabric adhesive in thin, controlled lines or dots.
- Press and smooth as you go. Place part of the rug into the glue, then smooth outward with your hands to avoid bubbles and ripples.
- Work toward the edges. Continue gluing and smoothing in sections until the entire rug is secure.
Pro tip: Don’t try to glue the entire surface at once. Working in small sections gives you time to adjust placement before the glue sets.
Option B: Wrap-and-Staple Method (Great for Heavier Rugs)
- Cut backing slightly smaller than the rug. You’ll need enough extra rug to wrap around the back by about 1–2 inches on all sides.
- Center the backing on the rug. Flip everything so the front of the rug is facing down and the backing is on top.
- Wrap and staple opposite sides first. Pull the rug snugly (not too tight) over one long edge and staple to the backing. Move to the opposite edge next.
- Repeat with the remaining sides. Fold in corners like wrapped gifts for a clean finish.
- Flip and check. Turn the piece right-side up and smooth any slight ripples by adjusting tension if needed.
This method gives the rug more structure and works well if you want a “gallery canvas” look, especially with deep frames or shadow boxes.
Step 3: Frame, Hang, and Style Your New Wall Art
Assemble the Frame
- Clean the frame and glass (or acrylic). Dust and fingerprints are 10 times more visible once they’re on the wall.
- Decide on glass vs. no glass.
- For fluffy or high-texture rugs, skip the glass so the fibers can breathe and stand out.
- For flatwoven rugs, glass or acrylic can protect from dust but may create glare.
- Place the rug and backing into the frame. Make sure it’s centered and snug. Use the frame’s clips or additional framer’s points to hold everything in place.
Add Secure Hanging Hardware
Framed rugs are heavier than typical art prints, so upgrade the hanging hardware:
- Install D-rings on both sides of the frame and connect them with picture wire; or
- Use a French cleat for very heavy pieces to distribute the weight evenly.
- Use wall anchors appropriate for your wall type (drywall, plaster, masonry).
Always check the weight rating on hooks and anchors. “Looks fine” is not a structural test.
Style Your Framed Rug Like a Pro
- Above a sofa or bed: Center the rug about 6–10 inches above the furniture so it feels connected, not floating away.
- In an entryway: Use a bold rug to create a focal point and pair it with a slim console table.
- In a gallery wall: Mix your framed rug with photos, prints, and mirrors to add texture among flat pieces.
- Neutral spaces: Use a colorful rug as a statement piece in an otherwise calm, minimal room.
Common Mistakes to Avoid
- Using a frame that’s too weak: Thin plastic frames can buckle or pop open under rug weight. Choose sturdy wood or metal.
- Skipping measurements: Guessing the size usually ends with a rug that’s slightly off-center inside the frame.
- Gluing only the corners: This leads to sagging over time. Attach the whole surface or use wrap-and-staple.
- Ignoring wall type: Heavy framed textiles on basic nails in crumbly plaster is a horror story waiting to happen.
- Hanging too high: The center of the rug should generally be around eye level (about 57–60 inches from the floor).
FAQ: Framing Rugs as DIY Wall Art
Can I frame a thick or shaggy rug?
You can, but you’ll usually need a deep shadow box or a custom frame to handle the thickness. For very fluffy rugs, skipping the glass helps keep the texture looking natural.
Will framing damage my rug?
If you avoid harsh adhesives, don’t compress the fibers too tightly, and protect it from direct sunlight, framing can actually extend a rug’s life by keeping it off the floor and away from foot traffic.
What if I rent and can’t make big holes in the wall?
Use heavy-duty picture hanging strips rated for higher weights or hang the framed rug on a single stud and patch the hole later. For especially heavy frames, stick to stud-based hanging with a minimal number of holes.
Can I do this with a bath mat or doormat?
Yes! Many stylish bath mats and doormats have amazing patterns and textures. Just make sure they’re clean and completely dry before you mount them.
Real-Life Experiences and Extra Tips for Framing Rugs
Once you’ve framed a rug or two, you’ll realize that the process is less “fine art conservation” and more “smart problem-solving with textiles.” Here are some practical lessons and ideas gathered from real-life projects and common DIY scenarios.
1. Start with a “Practice” Rug
If you have a truly special vintage piece, don’t let it be your first experiment. Try framing an inexpensive runner, bath mat, or small flatwoven piece first. You’ll get a feel for how your adhesive behaves, how heavy the finished piece is, and how much tension to apply when you wrap and staple.
Many DIYers are surprised by how much weight even a small rug adds once it’s combined with backing and frame. Doing a trial run means fewer surprises when you move on to the heirloom rug from your grandparents.
2. Treat the Rug Like Fabric, Not Like Wood
It’s tempting to think of rugs as rigid objects, but they behave more like thick fabric. That means they stretch a little, relax over time, and respond to humidity. When you mount your rug, aim for snug but not drum-tight. Overstretching can distort the pattern, especially on geometric designs, and may cause subtle warping as the fibers relax.
Checking your work from the front every few staples or glued sections helps keep the pattern straight. If you notice a diagonal pull developing, back up a few steps and loosen or re-position that area.
3. Think About Light and Shadow
One of the best things about framed rug wall art is the play of shadows across the texture. If possible, hang your rug where it catches gentle side light from a nearby window or a wall sconce. This keeps the piece interesting throughout the day as the light changes.
If your space is darker, consider adding a small picture light above the frame. Aim the beam so it grazes across the surface instead of shining straight on. This highlights the weave and pile without creating harsh glare, especially if you’re using glass or acrylic.
4. Use Your Rug as a Color Roadmap
Rugs are excellent “boss pieces” they’re full of colors you can repeat around the room. Once your rug is framed and hung, pull two or three shades from the pattern and echo them in throw pillows, vases, lamps, or artwork nearby. This makes the framed rug feel intentional, like it was always part of the room’s plan.
For example, if your rug has deep teal, rust, and cream tones, you might paint a nearby side table a soft teal, use rust-colored pillows on the sofa, and choose a neutral cream throw. Suddenly, your framed rug is not just art it’s the design anchor.
5. Don’t Be Afraid to Go Big
Many people default to small framed rugs because they feel more manageable. But if you have a big blank wall and a striking rug, go for a larger piece. A framed 3′ × 5′ rug can stand in for a large canvas, making your space feel custom and curated instead of filled with generic prints.
In dining rooms, oversized framed rugs look fantastic above buffets or sideboards. In bedrooms, they can act as an alternative to a traditional headboard, adding softness and color behind the bed.
6. Mix Rugs into a Gallery Wall
For a more collected feel, try adding a small framed rug into a gallery wall of photos, artwork, and mirrors. The texture breaks up the sea of rectangles and paper, making the arrangement feel more dynamic. Just be mindful of weight make sure your anchors and hooks match the heaviest piece in the arrangement.
7. Consider Long-Term Care
Finally, treat your framed rug like the textile it is. Avoid hanging it in direct, harsh sunlight where colors may fade. Dust it periodically with a soft brush attachment on your vacuum or a microfiber cloth. If you used glass, clean it gently without letting cleaner run down into the frame.
If you ever decide to unframe the rug, slow and gentle wins. Remove staples carefully, and if you used fabric-safe adhesive in moderate amounts, you may still be able to reuse the rug in another way, like a cushion cover or smaller wall hanging.
The more you experiment, the more you’ll see rugs as flexible, creative art materials rather than just something you roll out under the coffee table. And once friends see your framed rug wall art, be prepared to hear: “Wait… that’s a rug?” followed immediately by “Okay, teach me how to do that.”
Conclusion
Framing a rug in three easy steps comes down to picking the right textile, mounting it securely, and giving it a frame that can handle the weight without losing the texture that makes rugs so special. With a bit of planning and a few basic tools, you can turn an ordinary floor piece into a standout work of DIY wall art that feels custom, cozy, and seriously stylish.


