Table of Contents >> Show >> Hide
- First: What Exactly Are Mushroom Spores?
- Safety and Legality: Read This Before You Touch Anything
- What You Need to Harvest Spores (Simple, Cheap, and Not Weird)
- Step-by-Step: How to Make a Mushroom Spore Print
- How to Store Mushroom Spores So They Stay Useful
- Can You Grow Mushrooms Directly From Spores at Home?
- The Safer, Easier Way to Grow Edible Mushrooms at Home (Still Very Fun)
- How Spore Prints Help You Grow Better Mushrooms (Even If You Don’t Grow From Spores)
- Troubleshooting: When Your Spore Print (or Grow) Doesn’t Go to Plan
- Mini Case Examples: Beginner-Friendly Mushrooms That Pair Well With Spore Printing
- Conclusion: Spores Are the Beginning, Not the Whole Story
- Experience Section: of Real-World “What It’s Like” Moments
Growing mushrooms at home feels like cheating at gardeningin the best way. No sun? Fine. No green thumb? Also fine. Fungi are here for your dark corner, your spare closet, and your “I swear I’ll clean this shelf later” energy.
This guide explains how mushroom spores work, how to collect them safely (hello, spore print art), and how those spores fit into real-world home mushroom cultivation. We’ll keep things focused on legal, edible mushrooms like oyster and shiitake. One important note: detailed spore-to-grow “lab-style” propagation methods can be misused for illegal cultivation, so I’ll describe that part at a high level and steer you toward safer, beginner-friendly ways to grow delicious mushrooms at home.
First: What Exactly Are Mushroom Spores?
Think of spores like a mushroom’s version of seedsexcept much smaller, lighter, and dramatically more eager to float into places you didn’t invite them. Spores are reproductive cells released from a mature mushroom’s spore-producing surface (usually gills, pores, or teeth).
When spores land in a suitable environment, two compatible spores can germinate and form mycelium (the white, threadlike network that does the real work). The mushroom you see is basically the fruiting bodythe “apple” on a much larger underground “tree.”
Why Spore Prints Matter
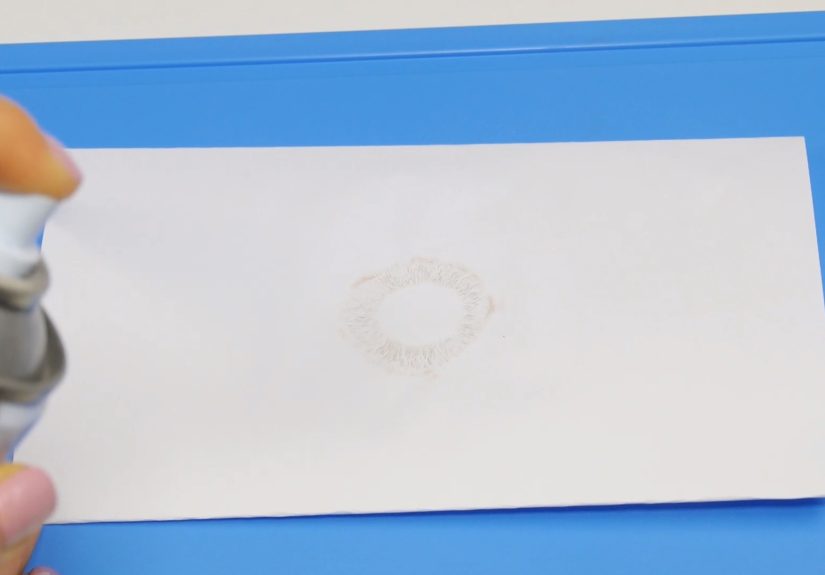
A spore print is the colored deposit left behind when a mushroom drops spores onto a surface. It’s used for identification (spore color can narrow down a mushroom’s genus) and for collecting spores for microscopy, breeding, or educational projects.
Safety and Legality: Read This Before You Touch Anything
Don’t eat wild mushrooms unless an expert has identified them. Many dangerous species look similar to edible ones, and cooking doesn’t necessarily destroy certain toxins. If you want to make spore prints, it’s safest to use mushrooms from the grocery store (like portobello, cremini, or oyster mushrooms) or a trusted grow kit.
Only work with mushrooms that are legal where you live. This article is about edible home cultivation and educational spore collection. If you’re under 18, ask an adult to help with anything involving sharp knives, hot water, or tools.
What You Need to Harvest Spores (Simple, Cheap, and Not Weird)
You can make a spore print with basic household items. Here’s a practical checklist:
Basic supplies
- A mature mushroom cap (oyster, portobello, cremini, etc.)
- Aluminum foil (best for storage) and/or white + dark paper (best for seeing color)
- A cup, bowl, or glass to cover the cap
- A clean knife (to remove the stem)
- Optional: a dropper for a tiny drop of water
- Optional: gloves and rubbing alcohol for wiping surfaces
Nice-to-have upgrades
- Wax paper envelopes or small sealable bags for storing prints
- A label and marker (future-you will thank you)
- A basic microscope if you’re doing identification projects
Step-by-Step: How to Make a Mushroom Spore Print
This is the cleanest, safest way to harvest spores at homeespecially for edible mushrooms from a store.
1) Choose a mature cap (maturity matters)
Pick a mushroom whose cap is open enough that the gills/pores are exposed. Very young “button” mushrooms may not drop many spores yet. A portobello (mature cremini) is basically the overachiever of spore printing.
2) Prep your print surface
Lay down a square of aluminum foil. If you want to see spore color clearly, you can place half the cap over white paper and half over dark paper. Foil is excellent because you can fold it into a neat spore “packet” later.
3) Remove the stem and place the cap gill-side down
Slice off the stem close to the cap so the mushroom sits flat. Place the cap with gills/pores facing down on your foil or paper.
4) Cover it like you’re tucking it in for a nap
Cover the cap with a cup or bowl. This reduces airflow and helps spores settle nicely instead of becoming airborne confetti.
5) Wait (the hardest gardening skill)
Leave it undisturbed for several hours, often overnight. Depending on freshness and humidity, spores may drop sooner or later. If your indoor air is very dry, a tiny drop of water on top of the cap can encourage spore releasedon’t flood it.
6) Lift the cap straight up
Remove the cover and lift the cap carefully. You should see a delicate patternlike a nature-made stampon the foil/paper underneath.
7) Let the print dry briefly
If there’s any surface moisture, let the print air-dry in a clean, still place for a short time before storing. You want spores dry enough to store without turning into a science experiment.
How to Store Mushroom Spores So They Stay Useful
A spore print is surprisingly easy to store if you keep it dry, sealed, and labeled.
Best practices for storage
- Fold foil carefully around the print so the spores stay protected.
- Place the folded foil in a small bag or envelope.
- Label with mushroom type (and source), date, and any notes (e.g., “store-bought oyster”).
- Store in a cool, dry place away from humidity and sunlight.
Reality check: spore viability varies a lot by species and storage conditions. In general, drier and cooler storage helps, but spores are also more prone to contamination the longer they sit around. If your goal is eating mushrooms sooner rather than running a tiny fungus museum, consider using fresh prints and beginner-friendly spawn methods (more on that below).
Can You Grow Mushrooms Directly From Spores at Home?
Yes… but it’s not the easiest starting point, and it’s not the most reliable path for beginners. Here’s why:
Spores are “genetic lottery tickets”
Unlike cloning a culture (which gives you consistent results), spores mix genetics. You might grow something vigorousor something slow and fussy that acts like it has a busy schedule and can’t colonize your substrate until next season.
Contamination is the main villain
Spores are microscopic and collected from the open air. That means other microbes can hitch a ride. When you try to move from spores to a growing culture, sterile technique matters a lot.
A high-level look at the “spores to culture” step
In professional and educational settings, spores are typically germinated on sterile nutrient media (often agar) to isolate clean mycelium before moving it to a bulk growing substrate. That process can be taught safely in supervised workshops and lab classes, but it’s not something I’m going to provide as a detailed at-home protocol because those same procedures can be misused for illegal cultivation.
Beginner takeaway: collect spore prints for learning, microscopy, and identificationand use commercial spawn or a grow kit for actually producing edible mushrooms at home.
The Safer, Easier Way to Grow Edible Mushrooms at Home (Still Very Fun)
If your goal is harvesting mushrooms to eat, you’ll get faster, more reliable results using spawn (living mycelium on a carrier like grain or sawdust) from a reputable supplier. It’s the equivalent of buying a healthy plant instead of trying to breed one from seed on hard mode.
Option A: Grow kits (best for first-timers)
Grow kits are forgiving, tidy, and surprisingly productive. You typically keep the kit in the right humidity range and harvest multiple flushes. This is the “I want mushrooms, not a second job” option.
Option B: Oyster mushrooms in a bucket (classic beginner project)
Oyster mushrooms are popular for beginners because they colonize aggressively and tolerate a range of conditions. Many educators and extension programs recommend oyster mushrooms as a starting species.
At a high level, bucket growing involves:
- Using a clean container with airflow holes
- Adding a suitable, prepared substrate (often straw or hardwood-based material)
- Mixing in oyster mushroom spawn
- Keeping the environment humid with fresh air exchange
Important: “Preparation” of substrate is about reducing competing organisms so the mushroom mycelium can win. There are different approaches (often involving heat or controlled pasteurization). If you’re new, consider buying pre-prepared substrate or following a supervised class methodsafer and more consistent.
Option C: Shiitake on logs (outdoor patience, big payoff)
Shiitake are commonly grown on hardwood logs and can fruit for years once established. It’s more of a slow-burn hobby (pun fully intended), but the payoff is real: homegrown shiitake can be incredibly flavorful.
At a high level, log growing usually involves:
- Selecting appropriate hardwood logs (often oak or maple)
- Introducing shiitake spawn to the logs
- Keeping logs in a shaded, moist environment while the mycelium colonizes over months
- Fruiting in seasons with favorable temperature and moisture
If you do any drilling or tool work for logs, get adult supervision and follow tool safety rules. Mushrooms are fun; ER visits are not a flex.
How Spore Prints Help You Grow Better Mushrooms (Even If You Don’t Grow From Spores)
Spore prints aren’t just prettythough they’re definitely frame-worthy. They also help you:
- Confirm identification clues (spore color is a key trait)
- Learn mushroom anatomy (gills, pores, veil remnants, cap maturity)
- Understand timing (when a mushroom is ready to drop spores often correlates with maturity)
- Explore genetics (spores are how new strains are developed in controlled settings)
Troubleshooting: When Your Spore Print (or Grow) Doesn’t Go to Plan
Problem: No spore print appeared
- The mushroom may be too young (gills not releasing spores yet).
- The cap may be too drycovering it helps; a tiny drop of water can help.
- The mushroom may be past its prime and drying out.
Problem: The print looks smudged or watery
- Condensation can drip onto the print. Use a larger cover or reduce moisture.
- Let the print dry before storing.
Problem: Your home grow smells “off” or looks fuzzy in weird colors
Healthy mycelium is often white and ropey or cottony, depending on species. Strong foul odors or unexpected colors (especially green) can indicate contamination. When in doubt, don’t consume anything questionablestart over with cleaner materials and consider a kit or pre-prepared substrate for consistency.
Mini Case Examples: Beginner-Friendly Mushrooms That Pair Well With Spore Printing
Portobello (Agaricus bisporus)
Easy to find, often drops a dark brown spore print, and makes a bold, dramatic pattern. Great for learning the basics.
Oyster mushrooms (Pleurotus spp.)
Commonly recommended for home cultivation. Spore prints can be pale (often white to light lilac/gray depending on variety), so foil or dark paper helps you see the deposit.
Shiitake (Lentinula edodes)
More often grown via spawn rather than spores by beginners. Still interesting for learning lifecycle conceptsespecially if you’re doing log cultivation.
Conclusion: Spores Are the Beginning, Not the Whole Story
Harvesting mushroom spores at home is one of the coolest “science-meets-snack” hobbies out there. A spore print teaches you how mushrooms reproduce, helps with identification, and gives you a tangible reminder that fungi are basically running an invisible empire under our feet.
If you’re aiming to grow edible mushrooms at home, spore prints are a great educational toolbut the most reliable path to dinner is usually starting with reputable spawn or a beginner grow kit. That approach reduces contamination headaches, shortens the learning curve, and lets you focus on the fun part: harvesting a fresh flush and immediately bragging about it to someone who didn’t ask (the correct way to enjoy a hobby).
Experience Section: of Real-World “What It’s Like” Moments
People expect mushroom spore harvesting to feel like a high-tech lab procedure. In reality, the first time you make a spore print, it feels more like hosting a tiny sleepover for a mushroom cap. You set it down on foil, cover it with a cup, and then spend the next several hours peeking at it like it’s a birthday present that might open itself.
A common first-timer experience: choosing the wrong mushroom maturity level. Lots of beginners grab the prettiest, firmest mushroom (because it looks “fresh”), only to discover that very young mushrooms don’t always drop spores. Then they try again with a more mature capoften a portobelloand suddenly the print appears like magic. The reaction is usually some combination of: “Whoa,” “That’s actually beautiful,” and “Why doesn’t anyone talk about how cool fungi are?”
Another classic moment is realizing how much the environment matters. In a dry home, spore prints can come out faint. In a humid home, you might get condensation and a slightly smudgy print. Many hobbyists learn to treat spore printing as a small experiment: try foil vs. paper, try dark vs. light backgrounds, and notice how the pattern changes depending on gill shape. Oyster mushrooms, for example, can make prints that are subtle and delicatepeople often think nothing happened until they tilt the foil under a light and see the shimmer of deposited spores. It’s like a secret message from the mushroom.
Then there’s labelingan underrated life lesson. Almost everyone has a “mystery print” phase where they find a folded foil packet weeks later and think, “This is either oyster mushroom spores… or my own personal confetti.” The moment you start writing the date and mushroom type on every print, you feel like you leveled up from “curious person with mushrooms” to “organized mycology citizen.”
When people move from spore prints to actual cultivation (with legal edible species), they often describe the first successful grow as oddly emotional. Watching mycelium colonize a substrate looks like a slow, quiet takeovertiny white threads gradually claiming territory. And then one morning, pins appear. That’s the moment most beginners become true believers: yesterday it looked like nothing, today it looks like a miniature forest trying to happen. It’s also when you learn the practical sidefresh air matters, humidity matters, and mushrooms absolutely will grow toward whatever gap in your setup gives them the best chance.
The funniest shared experience might be the “mushroom timing problem.” A flush can go from “cute baby mushrooms” to “harvest time” surprisingly fast, and people are often caught off guard. Many growers learn to check daily during fruiting because mushrooms don’t wait for your weekend plans. They’re on fungus time, which is apparently “now.” The good news: once you’ve harvested your first homegrown mushrooms, everything you learnedfrom spore printing to humidity habitssuddenly feels worth it. And yes, you will probably show someone a photo of your spore print like it’s a proud family portrait. That’s normal.


