Table of Contents >> Show >> Hide
- Before You Start: Plan Your Crown Molding Project
- Step-by-Step: How to Install Crown Molding
- Finishing Touches: Caulk, Fill, and Paint
- Common Mistakes to Avoid When Installing Crown Molding
- When to Call a Pro
- Real-World Experiences and Lessons Installing Crown Molding
- Practice cuts are not a waste they’re cheap tuition
- Working solo? Foam or lightweight crown is your friend
- Imperfect walls are normal perfection is not the goal
- Slow down on the last inch of every cut
- Label every piece as you cut it
- Plan your “hero wall” for last
- Final thought: crown molding is a confidence builder
Few upgrades make a room look “finished” as quickly as crown molding. That slim strip
of trim where the wall meets the ceiling can make a basic boxy room look taller, more
custom, and a whole lot more expensive than it actually was. The good news? Learning
how to install crown molding is absolutely within reach for a patient DIYer with a
miter saw, a little math, and a sense of humor about sawdust in their hair.
In this guide, we’ll walk through everything from picking the right profile to coping
inside corners, so you end up with crisp joints instead of “don’t look too closely”
corners. We’ll cover classic wood crown, but most of the steps also apply if you’re
installing foam or PVC crown molding.
Before You Start: Plan Your Crown Molding Project
Choose the right crown molding material and size
Crown molding comes in several materials, each with pros and cons:
-
Solid wood: Traditional, paintable or stainable, and strong. It’s
also heavier, more expensive, and sensitive to humidity changes. -
MDF (medium-density fiberboard): Smooth, great for painting, and
budget-friendly. It’s heavier than foam and doesn’t love moisture, so skip it in
bathrooms with poor ventilation. -
Polystyrene or polyurethane foam: Lightweight, easy to cut with a
handsaw, and ideal for solo DIYers or long runs. Many styles are made to glue up,
which can be handy if your ceiling framing is “creative.” -
PVC: Moisture-resistant and good for bathrooms or kitchens, but
usually must be painted and can flex slightly.
For size, a common starting point is:
- 8-foot ceilings: 3 1/2″ to 4 1/4″ crown
- 9-foot ceilings: 4 1/4″ to 5 1/4″
- 10-foot+ ceilings: 5 1/4″ and up, often in multi-piece “built-up” profiles
If you already have baseboards or window casings, choose a crown profile that feels
like part of the same “family” similar curves, thickness, and level of detail. That
cohesion is what makes a room look intentionally designed rather than random.
Measure the room and buy enough molding
To estimate how much crown molding you need:
- Measure each wall and add the lengths together to get the total perimeter.
- Add at least 10–15% extra for waste, miscuts, and learning moments.
-
Whenever possible, buy pieces long enough to span whole walls, so you reduce the
number of joints.
Pro tip: If your room is longer than the available stock lengths, plan scarf joints
where they’ll be least noticeable (not right over a doorway you stare at constantly).
Tools and materials checklist
Here’s what you’ll want on hand before you make the first cut:
- Miter saw (compound miter saw strongly recommended)
- Coping saw (for inside corner joints)
- Measuring tape and pencil
- Stud finder
- Level or laser level
- Caulk gun and paintable latex caulk
- Wood glue or construction adhesive (as needed)
- Finish nailer (or hammer and finish nails)
- Wood filler or spackle
- Safety glasses and hearing protection
Step-by-Step: How to Install Crown Molding
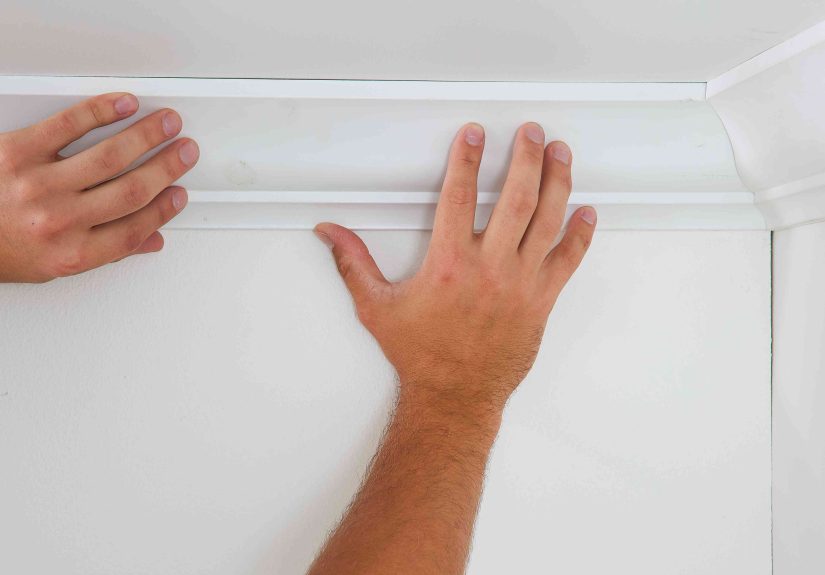
1. Mark reference lines on the wall and ceiling
One of the easiest ways to mess up crown molding installation is to “eyeball” where
it sits. Don’t do that. Instead:
-
Take a short scrap of your crown molding and hold it in position where the wall
meets the ceiling. -
With a pencil, trace the bottom edge of the molding onto the wall and the top edge
onto the ceiling. -
Use a level or laser to extend those marks around the room as continuous reference
lines. -
Use a stud finder to locate studs and ceiling joists, and mark them slightly below
the bottom line so you still see them while you’re working.
Those reference lines are your “parking spaces” for the molding. When each piece
sits right on those lines, your joints will be much easier to align.
2. Understand the “upside down and backwards” trick
Most pros cut crown molding on a miter saw by placing it upside down and
nested against the fence at the same “spring angle” it will have against the wall and
ceiling. Think of the saw table as your ceiling and the fence as your wall.
Basic rules of thumb:
-
Inside corners: the piece on your left usually gets a square end; the piece on your
right is often coped to fit. -
Outside corners: both pieces are mitered at equal and opposite angles (usually
45°, but walls rarely cooperate perfectly). -
When in doubt, use scraps to test which way the angles should go before cutting the
“real” piece.
Some DIYers prefer to cut crown flat on the table using the saw’s bevel and miter
scales with angle charts. That works too, but nesting is easier to visualize for
beginners.
3. Start on the longest wall
Begin with the longest, straightest wall in the room. This helps you learn the
“feel” of holding and nailing the crown before you tackle fiddly corners.
- Measure the wall length at the ceiling, not the floor.
-
Cut your first piece with square ends if it goes between two inside corners and is
a single continuous run. -
If you need to splice two pieces along a wall, plan a scarf joint:
two 45° cuts overlapping along a stud. Glue and nail both pieces into the stud so
the joint is strong and less visible. -
Hold the crown on your reference lines and nail into studs and into the top plate
every 12–16 inches using finish nails.
Don’t overdrive the nails; you want them just below the surface so you can fill the
tiny holes later without craters.
4. Inside corners: coping vs. mitering
Inside corners are where crown molding earns its reputation as “tricky,” but coping
makes them far more forgiving than simple mitered joints.
A coped joint works like this:
-
Install one piece of crown right into the corner with a square cut. This is your
“back” piece. -
For the intersecting piece, cut a 45° inside miter at the end on the miter saw.
You’ll see the molding’s profile exposed on the cut face. -
Use a coping saw to carefully cut along that profile, angling the saw slightly
back (about 5°) so the front edge is crisp and the back is relieved. -
Clean up any fuzz or bumps with a file or sandpaper so the coped edge fits tight
against the face of the first piece.
Why cope instead of just mitering both pieces? Because walls are rarely a perfect
90°. A coped joint is more forgiving of slight angle variations and won’t show gaps
as the room shifts with seasonal movement.
5. Outside corners: clean miters and smart support
Outside corners show off your work, so take your time here:
-
Confirm the corner is actually 90°. If it’s 88° or 92°, adjust your miter angle
slightly (e.g., 44° or 46°). -
Cut the first piece with a miter that leaves the long point on the ceiling
edge (since the crown is upside down on the saw). -
Hold the cut piece in place and mark exactly where the corner lands on the wall,
then measure for the second piece from that point. -
Cut the matching miter on the second piece and dry-fit both before nailing
anything. -
Nail close to the joint on both pieces and, if possible, add a small block of
backing behind the corner to keep things from shifting.
If the corner is stubbornly out-of-square, you can sneak up on the angle with tiny
adjustments, shaving off a hair’s width at a time until the joint closes.
6. Handling wavy walls and ceilings
Nearly every house has a wall or ceiling that’s just a little wavy. You have three
main options:
-
Split the difference: Hold the crown so the gap is shared between
wall and ceiling, then let caulk bridge the minor imperfections. -
Add backing: In extreme cases, nail a strip of wood to the wall or
ceiling so the crown has something solid to land on. -
Scribe the molding: For high-end installs, you can shave the back
of the molding to match a wavy surface, but that’s advanced territory.
For most DIY crown molding installations, splitting the difference and caulking
modest gaps is the sweet spot between perfection and staying sane.
Finishing Touches: Caulk, Fill, and Paint
Even pro trim carpenters expect a little caulk and touch-up work at the end. The goal
is not a raw “saw-cut” finish; it’s a smooth, seamless line of trim that looks like
it’s always been there.
-
Fill nail holes: Use wood filler or lightweight spackle. Let it
dry, then sand flush with fine-grit sandpaper. -
Caulk the gaps: Run a small bead of paintable latex caulk where the
crown meets the wall and ceiling. Smooth it with a damp finger or a caulk tool.
Less is more; you’re not frosting a cake. -
Touch up joints: If a scarf joint or corner has a hairline gap,
caulk can make it disappear before paint. -
Prime (if needed): Bare wood or raw MDF should be primed. Some
foam crown molding comes pre-primed; check the packaging. -
Paint: Most people use semi-gloss or satin on trim. Satin gives a
softer, modern look; semi-gloss is more traditional and easier to clean.
Stand back, squint a little, and enjoy your new “custom” room. It’s amazing what a
few strips of crown molding can do.
Common Mistakes to Avoid When Installing Crown Molding
Cutting every piece before test-fitting
It’s tempting to measure once, cut a whole batch of pieces, and nail them all up.
That’s how you end up with an expensive pile of “practice” molding. Instead, cut one
piece, test-fit it, adjust, and then move on to the next. Treat your first few cuts
as part of the learning curve, not the final exam.
Mixing up orientation on the miter saw
One of the most common complaints from new DIYers is, “Why is this piece upside down
when I put it on the wall?” Remember: when you nest the crown on the saw, the part
that touches the table is the ceiling edge, and the part against
the fence is the wall edge. A tiny pencil mark on the “wall” edge
of each board can save a lot of confusion.
Not nailing into studs or solid backing
Crown molding isn’t heavy like a cast-iron tub, but it still needs solid support.
Nail into studs, top plates, and ceiling joists whenever possible. If you’re using
glueable foam crown, follow the adhesive manufacturer’s instructions and still try
to catch studs with a few brad nails for insurance.
Skipping caulk and paint
Raw, uncaulked joints will make even perfectly cut crown look amateurish. Trim work
is a combination of carpentry and paint magic. Give yourself the full “magic” by
budgeting time to caulk, sand, and paint properly.
When to Call a Pro
Installing crown molding is a classic DIY project, but there are times when hiring a
trim carpenter is the smarter play:
- Very tall ceilings or rooms with complicated angles and built-ins
- Historic homes where molding must match existing profiles
- Rooms with elaborate multi-piece crown assemblies
-
If you’re already juggling ten other renovation tasks and want a fast, clean
result
That said, if you’re comfortable with a miter saw and you enjoy learning new skills,
DIY crown molding installation is incredibly satisfying. Every time you walk into
the room, you’ll see that crisp line at the ceiling and think, “Yep, I did that.”
Real-World Experiences and Lessons Installing Crown Molding
Reading a how-to guide is one thing; living through an afternoon (or weekend) of
crown molding installation is another. Here are some hard-earned lessons and
real-world experiences that can help you get from “this can’t possibly be right” to
“wow, that looks like a magazine photo.”
Practice cuts are not a waste they’re cheap tuition
Many DIYers report that the first hour of installing crown molding feels like
learning a new language. Inside and outside corners, spring angles, left-hand vs.
right-hand miters it’s a lot. The smartest move is to cut several 12- to 18-inch
scrap pieces and label them “inside left,” “inside right,” “outside left,” and
“outside right.” Use these as templates to test angles and visualize how pieces will
meet in corners.
Once you understand how those four little sample pieces work together, full-length
boards feel much less intimidating. Think of it as rehearsal before opening night.
Working solo? Foam or lightweight crown is your friend
Wrestling a 16-foot piece of solid wood crown up a ladder by yourself is… ambitious.
Many homeowners who’ve done both will tell you that lightweight foam or
polyurethane crown molding is much easier to handle solo, especially in smaller
spaces. You can cut it with a fine-tooth handsaw or miter saw, it’s easy to nail or
glue, and you don’t feel like you’re bench-pressing lumber above your head.
If you’re determined to use heavier wood crown, consider making a simple T-shaped
support out of scrap 2x2s and a flat board. Wedge it between the floor and ceiling
to temporarily hold one end of the molding while you position and nail the other.
Imperfect walls are normal perfection is not the goal
Almost everyone who installs crown molding discovers that at least one wall bows,
dips, or leans. When your beautiful straight board meets a decidedly not-straight
ceiling, small gaps are inevitable. The trick is not to panic. Use your reference
lines to keep the molding in its proper “plane,” then accept that caulk is part of
the process.
A helpful mindset: you’re not building a piano; you’re building a painted trim
detail that viewers will see from several feet away. If the joints are tight and the
overall line is smooth, tiny variations behind a bead of caulk won’t show.
Slow down on the last inch of every cut
One common problem with crisp miters is “blowout” at the very tip of the molding
where the saw exits the cut. That ragged edge makes corners harder to close up
tightly. To avoid this, keep steady pressure on the molding, let the saw blade reach
full speed before each cut, and slow down as you complete the last inch. With foam
or softer woods, a sharp blade is especially important.
You can also back up the cut with a scrap piece of wood behind the molding to
support those delicate edges.
Label every piece as you cut it
After an hour of measuring, cutting, and hauling boards around, crown molding pieces
start to look suspiciously similar. A simple system “North wall, left inside
corner,” “East wall, outside corner,” and so on written on blue painter’s tape
stuck to each piece can save you from installing a board upside down or on the wrong
wall.
Many seasoned DIYers will even lightly sketch the room layout on a scrap of
cardboard and note each piece’s length, angle, and orientation. It takes a few extra
minutes but saves a lot of backtracking.
Plan your “hero wall” for last
If one wall in the room is especially visible the one you see first when you walk
in, for example consider saving that wall for last. By then, you’ll have dialed in
your cutting and coping technique, and your most noticeable seams and corners will
benefit from your newly acquired crown molding superpowers.
Final thought: crown molding is a confidence builder
Once you’ve successfully installed crown molding in one room, other trim projects
suddenly feel less daunting. Casings, baseboards, wainscoting, even built-in
shelving they all lean on the same skills: accurate measuring, careful cutting, and
a willingness to tweak and test-fit until it’s right. Your first crown molding
project isn’t just about one room; it’s about leveling up your DIY game across the
whole house.


