Table of Contents >> Show >> Hide
- Why a Brightening Cream Is Better Than a “Whitening” Cream
- How to Make Brightening Cream: 8 Steps
- Step 1: Start With the Right Goal
- Step 2: Choose Safe, Simple Ingredients
- Step 3: Skip the “Natural” Ingredients That Love Causing Chaos
- Step 4: Clean Everything Like You Mean It
- Step 5: Make a Small Test Batch
- Step 6: Patch Test Before You Get Brave
- Step 7: Store It Smartly and Use It Quickly
- Step 8: Apply It the Right Way
- Best Ingredients for a Homemade Brightening Cream
- Common Mistakes to Avoid
- Is Homemade Brightening Cream Worth It?
- Experience and Lessons From People Who Try to Make Brightening Cream at Home
- Final Thoughts
Let’s get one thing out of the way before the mixing bowl starts feeling important: healthy skin does not need to be lighter to be beautiful. Most people searching for a “whitening cream” are really looking for something gentler and far more sensible a cream that helps skin look brighter, smoother, more even, and less tired than a Monday morning meeting.
That is exactly where a homemade brightening cream can make sense. Not a sketchy bleach-in-a-jar situation. Not a mystery potion with ingredients that sound like they belong in a garage, not on a face. Just a simple, skin-friendly cream made with moisturizing, soothing ingredients and a few carefully chosen brightening helpers.
The smartest way to do this at home is not to play cosmetic chemist with harsh powders, random acids, or unlabeled ingredients. It is to start with a fragrance-free cream base and customize it lightly. Think of it like upgrading plain toast with avocado, not rebuilding the entire bakery from scratch.
In this guide, you will learn how to make brightening cream in 8 steps, which ingredients are worth using, which ones deserve a dramatic “absolutely not,” and how to avoid turning your skin-care experiment into a regret with a lid.
Why a Brightening Cream Is Better Than a “Whitening” Cream
The phrase “whitening cream” still gets a lot of searches, but it often points people toward unsafe ideas. A better goal is brightening: improving the look of dullness, supporting the skin barrier, and helping uneven-looking tone appear smoother over time.
A good brightening cream does not try to erase your natural skin color. Instead, it focuses on things that actually make skin look fresher: hydration, barrier support, gentle antioxidants, and ingredients commonly used to improve the appearance of dark marks. That means you want to think in terms of glow, clarity, and even tone not bleaching, burning, or battling your face like it owes you money.
How to Make Brightening Cream: 8 Steps
Step 1: Start With the Right Goal
Before you make anything, decide what you want your cream to do. A safe DIY brightening cream should aim to:
- Moisturize dry or tired-looking skin
- Support the skin barrier
- Help skin look more radiant
- Reduce the appearance of post-acne marks or uneven-looking tone
It should not aim to bleach your skin, strip your barrier, or “work overnight.” Any product promising instant transformation usually comes with a side dish of irritation.
Step 2: Choose Safe, Simple Ingredients
The easiest and safest formula starts with a store-bought fragrance-free cream or moisturizer as your base. This gives you a better texture, more stability, and fewer chances to create a lumpy science project.
Here is a beginner-friendly ingredient list:
- 2 tablespoons fragrance-free cream base look for a noncomedogenic moisturizer with ceramides, glycerin, dimethicone, or shea butter
- 1 teaspoon pure aloe vera gel for a lightweight, soothing feel
- 4 to 6 drops glycerin helps draw moisture into the skin
- 6 to 10 drops niacinamide serum a gentle brightening favorite
- Optional: 4 to 6 drops of a gentle vitamin C serum or vitamin C derivative serum
This combination gives you hydration plus brightening support without forcing your skin into a dramatic performance. It is especially useful if you want a DIY cream for glowing skin rather than something harsh.
Step 3: Skip the “Natural” Ingredients That Love Causing Chaos
Just because an ingredient came from a fruit, plant, or kitchen shelf does not mean your face wants to date it. Some common DIY skin-care trends are far more irritating than helpful.
Avoid these in your cream:
- Lemon or lime juice
- Apple cider vinegar
- Hydrogen peroxide
- Strong essential oils
- Unknown whitening powders or unlabeled active ingredients
Citrus can irritate skin and, when mixed with sun exposure, can lead to discoloration and irritation that looks like a burn. Hydrogen peroxide can also irritate skin and weaken the barrier. In other words, your kitchen is excellent at making salad dressing. It is not always great at making face cream.
Step 4: Clean Everything Like You Mean It
Homemade skin care goes wrong surprisingly often because people focus on the ingredients and forget the boring part: hygiene. The boring part is doing a lot of heavy lifting.
Before mixing:
- Wash your hands thoroughly
- Use a clean bowl and spoon or spatula
- Use a clean, dry jar with a lid
- Avoid dipping wet fingers into the finished cream later
If your formula contains water-based ingredients like aloe vera or serums, it is more vulnerable to contamination than a plain oil balm. That is why small batches are your friend. Tiny batch, big common sense.
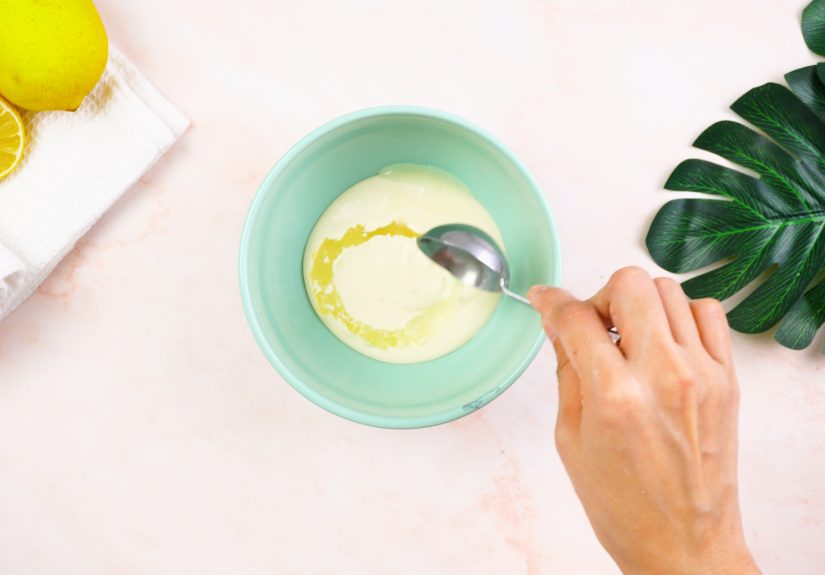
Step 5: Make a Small Test Batch
Now it is time to mix. Add your base cream to a clean bowl. Stir in the aloe vera gel until smooth. Add glycerin drop by drop. Then mix in the niacinamide serum. If you are using a gentle vitamin C serum, add that last and stir until the texture looks even.
Your goal is a cream that looks smooth, not separated, and easy to spread. If it becomes too thin, add a little more cream base. If it feels too thick, a tiny bit more aloe vera gel can loosen it.
Do not add ten “bonus ingredients” just because you own them. Skin care is not a talent show. Keep the formula simple enough that you know what is helping and what might be causing irritation.
Step 6: Patch Test Before You Get Brave
This step is where patience earns its paycheck. Before using the cream on your whole face, apply a small amount to a test spot, such as the inner arm or near the jawline. Use it consistently for several days before moving forward.
A proper patch test helps you catch problems like:
- Redness
- Stinging
- Itching
- Swelling
- Unexpected breakouts
If your skin reacts badly, stop using the formula. A skin-care product that “just burns a little” is not building character. It is asking to be fired.
Step 7: Store It Smartly and Use It Quickly
A professionally made cream is designed with tested preservation and stability in mind. A homemade cream usually is not. That means you should:
- Make only a small amount
- Keep the lid tightly closed
- Use a clean spatula instead of your fingers
- Throw it out if the smell, color, or texture changes
If you want a product with a long shelf life, polished texture, and tested preservation, buy one. Homemade brightening cream is best treated as a simple, short-use DIY project, not a six-month bathroom roommate.
Step 8: Apply It the Right Way
Even the best cream will not do much if the routine around it is chaotic. Apply your brightening cream to clean, slightly damp skin. Use a small amount and smooth it over the face or any areas with dullness or uneven-looking tone.
Use it once daily at first. If your skin handles it well, you can increase to twice daily depending on the ingredients and texture. In the morning, always follow with broad-spectrum sunscreen SPF 30 or higher. This is non-negotiable. If you skip sunscreen while trying to brighten the look of dark marks, you are basically mopping the floor while wearing muddy boots.
Best Ingredients for a Homemade Brightening Cream
If you want the short list, these ingredients are worth your attention:
Niacinamide
Niacinamide is one of the most beginner-friendly brightening ingredients. It is known for helping improve the look of dark spots, supporting the skin barrier, and playing nicely with many skin types.
Vitamin C
Vitamin C is a popular antioxidant that can help skin look brighter and more refreshed. It is often used in the morning. For DIY use, a finished serum is a better choice than trying to formulate raw vitamin C powder at home.
Ceramides
Ceramides help support the skin barrier. When your barrier is happier, your skin usually looks less irritated and more balanced. That alone can make the complexion appear healthier and more radiant.
Glycerin
Glycerin is a classic humectant, which means it helps attract water to the skin. It is humble, effective, and not out here demanding applause.
Aloe Vera
Aloe vera gives a soothing, cooling feel and can make a DIY cream feel lighter and fresher when used in a modest amount.
Common Mistakes to Avoid
- Using harsh acids without understanding them: Strong exfoliants can irritate more than they help.
- Trying to make your skin lighter instead of healthier: Healthy skin always wins the long game.
- Adding fragrance: It smells lovely until your face disagrees.
- Skipping patch testing: Confidence is great. So is not getting a rash.
- Ignoring sunscreen: Dark marks often stick around longer without daily sun protection.
- Making huge batches: More product is not better if it goes bad before you finish it.
Is Homemade Brightening Cream Worth It?
Yes if you keep expectations realistic. A homemade brightening cream can be a good option when you want something gentle, budget-friendly, and customizable. It is especially useful if you already have a plain moisturizer and a trusted niacinamide or vitamin C serum at home.
No if your goal is dramatic fading, medical treatment, or correcting persistent pigmentation conditions. In that case, a dermatologist is a much better idea than a kitchen spoon. Some skin concerns need prescription treatment, not optimistic stirring.
Experience and Lessons From People Who Try to Make Brightening Cream at Home
One of the most common experiences people report is that they begin with grand ambitions and end with a much greater appreciation for simplicity. At first, the plan sounds easy: mix a few things together, apply, wake up glowing, and politely pretend genetics were not involved. Then reality shows up in slippers. The cream is too greasy, too sticky, too runny, or somehow all three at once. That is usually the moment when people learn their first important lesson: a good homemade cream is more about balance than quantity.
Another very common experience is discovering that “natural” does not automatically mean “gentle.” Plenty of beginners reach for lemon juice because the internet has been whispering strange things for years. The result is often stinging, redness, or skin that feels personally offended. The same thing happens with too much essential oil, strong fragrance, or a random acid that sounded impressive in a video. After one bad round, most people become instant fans of the boring, reliable crew: fragrance-free cream, glycerin, niacinamide, and aloe vera.
People with acne-prone skin often learn a different lesson. They assume any cream will clog pores, so they either avoid moisturizer completely or create a formula loaded with oils because “rich” sounds luxurious. Then the breakouts arrive like uninvited guests. What usually works better is a lighter, noncomedogenic base with brightening ingredients added in small amounts. In practice, the best results tend to come from formulas that feel almost disappointingly normal.
There is also the storage lesson, and this one shows up fast. Someone makes a big jar because it feels efficient, dips fingers into it for a week, forgets about it on the bathroom shelf, then notices the texture changing. Suddenly the product looks suspicious, and now everyone in the house becomes a cosmetic detective. That experience teaches the value of tiny batches, clean tools, and not treating homemade cream like a canned food item with an emotional support lid.
Perhaps the biggest lesson people share is that brightening is not just about the cream. The cream can help, yes, but the real glow-up often comes from the boring habits nobody wants to make into a dramatic montage: washing gently, moisturizing consistently, and wearing sunscreen every day. Many people say they finally saw better results once they stopped chasing miracle ingredients and started protecting their skin from the sun. That is less glamorous than a magical overnight potion, but it works better and comes with fewer regrets.
And finally, people learn that skin care goes more smoothly when the goal is healthier-looking skin, not a different identity in a jar. Once the pressure to “transform” disappears, the process becomes easier, gentler, and more sustainable. A homemade brightening cream can absolutely be part of that routine. It just works best when it behaves like a helpful supporting actor, not a reckless main character.
Final Thoughts
If you want to know how to make brightening cream at home, the safest answer is also the least dramatic: start with a good fragrance-free cream, add a small amount of gentle brightening ingredients, patch test carefully, and protect your skin with sunscreen every single day.
The best homemade formula is not the harshest one. It is the one your skin can actually live with. Keep it simple, keep it clean, and keep your expectations smarter than the average beauty myth. Your skin will usually reward consistency far more than it rewards chaos in a jar.


