Table of Contents >> Show >> Hide
- What a Guitar Pickup Actually Does
- Start with the Right Goal: Build a Single-Coil First
- Choose Your Design Before You Wind a Single Turn
- Step-by-Step: How to Make a Guitar Pickup
- How to Shape Tone on Purpose
- Common Mistakes That Ruin a First Pickup
- Troubleshooting a DIY Pickup That Sounds Weird
- What the First-Build Experience Really Feels Like
- Final Thoughts
- SEO Tags
If you have ever looked at an electric guitar pickup and thought, “That tiny rectangle cannot possibly be responsible for all this glorious noise,” welcome to the club. A pickup looks humble. It is not humble. It is the little electromagnetic drama queen sitting under your strings, translating vibration into signal and signal into tone. And yes, you can make one yourself.
Building a guitar pickup is equal parts craft project, science experiment, and character-building exercise. You will work with magnets, ultra-thin wire, solder, patience, and the occasional muttered speech that should not be delivered around small children. But if you take it step by step, making a pickup is absolutely doable. Better yet, it teaches you more about guitar tone than reading a mountain of forum debates ever will.
This guide walks through how to make a guitar pickup from scratch, with a special focus on the easiest and smartest first build: a vintage-style single-coil. We will also cover how pickup design changes tone, how to avoid rookie mistakes, and what the real-world DIY experience is like once the wire starts spinning.
What a Guitar Pickup Actually Does
A traditional magnetic guitar pickup works by turning string movement into electrical signal. The pickup creates a magnetic field, your steel strings move within that field, and the coil of wire converts that movement into current your amp can amplify. That is the big idea. The small details, however, are where tone starts wearing a fake mustache and becoming “character.”
Those details include magnet strength, wire gauge, how many turns you wind, the shape of the bobbin, the spacing of the windings, and whether you build a single-coil or a humbucker. In plain English, pickups are simple, but they are not basic. A small change in construction can take you from bright and snappy to thick and punchy faster than a guitarist can say, “I swear I can hear the difference.”
Start with the Right Goal: Build a Single-Coil First
If this is your first pickup build, do not begin by trying to recreate a boutique humbucker with secret fairy dust and intergalactic complexity. Start with a single-coil. It has fewer parts, fewer wiring headaches, and a much clearer relationship between what you build and what you hear.
Parts You Will Need
- Top and bottom flatwork or a bobbin set
- Pole pieces or magnets, depending on the pickup style
- Magnet wire, usually 42 AWG for many vintage-style single-coils
- Hookup wire or cloth push-back lead wire
- Eyelets or solder points for start and finish connections
- Tape, string, or cover material to protect the coil
- Wax for potting, if you plan to pot the pickup
Tools You Will Need
- A pickup winder, drill-based jig, or other controlled spinning setup
- A counter, if possible
- Multimeter
- Soldering iron and solder
- Small hand tools such as pliers, cutters, and a hobby knife
- A polarity tester or compass for checking magnetic orientation
- Safety gear and a well-ventilated workspace
Choose Your Design Before You Wind a Single Turn
The biggest beginner mistake is not poor winding. It is poor planning. Before you build, decide what kind of pickup you want and what guitar it is going into.
Best First Build: Vintage-Style Strat Single-Coil
A Strat-style single-coil is one of the most approachable options because the layout is simple and the parts are widely available. A classic recipe uses 42 AWG magnet wire, Alnico rod magnets, and a winding count in the neighborhood of roughly 8,000 turns. That does not mean you must hit a magic number like you are defusing a movie bomb. It means you are working in a proven range.
Want a Hotter Sound?
Add more windings and you generally get stronger output, thicker mids, and a little less airy top end. Underwind it and the pickup tends to sound more open, brighter, and more vintage-leaning. Think of turns as seasoning. Too little and the meal is thin. Too much and you have made sonic stew.
Thinking About a Humbucker?
A humbucker uses two coils with opposite winding and opposite magnetic polarity so noise gets canceled while the string signal remains. That is brilliant, but it also means twice the coils, more matching, and more opportunities to wire something backwards and spend an hour wondering why your guitar sounds like it is apologizing for existing. Learn on a single-coil first, then graduate.
Step-by-Step: How to Make a Guitar Pickup
1. Assemble the Bobbin or Flatwork
Start by assembling the structure that will hold the coil. For a Fender-style single-coil, that usually means pressing the magnetic pole pieces through the flatwork and installing eyelets for the lead connections. Make sure every edge that will sit near the wire is smooth. Even a tiny burr or nick can snag the magnet wire and snap it mid-wind. That thin wire is not emotionally resilient.
If you are building a P-90 or humbucker later, the bobbin arrangement changes, but the principle stays the same: the coil needs a stable frame, clean edges, and a clear path for the wire.
2. Mount the Pickup on the Winder
Attach the pickup securely so it spins true. If it wobbles, the coil can wind unevenly or the wire can jump where it should not. The wire should feed off the end of the spool rather than forcing the spool to spin under strain. A lot of experienced builders treat this part seriously because smooth feed equals fewer heartbreaks.
Before you start the motor, turn the pickup by hand and confirm everything is centered. Then make your first 6 to 10 wraps by hand. This anchors the wire and helps prevent it from pulling free the moment the machine starts.
3. Wind the Coil
This is the moment where guitar myth and actual hand skills meet. Guide the wire onto the spinning bobbin with light, consistent tension. Many builders use felt or a soft guide so the wire feeds smoothly. Do not wind too loose, because that can lead to a sloppy, microphonic pickup. Do not wind too tight, because too much tension can deform the bobbin or stress the wire.
For a first Strat-style pickup, aim for a practical vintage-style target such as around 8,000 turns of 42 AWG wire. If you are building a Tele neck pickup, 43 AWG is common in some traditional examples. If you eventually build a vintage-style humbucker, a common reference point is around 5,000 turns per coil using 42 AWG wire.
Some builders prefer a neat, even pattern. Others hand-guide the wire in a looser scatterwound style. Scatterwinding can change the coil’s internal capacitance and often gets credit for a livelier, more complex feel. That said, do not treat it like mystical wizardry. It is a construction choice, not a secret portal.
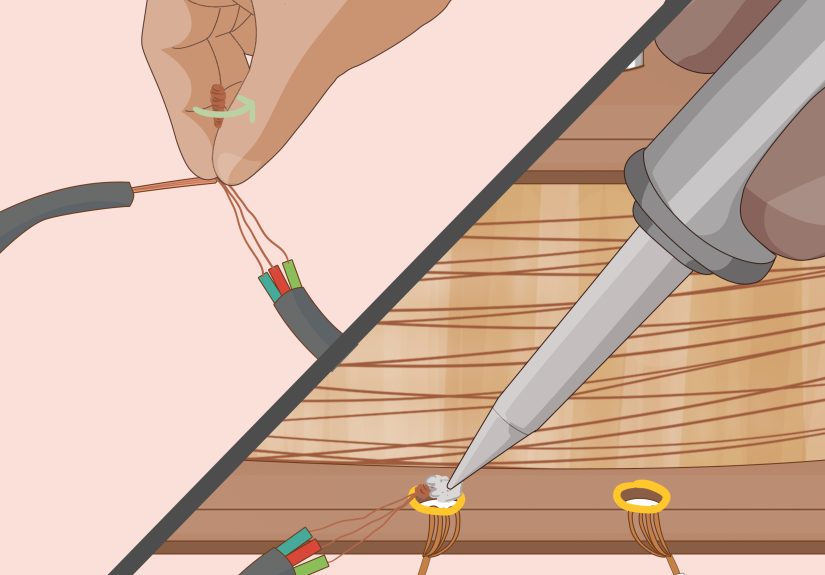
4. Solder the Start and Finish Leads
Once you hit your target turns, cut the wire with enough length to reach the eyelets or lead connections comfortably. Carefully scrape or sand the insulation off the magnet wire ends, then solder them to the hookup leads.
For a basic single-coil, the start lead usually becomes ground and the finish becomes hot. For humbuckers, lead colors vary by manufacturer, which is why blindly following a random color chart from the internet is a fantastic way to build suspense and terrible tone. Always match the wiring scheme to the specific lead code you are using.
5. Test the Pickup Before You Get Dramatic
Use a multimeter to check DC resistance before wrapping or potting the pickup. A vintage-style Strat single-coil often reads somewhere in the ballpark of around 5.75k to 6.75k ohms, while hotter winds go higher. This number is a reference, not the whole story, but it is an excellent reality check.
If the meter shows an open circuit, you may have a broken coil wire or a bad solder connection. If the reading is suspiciously low, you may have internal shorts or a wiring problem. Testing now can save you from installing a pickup that performs like a decorative paperweight.
6. Magnetize or Verify Polarity
If your pole pieces are not already charged, you will need to magnetize them. You also need to confirm polarity. This matters even more if you are building a matched set. For reverse-wound, reverse-polarity arrangements, one pickup is wound in the opposite direction and magnetized in the opposite orientation so certain combined positions cancel hum.
If you ignore polarity and phase, two pickups that should sound glorious together can end up thin, nasal, and deeply confused.
7. Protect the Coil
Once the pickup tests correctly, protect the coil. Depending on style, that might mean wrapping it with string or tape, or installing a cover. This is not cosmetic fluff. The coil wire is delicate, and protection helps prevent damage during installation and use.
8. Pot the Pickup if Needed
Potting reduces unwanted microphonics and squeal by filling gaps in and around the coil with wax. Many builders use paraffin, or a paraffin and beeswax mix, heated to roughly 145 to 150 degrees Fahrenheit. The pickup is suspended in the wax until air bubbles stop rising, then removed and allowed to cool.
Important workshop reality check: overheated wax is a fire hazard. Never heat potting wax on a kitchen stove or in a microwave. Use controlled heating, ventilation, and common sense. Potting is optional for some vintage-minded builds, but if you plan to use gain, stage volume, or a metal cover, light potting is often a very smart move.
9. Install the Pickup and Set Height
Once the pickup is wired into the guitar, set the pickup height by ear. That last phrase matters. By ear. Published starting points are useful, but height changes output, attack, dynamics, and even intonation feel. A common starting reference for single-coils is around 1/8 inch on the bass side and 3/32 inch on the treble side with the strings fretted at the highest fret, then adjusted to taste.
Too close and the magnetic pull can choke sustain or cause weird warbling. Too far and the sound gets weak. Pickup height is not a tiny setup detail. It is part of the design.
How to Shape Tone on Purpose
Magnet Choice
Alnico II is often associated with a softer, sweeter response. Alnico V is stronger and commonly described as punchier and more aggressive, which is one reason it works well in many bridge pickups. Ceramic magnets can sound powerful and focused, but they are usually not where beginners start when learning basic vintage-style pickup making.
Wire Gauge and Turn Count
Forty-two AWG is extremely common in pickup building. Forty-three AWG lets you fit more wire into a smaller space, which can be useful when chasing higher output or traditional designs built around tighter bobbins. More turns usually push output and mids upward. Fewer turns generally keep the pickup clearer and brighter.
Scatterwound Versus Uniform Wind
A hand-guided scatterwound coil can sound a little more open or harmonically textured to many players. A very even wind can sound smoother and more consistent. Neither is automatically “better.” The better choice is the one that gets you the voice you want without turning the build into an opera.
Single-Coil Versus Humbucker
Single-coils tend to deliver brightness, snap, and articulation, along with the possibility of hum. Humbuckers trade some of that raw edge for thicker output and much better noise rejection. The right design depends on the guitar, the rig, and whether you like your tone sparkling, snarling, or politely punching walls.
Common Mistakes That Ruin a First Pickup
- Winding with inconsistent or excessive tension
- Allowing the wire to snag on sharp edges
- Forgetting to document start, finish, and polarity
- Skipping the multimeter test before final assembly
- Using the wrong wiring code for your lead wires
- Heating potting wax too aggressively
- Assuming pickup height does not matter after installation
The cure for most of these mistakes is boring but effective: slow down, take notes, and check your work before moving on. Pickup building rewards patience more than heroics.
Troubleshooting a DIY Pickup That Sounds Weird
Weak Output
This can come from too few turns, weak magnets, partial shorts in the coil, or bad solder joints. Start with the multimeter, then confirm magnet strength and connections.
Harsh Squeal at Volume
That usually points to microphonics. The coil may be too loose, the cover may be vibrating, or the pickup may need potting.
Thin Sound in Combination Positions
Check phase and polarity. If two pickups are out of phase, the combined tone often gets hollow and weak.
No Sound at All
Look for an open coil, broken finish lead, or a solder joint that never truly bonded. Cold solder joints love pretending they are helping while doing absolutely nothing.
What the First-Build Experience Really Feels Like
The first time most people make a guitar pickup, the experience is less “master luthier in a candlelit workshop” and more “nervous scientist guarding one strand of wire like it is the last noodle on Earth.” That is normal. In fact, it is part of the charm.
A typical first build begins with overconfidence. You line up the flatwork, magnets, wire, and soldering tools and think, “This seems manageable.” Then you pick up 42 AWG wire, realize it is thinner than your patience on a Monday, and immediately develop a whole new respect for pickup makers. The wire does not look intimidating until it snaps, vanishes into your fingers, and forces you to stare at your workbench like it has betrayed you personally.
Then comes the winding stage, which is where the project becomes weirdly addictive. At first, every turn feels risky. You worry about tension, direction, alignment, and whether your counter is lying to you. But after a few hundred turns, the process starts to make sense. You stop fighting the wire and start guiding it. The bobbin spins, the coil grows, and the pickup slowly changes from a pile of parts into a real object with personality. It is a fantastic moment. It feels a little like cooking and a little like engineering, which is probably why pickup builders can talk about wire for hours without blinking.
The next surprise is how much the little details matter. A solder joint that looks “close enough” might not be close enough. A magnet orientation you forgot to label can suddenly matter a lot when you combine pickups. A coil that measures fine on the bench can still sound different once installed, because pickup height and guitar wiring change the final result. This is the moment where many first-time builders realize that pickup making is not just manufacturing. It is tuning. You are not merely assembling a device. You are deciding how the guitar will speak.
And then, the big payoff: you plug in. Maybe the first note is glorious. Maybe the first note is quiet, thin, or accompanied by a hum that sounds like your amp is meditating. Either way, you learn fast. If it works, you feel like a genius. If it half-works, you become a detective. If it does not work at all, you become a detective with coffee. Every version is useful, because even a flawed pickup teaches you more than ten hours of theory.
That is why so many builders keep going after the first attempt. Not because the first pickup is always perfect, but because the process is revealing. You hear what more turns do. You feel what tighter winding tension does. You notice how a magnet swap or a height adjustment changes the voice. Suddenly pickups stop being mysterious chunks of hardware and start becoming understandable tools. Once that happens, guitar tone feels less like magic and more like craft. Still magical, sure, but now it is magic with notes, measurements, and a soldering iron.
Final Thoughts
If you want to learn how to make a guitar pickup, the smartest path is simple: build one straightforward single-coil, document everything, test every step, and listen carefully after installation. Once you understand how magnets, wind count, tension, and height interact, you can start chasing any voice you want, from glassy and vintage to hot and muscular.
In other words, making a pickup is not just about saving money or bragging rights. It is about gaining control over one of the biggest tone-shaping parts of the entire guitar. And that is a pretty good return for a spool of tiny wire and a weekend of patient tinkering.


