Table of Contents >> Show >> Hide
- What Is a Stacked Pumpkin Decoration (and Why It Works So Well)?
- Plan Your Look in 5 Minutes (Before You Buy Anything)
- Supplies and Tools (Pick Your Method)
- Method 1: DIY Faux Stacked Pumpkin Topiary (Easy + Long-Lasting)
- Step 1: Choose Pumpkins That Stack Nicely
- Step 2: Decide Your Support Strategy (Rod vs. Nesting)
- Step 3: Build a Heavy Base (So Wind Doesn’t Win)
- Step 4: Make Clean Holes in the Pumpkins
- Step 5: Stack and Secure
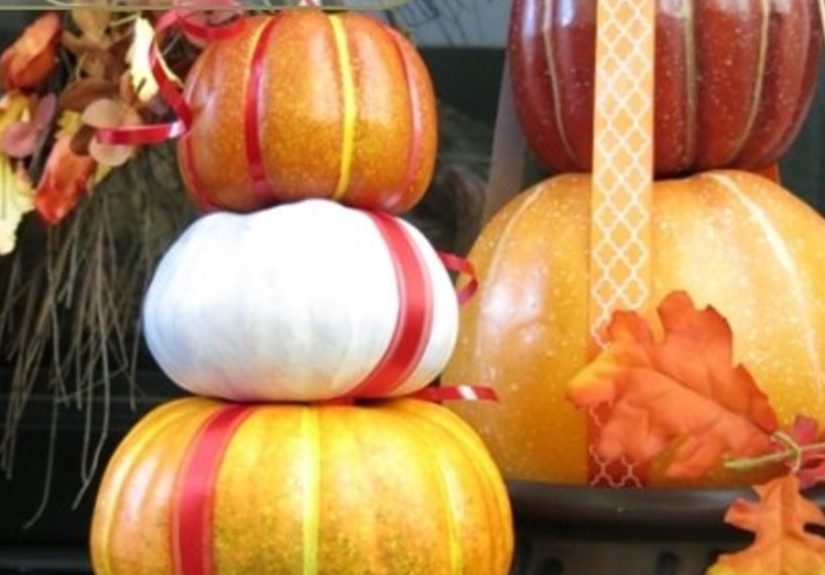
- Step 6: Decorate the Tiers (The Fun Part)
- Step 7: Seal It (Especially If It’s Going Outdoors)
- Method 2: Real Pumpkin Stack (Perfect for Halloween Night or a Weekend Party)
- Method 3: Wooden Stacked Pumpkins (Year-After-Year, No-Mess Fall Decor)
- Finishing Touches That Make It Look “Styled,” Not “Stacked”
- Make Your Stacked Pumpkins Survive Outdoors
- Troubleshooting (Because Pumpkins Love to Be Difficult)
- Quick Design Ideas to Copy
- Experiences and Lessons Learned (So Your First Stack Goes Smoothly)
- Wrap-Up
Stacked pumpkin decorations are the fall equivalent of putting on a cozy sweater and pretending you don’t have an inbox. They’re cheerful, customizable, and they instantly make a porch, entryway, mantel, or dining table look like you have your life together (even if you’re currently eating dinner over the sink).
Whether you call it a pumpkin topiary, pumpkin tower, or stacked pumpkin totem, the idea is simple: layer pumpkins in graduated sizes, secure them so they don’t wobble, then dress them up with paint, greenery, ribbon, lights, and personality. The best part? You can make one that lasts a weekend (real pumpkins) or one that lasts for years (faux or wooden pumpkins). This guide walks you through all three, with practical tips so your stack stays cuterather than doing a slow-motion lean like it’s auditioning for a dramatic movie scene.
What Is a Stacked Pumpkin Decoration (and Why It Works So Well)?
A stacked pumpkin decoration is a vertical arrangement of pumpkinsusually three to fivesecured around a central support (like a dowel or stake) or nested and glued together. It works because:
- Height adds impact (fast): Vertical decor reads as “intentional” from the curb.
- Layers create texture: Each pumpkin is a “tier” you can decorate differently.
- It’s flexible: Halloween faces, Thanksgiving elegance, farmhouse neutrals, boho colorsame base, different vibe.
Plan Your Look in 5 Minutes (Before You Buy Anything)
Before you start cutting holes in pumpkins like a very seasonal surgeon, make three quick decisions:
- Where will it live? Covered porch, open yard, indoor table, or entryway corner. Wind and rain change your build choices.
- How long should it last? One week (real pumpkins), one season (faux), or many years (wood).
- What’s the style? Classic orange, white and neutral, jewel tones, painted patterns, house numbers, spooky faces, or “soft fall” with dried florals.
Rule of thumb: If you want it outdoors for more than a few days, faux pumpkins are usually the easiest route. If you want it outside in real weather, you’ll want a sturdier base and a sealant strategy.
Supplies and Tools (Pick Your Method)
Below are the most common materials. You won’t need everythingchoose what fits your version.
For Faux Pumpkin Topiary (Most Popular)
- 3–5 faux craft pumpkins in graduated sizes (foam or plastic)
- Wooden dowel (about 3/8″ to 1″) or a sturdy stake/rebar (for outdoor stability)
- Planter/urn/bucket (optional but looks high-end)
- Weight for base: gravel, sand, bricks, or packed dirt
- Hot glue gun + glue sticks (high-temp is stronger) or strong adhesive
- Craft knife/utility knife
- Drill + bit (helpful for clean holes)
- Decor: faux leaves, floral picks, moss, ribbon, bow, mini wreath, twine, lights
- Paint (acrylic or spray) + optional primer
- Clear sealer (especially if outdoors)
For Real Pumpkin Stack (Short-Term, Super Charming)
- 3–5 real pumpkins (heaviest and widest on the bottom)
- Sturdy garden stake or post (and optional string lights)
- Knife/saw for cutting openings
- Spoon/scraper for cleaning (if carving)
- Battery lights (safer than candles)
For Wooden Stacked Pumpkins (Reusable, No Rot Drama)
- Wood pumpkin cutouts (or wood rounds / cutting boards you can paint)
- Wood glue + optional screws for strength
- Dowel or 1×2 support piece behind the stack
- Paint, stain, wax, sandpaper
- Ribbon/twine and faux greenery
Method 1: DIY Faux Stacked Pumpkin Topiary (Easy + Long-Lasting)
This is the classic “front porch pumpkin tower” you’ll see in fall decor featuresand for good reason: it’s sturdy, reusable, and forgiving if you mess up a little (paint covers many sins).
Step 1: Choose Pumpkins That Stack Nicely
Pick pumpkins that graduate in size and have relatively flat(ish) spots where they’ll meet. Slightly imperfect shapes can look more realisticbut very round pumpkins tend to wobble unless you carve a nest or use a center rod.
Pro tip: Do a “dry stack” on the floor at the store (or at home) to check proportions. If your stack looks like it’s wearing a tiny hat, you need a smaller top pumpkin or a larger middle.
Step 2: Decide Your Support Strategy (Rod vs. Nesting)
You have two reliable ways to keep faux pumpkins stable:
- Center rod method (best for outdoor): You run a dowel/stake up the middle and slide pumpkins onto it.
- Nesting + glue method (best for indoor/covered areas): You carve a shallow opening in the bottom of the upper pumpkins so they “nest” into the pumpkin below, then glue them in place.
Step 3: Build a Heavy Base (So Wind Doesn’t Win)
If your topiary will sit on a porch, a planter or urn instantly upgrades it. Fill it with gravel, sand, or packed dirt to create weight. Push your dowel or stake down into the base so it stands straight. If you’re using a simple dowel, you can stabilize it by embedding it into floral foamthen hiding the foam under moss and picks.
Step 4: Make Clean Holes in the Pumpkins
Mark the center point on the bottom of each pumpkin (except the bottom one if it will sit directly in the planter). Use a drill bit sized to your dowel/stake, or carefully cut a hole with a craft knife. Keep the hole snug; a loose fit causes wobble.
Alignment hack: Slide each pumpkin onto the rod and check the angle before moving to the next. Tiny adjustments now save you from a crooked tower later.
Step 5: Stack and Secure
- Anchor the rod in the planter/base.
- Slide the largest pumpkin on first.
- Add hot glue or strong adhesive where the pumpkins touch (especially for outdoor builds).
- Continue stacking medium, then small pumpkins.
- If the top pumpkin has a stem you like, keep it. If not, replace it with a twig, cinnamon sticks, or a faux stem.
Tip for realistic spacing: Don’t press pumpkins together so tightly they look squished. A slight separation can look more naturalespecially once you add moss or leaves between tiers.
Step 6: Decorate the Tiers (The Fun Part)
Now you get to make it yours. A few reliable looks:
- Classic porch: Greenery at the base, a bow near the top, and a small wreath tucked around the middle pumpkin.
- House numbers: Paint or apply vinyl numbers to the front-facing pumpkins for curb appeal.
- Boho color: Spray paint in muted terracotta, cream, and warm blush; add dried grasses and textured ribbon.
- Halloween: Paint faces, wrap with black yarn, add spiders, or do a “vampire” theme with bold accents.
Step 7: Seal It (Especially If It’s Going Outdoors)
Paint looks greatuntil dew, drizzle, or intense sun decide to remix your masterpiece. If the topiary will be outdoors, use a clear sealer appropriate for your paint type. Multiple light coats typically protect better than one heavy coat. Let it dry fully before display.
Method 2: Real Pumpkin Stack (Perfect for Halloween Night or a Weekend Party)
Real pumpkins look amazing, but they’re temporary. Use this method if you want a wow moment for a short timelike a party, trick-or-treat night, or a fall weekend.
Step 1: Pick the Right Pumpkins
Choose pumpkins with stable bottoms. Put the largest/heaviest on the bottom and keep your top pumpkin smaller so your tower doesn’t feel top-heavy.
Step 2: Create Openings for the Stake
Cut a hole in the bottom of the pumpkins that will slide down onto your stake/post (usually all but the bottom if the stake is anchored in the ground). If you’re carving faces, clean out the pumpkins so they don’t rot instantly. For simple stacking without carving, you can still cut openings and keep the pumpkins intactjust know they won’t last as long if moisture gets trapped.
Step 3: Anchor the Post and Add Lights (Optional)
Push a sturdy stake into the ground or into a heavy base. If you want a glowing tower, wrap the post with string lights before you slide pumpkins onto it. Battery-powered lights keep it simpler and safer.
Step 4: Stack and Finish
Slide the pumpkins down the post, adjusting the faces or front side as you go. Place the lid back on the top pumpkin or finish with a decorative topper (like a smaller gourd).
Real talk: In warm climates, carved real pumpkins can go soft quickly. If you want the look without the countdown timer, use faux pumpkins and paint them for a surprisingly realistic finish.
Method 3: Wooden Stacked Pumpkins (Year-After-Year, No-Mess Fall Decor)
Wooden stacked pumpkins are ideal if you love the look of a pumpkin tower but want something you can store with your holiday bins and reuse forever.
Step 1: Choose Your Wood Shapes
You can buy unfinished wood pumpkin cutouts, use wood rounds, or repurpose cutting boards. Aim for three pieces in graduated sizes so the stack looks balanced.
Step 2: Sand, Paint, or Stain
Lightly sand edges so paint adheres smoothly. Paint for a crisp, modern look; stain for rustic; or mix both for that “handmade but polished” vibe. Add details like buffalo check, subtle speckles, or hand-lettered words (HELLO FALL, BOO, or a family name).
Step 3: Assemble the Stack
Use wood glue and clamp if possible. For extra strength, attach a support strip or dowel along the back. If it’s meant to sit outside, choose a water-resistant wood glue and seal the finished piece.
Step 4: Add the Stem and Bow
A twig stem, a short piece of driftwood, or a wrapped bundle of cinnamon sticks looks great. Tie on a bow or wrap twine around the “neck” between pumpkins for that classic stacked-pumpkin silhouette.
Finishing Touches That Make It Look “Styled,” Not “Stacked”
- Moss between tiers: Hides seams and makes faux pumpkins look more natural.
- Grapevine or mini wreath: Adds texture and frames the stack.
- Ribbon: Use wired ribbon for fuller bows that hold shape.
- Lights: Wrap micro-lights around the center rod or tuck them into greenery.
- Color story: Keep it to 2–4 colors so it feels intentional.
Make Your Stacked Pumpkins Survive Outdoors
If your stacked pumpkin decoration is heading outside, focus on three enemies: wind, moisture, and sun.
- Wind: Use a heavy base (gravel/sand), keep the center rod anchored, and avoid oversized bows that turn into sails.
- Moisture: Seal painted surfaces, and don’t let water pool in the planteradd drainage stones or keep it under cover.
- Sun: UV can fade paint. A UV-resistant clear sealer helps, and placing your topiary in partial shade extends its good looks.
Troubleshooting (Because Pumpkins Love to Be Difficult)
My stack is wobbly.
Use a thicker dowel/stake, tighten the hole fit, and add adhesive between tiers. If it’s in a planter, add more weight at the bottom.
The pumpkins keep leaning.
Check that your rod is perfectly vertical before stacking. Small angle issues compound as you go up (like bad decisions in a group chat).
Paint is scratching or peeling.
Foam can be delicate. Use light coats, let it cure, and seal it. Avoid dragging the finished topiary across rough concrete.
It looks “flat.”
Add contrasting texture: moss, leaves, grapevine, a bow, or small floral picks between tiers. Texture is the secret sauce of fall decor.
Quick Design Ideas to Copy
- Candy corn stack: Yellow bottom, orange middle, cream topsimple, playful, and instantly recognizable.
- Neutral farmhouse: White pumpkins, black-and-white ribbon, eucalyptus, and a natural twig stem.
- Jewel-tone porch: Deep teal, plum, and warm gold accents with berry picks.
- Spooky topiary: Painted faces, black accents, and subtle lighting for nighttime drama.
- Thanksgiving centerpiece: Smaller stack in a crock with moss, then add mini pumpkins and candles around it.
Experiences and Lessons Learned (So Your First Stack Goes Smoothly)
When people try a stacked pumpkin decoration for the first time, the surprise isn’t the decoratingit’s the engineering. Pumpkins look innocent, but stacking them is basically a tiny architecture project that demands balance, stability, and a little patience.
Lesson #1: The “perfect” pumpkins are the ones that behave. It’s tempting to pick the fanciest shapes, but the best stack starts with pumpkins that naturally sit well together. Many DIYers find that slightly squashed pumpkins (with flatter tops/bottoms) are easier than super round ones. A cute lumpy pumpkin can absolutely workyou just might need to nest it more deeply or rely on a center rod to keep it from spinning.
Lesson #2: A thicker support solves half your problems. A skinny dowel can work indoors, but outdoors it may flex, which leads to wobble. People who build these year after year often size up their dowel or switch to a sturdier stake when the topiary is meant to handle breezes. It’s also common to discover that the base matters more than the top: a heavy planter with gravel is like giving your pumpkins a solid foundation and a pep talk at the same time.
Lesson #3: Hole alignment is everything. The most frequent “why is it leaning?” moment comes from slightly off-center holes. A smart habit is to stack one pumpkin at a time, step back, and check the front view before committing with glue. If the hole ends up a bit off, some DIYers gently widen it on the side that needs correction, then use adhesive or filler decor (moss, leaves, a mini garland) to disguise the adjustment.
Lesson #4: Hot glue is fast, but it’s not magic. Hot glue is amazing for speed and convenience, but it can struggle on slick plastic pumpkins or in extreme heat/cold. Crafters often improve results by lightly roughing up contact points (a gentle sand) so glue grips better, and by using glue generously where pumpkins touchthen hiding those glue lines with moss or ribbon. The decorating trick also doubles as a structural trick, which feels delightfully sneaky.
Lesson #5: Paint is a personality multiplierif you go easy. Many people discover that lighter coats look better and last longer than heavy coats, especially on foam. A few thin layers keep details crisp and reduce the chance of tacky, dent-prone surfaces. And if you’re chasing a higher-end look, it’s often the finish that sells it: a matte sealer reads modern and cozy; a satin finish feels classic; a slight sheen can mimic the natural glow of real pumpkins.
Lesson #6: Decorating is easier when you pick one “hero” detail. The most polished stacks usually have one big statementlike a bow, a mini wreath, house numbers, or bold painted patternsthen everything else supports it. Too many competing add-ons can make the tower feel busy. If you’re unsure, build the stack, add greenery at the seams, and stop. You can always add more later. (You cannot easily un-add hot glue. Ask anyone who has tried.)
Lesson #7: Storage matters if you want to reuse it. A lot of DIYers don’t think about storage until they’re holding a tall pumpkin tower in November like, “Where do I put you now?” If you want it reusable, consider making it in sections (two pumpkins glued, then the third on top) or building it so the pumpkins slide off the rod. Wrap pumpkins in paper or fabric to prevent dents, and store bows separately so they don’t get crushed into sad ribbon noodles.
Once you build one stacked pumpkin decoration, you’ll realize it’s not just a craftit’s a seasonal tradition waiting to happen. You can refresh it each year with new colors, swap the bow, change the picks, or add house numbers. And the next time someone says, “Wow, where did you buy that?” you get to say the most satisfying sentence in DIY: “Oh, I made it.”
Wrap-Up
A stacked pumpkin decoration is one of those rare DIYs that’s both approachable and high-impact. Start with a stable base, decide whether you’re building with faux, real, or wood pumpkins, then secure your tiers so they’re straight and sturdy. From there, it’s all creativity: paint, ribbon, moss, lights, and little touches that match your home’s style. Build it once, tweak it each season, and enjoy the kind of fall curb appeal that makes neighbors slow down as they walk by (in a non-creepy way).


