Table of Contents >> Show >> Hide
- Why Measuring Chainsaw Bar Length Matters
- What Chainsaw Bar Length Actually Means
- What You Need Before You Measure
- How to Measure Chainsaw Bar Length in 4 Easy Steps
- How to Measure Overall Bar Length
- Do Not Stop at Bar Length: 3 More Numbers That Matter
- Where to Find These Specs Without Measuring Everything by Hand
- Quick Examples of Chainsaw Bar Measurement
- Common Mistakes to Avoid
- Best Tips & Tricks for Measuring Chainsaw Bar Length Correctly
- How Bar Length Affects Performance
- When to Replace the Bar, Not Just the Chain
- Real-World Experiences: What People Learn the Hard Way
- Final Takeaway
- SEO Tags
If you have ever stood in the hardware aisle holding a tape measure in one hand and a slightly suspicious-looking chainsaw in the other, welcome to the club. Measuring chainsaw bar length sounds simple until you realize there is bar length, cutting length, overall length, and the very rude fact that buying the wrong replacement chain can turn a five-minute project into a “guess I live here now” situation.
The good news is that learning how to measure chainsaw bar length is not difficult. The better news is that once you know the trick, you will probably never buy the wrong bar or chain again. In most cases, what people call the chainsaw bar length is the usable cutting length, not the full metal bar from tip to tail. That one detail saves a lot of confusion.
In this guide, you will learn exactly how to measure chainsaw bar length, how to tell the difference between called length and overall bar length, what numbers matter when replacing a bar or chain, and a few practical tips that can save your knuckles, your patience, and maybe your Saturday.
Why Measuring Chainsaw Bar Length Matters
Knowing the correct chainsaw bar length matters for more than bragging rights in the garage. It affects the replacement bar you buy, the chain you install, how safely the saw handles, and what type of jobs the saw can do comfortably.
A shorter bar is generally lighter and easier to control, which makes it great for limbing, pruning, and lighter cutting jobs. A longer bar gives you more reach and more cutting capacity for bigger logs and heavier work. That said, bigger is not always better. A bar that is too long for the saw or the user can make the tool feel awkward, heavier, and less efficient. Translation: the chainsaw starts acting like it has opinions.
What Chainsaw Bar Length Actually Means
Called Length vs. Overall Length
Here is the part that trips up a lot of people: the length used for shopping is usually the called length, also known as the cutting length. This is the distance from the front edge of the saw body to the tip of the guide bar. In other words, it is the part of the bar you can actually use for cutting.
The overall length is the full physical length of the bar after it is removed from the saw. That measurement includes the part hidden inside the powerhead during normal use. So if you remove a guide bar and measure it from end to end, that number will be longer than the size listed on the box.
For example, a bar that is sold as an 18-inch bar may measure more than 18 inches from tip to tip when removed. That does not mean you bought the wrong part. It just means chainsaw sizing likes to be a little dramatic.
What You Need Before You Measure
You do not need a workshop full of gear to measure a chainsaw bar. A few simple items will do the job:
- A tape measure or rigid ruler
- A pair of work gloves
- A clean, flat work surface
- A pencil or phone note if you want to record the numbers
Before you measure, make sure the chainsaw is turned off, cool, and disconnected from its power source. If it is a gas model, let it cool down fully. If it is electric or battery-powered, unplug it or remove the battery. Gloves are a smart idea because even a dull chain can still remind you who is boss.
How to Measure Chainsaw Bar Length in 4 Easy Steps
Step 1: Put the Chainsaw on a Flat Surface
Set the saw on a stable workbench, table, or other flat surface. You want the bar straight and easy to read. A wobbly setup makes a simple task way more exciting than it needs to be.
Step 2: Find the Front Edge of the Saw Body
Look for the point where the guide bar disappears into the chainsaw housing. That front edge of the powerhead is where your measurement starts. You are not measuring from the handle, the bumper spikes, or some random plastic edge that happens to be nearby.
Step 3: Measure to the Tip of the Bar
Run the tape measure from the front edge of the chainsaw body to the far tip of the guide bar. Measure the exposed section only. This gives you the usable cutting length, which is the number that matters most when people ask, “What size bar is that saw?”
Step 4: Round to the Nearest Standard Size
If your measurement is not a perfect whole number, round it to the nearest published bar size. Most homeowner chainsaws use common sizes like 10, 12, 14, 16, 18, 20, or 24 inches. So if your exposed bar measures about 17 1/2 inches, you will usually shop for an 18-inch chainsaw bar.
This step is important because chainsaw sizing is not usually sold in quirky fractions. Nobody strolls into a store asking for a 17.63-inch guide bar unless they are trying to confuse the staff for sport.
How to Measure Overall Bar Length
Sometimes you want the full length of the bar, especially when identifying an old bar, comparing parts, or checking wear. In that case, remove the guide bar from the saw and measure from one end to the other.
This number is the overall length, not the called length. It is useful for identification, but it is not the only number you should use when buying a replacement. If you stop here, you are only halfway to the right answer.
Do Not Stop at Bar Length: 3 More Numbers That Matter
Here is where many chainsaw owners go wrong: they measure the bar length, buy a part with the same inch number, and assume they are done. Sadly, chainsaw bars and chains are pickier than that. To buy the correct replacement, you should also confirm pitch, gauge, and drive link count. In some cases, you also need the correct bar mount pattern.
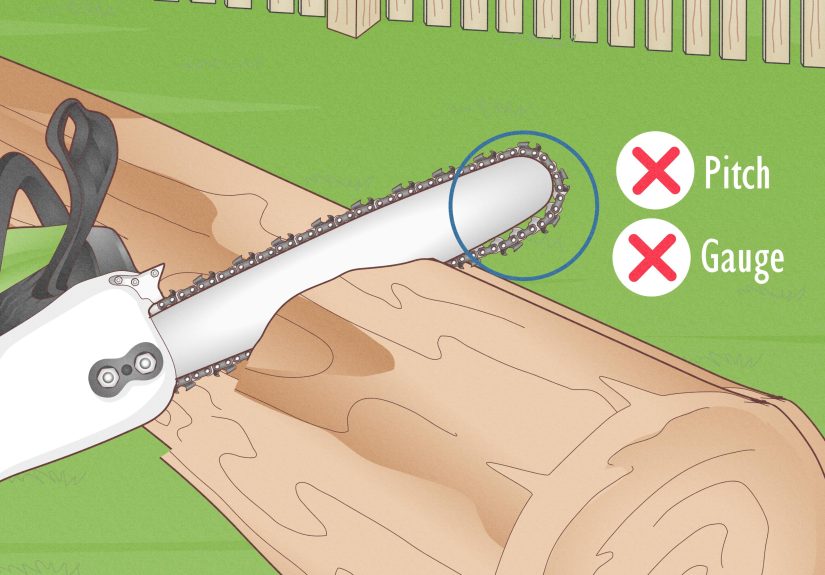
1. Chain Pitch
Pitch describes the size of the chain. It is commonly measured by finding the distance across any three consecutive rivets and dividing that number by two. Common pitch sizes include 1/4 inch, .325 inch, and 3/8 inch. If the pitch does not match the sprocket and bar, the chain will not fit correctly. That is not a “close enough” situation.
2. Chain Gauge
Gauge is the thickness of the drive links, the part of the chain that sits inside the guide bar groove. Common gauges include .043 inch, .050 inch, and .058 inch. A chain with the wrong gauge will either fit too loosely or not fit into the groove at all. Neither outcome is charming.
3. Drive Link Count
The drive link count is the total number of drive links in the chain loop. This number must match the bar and saw setup. Two chains can both be 16 inches long in the everyday sense but still require different drive link counts depending on brand, bar mount, and design.
That is why “I have a 16-inch chainsaw” is not enough information when shopping for a new chain. It is a good start, but it is not the full recipe.
Where to Find These Specs Without Measuring Everything by Hand
Sometimes the easiest answer is already stamped right on the saw or bar. Check these spots first:
- The guide bar near the mounting end
- The side cover area
- The owner’s manual
- The manufacturer’s replacement parts guide
- The existing chain packaging, if you still have it
Many guide bars include stamped information showing the bar length, pitch, and gauge. Some manufacturers also encode the called length into the bar part number. That is especially handy when your tape measure is missing because it wandered off to live with the 10mm socket.
Quick Examples of Chainsaw Bar Measurement
Example 1: A Basic Homeowner Saw
You measure from the front of the saw body to the tip of the bar and get 15 7/8 inches. In everyday shopping terms, that is a 16-inch chainsaw bar.
Example 2: An Older Saw with a Worn Bar
The bar tip looks worn and the stamp is hard to read. You remove the bar, measure the whole thing, then compare the number with the saw model and chain specs. This helps you confirm the original called length and avoid guessing.
Example 3: Buying a New Chain
You know the saw has an 18-inch bar, but you still check the chain pitch, gauge, and drive link count. Smart move. An 18-inch chain is not one universal size. It is a category, not a magic password.
Common Mistakes to Avoid
Measuring the Whole Bar While It Is Still Mounted
If the bar is still attached to the saw, do not try to imagine the hidden section inside the housing. Measure only the exposed cutting portion.
Ignoring Pitch, Gauge, and Drive Links
This is the most common replacement mistake. Bar length alone does not guarantee compatibility.
Guessing Based on Memory
“I think it was a 20-inch bar” is how unnecessary second trips to the store are born. Take the two minutes and measure it.
Assuming All Brands Use the Same Setup
They do not. Two different saws can both use a 16-inch bar and still need different chains or mount patterns.
Measuring a Dirty or Bent Bar
Sawdust buildup, caked oil, and visible wear can make it harder to read markings or measure accurately. Wipe the bar clean first.
Best Tips & Tricks for Measuring Chainsaw Bar Length Correctly
Use the Stamp Before the Tape
If the bar stamp is still readable, start there. It is often faster and more accurate than measuring from scratch.
Take a Photo of the Specs
Before heading to the store, snap a photo of the bar markings and the saw model plate. It is easier than trying to remember whether the gauge was .043 or .050 while standing under fluorescent lights questioning all your life choices.
Check the Manual or Manufacturer Site
If the saw model is known, the official replacement chart is often the fastest route to the right fit.
Measure Twice, Buy Once
Yes, it is a classic line, but it survives because it is true. One quick recheck beats the hassle of returns.
Match the Job to the Bar
Do not automatically chase a longer bar. For pruning, storm cleanup, and lighter homeowner tasks, a shorter bar is often easier to handle and less tiring over time.
How Bar Length Affects Performance
The right chainsaw bar length is not just about fitting replacement parts. It also affects how the saw behaves in your hands.
Shorter bars are usually easier to maneuver, quicker for smaller cuts, and less tiring for overhead or awkward-angle work. Longer bars let you cut larger diameter wood more efficiently, but they also add weight and can ask more from the motor.
If you use a longer bar than the saw is designed to handle, cutting performance can suffer. The chain may move less efficiently, the saw can bog down more easily, and the whole setup may feel unbalanced. In other words, giving a modest homeowner saw a giant bar is a little like asking a compact sedan to tow a submarine.
When to Replace the Bar, Not Just the Chain
Sometimes the chain is not the main problem. If the saw cuts crooked, the bar rails are badly worn, the groove is damaged, the nose sprocket is rough, or the bar has visible cracks or heavy uneven wear, the guide bar itself may need replacement.
A fresh chain on a badly worn bar can still perform poorly. That is why experienced users treat the bar and chain as a working pair rather than two unrelated parts that happened to meet in the garage.
Real-World Experiences: What People Learn the Hard Way
One of the most common real-world experiences with chainsaw bar measurement starts with confidence and ends with a return receipt. A homeowner looks at an older saw, gives the bar a quick eyeball estimate, and decides it is probably 18 inches. At the store, they grab an 18-inch replacement chain, head home, install it, and realize the chain either hangs too loose, refuses to fit, or looks close enough to tempt bad decisions. The problem is rarely the inch number alone. It is usually that the old setup also had a specific pitch, gauge, and drive link count that got ignored. This happens a lot because “18-inch bar” sounds complete when it is really just the headline.
Another frequent experience happens with inherited or secondhand chainsaws. Someone gets a saw from a relative, neighbor, or garage sale and assumes the current bar must be original. Then they remove the bar, clean it off, and discover the saw has been modified at some point. Maybe the original setup was 16 inches, but a previous owner swapped on a different bar length. Suddenly the owner’s manual and the actual saw do not seem to agree. In those cases, measuring the exposed bar, reading the stamp on the bar itself, and confirming the chain specs becomes the difference between solving the mystery and buying parts through pure optimism.
There is also the experience of learning that longer does not always feel better. Many first-time buyers assume a longer bar is automatically more powerful or more useful. Then they spend an afternoon trimming limbs with a saw that feels nose-heavy and awkward. After using a shorter bar setup, they realize the saw feels lighter, easier to control, and much less fatiguing. That is why experienced users often talk less about the “biggest bar” and more about the “right bar for the job.” It is not about winning a contest. It is about efficiency, control, and not waking up the next morning feeling like your shoulders filed a complaint.
Another lesson people learn the hard way is that bar markings are worth recording before they wear off. A new saw may clearly show the bar length, pitch, and gauge, but after months or years of oil, sawdust, sharpening, heat, and general chainsaw life, those markings can become harder to read. People who take a photo early save themselves a lot of guesswork later. It is such a simple trick that it feels almost unfair.
Then there is the practical experience of measuring in a hurry versus measuring carefully. In a hurry, people measure from the wrong point, forget to round to the nearest standard size, or confuse overall bar length with cutting length. When measured carefully on a flat surface, with the saw cool and clean, the answer usually becomes obvious in under two minutes. That small pause is often what separates a smart repair from an annoying detour.
What all these experiences have in common is simple: chainsaw bar measurement is easy once you know what number matters. Most problems come from assumptions, not from the measuring itself. The people who get it right are not necessarily more experienced. They are just the ones who take a moment to verify the bar length and the chain specs before they buy.
Final Takeaway
If you want to measure chainsaw bar length correctly, measure the exposed portion of the guide bar from the front of the saw body to the tip. That gives you the called length, which is the number most people use when shopping for replacement bars and chains. If you remove the bar and measure the whole thing, that is the overall length, which is useful for identification but not the only number you need.
Most importantly, do not stop with bar length alone. For a proper replacement, check the pitch, gauge, drive link count, and sometimes the mount pattern too. Do that, and you will avoid the classic chainsaw-owner tradition of buying a part that is almost right, which is really just a polite way of saying “wrong.”


