Table of Contents >> Show >> Hide
- Why Fall Is the Right Time to Plant Tulip Bulbs
- How to Choose the Best Tulip Bulbs
- Pick the Right Spot: Sun, Soil, and Drainage
- How to Plant Tulip Bulbs in Fall, Step by Step
- Can You Plant Tulips in Containers?
- What Warm-Climate Gardeners Should Know
- How to Care for Tulips After Planting
- Common Mistakes That Ruin Tulip Displays
- Experience Section: Real-World Lessons From Planting Tulip Bulbs in Fall
- Conclusion
Planting tulip bulbs in fall is one of those rare gardening jobs that feels suspiciously easy for the amount of spring drama it delivers. You dig a hole, tuck in a bulb that looks a little like an onion with ambition, cover it up, and then wait through winter like a patient magician. A few months later, your yard explodes into color and your neighbors suddenly become very interested in your “gardening secrets.”
If you want tall, healthy tulips and not a sad patch of floppy stems and regret, timing and technique matter. Tulips are not difficult, but they are a little opinionated. They like cool soil, good drainage, and a gardener who understands that “pretty flower” starts with “smart planting.” In this guide, you’ll learn exactly how to plant tulip bulbs in fall, where to place them, how deep to set them, and what to do after planting so you get the kind of spring display that makes people stop mid-walk and say, “Whoa.”
Why Fall Is the Right Time to Plant Tulip Bulbs
Tulips need a long period of winter chill to develop properly and bloom well in spring. That is why fall planting is not just recommended; it is essential. Putting bulbs in the ground while the soil is still too warm can trigger premature growth, while planting too late may not give roots enough time to establish before the ground freezes.
The sweet spot is usually when nighttime temperatures are consistently cool and the soil has started to chill down. In colder parts of the country, that often means early to mid-fall. In milder regions, planting may happen later in fall or even early winter. The key is to plant before the ground freezes hard, but after summer heat has fully backed off.
Think of tulip bulbs as tiny spring batteries. Fall is when they charge up underground. Winter is their quiet prep season. Spring is the grand performance.
How to Choose the Best Tulip Bulbs
Great tulips begin at the bulb bin. The biggest mistake many gardeners make is buying whatever is left over at the garden center after everyone else has already grabbed the good stuff. If you want stunning spring flowers, shop early and pick bulbs that look like they have their life together.
What healthy tulip bulbs look like
- Firm and solid, not soft or squishy
- Large and plump, because bigger bulbs usually mean bigger blooms
- Free of mold, deep blemishes, or dark rotten spots
- Not shriveled, papery-dry, or suspiciously lightweight
If you cannot plant right away, store bulbs in a cool, dark, dry place with good air circulation. Do not toss them in a warm garage corner and hope for the best. Tulip bulbs are patient, but they are not immortal.
Hybrid tulips vs. species tulips
If your goal is one jaw-dropping spring display, hybrid tulips are the showboats. They offer rich colors, dramatic petal shapes, and that classic storybook tulip look. But many modern hybrids perform best the first year and may decline after that.
If you want tulips that are more likely to return year after year, look into species tulips or varieties known for naturalizing. They are often smaller and a bit less flashy, but they tend to behave more like reliable garden residents and less like glamorous seasonal guests.
Pick the Right Spot: Sun, Soil, and Drainage
Tulips are not fans of soggy feet. If your yard has a spot where water sits around in winter like it is waiting for a bus, do not plant tulips there. Bulb rot is real, and it is a fast way to turn your spring display into a mystery disappearance.
The ideal site for tulips
- Full sun: Tulips perform best where they get plenty of light in spring.
- Well-drained soil: Rich, loose soil is ideal, but the real nonnegotiable is drainage.
- No standing winter water: Raised beds or berms can help if your soil stays wet.
- Room for airflow: Crowded, damp conditions invite trouble.
If you have heavy clay soil, do not panic. You can still grow tulips. Improve the bed with compost, loosen the planting area deeply, and plant a bit shallower than you would in sandy soil. In very wet climates, raised beds can make a huge difference.
How to Plant Tulip Bulbs in Fall, Step by Step
Now for the fun part: getting those bulbs into the ground without accidentally planting them upside down like confused little submarines.
1. Loosen the soil first
Prepare the bed before you start popping in bulbs one by one. Loosen the soil deeply so roots can grow easily. Mix in compost if the soil is compacted or low in organic matter. This is especially helpful in tough, dense garden beds.
2. Dig to the proper depth
A reliable rule of thumb is to plant tulip bulbs about three times as deep as the bulb’s height or width. For many standard tulips, that works out to roughly 6 to 8 inches deep. Smaller tulips may go a little shallower; large bulbs can go deeper.
Measure from the bottom of the bulb, not the tip. In sandy soils, you can plant slightly deeper. In heavier clay soils, slightly shallower is often better.
3. Space the bulbs correctly
Most tulip bulbs should be spaced about 4 to 6 inches apart. That gives each bulb enough room to grow without making the bed look skimpy. If you are planting in containers, you can tuck them a bit closer for a fuller display.
For the best visual effect, do not plant tulips in lonely little rows like sad soldiers. Plant them in generous clusters or drifts. A group of 10 or more bulbs of the same variety usually looks far better than a few scattered here and there.
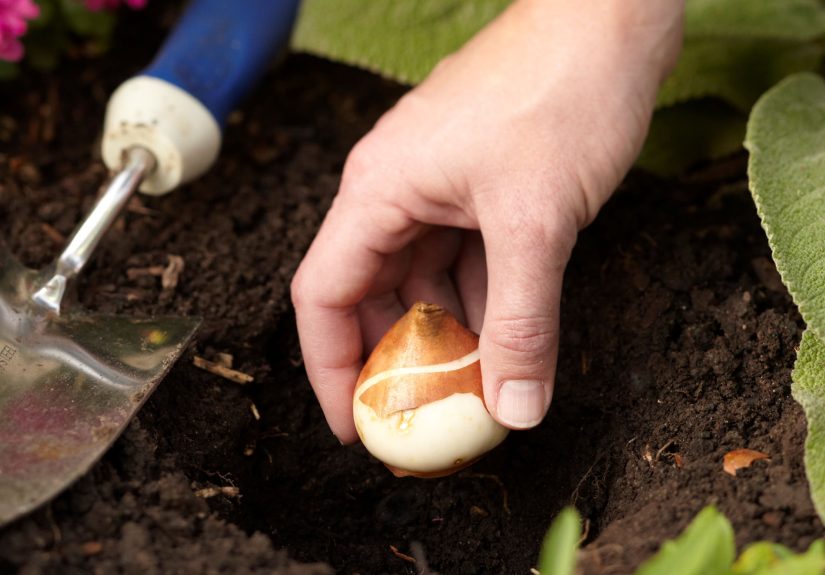
4. Place the bulb pointy side up
The pointed end goes up, and the flatter basal plate goes down. That is where roots emerge. If you are unsure, remember this: roots go down, drama goes up.
If a bulb gets planted sideways by accident, it will often sort itself out, but do not make that its life plan.
5. Cover and water
Backfill the hole with soil and water well after planting. That first deep drink helps settle the soil and kick-start root growth. After that, bulbs usually do not need constant watering in fall unless conditions are unusually dry.
6. Add mulch
A light layer of mulch helps moderate soil temperature, reduce frost heaving, and hold moisture more evenly. Shredded leaves, bark, or another organic mulch works well. Think of it as a winter blanket, not a heavy mattress.
Can You Plant Tulips in Containers?
Absolutely. Containers are a great way to enjoy tulips on patios, porches, and entryways, especially if your garden soil is poor or your backyard squirrels operate like a coordinated crime ring.
Use a pot with drainage holes and a high-quality potting mix. Plant bulbs close together for a lush display, but do not let them touch. The challenge with containers is winter protection. Bulbs in pots are more exposed to freeze-thaw cycles than bulbs in the ground, so containers may need to be moved to a protected spot or insulated for winter.
In very cold regions, some gardeners sink pots into the ground for winter and lift them back out in spring. It is a little extra work, but so is every hobby that ends in applause.
What Warm-Climate Gardeners Should Know
If you garden in a region with mild winters, tulips can be trickier. They still need a chilling period to bloom properly. In warmer climates, that often means buying pre-chilled bulbs or chilling them yourself in the refrigerator before planting.
If you refrigerate bulbs, keep them in a ventilated paper bag and away from apples or other ripening fruit. Fruit releases ethylene gas, which can interfere with flower development. That is right: your tulips can be sabotaged by produce.
Warm-climate gardeners often treat tulips as annuals, enjoying a spectacular one-season show and then replanting fresh bulbs the following fall. There is no shame in that. Gardening is about results, not guilt.
How to Care for Tulips After Planting
Once your bulbs are in the ground, your job gets easier. The best thing you can do is mostly leave them alone.
In winter
Mulch can help in colder climates, especially where freeze-thaw cycles are common. Tulips are hardy, but winter conditions can heave bulbs upward if the soil keeps expanding and contracting.
In spring
When shoots emerge, make sure the bed does not stay weedy or overly wet. If rainfall is scarce during a dry spring, water as needed, but do not keep the soil soggy. Tulips like moisture, not swamp conditions.
After the flowers fade
Deadhead spent blooms so the plant does not waste energy making seeds. But leave the foliage alone until it turns yellow and starts to die back naturally. Yes, the leaves get floppy. Yes, they are not cute. But those leaves are recharging the bulb for future growth.
If you cut the leaves too early, you may get fewer flowers next year or none at all. Tulips remember.
Common Mistakes That Ruin Tulip Displays
Planting too early
Warm soil can trigger premature sprouting and stress the bulbs before winter even begins.
Ignoring drainage
This is the classic tulip-killer. If your soil stays wet, improve drainage before planting.
Planting too shallow
Shallow bulbs are more vulnerable to cold, animals, and weak growth.
Spacing too far apart
One tulip here, another four feet away, and suddenly your “design” looks like a planting error. Group bulbs for impact.
Cutting foliage too soon
The leaves are not just decoration. They are the bulb’s energy factory for next year.
Expecting every tulip to perennialize forever
Many hybrid tulips are at their best in year one. If they return beautifully, celebrate. If not, it is not always your fault. Sometimes the bulb is simply living its best one-season life.
Experience Section: Real-World Lessons From Planting Tulip Bulbs in Fall
The first time I planted tulip bulbs in fall, I made the classic beginner mistake: I treated them like seeds with a flair for drama. I tucked a few here, a few there, and figured spring would somehow transform my scattered effort into a magazine-worthy display. Spring arrived, and what I got looked less like a curated tulip garden and more like random colorful interruptions in the mulch. The flowers were pretty, but the overall effect was chaos wearing lipstick.
The next year, I changed my approach. Instead of sprinkling bulbs around the yard like confetti, I planted them in bold groups. That single shift made the biggest visual difference. Ten red tulips together looked intentional. Fifteen soft pink tulips along a path looked elegant. A drift of mixed late-bloomers near the mailbox looked like I understood landscape design, which was flattering and also untrue.
I also learned the hard way that drainage is not a boring technical detail; it is the whole game. One bed near the downspout stayed wetter than I realized, and the bulbs there either rotted or produced weak, miserable leaves. The bulbs planted in a raised bed with looser soil, on the other hand, came up strong and flowered like overachievers. Ever since then, I have been suspicious of any planting spot that stays soggy after rain.
Another real-life lesson was timing. One year I got excited, planted too early, and a stretch of warm weather convinced some bulbs to start growing before winter settled in. They survived, but they were not thrilled about it. Since then, I wait until the weather feels properly cool and the garden has officially stopped pretending it is still summer.
Critters also deserve an honorable mention because squirrels apparently believe tulip bulbs are a seasonal snack box created specifically for them. After losing a few treasured bulbs, I started planting in areas mixed with daffodils, using light barriers in problem spots, and covering freshly disturbed soil when needed. It did not turn my garden into Fort Knox, but it definitely reduced the furry theft rate.
The biggest mindset change, though, was learning not to take tulips personally. Some years are spectacular. Some years a few varieties do not return well. Some years the weather does weird things. Once I stopped expecting every bulb to behave like a lifelong perennial and started treating tulips as both a garden pleasure and a bit of spring theater, I enjoyed them more. They became less of a test and more of an event.
That is probably the best advice I can share from experience: plant generously, plant smart, and plant with a little optimism. Tulips reward planning, but they also reward gardeners who embrace the seasonal magic of it all. You do the work in fall, trust the process in winter, and in spring, for a few glorious weeks, your yard looks like it has absolutely everything figured out.
Conclusion
If you want stunning spring tulips, fall planting is where the magic begins. Choose large, healthy bulbs, wait for cool weather, plant them deep in well-drained soil, and group them generously for the best display. Give them sun, protect them from soggy conditions and hungry critters, and let the foliage fade naturally after bloom. That simple routine can turn a plain bed, border, or container into one of the brightest moments of spring.
In other words, planting tulip bulbs in fall is not complicated. It is just one of those gardening jobs where doing the basics really well makes you look wildly talented a few months later.


