Table of Contents >> Show >> Hide
- What Brown Spots on Hydrangea Leaves Usually Mean
- Learn the Difference Between Disease and Stress Damage
- Start With the Right Planting Location
- Water the Soil, Not the Leaves
- Use Mulch Like a Smart Garden Assistant
- Improve Airflow Before Problems Start
- Practice Clean Garden Hygiene
- Keep Soil Conditions Stable and Healthy
- Do Not Overfeed the Plant
- Watch the Weather and Act Early
- When Fungicides Make Sense and When They Do Not
- What to Do if Brown Spots Are Already There
- Common Mistakes That Invite Brown Spots
- A Simple Prevention Routine for Healthy Hydrangea Leaves
- Gardener Experience: What People Often Learn the Hard Way About Brown Spots
- Conclusion
Hydrangeas are the drama queens of the garden in the best possible way. They show up with giant blooms, lush leaves, and the kind of presence that makes neighboring plants feel a little underdressed. But then one morning, you walk outside with coffee in hand and spot those dreaded brown marks creeping across the leaves. Suddenly, your beautiful shrub looks like it has had a rough week.
If you are wondering how to prevent brown spots on your hydrangea leaves, the good news is that the problem is often manageable. Brown spotting usually points to a combination of moisture, weather, airflow, and plant stress rather than one mysterious garden curse. In many cases, the solution is less about heroic rescue missions and more about getting the basics right: proper watering, smarter placement, cleaner maintenance, and a little restraint when reaching for fertilizer or a sprinkler.
This guide breaks down what causes brown spots on hydrangea leaves, how to prevent them before they spread, and what to do when your plant already looks a little battle-tested. Think of it as hydrangea first aid with better manners and less panic.
What Brown Spots on Hydrangea Leaves Usually Mean
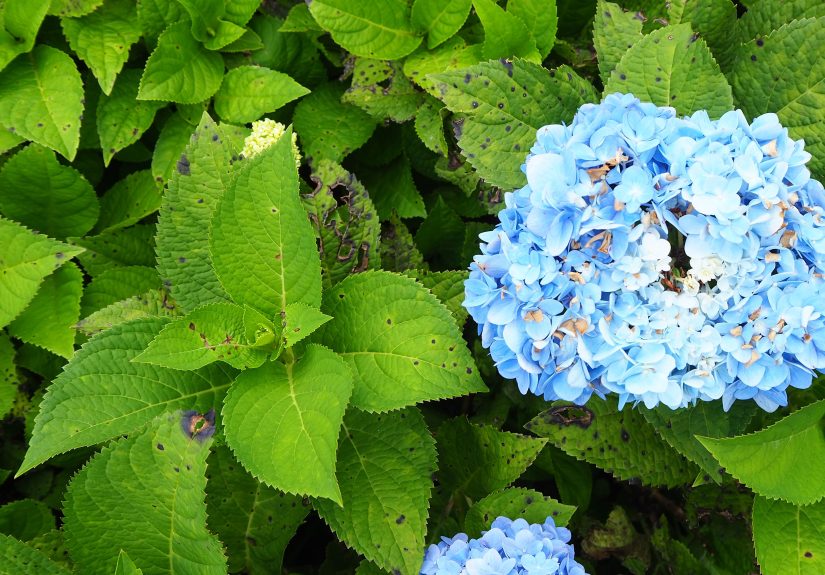
Brown spots are a symptom, not a full diagnosis. That distinction matters because prevention depends on knowing what your hydrangea is trying to tell you. In many landscapes, the most common culprit is fungal leaf spot, especially Cercospora. This disease often begins on lower leaves and works its way upward. The spots may look purple-brown at first, then develop tan or gray centers as they age.
Another possible cause is anthracnose, which tends to create larger, more irregular brown lesions that can look sunken or form a target-like pattern. Bacterial leaf spot can also show up during warm, wet conditions. And not every brown patch is caused by disease. Heat stress, sun scorch, inconsistent watering, fertilizer burn, or poor drainage can also leave leaves looking crisp, blotchy, or tired.
In plain English, your hydrangea may not be “sick” in a dramatic sense. It may simply be stressed, damp for too long, crowded, or growing in a spot that makes trouble easy.
Learn the Difference Between Disease and Stress Damage
Signs it may be fungal or bacterial leaf spot
If the spots are round or irregular, have darker margins, appear first on lower leaves, or multiply quickly during rainy or humid weather, disease is a likely cause. Leaves may yellow and drop early if the problem becomes severe.
Signs it may be sun or moisture stress
If the leaf edges are dry and crispy, the browning appears after heat waves, or the damage is worst on the side facing intense afternoon sun, stress is a stronger suspect. Brown patches caused by environmental stress often look more scorched than spotted.
Why this matters
Fungal leaf spot prevention focuses on keeping foliage dry, improving air circulation, and removing infected debris. Stress prevention focuses on correcting light, water, and soil conditions. Different problem, different fix.
Start With the Right Planting Location
The easiest way to prevent hydrangea leaf problems is to avoid putting the plant in a place where it has to fight for survival. Most hydrangeas, especially bigleaf, smooth, and oakleaf types, prefer morning sun and afternoon shade. That setup gives them enough light to bloom without roasting the leaves during the hottest part of the day.
A site with all-day blazing sun can leave foliage stressed and vulnerable. On the other hand, dense shade is not ideal either. Too little light slows drying after rain and creates the sort of damp, still environment that leaf spot diseases enjoy far too much.
Choose a spot with:
- Morning sunlight and protection from harsh afternoon sun
- Good air movement around the plant
- Well-drained soil with plenty of organic matter
- Enough space for the mature size of the shrub
This step sounds boring, but boring is underrated in gardening. Good siting prevents a surprising number of future headaches.
Water the Soil, Not the Leaves
If hydrangeas could send text messages, one of them would probably read: “Please stop spraying my face.” Overhead watering is one of the fastest ways to encourage leaf spot diseases because it leaves foliage wet for extended periods. Wet leaves plus warm temperatures plus limited airflow equals a five-star resort for fungal spores.
Instead, water at the base of the plant. A soaker hose or drip irrigation system is ideal, but even hand-watering at soil level is better than using a sprinkler that drenches the leaves. Deep watering is usually more helpful than frequent shallow watering. The goal is evenly moist soil, not soggy soil and not bone-dry soil followed by panic flooding.
As a general rule, hydrangeas perform best with consistent moisture. During dry spells, check the soil a few inches down. If it feels dry, water thoroughly. If it feels wet and heavy, wait. Brown spots often become worse when a plant swings between drought stress and excessive moisture.
Use Mulch Like a Smart Garden Assistant
A 2- to 3-inch layer of mulch does several helpful things at once. It keeps the root zone cooler, conserves soil moisture, reduces splashing from rain, and helps stabilize conditions around the plant. That last benefit matters because dramatic swings in soil moisture can stress hydrangeas and make leaves more vulnerable.
Organic mulches such as pine bark, shredded leaves, or pine straw work well. Just keep mulch a few inches away from the stems. Piling it right against the base may trap moisture where it should not be and can create other problems. Mulch is wonderful, but mulch volcanoes belong on the no-thank-you list.
Improve Airflow Before Problems Start
Hydrangeas with crowded branches or plants packed too closely together tend to stay damp longer after rain or irrigation. That extra moisture hang time gives fungal diseases a real advantage.
To improve airflow:
- Plant hydrangeas with enough spacing for mature width
- Avoid stuffing them into tight foundation beds
- Thin out dead, weak, or crossing stems when appropriate for the species
- Keep nearby shrubs from closing in around them
Do not go wild with pruning just because a pair of shears feels empowering. Some hydrangeas bloom on old wood, and careless pruning can remove future flowers. The goal is openness, not a tragic haircut.
Practice Clean Garden Hygiene
If your hydrangea had leaf spots last year, old infected leaves and debris may still be hanging around the planting area like unwanted party guests. Many disease organisms survive on fallen leaves, then return when conditions become favorable.
One of the most effective preventive habits is simple sanitation:
- Remove spotted leaves from the plant when practical
- Rake up and discard fallen leaves beneath the shrub
- Clean out dead plant material at the end of the season
- Do not compost obviously diseased debris unless your compost system gets reliably hot
This is not glamorous work, but it cuts down the amount of disease material waiting to re-infect fresh growth. Think of it as breaking the cycle before it gets comfortable.
Keep Soil Conditions Stable and Healthy
Hydrangeas prefer soil that is fertile, rich in organic matter, and well drained. Poor drainage is a major stress factor. If roots sit in saturated soil too long, the plant struggles, and stressed plants are easier targets for disease and leaf damage.
If your soil is heavy clay, work in compost before planting and make sure water does not collect around the root zone. If your soil drains too quickly, organic matter and mulch can help it hold moisture more evenly. The goal is balance. Hydrangeas like moisture, but they do not want to live in a swamp.
A soil test can also be useful, especially if the plant seems weak year after year. While leaf color and bloom color often get all the attention, soil structure matters just as much for preventing foliage problems.
Do Not Overfeed the Plant
Fertilizer can help when soil is poor, but overdoing it may encourage tender new growth that is more susceptible to stress and disease. Too much nitrogen can push lush leaves at the expense of stronger, balanced growth.
Use a balanced fertilizer only as needed and according to label directions or local extension guidance. Compost and organic matter often do a lot of quiet, useful work without pushing the plant into a soft, overgrown sprint. In other words, do not try to turn your hydrangea into a bodybuilder.
Watch the Weather and Act Early
Brown spots often show up after stretches of rain, heavy dew, high humidity, or warm days followed by wet nights. That means prevention is easier when you pay attention before the leaves look bad.
After extended wet weather:
- Inspect lower leaves first
- Remove early spotted leaves if the problem is limited
- Make sure mulch has not crept against the stems
- Hold off on overhead watering entirely
- Clear weeds and crowding around the base
Early action can keep a small issue from becoming a late-summer leaf-drop situation.
When Fungicides Make Sense and When They Do Not
Many gardeners jump straight to sprays, but fungicides are not magic erasers. They work best as a preventive tool or at the very earliest stage of disease, not after the plant is heavily spotted. Once a leaf is damaged, it usually stays damaged.
If your hydrangea gets significant leaf spot every year, especially early in the season, a labeled fungicide may help protect new growth. But cultural practices still do most of the heavy lifting. Watering correctly, improving airflow, and cleaning up infected debris are usually more important than a bottle on a shelf.
Always read and follow the product label. Make sure the product is labeled for use on hydrangeas and for the disease you are targeting. Avoid casual spraying just because the leaves look rude.
What to Do if Brown Spots Are Already There
If your hydrangea already has brown spots, do not assume the whole plant is doomed. In many cases, especially with Cercospora, the issue is largely cosmetic unless it becomes severe enough to cause heavy defoliation.
Here is a practical recovery plan:
- Remove the worst affected leaves if only a small portion of the plant is involved.
- Clean up fallen debris under the shrub.
- Switch to watering at the base only.
- Check whether the plant is getting too much afternoon sun.
- Thin nearby growth if the area feels crowded and still.
- Monitor new leaves to see whether symptoms continue spreading.
New, healthy growth is your best sign that conditions are improving.
Common Mistakes That Invite Brown Spots
- Planting hydrangeas in hot, exposed afternoon sun
- Using overhead sprinklers late in the day
- Crowding shrubs too closely together
- Ignoring fallen leaves after a diseased season
- Overwatering poorly drained soil
- Overfertilizing for fast, lush growth
- Waiting too long to inspect leaves after wet weather
Most hydrangea problems do not begin with one giant mistake. They usually build from a stack of small, preventable habits.
A Simple Prevention Routine for Healthy Hydrangea Leaves
If all the advice above feels like a lot, here is the simplified version:
- Plant hydrangeas in morning sun and afternoon shade when the variety calls for it.
- Use well-drained, organic-rich soil.
- Apply 2 to 3 inches of mulch, but keep it away from stems.
- Water deeply at the soil line, not over the foliage.
- Give the plant room to breathe.
- Remove spotted leaves and clean up fallen debris.
- Consider labeled preventive treatment only if disease is a recurring problem.
That is the core strategy. No drama. No complicated ritual. Just steady care that keeps your hydrangea from living in conditions that encourage trouble.
Gardener Experience: What People Often Learn the Hard Way About Brown Spots
One of the most common experiences with hydrangea brown spots starts with confusion. A gardener sees a few marks on the leaves and assumes the plant needs more water. So the sprinkler goes on more often, the foliage stays wetter longer, and the problem quietly gets worse. A week later, there are more spots, a few yellow leaves, and a rising sense that the shrub is personally offended. This happens a lot because hydrangeas do need moisture, but they need it in the right place and in the right amount.
Another familiar experience is discovering that the plant looked perfect in spring, only to get spotty by midsummer. That often leads people to think the disease came out of nowhere. In reality, the trouble may have been building for weeks while humid weather, overhead watering, and tight spacing created ideal conditions for infection. By the time spots are obvious, the real lesson is that prevention needed to begin earlier.
Gardeners also learn that location matters more than labels on a nursery pot. A hydrangea planted near a reflective wall, driveway, or west-facing corner may technically survive, but the leaves can look rough during hot weather. Once moved, or once nearby shade improves, the plant often behaves like a completely different shrub. It is a humbling reminder that “part sun” on a tag and actual backyard heat are not always the same thing.
Many people also discover the value of cleanup after ignoring it for a season or two. Fallen leaves under a hydrangea do not seem dramatic in winter. They just look like leaves. But if those leaves carried disease, they can help restart the problem the next year. Gardeners who begin removing old debris, trimming out congested stems, and watering at the base often notice that their hydrangeas still get the occasional blemish, but the overall plant stays fuller, greener, and less stressed.
There is also the emotional experience, which deserves a small mention because it is very real. Hydrangeas are flashy plants, so leaf damage feels more disappointing than it might on a less glamorous shrub. But experienced gardeners usually reach the same conclusion: a few spotted leaves are not the end of the world. Healthy roots, good growing conditions, and steady maintenance matter more than perfect foliage every single day of the season.
The most useful experience-based lesson is this: hydrangeas reward consistency. Not heroic interventions. Not random sprays. Not one weekend of intense garden guilt. Consistency. A sensible spot, even moisture, clean soil surface, decent airflow, and regular observation usually make the biggest difference. Once gardeners learn that pattern, brown spots stop feeling mysterious and start feeling manageable.
Conclusion
Preventing brown spots on hydrangea leaves comes down to reducing plant stress and making life harder for leaf spot diseases. Give your hydrangea the right balance of sun and shade, keep the soil evenly moist but well drained, water at the base, mulch the root zone, improve airflow, and clean up infected debris before it becomes next season’s repeat performance.
Perfect leaves all season long may not happen in every climate or every summer, especially when weather turns wet and humid. But with smart prevention, your hydrangea can stay healthier, fuller, and far more attractive. And that means more time admiring the blooms and less time squinting suspiciously at the leaves like a garden detective with trust issues.


