Table of Contents >> Show >> Hide
- Before You Print: A 3-Minute Setup That Saves 30 Minutes of Rage
- Method 1: Print a Single Envelope Using Word’s Built-In Envelope Tool
- Method 2: Print a Batch of Envelopes with Mail Merge (Word’s “Bulk Mode”)
- Printer Setup: Loading Envelopes Without Summoning a Paper Jam
- Troubleshooting: Fix the Most Common Envelope Printing Problems
- Make It Look Professional: Layout Tips That Help Your Mail Actually Arrive
- Real-World Experiences and Lessons (500+ Words)
Printing an envelope sounds like the kind of task you should be able to do while half-asleep, holding coffee, and
questioning your life choices. And yet… one wrong setting and your printer proudly stamps the return address onto the
flap like it’s signing autographs.
The good news: Microsoft Word can print clean, professional envelopessingle pieces or full batchesonce you know
where the settings are hiding and how your printer likes to be fed (the envelope, not you). This guide walks you
through the whole thing with practical steps, printer-safe habits, and troubleshooting that actually fixes stuff.
Before You Print: A 3-Minute Setup That Saves 30 Minutes of Rage
1) Confirm your envelope size (don’t guess)
In the U.S., the most common business envelope is a #10 (often listed as Envelope Com 10 in Word).
Invitations might use A-style sizes (like A2 or A7), and international mail often uses DL.
Use the size printed on the boxor measure the envelopebecause “it looks like a #10” is how alignment disasters begin.
2) Check your printer’s envelope path
Many printers prefer envelopes via a Tray 1 / MP (multi-purpose) tray or a manual feed slot.
Some printers can do stacks; others want you to feed one envelope at a time like a polite offering.
- Inkjet printers usually handle envelopes well, but ink can smear if you use coated envelopes.
- Laser printers can curl or wrinkle envelopes if the envelope glue or thickness doesn’t play nice with heat.
3) Do one “test print” on plain paper first
Here’s the cheat code: run a test print on a blank sheet of paper, then hold that paper against the envelope
to see if the address block lines up. If it’s off, you adjust offsets in Word before you sacrifice real envelopes.
Method 1: Print a Single Envelope Using Word’s Built-In Envelope Tool
This is the simplest (and most reliable) way for one-off envelopes: invoices, letters, thank-you notes, “please stop parking in my spot” noticeswhatever.
Step-by-step (Word for Microsoft 365 / Word 2019–2024 on Windows or Mac)
- Open Word and start a blank document (or open your letter if you want the envelope saved with it).
- Go to the Mailings tab, then click Envelopes.
-
In Delivery address, type the recipient’s address.
Tip: If you use an address book/contacts feature, Word may let you insert a saved addressuseful for avoiding typos. - In Return address, type your return address (or leave it blank if you truly enjoy living dangerously).
- Click Options to open Envelope Options.
Envelope Options: The settings that make it look “printed,” not “panicked”
-
Envelope size: Choose the exact size (for #10, look for Envelope Com 10).
If your size isn’t listed, select Custom size and enter width/height. -
Delivery/Return address font: Use a simple, readable font (think Arial, Calibri, Times New Roman).
Script fonts look fancy until the mail scanner reads it as “???”. -
Address positioning (Left / Top): If your printer prints too high/low or too far left/right,
these offsets are how you fix it without starting a feud with your print driver.
Printing Options: The “feed method” is not optional
This is where Word shows a small diagram telling you how to load the envelope (face up/down, flap left/right).
Follow the diagramit’s Word’s best guess based on your printer driver. If the first print is wrong,
you come back here and switch the feed method.
- In the Envelope Options dialog, click the Printing Options tab.
- Look at the Feed method diagram.
- Load the envelope to match that diagram.
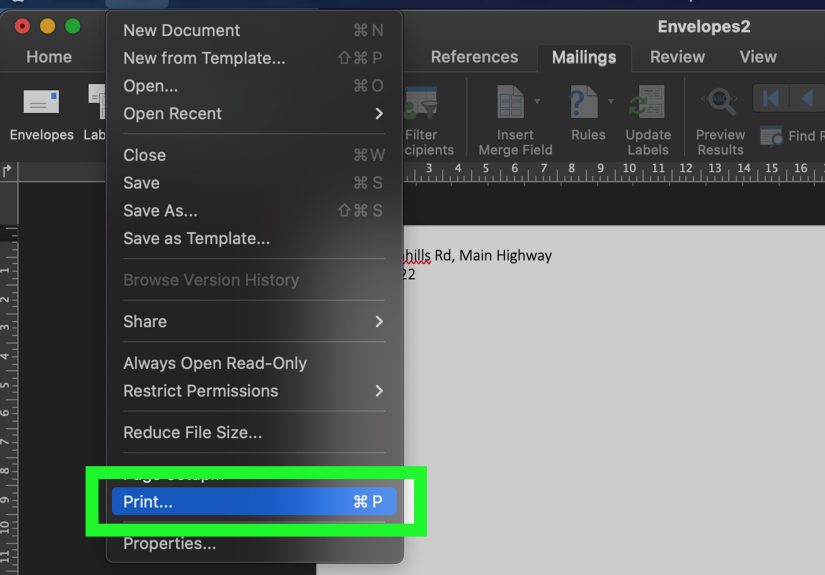
Print or “Add to Document”
- Print: Great for one envelope right now.
-
Add to Document: Adds the envelope as page 1 of your document so you can save it and reuse settings later.
Pro move: If you often mail to the same place (PO box, accountant, landlord, mortal enemy), saving is worth it.
Method 2: Print a Batch of Envelopes with Mail Merge (Word’s “Bulk Mode”)
If you’re printing multiple envelopesholiday cards, customer mailers, event invitesmail merge is the way to go.
It sounds fancy, but it’s basically “one design + many addresses = you look organized.”
Step 1: Prep your address list (Excel is easiest)
Create a spreadsheet with clear columns. Keep it boring and consistent. Boring is good. Boring is printable.
- FirstName
- LastName
- Address1
- Address2 (optional)
- City
- State
- ZIP
Save it. Close it. (Mail merge loves closed files. Open files sometimes make it dramatic.)
Step 2: Start the envelope merge in Word
- In Word, go to Mailings → Start Mail Merge → Envelopes.
- Choose your Envelope size (again: accuracy over vibes).
- Click Select Recipients and choose your Excel file (or Outlook contacts if you use them).
- Click where the delivery address should appear, then choose Address Block (or insert fields manually).
- Use Preview Results to flip through a few entries and confirm formatting.
- When it looks right: Finish & Merge → Print Documents.
Batch-print sanity tips (learned the hard way by basically everyone)
- Print 2 test envelopes first before you print the full stack.
- Watch the first few feed to catch jams early.
- Keep your envelope stack neatbent envelopes become printer confetti.
Printer Setup: Loading Envelopes Without Summoning a Paper Jam
Word can format the envelope perfectly and your printer can still ruin your day if the envelope is loaded wrong or the driver settings don’t match.
The goal is: Word size + printer size + correct tray/feed.
How to load envelopes (general best practices)
- Flatten the envelope: press edges and corners so it feeds evenly.
- Keep flaps closed (unless your printer manual says otherwise).
- Don’t overload: many trays only handle 5–10 envelopes reliably.
- Use the recommended tray (often Tray 1 / MP tray / manual feed).
Match the print driver settings to the envelope
In the Print dialog (or printer properties), look for:
- Paper size: #10 / DL / your chosen size
- Paper type: Envelope (or “Thick paper” / “Heavy” depending on printer options)
- Orientation: Many printers print envelopes in Landscape for proper rotation
- Tray selection: Choose the tray you actually loaded
If your printer has a control panel and asks what you loaded, answer honestly. This is not the time for “close enough.”
Troubleshooting: Fix the Most Common Envelope Printing Problems
Problem: The address prints too high / too low / too far left
-
Go back to Mailings → Envelopes → Options and adjust the
Delivery address Left and Top offsets slightly. -
Make sure the envelope size in Word matches the paper size in the printer driver.
A mismatch forces the printer to “help,” and printers are terrible life coaches. - Try a different Feed method in Word’s Printing Options tab.
Problem: It prints upside down or on the flap
- Switch the envelope orientation by changing the feed method in Word.
- Reload the envelope exactly as Word’s diagram shows.
- Confirm the printer driver is set to Envelope and the right tray.
Problem: Smudging, streaks, or ink that won’t dry
- Use envelopes labeled for your printer type (inkjet-safe envelopes help a lot).
- Select Envelope or Thick/Heavy media type in the printer driver.
- Let envelopes dry flat for a minute before stacking.
Problem: Printer jams or wrinkles envelopes
- Feed fewer envelopes at a time.
- Flatten edges/corners and avoid envelopes with bulky seams.
- Use the manual feed slot (if available) for better control.
Problem: Mail merge prints, but formatting looks weird
- Use Word’s Address Block tool to standardize layout.
- Preview multiple recordssome addresses have longer lines and need spacing tweaks.
- Keep the delivery address font simple and readable.
Make It Look Professional: Layout Tips That Help Your Mail Actually Arrive
Use sensible address placement
For typical U.S. mail, the standard layout is:
- Return address: upper-left corner
- Postage: upper-right corner
- Delivery address: centered (usually slightly lower than center)
Choose readability over personality
Your envelope does not need to express your “brand voice” in 9-point cursive. If you’re mailing through USPS,
clean text improves readability (and automated sorting). Use black ink, avoid reverse colors, and stick with
simple fonts at about 10–12 pt for the address.
Create a reusable envelope template
If you mail often, save yourself future effort:
- Click Add to Document when you set up an envelope you like.
- Save it as a named file (for example: Envelope – #10 – Office).
- Next time, open it and update the delivery address.
Real-World Experiences and Lessons (500+ Words)
Envelope printing is one of those “small” tasks that becomes unexpectedly emotional the moment it goes wrong.
Over time, people tend to collect envelope-printing stories the way you collect spare USB cables: you don’t remember
how they got there, but you’re pretty sure at least one of them is haunted.
Experience #1: The “I’ll just print one envelope” trap
Someone needs to mail a single letter. Easy. They open Word, type the addresses, and hit Print.
The printer responds by placing the delivery address somewhere near the upper-left cornertechnically on the envelope,
but also technically in a different ZIP code. The fix is almost always the same: envelope size mismatch.
Word was set to #10, the driver was set to Letter, and the printer “scaled” everything like it was helping.
Once people learn to confirm envelope size in both Word and the printer driver, the whole process gets boring
in the best way. Boring printing is successful printing.
Experience #2: The office holiday-card marathon
Batch-printing envelopes for holiday cards looks fun on a spreadsheet and chaotic in real life. The first ten feed fine.
Then one envelope with a slightly bent corner jams the tray, and suddenly the printer is doing its impression of a paper shredder.
The lesson everyone learns: flatten the stack, feed fewer envelopes at a time, and watch the first few prints.
Also: do not start this job five minutes before the mail pickup. That’s not confidencethat’s a suspense thriller.
Experience #3: Wedding invitations vs. “fancy fonts”
Weddings bring out the inner typographer in people, and envelopes become tiny works of art. The trouble starts when
the delivery address is printed in a delicate script that looks amazing on Instagram and less amazing to a mail scanner.
Many folks end up compromising: keep the recipient address readable (simple font, good contrast),
then let the design flair live in the return address styling or a small monogram.
It’s the printing equivalent of wearing comfortable shoes to the receptionstill classy, less pain.
Experience #4: The “why is Word printing on the flap?” mystery
This one usually happens when the feed method diagram is ignored. People load the envelope the way they’ve always loaded paper,
and Word quietly assumes the envelope is rotated a different direction. The print lands on the flap, and the envelope suddenly looks
like it received a tattoo. The fix is wonderfully low-tech: return to Word’s Printing Options, switch the feed method,
and reload the envelope exactly as the diagram shows. It can feel sillylike you’re learning how to insert bread into a toaster
but it works.
Experience #5: Small business shipping labels and the “template era”
For small business owners, the biggest upgrade is moving from “retyping addresses” to “saved templates + mail merge.”
Once the envelope layout is dialed infonts, placement, printer settingsthe rest becomes a repeatable system.
They save a template, keep an address list in Excel, and print in batches. Less time fussing with formatting,
fewer mistakes, and fewer awkward moments where a customer receives an envelope addressed to “CITY, STATE ZIP”
because the fields weren’t mapped correctly. The funny part is that the best printing workflow isn’t fancy at all:
it’s consistent, test-driven (two test envelopes!), and mildly suspicious of anything labeled “Auto.”
The bottom line from all these experiences is simple: envelope printing succeeds when you treat it like a tiny production run.
Confirm the size, match driver settings, respect the feed method, and test before you commit. Do that, and your envelopes come out
sharp, aligned, and professionallike you have your life together, even if your browser currently has 47 tabs open.


