Table of Contents >> Show >> Hide
- What Concrete Actually Is
- Choose the Right Concrete Mix for the Job
- Tools and Materials You Will Need
- How to Mix Concrete by Hand
- How to Mix Concrete in a Mixer
- How Much Water Should You Use?
- Signs of Properly Mixed Concrete
- Common Concrete Mixing Mistakes to Avoid
- What Happens After Mixing Matters Too
- Hand Mixing vs. Mixer: Which Is Better?
- Practical Example: Mixing Concrete for a Small Pad
- Final Thoughts
- Real-World Experiences With Mixing Concrete
- SEO Tags
If you have ever looked at a bag of concrete mix and thought, “How hard can this be?” the answer is: not very hard, until it suddenly becomes very hard in the most literal way possible. Concrete is wonderfully simple in theory, but in practice, a sloppy mix can turn a weekend project into a cracked, crumbly monument to overconfidence. The good news is that learning how to properly mix concrete is not some secret rite known only to contractors with sun-faded baseball caps. It is a skill you can absolutely learn.
Whether you are pouring a small slab, setting fence posts, patching a walkway, or building a tiny backyard masterpiece, the quality of your concrete starts long before you smooth the surface. It begins with the right materials, the right water amount, the right mixing method, and a healthy respect for timing. Think of it like baking, except the cake can support a shed and weighs as much as a small rhinoceros.
In this guide, you will learn how to properly mix concrete by hand and with a mixer, how to spot the right consistency, which common mistakes to avoid, and what to do after the mix is placed. If you want stronger, more durable concrete and fewer DIY regrets, you are in the right place.
What Concrete Actually Is
Before mixing begins, it helps to clear up one common point of confusion: cement and concrete are not the same thing. Cement is the binding ingredient. Concrete is the finished mixture made from cement, sand, aggregate such as gravel or crushed stone, and water. Once water is added, the cement reacts and binds everything together into a hard, durable mass.
That distinction matters because proper concrete mixing is all about proportion and consistency. Too little water and the mix stays dry, crumbly, and difficult to work. Too much water and the concrete becomes weak, more likely to shrink, and more likely to crack later. In other words, concrete is forgiving enough for DIY work, but not forgiving enough to reward freestyle chemistry.
Choose the Right Concrete Mix for the Job
One of the smartest things you can do before mixing concrete is choose a product designed for your project. Not every mix behaves the same way. Standard concrete mix works well for general slabs, walkways, and steps. Fast-setting concrete is useful for posts and quick repairs. High-strength or crack-resistant mixes are better when durability matters more than convenience.
If you are using bagged concrete, always read the package instructions first. Manufacturers specify the recommended water amount, working time, and typical application. That matters because one bag might want a stiffer mix while another is designed to flow more easily. Even if you have mixed concrete before, this is not the moment to say, “I know better than the bag.” The bag has lawyers and engineers. Respect the bag.
Tools and Materials You Will Need
For Hand Mixing
- Bagged concrete mix or measured raw ingredients
- Wheelbarrow, mixing tub, or mortar pan
- Garden hoe, mixing hoe, shovel, or heavy-duty rake
- Bucket or measuring container for water
- Gloves, safety glasses, long sleeves, and a dust mask or respirator
For Machine Mixing
- Portable concrete mixer
- Measured water source
- Concrete mix
- Shovel or bucket for loading
- Protective gear
Safety is not optional here. Dry concrete ingredients can irritate skin, and cement dust can be rough on your lungs and eyes. Wear gloves, avoid breathing dust, and clean up with water instead of dry sweeping dust all over the place like you are trying to summon a construction ghost.
How to Mix Concrete by Hand
For small projects, hand mixing concrete is practical, affordable, and usually the easiest route. The key is to work in manageable batches. If you try to mix too much at once, you will tire out fast and end up with an uneven result.
Step 1: Prepare Your Mixing Area
Set your wheelbarrow, trough, or mortar pan on level ground near the pour area. Have your tools, water, and forms ready before you open the bag. Concrete does not care that you forgot your finishing trowel in the garage. Once water hits the mix, the clock starts ticking.
Step 2: Add the Dry Mix
Pour the bagged concrete into the mixing container. If you are making concrete from scratch, measure your materials carefully. A common general-purpose homemade ratio is one part Portland cement, two parts sand, and three parts gravel, though some DIY guides use slightly different proportions depending on the application. For most homeowners, bagged concrete is easier, more consistent, and far less likely to produce an accidental science experiment.
Step 3: Form a Crater and Add Water Gradually
Make a crater in the center of the dry mix and add about three-quarters of the recommended water. This part is where strong concrete is won or lost. Do not dump in all the water at once unless your goal is to create something between soup and sadness.
Use a hoe or shovel to pull dry material into the water, folding and turning the mix until it begins to combine. Add the remaining water slowly, a little at a time, until the mix reaches the proper consistency.
Step 4: Mix Thoroughly
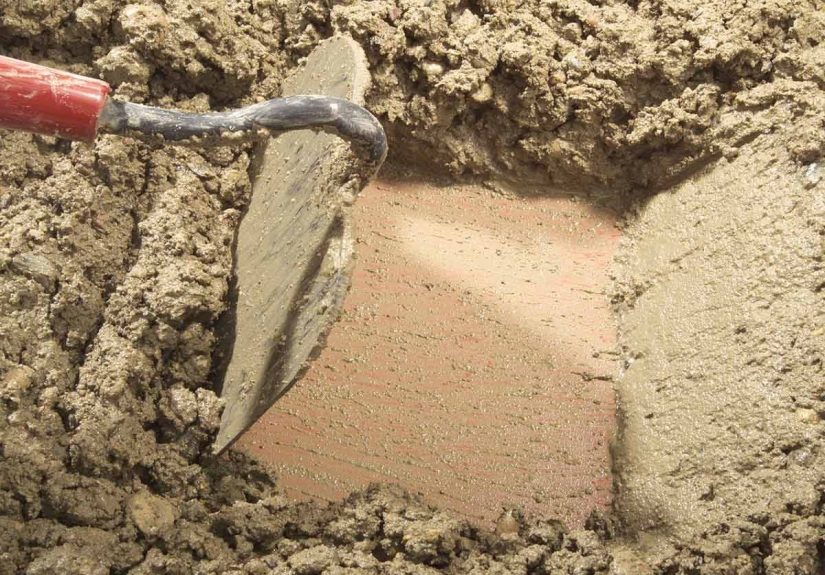
Keep blending until the color and texture are uniform and there are no dry pockets or clumps. Scrape the sides and bottom of the wheelbarrow so nothing is left unmixed. Properly mixed concrete should hold together when shoveled, feel thick and plastic, and not release excess water onto the surface.
Step 5: Check the Consistency
The best concrete mix for many small DIY jobs looks a bit like thick oatmeal or peanut butter. It should be wet enough to place and consolidate, but stiff enough to hold shape. If it sloshes, it is too wet. If it crumbles and refuses to bind, it is too dry. Add water only in small increments, because once the mix turns soupy, there is no magic button that restores full strength.
How to Mix Concrete in a Mixer
If you are working on a larger slab, walkway, or multiple batches, a concrete mixer can save time and your lower back. It also helps produce more consistent results when used correctly.
Step 1: Wet the Drum Lightly
Start with a damp drum, not a bone-dry one. A quick rinse helps prevent dry material from sticking immediately to the inside.
Step 2: Add Some Water First
Many manufacturers recommend adding part of the measured water to the drum before the dry mix. This helps the mixer move material more effectively and reduces buildup inside the barrel.
Step 3: Add the Concrete Mix
Pour in the bagged mix steadily while the drum rotates. Then add the remaining water gradually until the concrete reaches a uniform, workable consistency. Avoid overloading the mixer. Smaller, consistent batches almost always outperform heroic, overloaded ones.
Step 4: Mix Long Enough, But Not Forever
Most small mixer batches need only a few minutes to become uniform. You want full blending, not endless spinning. Once the mix is even and workable, discharge it promptly and move to placing. Letting concrete sit in the mixer too long is a great way to waste effort and invent new cleaning problems.
How Much Water Should You Use?
This is the question that makes or breaks the mix. The answer is simple: use the amount recommended by the manufacturer and adjust only slightly if needed. Many 80-pound bags call for roughly 3 to 4 quarts of water, but formulas vary, so read the label every time.
The water-to-cement relationship is critical to concrete strength. More water may make the mix easier to shovel, but it usually lowers strength, increases shrinkage, and raises the chance of cracking. Beginners often think wetter means better because it feels easier to place. In reality, it usually means weaker concrete and future annoyance.
If your mix seems stubborn, do not immediately flood it. Mix it thoroughly first. Often the water is there, just not fully distributed yet. Add small amounts only after the mix has had a chance to combine.
Signs of Properly Mixed Concrete
- The color is uniform throughout the batch
- No dry powder or unmixed clumps remain
- The mix holds together on a shovel without running off like batter
- It is workable enough to place and level
- There is no standing water on the surface of the mix
If you scoop some up and it mounds rather than pours, that is usually a good sign for general-purpose work. You are aiming for controlled workability, not a liquid puddle.
Common Concrete Mixing Mistakes to Avoid
Adding Too Much Water
This is the big one. Extra water may feel helpful now, but it can reduce strength and durability later. Concrete that is too wet also tends to shrink more as it cures.
Mixing Inconsistently
Poorly blended concrete creates weak spots. Dry pockets, uneven moisture, and clumps of unmixed material can all compromise performance.
Working Too Slowly
Concrete has a limited working time. Have your forms, reinforcement, base, and finishing tools ready before you mix. “I’ll just go grab something” is a dangerous sentence once the batch is live.
Using the Wrong Product
A post-setting mix is not always ideal for a slab. A sand mix is different from a gravel-based concrete mix. Match the product to the job.
Skipping Safety Gear
Cement can cause skin irritation, and silica-containing dust is not something you want in your lungs. Gloves, eye protection, and dust control are part of the job, not an optional fashion statement.
What Happens After Mixing Matters Too
Even perfectly mixed concrete can disappoint if it is placed or cured poorly. Pour the mix promptly, spread it evenly, and consolidate it so air pockets are minimized. Screed the surface level, then float and finish as needed for your project.
After placement, curing becomes the next big priority. Concrete does not simply “dry.” It cures through a chemical reaction that benefits from moisture retention. If the surface dries too quickly, the finished result can lose strength and become more prone to cracking. Keep fresh concrete protected from harsh sun, wind, or rapid drying. For many projects, lightly misting or covering the slab after finishing helps support better curing.
Hand Mixing vs. Mixer: Which Is Better?
For a mailbox post, stepping stones, or a small patch, hand mixing concrete is usually enough. It costs less, takes little setup, and works well for one or two bags at a time. For patios, sidewalks, repeated pours, or anything involving several bags, a mixer is usually the smarter option. It reduces labor, improves consistency, and helps you keep up with the pace of placement.
There is no medal for doing everything by hand. Choose the method that gives you the best control and the most consistent batch.
Practical Example: Mixing Concrete for a Small Pad
Let’s say you are pouring a small equipment pad in the backyard. You buy a general-purpose bagged concrete mix, prepare a compacted gravel base, and set your forms first. Then you stage your water, wheelbarrow, hoe, gloves, and finishing tools.
You open one bag at a time, add most of the water first, and mix until the batch reaches a thick, workable consistency. You do not chase a smoother look by overwatering. Instead, you place the concrete, screed it level, and finish it while it is still workable. Because the setup was ready before the first batch, the job moves smoothly and the finished pad has a much better chance of curing strong and looking clean.
That is what proper concrete mixing really looks like in the real world: less improvisation, more preparation, and a steady refusal to turn the wheelbarrow into a kiddie pool.
Final Thoughts
Learning how to properly mix concrete is less about brute strength and more about discipline. Measure carefully. Add water slowly. Mix thoroughly. Choose the right product. Work in manageable batches. Protect yourself from dust and wet cement. Then place and cure the concrete like it matters, because it does.
Done right, concrete is one of the most reliable materials a homeowner can work with. Done casually, it becomes a very heavy lesson. So take the extra few minutes, trust the process, and give your project the strong start it deserves.
Real-World Experiences With Mixing Concrete
One of the most useful things people learn after a few concrete projects is that the mixing stage reveals your habits fast. If you are patient, organized, and willing to measure carefully, concrete feels surprisingly cooperative. If you are impulsive, distracted, or convinced that “a little more water won’t hurt,” concrete becomes an unforgiving teacher. Many DIYers remember their first batch because it looked easy on paper but behaved very differently in a wheelbarrow under the sun.
A common first experience is mixing for fence posts. The project seems simple enough, but it teaches timing right away. You open the bag, add water, start mixing, and suddenly realize the level, shovel, and braces are not where they should be. That is when concrete introduces its favorite lesson: preparation is not optional. People who lay out everything first usually describe the job as manageable. People who do not often describe it with words that should not appear in a family blog.
Another frequent experience happens with small slab pours. Many beginners are nervous that the batch is too stiff, so they add more water to make it easier to move. The concrete becomes smoother in the short term, which feels like a victory, but the finish later turns dusty, weak, or prone to hairline cracks. After that, most people become much more respectful of the water line on the bag. Concrete has a remarkable way of making technical guidance feel personal.
There is also the physical side of the job. Hand mixing one bag sounds easy until you are halfway through the second or third batch. The material is heavy, the hoe starts to feel twice its size, and your shoulders begin negotiating with your future self. That experience is often what convinces homeowners to rent a mixer for bigger projects. It is not laziness. It is wisdom with sore arms.
Weather creates its own stories too. On warm, dry days, the mix can stiffen faster than expected, especially if your tools and forms are not ready. On cool days, the process feels more forgiving, but finishing may take longer. People who have done a few pours usually become very aware of sun, wind, and shade. They stop seeing concrete as just a material and start treating it like a process with its own personality.
Perhaps the most encouraging experience is that improvement comes quickly. The first batch may be clumsy, but by the second or third, your eye gets better. You recognize the right texture sooner. You mix more efficiently. You move with more confidence. What felt intimidating starts to feel almost rhythmic: add, fold, turn, scrape, check, place. That rhythm is why so many homeowners go from one repair job to tackling stepping stones, pads, posts, and even small patios.
In the end, the real experience of mixing concrete is not just about making a hard surface. It is about learning that a durable result usually comes from simple things done carefully. Measure honestly. Work steadily. Do not rush. Do not drown the mix. And remember that concrete rewards respect far more than bravado. That is a pretty good rule for home projects in general.


