Table of Contents >> Show >> Hide
- Why Thumbnail Previews Matter in Windows 7
- What Are Thumbnail Previews in Windows 7?
- How to See Thumbnail Previews in Windows 7: 6 Easy Steps
- Step 1: Open Windows Explorer
- Step 2: Change the Folder View to Medium, Large, or Extra Large Icons
- Step 3: Open Folder and Search Options
- Step 4: Uncheck “Always Show Icons, Never Thumbnails”
- Step 5: Enable “Show Thumbnails Instead of Icons” in Performance Settings
- Step 6: Clear the Thumbnail Cache
- Why Windows 7 Shows Icons Instead of Thumbnails
- How to Enable Taskbar Thumbnail Previews in Windows 7
- Best Folder Settings for Photo and Video Previews
- What File Types Show Thumbnail Previews?
- Troubleshooting: Thumbnails Still Not Showing?
- Helpful Example: Fixing a Pictures Folder That Shows Only Icons
- Security Reminder for Windows 7 Users
- Extra Experience: Real-World Lessons from Fixing Windows 7 Thumbnail Previews
- Conclusion
Note: Windows 7 is no longer supported by Microsoft, so use it carefully, especially if the computer connects to the internet. The steps below are intended for users maintaining an older PC, recovering files, working with legacy software, or organizing media on a Windows 7 machine.
Why Thumbnail Previews Matter in Windows 7
Trying to organize photos, videos, PDFs, or project files without thumbnail previews is a bit like shopping for cereal in a store where every box is gray and labeled “Food.” Technically, the files are there. Practically, your patience has already packed a bag and left.
Thumbnail previews in Windows 7 let you see a small visual preview of a file directly inside Windows Explorer. Instead of opening ten mystery image files named IMG_0047, IMG_0048, and the ever-helpful final-final-real-final.png, you can quickly identify what each file contains. This is especially useful for photos, videos, design files, scanned documents, and folders packed with visual content.
When thumbnail previews stop working, Windows usually shows generic icons instead of actual file previews. The good news is that this problem is often caused by a simple setting, not a dramatic computer tragedy. In many cases, enabling thumbnails takes only a few clicks. If that does not work, clearing the thumbnail cache, adjusting visual effects, or switching folder views usually solves the issue.
This guide explains how to see thumbnail previews in Windows 7 in six easy steps, plus troubleshooting tips for stubborn cases where Windows insists on being mysterious.
What Are Thumbnail Previews in Windows 7?
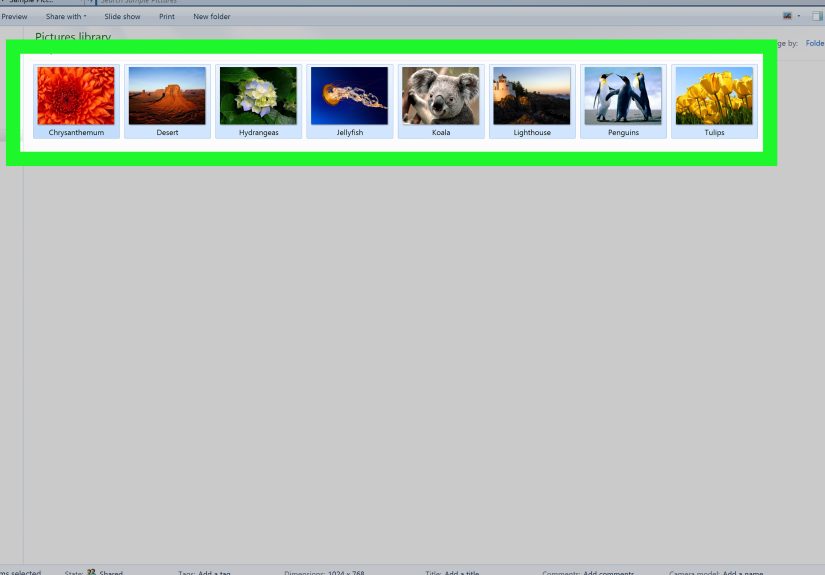
Thumbnail previews are small images that represent the contents of files or folders. In Windows 7, they appear in Windows Explorer when you use views such as Medium Icons, Large Icons, or Extra Large Icons. For example, a JPG photo may display a mini version of the picture, while a video file may show a frame from the video.
Windows 7 also includes taskbar thumbnail previews. These appear when you hover your mouse over an open program on the taskbar. For example, if you have several windows open, hovering over the program icon may show small live previews of each window. This article focuses mainly on file and folder thumbnail previews in Windows Explorer, but it also covers taskbar previews because the two are often confused.
How to See Thumbnail Previews in Windows 7: 6 Easy Steps
Follow these steps in order. Most users only need the first two or three. If your computer is feeling dramatic, continue through all six.
Step 1: Open Windows Explorer
Start by opening the folder where your files are stored. You can do this by clicking the folder icon on the taskbar, opening Computer from the Start menu, or pressing Windows key + E on your keyboard.
Navigate to a folder that contains images, videos, or other files that should display previews. A Pictures folder is a good testing location because image thumbnails are easy to recognize. If you are testing in a folder full of text documents, Windows may not always show useful previews depending on the file type and installed software.
Step 2: Change the Folder View to Medium, Large, or Extra Large Icons
Thumbnails do not appear in every folder view. If your folder is set to Details, List, or Small Icons, Windows may show only file names and generic icons.
To change the view, look near the top-right area of Windows Explorer for the Change your view button. Click it and choose one of these options:
- Medium Icons
- Large Icons
- Extra Large Icons
For photos, Large Icons usually works best. It gives you enough visual detail without turning your screen into a digital art gallery where only four files fit at once.
Step 3: Open Folder and Search Options
If you still see icons instead of thumbnail previews, check the main Windows Explorer setting that controls thumbnails.
In the folder window, click Organize in the top-left corner. Then choose Folder and search options. A new window called Folder Options will appear.
This is one of those classic Windows settings areas where one tiny checkbox can decide whether your computer behaves like a helpful assistant or a filing cabinet from 1998.
Step 4: Uncheck “Always Show Icons, Never Thumbnails”
In the Folder Options window, click the View tab. Under Advanced settings, look for this option:
Always show icons, never thumbnails
Make sure this box is unchecked. If it is checked, Windows 7 will show icons instead of thumbnails no matter how many times you glare at the screen.
After unchecking it, click Apply, then click OK. Return to your folder and give Windows a moment to rebuild the previews. If the folder contains many photos or videos, thumbnails may take a few seconds to appear.
Step 5: Enable “Show Thumbnails Instead of Icons” in Performance Settings
If thumbnails still do not appear, Windows may be using performance settings that disable visual previews. This can happen if the computer was configured for best performance, especially on older hardware.
Here is how to check:
- Click the Start button.
- Right-click Computer.
- Choose Properties.
- Click Advanced system settings on the left.
- Under the Advanced tab, find the Performance section.
- Click Settings.
- In the Visual Effects tab, make sure Show thumbnails instead of icons is checked.
- Click Apply, then OK.
This setting tells Windows that you want visual previews, not just basic file icons. If your PC is very old or low on memory, enabling thumbnails may slightly affect performance in large folders, but for most users the convenience is worth it.
Step 6: Clear the Thumbnail Cache
Windows 7 stores thumbnail previews in a cache so it does not have to recreate them every time you open a folder. Usually, this makes browsing faster. Sometimes, however, the thumbnail cache becomes outdated or corrupted. When that happens, thumbnails may display incorrectly, appear blank, or refuse to update.
To clear the thumbnail cache:
- Click the Start button.
- Type Disk Cleanup in the search box.
- Open Disk Cleanup.
- Select your main drive, usually C:.
- Wait while Windows scans the drive.
- Check the box labeled Thumbnails.
- Click OK.
- Confirm that you want to delete the selected files.
After Disk Cleanup finishes, restart Windows Explorer or reboot the computer. Then open your image folder again. Windows should rebuild fresh thumbnail previews.
Why Windows 7 Shows Icons Instead of Thumbnails
If you are wondering why this problem happens in the first place, there are several common causes. The most frequent reason is that the Always show icons, never thumbnails option was turned on. This can happen accidentally, during system optimization, or after someone changes folder settings while trying to make the computer faster.
Another common reason is the folder view. If you are using List or Details view, Windows may not display visual previews. Switching to Medium Icons or larger often fixes the issue instantly.
Performance settings can also disable thumbnail previews. Windows 7 includes visual effects that can be turned off to improve speed on older computers. If the system is set to “Adjust for best performance,” thumbnails may be disabled along with animations, shadows, and other visual features.
Finally, the thumbnail cache may be damaged. This is especially common after moving large batches of photos, downloading files, editing images, or dealing with interrupted file transfers. Clearing the thumbnail cache forces Windows to rebuild previews from scratch.
How to Enable Taskbar Thumbnail Previews in Windows 7
File thumbnails are not the only previews in Windows 7. The operating system also includes taskbar thumbnail previews, which appear when you hover over an open program on the taskbar.
If taskbar thumbnails are not working, check whether Aero features are enabled. Windows 7 taskbar previews depend on visual effects and desktop composition. If your system is using a Basic or Classic theme, you may see text labels instead of live previews.
To enable taskbar thumbnail previews:
- Right-click an empty area of the desktop.
- Choose Personalize.
- Select an Aero Theme.
- Right-click the taskbar and choose Properties.
- Make sure Use Aero Peek to preview the desktop is checked.
- Click Apply, then OK.
If Aero is unavailable, your graphics driver may be outdated, your edition of Windows 7 may have limited Aero support, or your system may not meet the visual requirements. Updating the graphics driver can help, but remember that Windows 7 hardware support is now limited because the operating system is old.
Best Folder Settings for Photo and Video Previews
If you work with images or videos often, a few folder settings can make Windows 7 much easier to use. First, use Large Icons or Extra Large Icons for photo folders. This gives you a clear preview without opening each file individually.
Second, sort files by date, type, or name depending on your workflow. For example, photographers may prefer sorting by Date taken, while bloggers and designers may prefer sorting by Name or Date modified.
Third, use the Preview Pane when needed. In Windows Explorer, click Organize, choose Layout, and enable Preview pane. This displays a larger preview on the right side when you select a file. It is useful when thumbnails are too small but opening every file would feel like punishment.
What File Types Show Thumbnail Previews?
Windows 7 commonly displays thumbnail previews for standard image formats such as JPG, JPEG, PNG, BMP, and GIF. It may also show thumbnails for common video formats if the right codecs and software support are installed.
Some files may not show previews by default. For example, certain RAW camera formats, specialized design files, or uncommon video formats may need additional software or codecs. PDF thumbnail previews may also depend on the PDF reader installed on the computer.
If one type of file shows thumbnails but another does not, the issue may not be Windows Explorer itself. It may be a file association, codec, or preview handler problem. In plain English: Windows knows how to preview some files, but others need a translator.
Troubleshooting: Thumbnails Still Not Showing?
Restart Windows Explorer
Sometimes Windows Explorer simply needs a refresh. Restarting the computer is the easiest method. If you prefer not to reboot, you can open Task Manager, end the explorer.exe process, and start it again. However, restarting the PC is safer for casual users.
Check the File Location
Files stored on external drives, network drives, DVDs, or slow USB devices may take longer to generate thumbnails. If previews appear slowly, copy a few files to your desktop and test there. If thumbnails work locally, the issue may be drive speed or network access.
Update or Reinstall the Default Program
If thumbnails fail only for one file type, check the default program. For example, if PNG files do not preview correctly, set Windows Photo Viewer or another reliable image viewer as the default program. Some third-party applications change file associations in ways that affect previews.
Run System File Checker
If thumbnail previews fail across the entire system and basic fixes do not help, system files may be damaged. You can run System File Checker by opening Command Prompt as administrator and entering:
This command scans protected Windows system files and attempts repairs. It is not magic, but it is more useful than repeatedly clicking the same checkbox and hoping Windows develops empathy.
Helpful Example: Fixing a Pictures Folder That Shows Only Icons
Imagine you open your Pictures folder and every image appears as the same boring icon. You know the photos are there, but you cannot tell whether DSC_1021 is a family photo, a sunset, or the blurry picture of your thumb that somehow survived three phone upgrades.
Here is the fastest fix:
- Open the Pictures folder.
- Change the view to Large Icons.
- Click Organize.
- Open Folder and search options.
- Go to the View tab.
- Uncheck Always show icons, never thumbnails.
- Click Apply and OK.
If the previews still do not appear, open Disk Cleanup and delete the thumbnail cache. In many cases, that combination solves the problem completely.
Security Reminder for Windows 7 Users
Windows 7 remains familiar, lightweight, and beloved by many users, but it is no longer a modern supported operating system. That means it does not receive regular security updates from Microsoft. If your Windows 7 PC is connected to the internet, it may be exposed to security risks.
If you must keep using Windows 7, avoid using it for sensitive tasks such as online banking, business email, or storing private customer information. Keep important files backed up, use reputable security software where possible, and consider moving critical work to a supported version of Windows or another supported operating system.
Extra Experience: Real-World Lessons from Fixing Windows 7 Thumbnail Previews
After helping many users troubleshoot old Windows machines, one thing becomes clear: thumbnail problems are rarely as complicated as they first appear. The user sees a folder full of generic icons and assumes something major has broken. In reality, the issue is usually one small setting hiding in Folder Options like it owes someone money.
The first practical lesson is to always check the folder view before changing deeper settings. Many people expect thumbnails to appear while using Details view. But Details view is designed for file names, dates, sizes, and types. It is excellent for sorting documents, but it is not ideal for browsing vacation photos or product images. Switching to Large Icons often creates the satisfying “Oh, there they are!” moment.
The second lesson is that performance tweaks can have side effects. On older Windows 7 computers, users often choose settings that promise better speed. That makes sense. Nobody enjoys waiting five minutes for a folder to open while the hard drive sounds like it is making popcorn. However, when Windows is adjusted for best performance, visual features such as thumbnails may disappear. The computer may feel slightly faster, but browsing images becomes much slower because every file must be opened manually.
The third lesson is that the thumbnail cache is both helpful and occasionally annoying. It is helpful because it lets Windows load previews faster. It is annoying because outdated cache files can make thumbnails look wrong or prevent them from updating. Clearing the thumbnail cache with Disk Cleanup is safe and often effective. Think of it as telling Windows, “Please forget what you thought this folder looked like and look again.”
Another experience worth mentioning involves external drives. Many Windows 7 users keep old photo collections on USB drives, memory cards, or backup disks. When thumbnails do not appear on these devices, the cause may be speed rather than settings. A slow external drive can make Windows take longer to generate previews. Testing the same files from the desktop can quickly reveal whether the problem is with Windows settings or the storage device.
File types also matter. Standard JPG and PNG files usually preview without trouble. But RAW camera files, old video formats, and certain scanned document formats may require extra software. This is where users sometimes get confused because one folder previews perfectly while another does not. The difference may not be the folder; it may be the file format.
One of the best habits is to create a small test folder. Copy three or four common image files into it, set the view to Large Icons, and apply the thumbnail settings. If previews work there, Windows is capable of showing thumbnails. Then you can investigate specific folders, file types, or drives. This saves time and prevents unnecessary changes to system settings.
Finally, patience helps. Windows 7 can take a moment to generate thumbnails, especially on older machines with mechanical hard drives. If you open a folder containing hundreds of photos, previews may not appear instantly. Give it a few seconds before assuming the fix failed. Sometimes the computer is not broken; it is just old enough to remember dial-up internet.
In short, the most reliable workflow is simple: choose a thumbnail-friendly view, disable “Always show icons, never thumbnails,” enable “Show thumbnails instead of icons,” clear the thumbnail cache, and test with common image files. These steps solve most Windows 7 thumbnail preview problems without complicated tools or risky registry edits.
Conclusion
Seeing thumbnail previews in Windows 7 makes file browsing faster, easier, and far less frustrating. Whether you are organizing old family photos, sorting downloaded images, checking video files, or cleaning up a messy desktop folder, thumbnails help you recognize files at a glance.
The core fix is simple: open Folder Options, go to the View tab, and make sure Always show icons, never thumbnails is unchecked. Then confirm that Show thumbnails instead of icons is enabled in Performance settings. If thumbnails still refuse to cooperate, clear the thumbnail cache with Disk Cleanup and restart the computer.
Windows 7 may be old, but it can still behave nicely when the right settings are enabled. And when thumbnail previews finally return, your folders stop looking like a wall of identical mystery buttons. That is a small victory, but on an older PC, small victories deserve applause.


