Table of Contents >> Show >> Hide
- Why Regular Dog Nail Trimming Matters
- What You Need Before You Start
- How to Trim a Dog’s Nails: 11 Steps
- Step 1: Gather Your Supplies Before You Touch a Paw
- Step 2: Choose the Right Time
- Step 3: Let Your Dog Check Out the Tools
- Step 4: Get Comfortable and Use Good Lighting
- Step 5: Learn Where the Quick Is
- Step 6: Hold the Paw Gently but Steadily
- Step 7: Start With the Easiest Nail
- Step 8: Clip Small Bits, Not Heroic Chunks
- Step 9: Watch Closely on Dark Nails
- Step 10: Smooth Sharp Edges and Check Every Toe
- Step 11: End With Praise, Treats, and a Reasonable Goal
- What If You Cut the Quick?
- How Often Should You Trim Your Dog’s Nails?
- Common Mistakes to Avoid
- When to Let a Professional Take Over
- Final Thoughts
- Experience and Practical Lessons From Real-Life Nail Trim Routines
Dog nail trims have a terrible reputation. Mention the clippers and some dogs suddenly become part athlete, part magician, and part noodles-with-feelings. But learning how to trim a dog’s nails does not have to feel like a wrestling match in a broom closet. With the right tools, a calm setup, and a little patience, you can turn nail care into a manageable routine instead of a monthly dramatic event starring one suspicious paw.
Regular nail trimming matters more than many owners realize. Long nails can change how a dog stands and walks, make floors slippery, snag on fabric, and turn zoomies into a traction experiment nobody asked for. The good news is that you do not need to be a professional groomer to do this well. You just need a steady hand, a good light, and the wisdom to stop before you turn “spa day” into “tiny crime scene.”
This guide breaks the process into 11 clear steps, with practical tips for white nails, black nails, nervous dogs, and humans who are trying very hard to look confident.
Why Regular Dog Nail Trimming Matters
Healthy dog nails should be short enough that they do not constantly tap on hard floors or push the toes out of a natural position. When nails get too long, the quick inside the nail can grow farther outward too, making future trims trickier. That is why frequent, small trims are usually easier than waiting until the nails look like miniature grappling hooks.
For many dogs, shorter, well-maintained nails mean better comfort, better traction, and less risk of broken nails. In other words, this is not just a cosmetic grooming chore. It is basic paw care.
What You Need Before You Start
- Dog nail clippers or a nail grinder
- Styptic powder or cornstarch
- Treats your dog considers deeply meaningful
- A towel or non-slip mat
- Good lighting
- A calm helper, if your dog does better with one
If you are choosing between clippers and a grinder, both can work. Clippers are faster. Grinders can help smooth edges and allow you to shorten nails gradually. Some owners love the precision of a grinder; others discover that the noise makes their dog look personally betrayed. Know your audience.
How to Trim a Dog’s Nails: 11 Steps
Step 1: Gather Your Supplies Before You Touch a Paw
Do not start the session by clipping one nail, realizing you forgot the styptic powder, and then sprinting across the house while your dog rethinks the friendship. Set everything within arm’s reach first. Having your tools ready keeps the process smooth and helps you stay relaxed, which matters because dogs are excellent at reading human tension.
Step 2: Choose the Right Time
Pick a moment when your dog is calm, not when they are bursting with energy like a furry confetti cannon. After a walk, play session, or quiet evening cuddle is often ideal. A tired dog is usually a more cooperative dog. Avoid doing nail trims when your dog is already stressed, hyper, or annoyed that dinner is six minutes late.
Step 3: Let Your Dog Check Out the Tools
Before trimming, let your dog sniff the clippers or grinder. Pair the sight and sound of the tool with treats and praise. This simple step can make a huge difference for dogs that flinch at anything remotely spa-related. If you use a grinder, turn it on briefly from a distance, reward calm behavior, and switch it off. The goal is to build a positive association instead of an action-movie soundtrack.
Step 4: Get Comfortable and Use Good Lighting
Choose a stable, well-lit area where you can clearly see the nails. Sit in a position that lets you support your dog without twisting their legs awkwardly. Small dogs may do well on your lap or a table with a non-slip mat. Larger dogs often do better on the floor. Good posture matters. If your back gives up halfway through, the nail trim may become a two-act tragedy.
Step 5: Learn Where the Quick Is
The quick is the living part of the nail that contains blood vessels and nerves. On light-colored nails, it usually appears as a pink area inside the nail. On black nails, you usually cannot see it clearly from the outside, which means you need to trim in tiny increments. This is the golden rule of dog nail trimming: when in doubt, remove less.
For white nails, aim to trim just the hooked tip and stay a safe distance away from the pink quick. For dark nails, clip a little at a time and watch the cut surface carefully. As you get closer to the quick, the center often changes appearance. That is your sign to stop being brave and start being cautious.
Step 6: Hold the Paw Gently but Steadily
Take one paw and hold it with calm confidence. Gently separate the toes if needed so you can see each nail clearly, including the dewclaw if your dog has one. Avoid squeezing too hard or pulling the leg into an uncomfortable angle. You are going for “supportive nail technician,” not “airport security.”
If your dog is nervous about paw handling, spend a few sessions simply touching paws, rewarding calmness, and stopping there. That still counts as progress. Cooperative care starts long before the first actual trim.
Step 7: Start With the Easiest Nail
Do not open with the hardest black dewclaw like you are trying to impress a panel of judges. Start with the nail that is easiest to see and easiest for your dog to tolerate. One successful nail can set the tone for the rest of the session. Success builds confidence for both of you, and frankly, both of you could use that.
Step 8: Clip Small Bits, Not Heroic Chunks
Place the clipper on the tip of the nail and make a small cut. Then reassess. For dogs with long nails, especially if they have not been trimmed regularly, the quick may extend farther than you expect. Small, repeated trims are safer than one ambitious clip that ends with apologizing and offering seventeen treats.
A helpful target is to trim near where the nail begins to curve downward, but not beyond your comfort level. If the nail is very overgrown, you may need multiple sessions over time to gradually shorten it while allowing the quick to recede.
Step 9: Watch Closely on Dark Nails
Black nails require patience. After each tiny clip, look at the fresh end of the nail. As you get closer to the quick, the center may look more moist, shiny, or oval-shaped compared with the dry outer shell. That is your cue to stop. This is not the moment to test your luck or your geometry skills.
If you prefer, use a grinder to shave down dark nails slowly. Many owners find this helpful because it allows better control. Just remember to go in short bursts so the nail does not heat up.
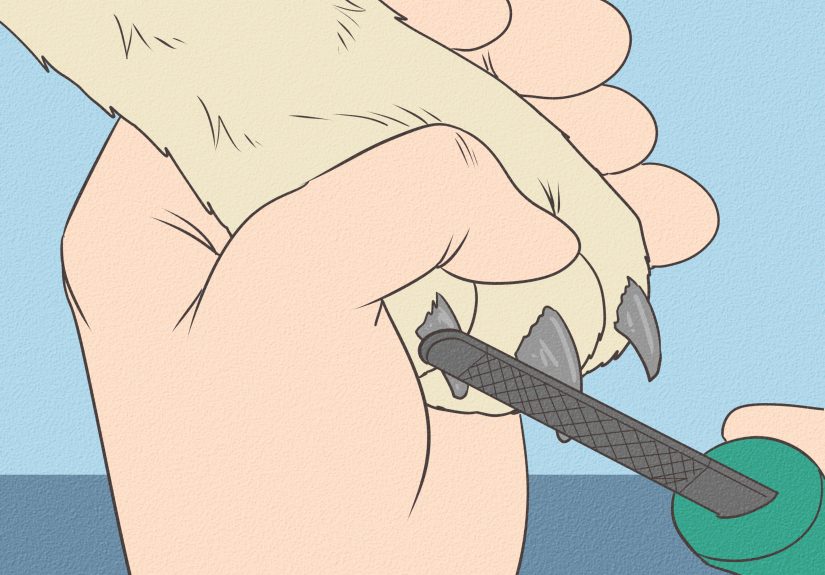
Step 10: Smooth Sharp Edges and Check Every Toe
After clipping, you can smooth rough edges with a grinder or file. This step is optional but useful, especially if the nails feel sharp enough to scratch skin, furniture, or your very expensive leggings. Be sure to check all nails, including dewclaws, which do not always wear down naturally and can become overgrown if forgotten.
Step 11: End With Praise, Treats, and a Reasonable Goal
Reward your dog generously after each nail or after the session. Praise, treats, and a calm finish help create better associations next time. If your dog only tolerates one paw today, that is still a win. You do not need to finish every nail in one sitting to make progress. Sometimes the smartest grooming strategy is knowing when to quit while everyone still respects each other.
What If You Cut the Quick?
First, do not panic. It happens, even to experienced owners. If you nick the quick, the nail may bleed and your dog may yelp. Apply styptic powder or cornstarch to the tip of the nail with gentle pressure. Stay calm, because your dog is already filing an emotional complaint. Most minor bleeding stops quickly, but if it continues longer than expected or the nail looks badly damaged, call your veterinarian.
How Often Should You Trim Your Dog’s Nails?
There is no one perfect schedule for every dog, but many need a trim every two to four weeks. Activity level, walking surfaces, age, and nail growth all matter. A simple clue is the sound test: if you hear consistent clicking on hard floors, it is probably time. Dogs who walk mostly on soft surfaces may need more frequent trims than dogs who regularly wear their nails down on pavement.
Common Mistakes to Avoid
- Trying to trim too much at once
- Skipping rewards and expecting your dog to be thrilled anyway
- Forgetting the dewclaws
- Using dull or poorly sized clippers
- Continuing when your dog is highly stressed
- Holding the paw in an awkward, uncomfortable position
If your dog becomes extremely fearful, struggles hard, growls, or snaps, stop and get professional help. A veterinarian, fear-free groomer, or qualified trainer can help you build safer handling routines. Some dogs need desensitization training over time, and some may need veterinary support for anxiety. That is not failure. That is good judgment with better odds of keeping all fingers intact.
When to Let a Professional Take Over
At-home dog nail trimming is not mandatory if it is miserable for everyone involved. If your dog has very dark nails, severe anxiety, a history of trauma, mobility issues, or nails that are extremely overgrown, a veterinarian or experienced groomer may be the better choice. The smartest pet owners are not the ones who insist on doing everything themselves. They are the ones who know when the situation calls for backup.
Final Thoughts
Learning how to trim a dog’s nails is one of those pet-care skills that looks terrifying right up until it becomes routine. Start small, stay calm, clip conservatively, and reward like you mean it. Over time, many dogs learn that nail trims are not the end of civilization. And once you get the hang of it, you may even find the process oddly satisfying. Not glamorous, exactly. But satisfying in the deeply adult way that clean baseboards and organized cables are satisfying.
Your mission is not perfection. Your mission is shorter nails, safer paws, and a dog that does not sprint to another zip code when the grooming tools appear. That is a worthy goal.
Experience and Practical Lessons From Real-Life Nail Trim Routines
If there is one thing dog owners learn quickly, it is that nail trims are rarely just about nails. They are about timing, trust, body language, and whether your dog believes the grinder is a small household dragon. In real homes, the most successful nail-trim routines are usually not the fastest ones. They are the ones built on repetition and low drama.
For example, many owners discover that their dog behaves completely differently depending on the setting. A dog that panics on a slippery bathroom floor may relax on a rug in the living room. Another dog may tolerate front paws just fine but act deeply offended when the back feet enter the conversation. These little observations matter. The more you notice your dog’s patterns, the easier the process becomes.
One common experience is that the first few sessions feel laughably unproductive. You get the treats, line up the clippers, sit down with determination, and manage exactly one nail. Maybe two if the stars align. That is normal. In fact, many dogs do best when owners stop chasing the fantasy of “all paws, one session, no resistance” and instead work in tiny, repeatable wins. One nail today, three tomorrow, one paw next weekend. Progress counts, even when it looks boring from the outside.
Owners of dogs with black nails often report the same learning curve: the fear fades only after they start paying attention to the cut surface and working slowly. The first few trims can feel like decoding a secret message. Then suddenly you begin to recognize the visual changes near the quick, your hands get steadier, and the job becomes less mysterious. Confidence grows from repetition, not from wishing very hard.
Another practical lesson is that rewards need to be worth the effort. Dry biscuits may not inspire emotional resilience during a paw-handling exercise. Tiny pieces of chicken, cheese, or another favorite treat often work better. Dogs are practical creatures. If you would like them to tolerate a weird buzzing tool near their feet, compensation should reflect the inconvenience.
Many pet owners also learn that their own mood matters more than expected. If you are rushed, frustrated, or determined to “just get it over with,” your dog often notices. Slower breathing, relaxed shoulders, and a steady pace can genuinely improve the session. Calm is contagious. So is panic. Unfortunately, dogs seem to excel at the second one.
Perhaps the biggest real-life takeaway is this: consistency beats heroics. Frequent mini-trims are usually easier than infrequent marathon sessions. Dogs remember patterns. If the routine is brief, calm, and followed by rewards, many eventually accept it as part of life. Not necessarily their favorite part, of course. But somewhere between “mildly rude” and “fine, whatever,” which is excellent progress in dog terms.
So if you are still new to this, give yourself some grace. Most people are awkward at first. Most dogs are skeptical at first. And yet, with practice, nail trims often go from stressful mystery to ordinary maintenance. That is the real victory: not becoming a perfect groomer, but becoming the kind of dog owner who can handle the basics with kindness, patience, and only a moderate amount of bribery.


