Table of Contents >> Show >> Hide
- What Are “Melting Candle Cupcakes,” Exactly?
- My Game Plan (So I Didn’t Summon Chaos)
- What You’ll Need
- Step-by-Step: How My Magical Melting Candle Cupcakes Happened
- What Went Right (A Rare and Beautiful Moment)
- What Went Wrong (Because of Course It Did)
- Flavor Ideas That Still Feel Halloween-y
- How to Make Them Look Extra Professional (Without Crying)
- Make-Ahead, Storage, and Party Survival
- Food Safety Notes (Because These Look Like Actual Candles)
- Conclusion: Would I Make Them Again?
- Extra: 500 More Words of My Real-Life “I Made These” Experience
If Halloween had a bake sale and a séance, these cupcakes would be the snack table centerpiecebecause they look like little pillar candles that are actively melting down the sides. (In a charming way. Not in a “call the fire department” way.) I’d seen “melting candle cupcakes” all over the internet, and my brain immediately went: Yes. That. My kitchen, however, went: Are you sure you should be trusted with hot sugar substances?
Reader, I tried them anyway. Here’s exactly how my magical melting candle cupcakes turned out: the wins, the flops, and the oddly specific lesson that frosting has a “mood” and it is heavily influenced by room temperature.
What Are “Melting Candle Cupcakes,” Exactly?
Melting candle cupcakes are Halloween cupcakes decorated to look like wax candlesusually with a tall “candle” in the center and a drippy “wax” effect cascading over the top. The trick is that everything is edible (or at least food-safe and removable), and the “wax” is typically made from candy melts, white chocolate, or ganache drips that set with a glossy, candle-like finish.
The effect is spooky-cute, surprisingly dramatic, and perfect for Halloween parties because people will either (1) gasp, (2) take 11 photos, then (3) ask, “Wait… is this actually a candle?”
My Game Plan (So I Didn’t Summon Chaos)
I wanted cupcakes that looked fancy but didn’t require me to earn a pastry degree mid-afternoon. So I aimed for a reliable cupcake base, a stable frosting “platform,” and a drip that looked like melted waxwithout turning my cupcakes into a sticky crime scene.
Key decisions I made up front
- Flavor: Vanilla cupcakes with vanilla buttercream (classic, crowd-friendly, and they let the Halloween colors shine).
- Color palette: Black “candle” + purple/orange “wax” drips (because Halloween deserves drama).
- Candle shape: A simple edible “candle” insert (more on options below).
- Wax drip material: Candy melts (fast-setting, glossy, and built for drips).
What You’ll Need
Here’s what I used (plus a few swap ideas if your grocery store is… not in the Halloween spirit).
For the cupcakes
- 12–18 cupcakes (homemade or boxedno shame in the Halloween game)
- Cupcake liners
- Cooling rack (non-negotiable if you want neat frosting later)
For the frosting base
- Buttercream frosting (enough for a generous swirl or a flat top)
- Gel food coloring (black + your “wax” colors)
- Piping bag + tip (or a zip-top bag with the corner snipped)
For the candle + flame
- Candle options (pick one): pirouette cookies, wafer cookies, thick pretzel rods, fondant “cylinders,” or store-bought edible wafer sticks
- Flame options: candy corn, sliced almonds + orange gel, a teardrop-shaped sprinkle, or a small piece of orange/yellow candy
For the “melted wax” drip
- Candy melts (white + colors) or white chocolate
- Microwave-safe bowl
- Spoon or squeeze bottle
- Optional: thinning agent made for candy melts (or a tiny bit of shortening if you’re careful)
Step-by-Step: How My Magical Melting Candle Cupcakes Happened
Step 1: Bake cupcakes like you want them to be frosted someday
I baked a batch of vanilla cupcakes and let them cool completely. And when I say “completely,” I mean I didn’t try to rush it with the “they feel mostly cool-ish” method that leads to frosting sliding off like a sad hat. If you’re baking from scratch, stick to proven cupcake basicsaccurate measuring, not overmixing, and pulling them when the tops spring back lightly. Once out of the oven, cool briefly in the pan, then move to a rack to finish cooling.
Step 2: Decide on your cupcake “top style” (flat vs. swirled)
For candle cupcakes, you can go two ways:
- Flat top: Looks more like a candle “surface,” easier to drip cleanly.
- Swirl top: Pretty and tall, but your wax drip can get a little wild.
I went with a mostly flat top (smoothed buttercream) because I wanted the drips to read clearly as “melting wax.” If you’re piping, keep your pressure steady and build a level surface rather than a sky-high spiral. You’re basically creating a “candle plate” for the drips.
Step 3: Chill the frosted cupcakes (yes, this matters)
After frosting, I chilled the cupcakes for a short stretch so the surface firmed up. This is one of those small steps that makes a huge difference: drips behave better on a cool, stable base. Warm frosting + warm drip = “Halloween lava flow,” and not the cute kind.
Step 4: Build the candle
This was the fun, arts-and-crafts momentlike baking met a Halloween costume closet.
My candle method: I used wafer-stick-style “candle” inserts (you can also use pirouette cookies if you want taller candles). I gently pushed one into the center of each cupcake. Then I dabbed a tiny bit of frosting on top to anchor the “flame.”
Flame hack: Candy corn makes an instant flame shape. If you want it more realistic, angle it slightly and add a tiny dot of chocolate or black gel near the base to mimic a wick. Suddenly you’re not just bakingyou’re doing edible special effects.
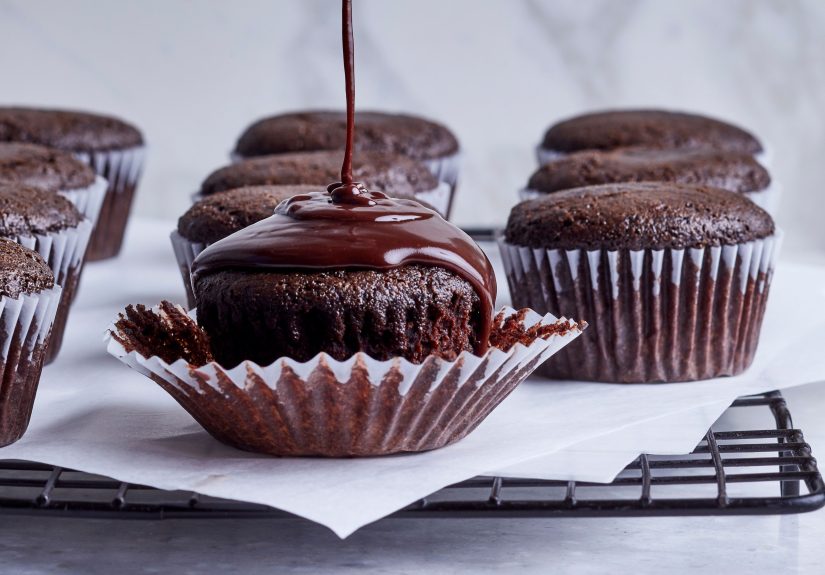
Step 5: Make the magical “melting wax” drip
This is where the candle illusion really shows up. I melted candy melts in short bursts, stirring often, until smooth. Then I tinted them into Halloween colors. The goal is a consistency that’s pourable but not runnythink warm honey, not hot soup.
How I applied the wax:
- I spooned a small pool of melted candy around the base of the candle insert at the top.
- I nudged little drips toward the edge, letting gravity create natural-looking “wax” trails.
- I added a few deliberate drips down the sides using the spoon tip for control.
My best drip tip: Start with less than you think. You can always add more drips, but you can’t un-melt a cupcake once it looks like it survived a frosting avalanche.
What Went Right (A Rare and Beautiful Moment)
- The illusion worked. The glossy candy melt drips really do look like wax.
- Chilling first saved me. My drips set faster and didn’t chew through the frosting.
- Black + bright drips = instant Halloween. High contrast makes the “melting candle” effect pop in photos.
What Went Wrong (Because of Course It Did)
Problem: My drips were too thick
My first batch of “wax” drips looked like candle wax that had decided to bulk up for winter. The candy melts were too thick, so the drips didn’t elongate naturally.
Fix: I gently rewarmed the melts and stirred until smoother. If you need thinning, use a product designed for candy melts or add the tiniest amount of fat-based thinner, then test again. Go slowover-thinning can make the drip go from “candle” to “paint spill.”
Problem: My drips ran too far
On cupcake #3, I got confident. Confidence is dangerous. I poured too much and it slid down the cupcake like it was late for a Halloween party.
Fix: Smaller spoonfuls, more pauses. Let each drip set a bit before adding a second layer.
Problem: My flame looked… like a traffic cone
Candy corn is convenient, but if you plop it straight upright, you’re basically making a tiny orange hat.
Fix: Angle it slightly and add a tiny “wick” detail near the base. Suddenly: flame. Not: miniature road safety equipment.
Flavor Ideas That Still Feel Halloween-y
You can keep the candle look and swap flavors to match your vibe:
- Black cocoa chocolate cupcakes + vanilla buttercream (super “midnight candle” aesthetic)
- Pumpkin spice cupcakes + cream cheese frosting (warm, cozy Halloween)
- Red velvet cupcakes + “blood drip” wax (slightly dramatic, very on-theme)
- Salted caramel cupcakes + white “wax” drips (sweet-meets-spooky)
How to Make Them Look Extra Professional (Without Crying)
Use a “two-tone wax” trick
Make a base drip color (like white or pale ivory), let it set, then add a second color in a few spots. It creates dimensionlike real wax layering.
Embrace imperfect drips
Real candles don’t melt symmetrically. If your drips are a little uneven, congratulationsyou’re accidentally realistic.
Add tiny Halloween details
- Edible glitter dusted near the flame for “magical” vibes
- Mini candy bats or sugar skull sprinkles
- A few candy pearls as “wax bubbles”
Make-Ahead, Storage, and Party Survival
If you’re making these for a party, here’s what I’d do next time:
- Day before: Bake cupcakes, cool, store airtight.
- Party day: Frost, chill, insert candles, add wax drips.
- Transport tip: Keep them cool. Heat is the villain of buttercream and drips alike.
Food Safety Notes (Because These Look Like Actual Candles)
Quick but important: don’t use real candle wax as decoration. Stick to edible candy melts, chocolate, or food-safe drips. If you decide to use actual birthday candles for looks, treat them as removable décor and pull them out before serving. The goal is “spooky cupcake,” not “surprise wax situation.”
Conclusion: Would I Make Them Again?
Yesand next time I’ll act like a responsible adult and stop free-pouring hot candy like I’m Jackson Pollock in an apron. These magical melting candle cupcakes are the perfect Halloween treat because they’re equal parts impressive and playful. They look fancy, but the technique is beginner-friendly once you get the drip consistency right.
If you want a dessert that doubles as décor, makes people do a double take, and earns you unsolicited compliments like, “Okay, wow, you’re talented,” this is your sign to make melting candle cupcakes for Halloween.
Extra: 500 More Words of My Real-Life “I Made These” Experience
Let me tell you what it’s actually like to make melting candle cupcakes at homebecause tutorials can make it look like you gently blink and suddenly you’re standing in a fog machine holding perfect cupcakes. In real life, it’s more like: you’re holding a bowl of melted candy, your dog is staring at you like you’re the reason Halloween exists, and you’re trying to drip “wax” artistically while your microwave beeps in judgment.
The biggest lesson I learned is that temperature is the boss. My first “wax” attempt was too hot and too thin, so the drip didn’t politely trail down the sidesit sprinted. It ran right over the frosting edge like it had a meeting across town. I tried to fix it by adding more candy melts, but that just made the bowl thicker in a way that felt personal. Eventually, I found the sweet spot: warm enough to flow, cool enough to behave. If you’re new to candy melts, think of it like styling bangstiny adjustments matter and overconfidence will hurt you.
I also discovered that you don’t need perfect cupcakes to get a perfect effect. One of my cupcakes had a slightly uneven top (classic home baker energy), and it ended up looking more like a candle because the wax pooled naturally in a lopsided way. It was the first time in my life a minor baking flaw made something better, and I would like to submit that moment for a national holiday.
The candle inserts were my favorite part because they instantly turn “cupcake” into “Halloween centerpiece.” I tested two options: wafer sticks and pirouette cookies. Wafer sticks were easier to bite through and felt more “kid-friendly,” while pirouettes looked taller and fancierlike the cupcake was wearing heels. The tradeoff? Pirouettes can crack if you push too hard. I learned this after snapping one and pretending it was “intentional candle distress.” (It was not intentional. It was me, panicking.)
For the flame, candy corn was reliable, but it looked best when I tilted it slightly instead of planting it straight up. Straight up reads “tiny hat.” Tilted reads “little flame.” I also added a dot of dark chocolate near the base to suggest a wick, and that tiny detail made people immediately understand what they were looking at.
Finally, the decorating rhythm matters: frost, chill, insert candle, drip wax, pause, then add more. When I rushed, the drips got messy. When I slowed down, each cupcake looked deliberatelike I was calm and skilled and not secretly googling “why is my drip ugly” on my phone. By the end of the batch, I felt like I’d unlocked a Halloween dessert cheat code: if you can make a controlled drip, you can make something that looks wildly professional. And honestly? That’s the kind of magic I want in my October.


