Table of Contents >> Show >> Hide
- What Is an Inexpensive Plank Wall?
- Why Choose a Budget-Friendly Plank Wall?
- Planning Your Inexpensive Plank Wall
- Step-by-Step: How to Build an Inexpensive Plank Wall
- Design Ideas for Your Budget Plank Wall
- Common Mistakes to Avoid
- Maintaining Your Plank Wall
- Real-Life Experiences with Inexpensive Plank Walls
- Conclusion: A High-Impact Project on a Low Budget
Love the look of a wood accent wall but not the price tag that comes with real tongue-and-groove boards?
An inexpensive plank wall is the budget-friendly hack that gives you the same cozy, custom look for a
fraction of the cost. With a little planning, some thin plywood or hardboard, and a free weekend, you can
create a wall that looks like it came straight out of a design magazinewithout taking out a second mortgage.
This guide walks you through the Remodelaholic-style approach to building a plank wall on the cheap, from
picking the right materials to nailing the last board in place. We’ll talk cost, tools, layout, painting,
and the small tricks experienced DIYers use to avoid those “why is this so crooked?” moments.
What Is an Inexpensive Plank Wall?
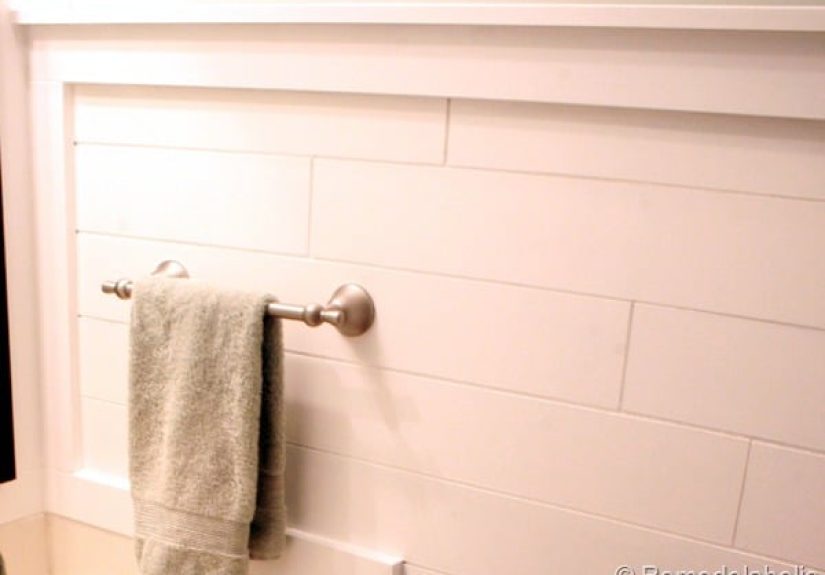
A plank wall is simply a wall covered with horizontal (or vertical) wood planks. The inexpensive version
uses thin sheet goodslike 1/8-inch hardboard (Masonite) or 1/4-inch plywoodcut into strips instead of
pricey solid-wood shiplap. Once the seams are spaced and painted or stained, it looks like classic shiplap
or rustic planking, but your wallet barely notices.
Instead of paying for pre-milled shiplap, you:
- Buy sheet materials like hardboard or plywood.
- Rip them into long, narrow planks.
- Nail them right onto your existing drywall or plaster.
- Paint or stain them to match your stylefarmhouse white, rustic stain, or modern dark tones.
The result? A feature wall that can cost well under $100 in many average-size rooms, especially if you’re
savvy with materials and already own a few tools.
Why Choose a Budget-Friendly Plank Wall?
Major Cost Savings
True shiplap boards and designer wall paneling get expensive fast. By using plywood or hardboard strips,
DIYers routinely report cutting project costs by half or more compared with solid-wood planks. Many tutorials
show full accent walls done for roughly $30 to $100 in materials, depending on the size of the wall and local
lumber prices.
High-End Look with Simple Tools
You don’t need a cabinetmaker’s workshop to pull this off. A circular saw or table saw, a nail gun (or hammer
and nails), and a sander are usually enough. Once painted, the wall looks custom and built-in, even though it’s
made from humble sheet goods.
Flexible Design Styles
An inexpensive plank wall is a chameleon:
- Farmhouse chic: crisp white paint and even spacing.
- Rustic cabin: varied stains and mixed wood tones.
- Modern cottage: soft neutrals or moody deep colors.
You can also choose horizontal, vertical, or even diagonal installation for different vibes.
Planning Your Inexpensive Plank Wall
1. Choose the Right Wall
Accent walls work best where they can truly stand out:
- Behind a bed as a statement headboard wall.
- In a dining room or breakfast nook.
- On a fireplace or TV wall in the living room.
- In an entryway or hallway to add interest to a small space.
Avoid walls with lots of doors, windows, or vents if you want an easy, clean install. The more cuts around
obstacles, the more time you’ll spend fitting pieces.
2. Estimate Cost and Materials
For a typical 8-by-10-foot wall, you’ll usually need:
- Two or three 4×8 sheets of 1/4-inch plywood or 1/8-inch hardboard, depending on plank width.
- 1-1/2″ to 2″ brad nails or finish nails.
- Tile spacers (1/16″ or 1/8″) to keep gaps consistent.
- Wood filler and caulk for finishing.
- Primer and paint (or stain and sealer).
Using sheet goods keeps the material cost low. Many DIYers manage a full wall for under $100, especially if they
already have leftover paint and basic tools on hand.
3. Gather Tools
You don’t need anything fancy, but these basics make the job smoother:
- Circular saw or table saw (or have the store rip the sheets for you).
- Miter saw or jigsaw for shorter cuts around outlets and corners.
- Stud finder.
- Level or laser level.
- Brad nailer and compressor, or hammer and finish nails.
- Safety glasses, hearing protection, and a dust mask.
Step-by-Step: How to Build an Inexpensive Plank Wall
Step 1: Prep the Wall
Good prep makes everything easier:
- Remove baseboards and any existing trim on the wall if you want a fully built-in look.
- Fill major holes or bumps and lightly sand the wall so planks sit flat.
- Give the wall a quick cleaning to remove dust and greasepaint and adhesive stick better to clean surfaces.
If you’re installing over glossy paint, scuff it with sandpaper or use a bonding primer so nothing peels over time.
Step 2: Rip the Planks
This is where the budget magic happens. Instead of buying pre-cut boards, you cut your own:
- Mark your sheet goods into strips4″, 5″, or 6″ widths are popular choices.
- Use a table saw or circular saw with a straightedge guide for clean, straight cuts.
- Label the “good” side of each plank so you know which side will face out.
After cutting, sand the edges to remove splinters. You can quickly hit the face with a sanding block if needed,
but most plywood or hardboard is already fairly smooth.
Step 3: Find the Studs and Mark a Level Line
Use a stud finder to locate studs and mark vertical lines with a pencil. You’ll aim to nail into these lines as
much as possible for a secure hold. Then:
- Use a level to draw a straight horizontal reference line where your first plank row will start.
- If your floor is uneven, start from the top or from a level line instead of relying on the baseboard line.
Taking time to get this first line straight saves you from “drifting” planks and awkward gaps later.
Step 4: Start Installing the Planks
Now for the fun part:
- Place your first plank along the level reference line, good side facing out.
- Use tile spacers between planks for consistent gaps1/16″ for tight lines, 1/8″ for more pronounced shiplap.
- Nail through the plank into the studs using brad nails or finish nails.
- Stagger end joints from row to row to avoid a “ladder” pattern.
Work your way up (or down) the wall row by row. For outlets and switches, hold the plank in place, mark the box
location, cut out the opening with a jigsaw, and then install it.
Step 5: Add Trim and Details (Optional)
For a polished look, many DIYers add:
- A simple casing or 1x board along the top as a cap.
- A shallow ledge using a 1×2 or similar for displaying small decor items.
- Reinstalled baseboards over the planks at the bottom.
These small details make the wall look intentional and built-in, not like an afterthought.
Step 6: Fill, Caulk, and Sand
Before painting or staining, do a quick round of cosmetic cleanup:
- Fill nail holes with wood filler and lightly sand once dry.
- Caulk along inside corners and between the plank wall and adjacent trim to hide gaps.
- Wipe down the entire surface with a tack cloth to remove dust.
If you want a more rustic look, you can skip filling some nail holes and let the texture showjust keep it
consistent so it looks intentional.
Step 7: Paint or Stain Your Plank Wall
Now the wall really comes to life:
- Prime first, especially if you used raw plywood or hardboard.
- For a modern farmhouse look, choose a soft white or warm neutral in an eggshell or satin finish.
- For a cozy cabin feel, stain the planks in mixed wood tones, then seal with a clear topcoat.
When painting, don’t flood the gaps with paint or you’ll lose the plank definition. Light coats and careful
rolling help keep those lines crisp.
Design Ideas for Your Budget Plank Wall
Classic Horizontal “Shiplap” Wall
The most popular option is horizontal planks painted white or off-white. It’s perfect for:
- Bedrooms behind the bed.
- Living rooms around a TV console or fireplace.
- Dining rooms paired with simple artwork and warm lighting.
Vertical Plank Wall for Height
If your ceilings feel low or your room needs more drama, run the planks vertically. This draws the eye upward,
making the room feel taller and slightly more modern. Vertical planking is great in small bedrooms, bathrooms,
or entryways.
Mixed-Stain Accent Wall
For a rustic or industrial look, stain different planks in varying shadeslike gray, walnut, and honeyand mix
them randomly. This creates a reclaimed-wood vibe using inexpensive paneling and leftover stain instead of
rare barn boards.
Common Mistakes to Avoid
Skipping the Level Line
Relying on your floor or ceiling as a reference is riskymost aren’t perfectly level. If your first row is off,
every row after it will exaggerate the problem. Always start with a level line and follow it religiously.
Not Sanding Edges
Rough, splintery edges make painting miserable and can catch on clothing or hands. A quick pass with a sander
saves you from fuzzy edges and paint buildup later.
Overfilling Gaps with Paint
Using too much paint or pressing too hard with the roller can flood the gaps between planks, erasing the shiplap
effect. If you accidentally fill a groove, a thin tool like a butter knife or paint can opener can help clean it
out while the paint is still wet.
Forgetting Expansion Considerations
Wood moves a bit with humidity changes. Those tiny tile spacers you used between planks give the boards room to
breathe and keep the gaps even. Skipping spaces altogether can lead to boards crowding each other and creating
cracks or squeaks over time.
Maintaining Your Plank Wall
The good news: once installed, plank walls are low maintenance.
- Dust regularly with a microfiber duster or vacuum brush attachment.
- For painted walls, wipe with a damp cloth and mild soap as needed.
- For stained walls, use a wood-safe cleaner and avoid harsh abrasives.
If a plank is damaged, thin plywood or hardboard makes it relatively easy to cut out and replace just that piece
without redoing the entire wall.
Real-Life Experiences with Inexpensive Plank Walls
Online, there are countless “before and after” photos showing how a basic, builder-grade room suddenly feels
custom after a plank wall goes up. But behind those pretty pictures, there are lots of lessons learned that
can help you plan smarter.
The “I Didn’t Think It Would Take This Long” Lesson
Many DIYers go into a plank wall project thinking it’s a one-evening job. In reality, it’s usually a full
weekend project, especially if you’re ripping your own planks and working around outlets, windows, or built-ins.
Cutting, sanding, spacing, and painting all add up.
That doesn’t mean it’s difficultit’s just detailed. The most time-consuming parts are ripping the boards and
doing all the little finish steps: filling nail holes, caulking, and painting. Planning for at least a day and a
half keeps the project fun instead of frustrating. If you finish early, you just get bonus lounge time.
The “Start in the Right Spot” Lesson
A lot of DIYers admit they wish they’d started in the most visible part of the room instead of the corner no one
sees. Why? Your first few rows are where you’re figuring out your rhythm. If those experimental cuts and seams
are tucked behind a tall dresser or in a low-traffic corner, nobody will notice a slightly awkward joint or two.
Once you feel confident with your spacing, nail angles, and cutting around outlets, you can move into the parts
of the wall that really stand outlike behind the bed or TV.
The “Thin Material for the Win” Lesson
People who use thin plywood or hardboard often comment on how much easier it is to handle compared with thick
boards. Thin sheets are:
- Lighter, so you can hold them up and nail them in place without needing three extra hands.
- Shallower, so you don’t always have to rebuild every piece of trim in the room.
- Cheaper, so you can plank larger walls without blowing your budget.
Many DIYers also mention using store cutting services to rip sheets into strips. While the cuts may not be
absolutely perfect, it can save a ton of time if you don’t want to rip every board yourself at home.
The “Don’t Skip the Sample Board” Lesson
Stain and paint can behave differently on plywood or hardboard compared with solid wood. People who take the
time to test their color choices on a scrap plank almost always say they were glad they did. Sometimes the
color looks darker, lighter, or warmer than expected, and that quick test can save you from repainting an entire
wall later.
A smart approach is to test:
- Your primer and paint combo on a scrap board.
- Your stain plus clear coat on another scrap.
- How the color looks at different times of day in your actual room.
The “Plank Wall as a Lifestyle Upgrade” Lesson
One of the most consistent pieces of feedback from homeowners is that a plank wall doesn’t just change the room
it changes how they use the room. A plain guest room suddenly feels like a cozy retreat. A boring hallway turns
into a spot where people actually pause to look at photos or art. Because the wall looks so intentional, people
take more pride in the space, keep it neater, and enjoy spending more time there.
For many, the best part isn’t the savings (though that’s a big bonus); it’s the sense of “we did this ourselves.”
Every time you walk past the wall, you get a little hit of satisfaction knowing you turned a flat, forgettable
surface into something with depth, texture, and personalitywithout paying designer prices.
Conclusion: A High-Impact Project on a Low Budget
An inexpensive plank wall is one of those rare DIY projects that checks every box: affordable, beginner-friendly,
and seriously high-impact. With some budget materials, basic tools, and a bit of patience, you can transform a
plain wall into a custom feature that looks like it came straight from a renovation show.
Whether you choose a clean white shiplap look, a rustic stained wall, or a modern vertical installation, the
process is similarand so is the payoff. You’ll get a warm, inviting room that reflects your style and your
handiwork. And once you finish one wall, don’t be surprised if you start eyeing other rooms, wondering where
the next set of planks should go.


