Table of Contents >> Show >> Hide
- Why Moss-Covered Pots Look So Good in Spring
- Pick Your Moss Strategy: Live, Preserved, or Faux
- Materials You’ll Need
- How to Make Spring Moss Covered Pots
- What to Plant in Moss Covered Pots
- Centerpiece Ideas That Actually Look Styled
- Care Tips: Keeping Them Cute Instead of Crispy
- The Moss Slurry Question: Does the Buttermilk Trick Work?
- Sourcing Moss Responsibly
- Troubleshooting: Common Problems and Fixes
- Experience Notes: What It’s Really Like Making Spring Moss Covered Pots
- Conclusion
There are two kinds of people in spring: the ones who casually “freshen up” the house, and the ones who suddenly want to wrap everything in greenery like it’s auditioning for a woodland musical. If you’re reading this, congratulationsyou’re the second kind. And honestly? Moss-covered pots are the perfect level of “I have my life together” without requiring you to actually have your life together.
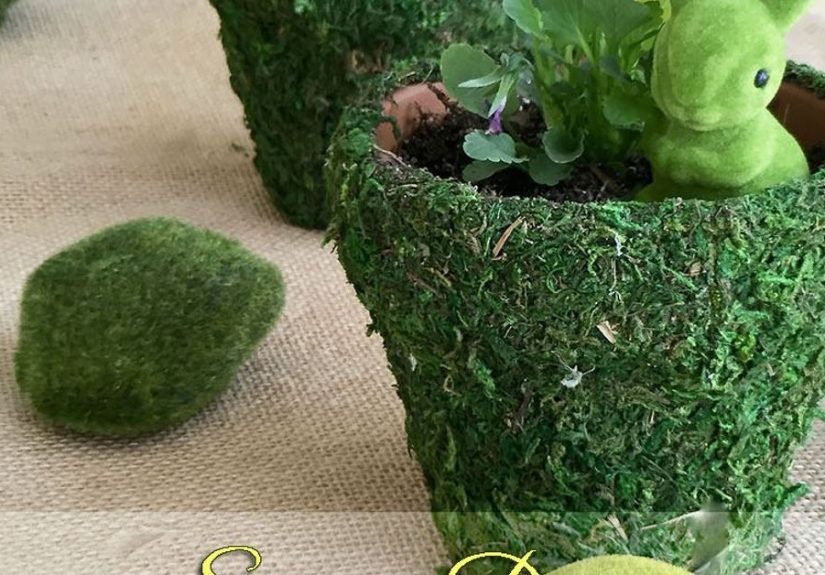
Spring moss covered pots are exactly what they sound like: ordinary planters (usually terracotta, cement, or tin) dressed up with moss so they look charmingly aged, garden-party-ready, and slightly enchanted. They can be used as table centerpieces, porch décor, wedding accents, Easter displays, or as a sneaky way to make mismatched pots look intentionally curated. The best part: you can make them with real moss, preserved moss, or faux moss depending on your vibe, your patience, and whether you want this to stay green for a weekend or a whole season.
Why Moss-Covered Pots Look So Good in Spring
Moss reads as “fresh” and “cozy” at the same time. It softens hard edges, adds natural texture, and makes a brand-new pot look like it’s been living its best life in an English garden for 30 years. In spring, moss also pairs beautifully with bulbs, pastel blooms, and bright green foliageso the whole thing looks like renewal and optimism… but in pot form.
The design trick hiding in plain sight
Moss visually connects your pots to nature even if they’re sitting on a dining table next to your laptop and a suspiciously large iced coffee. It’s like a shortcut to “organic style,” which is interior design language for “I want outdoorsy charm without bugs.”
Pick Your Moss Strategy: Live, Preserved, or Faux
Option 1: Live moss (pretty, needy, worth it)
Live moss gives the most authentic look and can stay vibrant if you keep it consistently moist and away from harsh sun. It prefers humidity and gentle light. Think “cool, shady forest floor,” not “full sun patio in July.” Live moss is great if you want a living centerpiece for a few weeks or you’re placing pots in a sheltered, damp area.
Option 2: Preserved moss (low-maintenance, not actually alive)
Preserved moss is real moss that’s been treated (often with glycerin-based solutions and dye) to keep it soft and colorful. It’s popular for crafts because it looks natural but doesn’t require watering. The tradeoff: it won’t grow, and too much direct sun or very dry air can cause it to fade or become brittle over time.
Option 3: Faux moss (durable, forgiving, zero drama)
Faux moss is ideal for high-traffic areas, outdoor displays that get blasted by sun, or homes with curious pets and toddlers who believe moss is a snack. It’s also the easiest to glue neatly. The look can be convincing if you choose a realistic texture and mix shades instead of using one flat “green carpet” tone.
Materials You’ll Need
- Pots: terracotta, ceramic, concrete, tin, or even plastic (rougher surfaces tend to grip better)
- Moss: sheet moss is easiest; Spanish moss can add texture; reindeer moss is fluffy filler (note: it’s often lichen)
- Adhesive: hot glue (fast), craft glue (strong but slower), or spray adhesive (good coverage)
- Optional fasteners: floral pins, wire, or twine (extra security and rustic style)
- Tools: scissors, gloves, and a small brush for cleanup
- Optional: floral foam or filler if you’re building a centerpiece arrangement
How to Make Spring Moss Covered Pots
Step 1: Prep the pot (don’t skip this)
Wipe off dust and let the pot dry fully. If it’s glossy, lightly scuff it with fine sandpaper so glue has something to grip. For terracotta, you’re already winningits porous surface is basically teamwork in pot form.
Step 2: Prep the moss
If you’re using sheet moss, gently pull it into workable sections. You want pieces that naturally follow curves. If the moss is dry and crackly, mist it lightly so it becomes flexible (especially for live moss). Don’t soak itthis is moss, not a kitchen sponge.
Step 3: Choose your attachment method
Method A: Hot glue (fastest, best for most people)
Apply glue in small areas (2–4 inches at a time) and press the moss in firmly. Work around the pot like you’re wrapping a gift… except the gift is for your home and the ribbon is nature’s velvet.
Method B: Craft glue (strong, but you need patience)
Brush glue onto the pot, press moss on, and hold for a few seconds. Use rubber bands or twine to keep sections in place while drying if needed. This is ideal if you want a cleaner look with fewer bulky glue spots.
Method C: Spray adhesive (smooth coverage)
Spray adhesive works well for covering larger areas quickly. Use it in a ventilated space and follow the label directions. Press moss down and smooth edges.
Step 4: Hide seams like a pro
Overlap pieces slightly. If you see gaps, tuck in small fragments like you’re patching a moss quilt. Rotate the pot often so you can spot bald spots before your guests do.
Step 5: Add a finishing touch
Wrap twine or thin jute around the rim for a cottage look. Or keep it clean and modern by trimming the moss neatly at the top edge. Either way, you now own a pot that looks like it has a tiny fairy mortgage.
What to Plant in Moss Covered Pots
Moss-covered pots are flexible. They can hold live plants, faux plants, or act as decorative “sleeves” around plastic nursery pots (which is secretly the easiest way to make this look professional).
Great spring choices
- Bulbs: tulips, hyacinths, daffodils (instant spring mood)
- Cool-weather annuals: pansies and violas (colorful and forgiving)
- Herbs: rosemary, thyme, mint (pretty and useful)
- Ferns: lush texture that matches the woodland look
- Faux stems: if you want “forever spring” without watering schedules
Centerpiece Ideas That Actually Look Styled
1) The “Farmhouse brunch” trio
Make three moss-covered terracotta pots in different heights. Drop in white hyacinths or faux ranunculus. Place them on a wooden board with a few speckled eggs or neutral candles. It’s soft, seasonal, and makes your table look like it belongs in a catalog.
2) The “front porch reset” cluster
Use larger mossed pots near your entryway. Add a fern in one, pansies in another, and a small evergreen (or faux topiary) in the third. The moss ties everything together so even mixed plant styles look intentional.
3) The “I’m hosting Easter” moment
Line up mini moss-covered pots (4-inch size) down the center of your table. Plant each with a single bloom color (all purple, all yellow, or all white) for a clean look. Add place cards or ribbon if you’re feeling fancy.
Care Tips: Keeping Them Cute Instead of Crispy
If you used live moss
- Moisture matters: mist regularly so moss stays damp, not drenched.
- Light: bright shade or indirect light is best; strong sun can brown it out.
- Airflow: good airflow helps reduce funk (yes, moss can get funky).
- Placement: sheltered porch, shaded patio, or indoors near a bright window (not in direct sun).
If you used preserved moss
- Don’t water it: it’s preserved, not thirsty.
- Avoid harsh sun: it may fade and dry out faster.
- Keep it clean: gently dust with a soft brush or cool air blow (low power).
If you used faux moss
- Dust it: microfiber cloth or a quick vacuum brush attachment works.
- Outdoor caution: UV can fade some faux moss over timeshade helps.
The Moss Slurry Question: Does the Buttermilk Trick Work?
If you’ve ever fallen down a DIY rabbit hole, you’ve probably seen the “moss smoothie” method: blend moss with buttermilk (or yogurt), paint it on, and voilàmoss magically grows on command. Here’s the honest take: moss can be propagated by spreading fragments and spores, and some extension-style guides describe slurry methods for establishing moss if moisture and conditions are right. But there’s also a lot of skepticism online because the “dairy” part can attract mold, smell bad, or fail if the environment isn’t consistently humid and shaded.
For pots specifically, slurry is rarely the easiest path. Pots dry out quickly and are often moved around, which makes consistency difficult. If your goal is the moss-covered pot look, attaching sheet moss (live or preserved) is far more reliable than hoping a painted slurry will establish evenly.
Sourcing Moss Responsibly
Moss grows slowly and plays an important role in ecosystems by holding moisture and providing habitat for tiny organisms. The most responsible approach is to buy moss from reputable garden centers, craft suppliers, or specialty growers rather than stripping it from wild spaces. If you do collect any from your own property, take small amounts from abundant areas and never “scalp” a whole patch. And definitely don’t harvest from protected landsbesides being harmful, removal can be illegal depending on location and rules.
Troubleshooting: Common Problems and Fixes
“My moss is falling off.”
Use smaller sections, add glue in short stretches, and press firmly. For extra security, wrap twine around the pot while glue sets. On very smooth pots, a light sanding step helps a lot.
“It looks bumpy and messy.”
Trim thicker moss areas and patch thin spots with smaller tufts. Moss is naturally uneven, but you want “charming uneven,” not “I dropped it in a hedge.”
“My live moss turned brown.”
Most commonly: too much sun or not enough consistent moisture. Move it to shade and mist more regularly. Also make sure it isn’t baking against a hot surface.
“It smells weird.”
That can happen if live moss stays too wet with poor airflow, or if slurry methods were used. Let it dry slightly, improve ventilation, and avoid overwatering.
Experience Notes: What It’s Really Like Making Spring Moss Covered Pots
The first time I made moss-covered pots, I assumed it would be a calm, cottagecore craft momentsoft music, a cup of tea, and me gently pressing moss onto a pot like a woodland artist. Reality: it was more like a competitive sport where hot glue strings tried to join the project and my scissors disappeared every 90 seconds. If you’re about to try this for the first time, here’s what actually matters when you want a “wow” result instead of a “well… it’s green” result.
The biggest lesson is that moss placement is everything. Sheet moss has a “grain” to itlittle stems and textures that naturally flow one direction. If you rotate pieces so the textures clash, it can look choppy. When you keep the moss flow consistent (especially around the pot’s belly), the final look becomes smoother and more intentional. I started paying attention to how the moss naturally curved and used that to wrap around the pot like fabric. The moment I did that, the project went from “craft day” to “decor piece.”
I also learned to respect the power of small pieces. My instinct was to slap on giant chunks to finish faster. But big pieces wrinkle, lift, and create gapsespecially around tight curves or near the rim. Smaller sections take longer but behave better. If you want to save time without sacrificing the look, do this: use medium pieces for the main body, then reserve smaller “patch” pieces for the top edge, the bottom edge, and anywhere the pot curves sharply.
Adhesive choice is another “it depends” situation. Hot glue is fast and forgiving, but it can leave visible shiny spots if you overdo it. Craft glue creates a cleaner finish, but you have to hold things longer and give it real drying time. My best compromise ended up being hot glue in tiny dots rather than long glue lines. Dots give you grip without saturating the moss. And if you accidentally create glue strings (you will), let them cool and then pull them offtrying to wipe warm glue is how you end up inventing new words.
For styling, I found that moss-covered pots look best when they’re treated like part of a larger scene. A single moss pot can look cute, but a group of three looks designed. The trick is varying height and texture: one pot with a fern, one with spring blooms, one with a candle or faux topiary. I once used three moss pots as a table centerpiece with white flowers and a few natural eggs tucked between them. It looked expensive. It was not expensive. That’s the kind of math I enjoy.
If you’re using live moss, the experience is slightly different because you’ll start thinking like a moss caretaker (which sounds dramatic, but it’s basically “don’t let it dry out and don’t roast it in the sun”). I kept my live-moss pots in bright shade and misted them. When I forgot for a couple of days, the moss didn’t immediately die, but it did lose that plush, fresh look. When I kept up with moisture and avoided direct sun, it stayed green long enough to make it through an entire spring season indoors. The takeaway: live moss rewards consistency, not intensity. It doesn’t want a flood; it wants steady, gentle moisture.
Finally, don’t underestimate cleanup. Moss sheds little bits, especially preserved and faux varieties. I started crafting over parchment paper so I could fold it up and dump the debris. Also, if you have pets, do a quick scan before placing the pots lowsome animals treat moss like a novelty snack. In short: make the mess once, clean it once, and then enjoy pots that look like they belong in a storybookwithout needing a greenhouse or a trust fund.
Conclusion
Spring moss covered pots are one of those rare DIY wins that feel both easy and impressive. You get instant seasonal charm, a flexible décor piece that works indoors or out, and a project that can be as simple or as styled as you want. Whether you go with live moss for that fresh woodland vibe, preserved moss for low-maintenance beauty, or faux moss for maximum durability, the result is the same: your home looks like spring showed up on purpose.


