Table of Contents >> Show >> Hide
- What Is the Creaming Method?
- Why the Creaming Method Matters
- When to Use the Creaming Method
- How to Use the Creaming Method Step by Step
- Common Mistakes That Ruin the Creaming Method
- How to Tell When Butter and Sugar Are Properly Creamed
- Best Recipes for Practicing the Creaming Method
- Creaming Method vs. Reverse Creaming
- Pro Tips for Better Results Every Time
- Conclusion
- Real-World Baking Experiences with the Creaming Method
If baking had a greatest-hits album, the creaming method would absolutely make the track list. It is one of those classic techniques that sounds fancy enough to impress dinner guests, but in reality it is wonderfully practical. If you have ever made a buttery layer cake, a batch of soft sugar cookies, or cupcakes with tender crumb, chances are you have already met this method face to face. You just may not have realized you were participating in one of baking’s most useful little acts of chemistry.
At its heart, the creaming method is simple: beat butter and sugar together until the mixture becomes lighter in color, fluffier in texture, and visibly fuller in volume. That fluffy mixture becomes the foundation for many cakes and cookies because it traps air before the batter even reaches the oven. In other words, your mixer is not just making noise to entertain the neighbors. It is building structure.
Still, simple does not always mean foolproof. Butter that is too cold refuses to cooperate. Butter that is too warm turns the whole thing into a greasy soap opera. Mix too little, and your cake may bake up dense. Mix too much, and your batter may lose the balance you were aiming for. The good news is that once you understand what the creaming method is doing, it becomes much easier to get beautiful, bakery-style results at home.
What Is the Creaming Method?
The creaming method is a mixing technique used primarily in cakes, cookies, and some frostings. It begins by beating softened butter with sugar until the mixture is pale, soft, and airy. After that, eggs are usually added one at a time, followed by alternating additions of dry ingredients and liquid ingredients. The order matters because each step helps build texture.
Think of sugar as a tiny team of energetic little chisels. As it beats against softened butter, the crystals carve microscopic air pockets into the fat. Those trapped pockets of air later expand in the oven, helping baked goods rise and creating a finer, lighter crumb. That is why the creaming method is especially popular in butter cakes and classic cookies that need both richness and structure.
It is also why this method is different from recipes that use melted butter, oil, or reverse creaming. Each approach creates a different texture. Creaming typically gives baked goods a more lifted, tender, fluffy result. Melted butter often produces denser, chewier textures. Reverse creaming tends to make cakes very tender and even, but with less of the airy lift that traditional creaming provides.
Why the Creaming Method Matters
Some recipe steps are flexible. This one is not the place to freestyle. The creaming step is important because it affects structure, tenderness, and even how evenly a cake bakes. When done properly, it helps create cakes that slice neatly, cupcakes that rise with confidence, and cookies that have a pleasant balance of softness and shape.
It also helps distribute sugar more evenly through the batter. That matters for both flavor and texture. Instead of pockets of sweetness here and there, the sugar becomes part of the structure of the mixture itself. You end up with a batter that is smoother, more stable, and more likely to bake the way the recipe intended.
In plain kitchen English, the creaming method gives you a head start. Before the leavening agents even begin doing their job, you have already built in some lift. It is like giving your batter a running start instead of asking it to get off the couch and sprint.
When to Use the Creaming Method
The creaming method works best in recipes where butter is meant to play a major structural role, not just a flavor role. It is commonly used in:
- Butter cakes and yellow cakes
- Pound cakes with a lighter crumb
- Cupcakes
- Sugar cookies
- Shortbread-style cookies with a more tender bite
- Classic buttercream-style frostings
It is not usually the right move for muffins, pancakes, waffles, brownies made with melted butter, or recipes specifically designed around oil. Those formulas rely on different mixing methods for a reason. So before grabbing the mixer, check whether the recipe is asking for creaming or for a different approach. Baking rewards following directions a little more than cooking does. It is less jazz, more orchestra.
How to Use the Creaming Method Step by Step
1. Start with the Right Butter Temperature
This is where many home bakers get tripped up. “Room temperature” does not mean warm, shiny, or halfway melted. Proper butter for creaming should be softened but still cool to the touch. It should give slightly when pressed, not collapse like a sad beach chair. If butter is too cold, it will not trap air well. If it is too warm, it will smear instead of aerate.
A good rule of thumb is this: you should be able to press a finger into the butter and leave a dent, but the stick should still hold its shape. That texture gives the sugar crystals something to work with.
2. Beat the Butter First if Needed
Some bakers like to beat the butter alone for about 30 seconds before adding sugar. This can help smooth out the texture and make the creaming more even. If your recipe tells you to do this, it is worth the extra half-minute. It is a tiny investment with a very polite return.
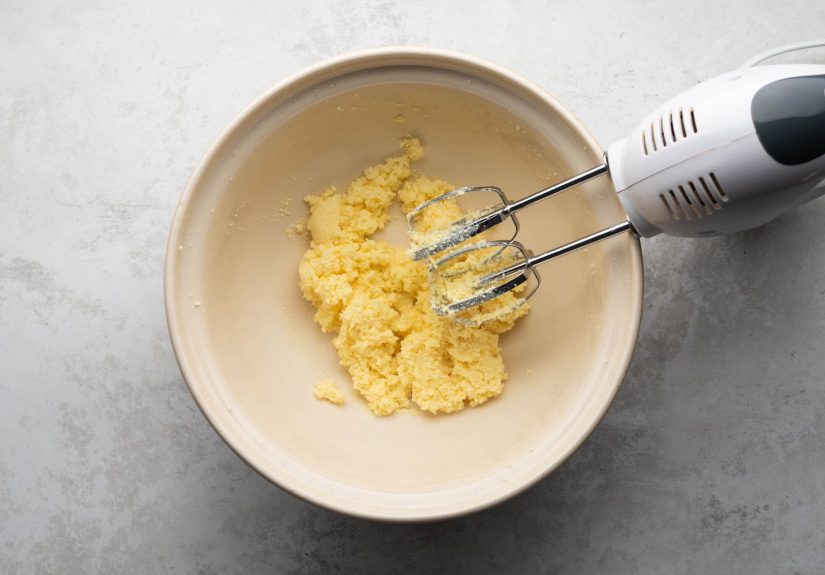
3. Add Sugar and Beat Until Light and Fluffy
Once the sugar goes in, beat the mixture on medium to medium-high speed until it becomes lighter in both color and texture. This usually takes several minutes, not several dramatic seconds. The mixture should look creamy, pale, and slightly expanded. It may still feel a little grainy because sugar crystals do not disappear completely at this stage, but it should no longer look heavy or pasty.
If it still looks yellow, thick, and compact, keep going. If it starts looking greasy, separated, or soupy, you may have gone too far or started with butter that was too warm.
4. Scrape the Bowl Often
Yes, scraping the bowl is mildly annoying. It is also one of the most effective ways to improve your baking. Butter likes to cling to the sides and bottom of the bowl, where it can hide from the mixer and avoid doing useful work. Use a rubber spatula to scrape down the bowl once or twice during creaming so everything mixes evenly.
5. Add Eggs One at a Time
After creaming, eggs are usually added one at a time, mixing well after each addition. This helps the batter stay emulsified and stable. Dumping them all in at once can overwhelm the mixture and cause it to curdle.
If the batter looks slightly curdled after an egg goes in, do not panic and do not draft a farewell letter to your cake. Often it smooths out as the next ingredients are added. It also helps when eggs are at room temperature, since cold eggs can shock the butter mixture.
6. Alternate Dry and Wet Ingredients
Once the eggs are incorporated, most recipes call for adding the flour mixture and the milk, buttermilk, or sour cream in alternating additions. Usually you begin and end with the dry ingredients. This helps keep the batter balanced and reduces the risk of overmixing.
Once flour enters the chat, gluten development becomes a concern. Mix only until the ingredients are just combined. Overmixing at this point can undo some of the tenderness you worked so hard to create during the creaming stage.
Common Mistakes That Ruin the Creaming Method
Using Butter That Is Too Warm
Warm butter cannot hold air as effectively. Instead of forming stable air pockets, it turns slick and greasy. The result can be a batter that looks fluffy for a minute but bakes into a heavier, flatter dessert.
Using Butter That Is Too Cold
Cold butter resists the sugar rather than partnering with it. Instead of an airy mixture, you get lumps, uneven creaming, and frustration that can be heard from neighboring zip codes.
Not Mixing Long Enough
Many bakers stop too soon. If the butter and sugar have not become lighter and fluffier, you have not built enough air into the batter. That often leads to cakes with tight crumb and cookies that feel more stubborn than tender.
Mixing Too Long
Yes, overmixing can happen during creaming too. If the mixture turns greasy, shiny, or almost separated, it may not hold structure as intended. The goal is light and fluffy, not melted-looking and tragic.
Skipping Bowl Scrapes
Uneven mixing means uneven baking. Pockets of butter left on the bowl can throw off the structure of the batter and cause streaks or inconsistent texture.
Adding Cold Eggs
Cold eggs can make the mixture seize or look curdled. Room-temperature eggs blend more smoothly and help maintain the emulsion.
How to Tell When Butter and Sugar Are Properly Creamed
Here is the visual checklist:
- The mixture looks paler than when you started
- It appears fluffier and increased in volume
- The texture looks smooth and soft, not greasy
- It holds to the paddle or beaters in a creamy mass
- It may still feel slightly grainy, but not chunky
If your mixture looks dense and buttery, keep mixing. If it looks shiny and sloppy, it has probably gone off-script. The best creamed mixture looks like it is ready to star in a butter commercial, not a kitchen rescue show.
Best Recipes for Practicing the Creaming Method
If you want to build confidence, start with recipes that clearly rely on this technique and make the results easy to notice. Good practice recipes include vanilla cupcakes, butter cakes, sugar cookies, and classic pound cakes. These recipes make the effect of proper creaming easy to see because the crumb, rise, and tenderness change noticeably when the method is done well.
Buttercream frosting can also be a useful practice ground. While frosting behaves differently from cake batter, it still teaches an important lesson: softened butter responds dramatically to mixing time and temperature. A few minutes can mean the difference between silky and sloppy.
Creaming Method vs. Reverse Creaming
The creaming method is the traditional approach, but it is not the only one in town. Reverse creaming, also called the two-stage method, starts by mixing butter into the dry ingredients first. This coats the flour with fat and limits gluten development, which can create a very tender, plush crumb and flatter cake layers.
Traditional creaming, on the other hand, typically produces more aeration because the sugar beats air into the butter before flour is added. That makes it a great choice when you want a cake or cookie with a lighter, fluffier structure.
Neither method is universally “better.” They are simply different tools. Traditional creaming is ideal when you want lift and classic buttery texture. Reverse creaming is handy when you want tenderness, even layers, and a little more forgiveness. A smart baker does not pick sides. A smart baker picks the result.
Pro Tips for Better Results Every Time
- Use a paddle attachment rather than a whisk for most cake batters
- Measure ingredients accurately, especially flour
- Bring eggs and dairy closer to room temperature before mixing
- Scrape the bowl and paddle regularly
- Do not rush the creaming step just because the recipe seems eager
- Stop mixing once flour is incorporated
- If you forgot to soften butter, grate it instead of melting it
Conclusion
The creaming method is one of the most valuable skills a home baker can master because it turns ordinary ingredients into a batter with built-in lift, tenderness, and structure. When butter is softened properly, sugar is beaten in long enough, and the remaining ingredients are added with care, the payoff shows up in every bite. Cakes become fluffier, cookies become more balanced, and your kitchen confidence quietly levels up.
The beauty of the creaming method is that it is both classic and practical. It does not require expensive equipment, rare ingredients, or a pastry degree framed dramatically above the oven. It just asks for patience, good butter, and the willingness to let the mixer do its thing for a few extra minutes. Once you learn what properly creamed butter and sugar look like, you will start spotting the difference immediately in your baking results.
So the next time a recipe says to cream butter and sugar, do not treat it like a throwaway line. That step is doing real work. Give it the attention it deserves, and your cakes and cookies will thank you in the universal language of tender crumbs and empty plates.
Real-World Baking Experiences with the Creaming Method
Anyone who bakes regularly eventually develops a relationship with the creaming method that feels almost personal. At first, it can seem like an annoying delay between “I want cake” and “I am eating cake.” But over time, many bakers realize that this step teaches some of the most useful lessons in the kitchen: patience, observation, and respect for texture.
One common experience is discovering that butter texture matters far more than expected. A baker may leave butter out too long, assume softer is better, and then end up with cookies that spread like they were chasing freedom across the pan. Another day, they may try using butter straight from the refrigerator and wonder why the batter looks rough and rebellious. After a few rounds of trial and error, the light bulb turns on: the butter needs to be softened, yes, but still cool enough to hold shape. That small adjustment can completely change the outcome.
Another familiar moment comes when someone finally lets the mixer run long enough. Many home bakers stop early because the ingredients look “pretty combined,” which feels emotionally sufficient but structurally unconvincing. Then one day they keep going for the full few minutes and notice the dramatic shift. The mixture turns paler, fluffier, and more voluminous. Suddenly the cake bakes higher, the crumb looks finer, and the mystery is solved. It is not magic. It is method.
The creaming method also teaches bakers how to read batter rather than blindly obey it. If a mixture looks curdled after the eggs go in, experienced bakers know not to panic immediately. If the batter smooths out after flour is added, all is well. If the mixture looks greasy during the creaming stage, they recognize it as a temperature issue instead of a personal betrayal by butter. This ability to interpret what is happening in the bowl is one of the biggest differences between nervous baking and confident baking.
There is also the simple joy factor. Properly creamed butter and sugar looks beautiful. It goes from dense and yellow to soft, pale, and cloudlike. For many bakers, that visual transformation is oddly satisfying, like watching before-and-after photos for dessert. It is one of those rare kitchen moments where science and comfort hold hands.
Over time, bakers often find themselves using the creaming method as a kind of benchmark. If a cake seems dense, they think back to the mixing stage. If cookies spread too much, they consider whether the butter was too warm. If a cupcake crumb is perfect, they remember that they took the extra minute to scrape the bowl and add eggs slowly. These little experiences build skill in a way recipes alone never can.
In that sense, the creaming method is more than a technique. It is a teacher. It trains the eye, improves timing, and helps bakers understand that great baking is often about details that look small but deliver big results. And once that lesson sticks, the method stops feeling fussy and starts feeling empowering. That is when baking gets really fun.


