Table of Contents >> Show >> Hide
- What is Zepbound, and why do injection sites matter?
- Where can you inject Zepbound?
- Where should you not inject Zepbound?
- How to rotate Zepbound injection sites the right way
- How to inject Zepbound step by step
- Best site for self-injection: abdomen vs. thigh vs. arm
- When should you inject Zepbound?
- What if you miss a dose?
- Tips to make Zepbound injections easier
- Common injection-site reactions
- Storage basics before injection day
- Zepbound injection site experiences: what people commonly notice in real life
- Final thoughts
Quick heads-up: Zepbound is a prescription medicine, not a DIY science fair project. If your doctor has prescribed it, knowing exactly where and how to inject it can make the process less stressful, less stingy, and a whole lot more routine. The good news is that Zepbound is designed for subcutaneous injection, which means it goes just under the skin, not into a muscle and definitely not into a vein. Once you understand the approved injection sites and the basic technique, the weekly shot becomes much less dramatic than your imagination may be making it.
This guide walks through the approved Zepbound injection sites, how to choose the best spot, how to rotate properly, what to avoid, and what many people commonly experience when they start. It also covers timing rules, missed-dose basics, and practical tips that help you inject with more confidence and less second-guessing.
What is Zepbound, and why do injection sites matter?
Zepbound is the brand name for tirzepatide. It is given once weekly as a subcutaneous injection. Because it is injected under the skin, the site matters for comfort, consistency, and skin health. Using the correct area helps you deliver the medicine as intended. Rotating spots also lowers the odds of irritation, soreness, and the “why does this exact spot hate me now?” problem that can happen when people keep injecting in the same place.
Injection site choice does not need to become a weekly existential crisis. The goal is simple: choose an approved area, use clean technique, and rotate the location from week to week. That combination gives you the best shot at making the shot feel manageable.
Where can you inject Zepbound?
Zepbound can be injected into three approved subcutaneous areas:
1. Abdomen
The abdomen is one of the most common Zepbound injection sites because it is easy to see and easy to reach. If you choose your stomach area, stay at least 2 inches away from your belly button. Think of your navel as a “do not disturb” zone. Most people find the lower or side portions of the abdomen easiest to use.
2. Thigh
The front or outer upper thigh is another approved area. This site works well for people who prefer sitting down while injecting or who simply want a break from using the abdomen every week. If your stomach feels crowded by life, leggings, waistbands, or nerves, the thigh is a solid backup plan.
3. Back of the upper arm
The back of the upper arm is also an approved Zepbound injection site, but it is generally best when another person is giving the injection. Technically approved? Yes. Convenient for solo use? Not usually. Unless you are unusually flexible or part owl, most people find the upper arm awkward to do by themselves.
Bottom line: the approved Zepbound injection sites are the abdomen, thigh, and back of the upper arm. The “best” location is usually the one you can reach comfortably, rotate reliably, and use without turning injection day into a wrestling match.
Where should you not inject Zepbound?
Knowing where not to inject is just as important as knowing where you can. Avoid areas where the skin is:
- Tender or painful
- Bruised
- Red or inflamed
- Hard or thickened
- Lumpy or pitted
- Scarred or damaged
- Scaly or irritated
Also, do not inject Zepbound into a muscle or a vein. It belongs under the skin. That is the whole assignment. If you have been repeatedly using the exact same spot, give that area a break and rotate to a different place in the same body region or switch regions entirely.
How to rotate Zepbound injection sites the right way
Rotation is not just a polite suggestion. It is one of the easiest ways to reduce skin irritation and avoid repeated trauma to one area. You may use the same general body region, but you should not use the same exact spot every time.
Here is a simple rotation pattern many people find helpful:
- Week 1: right lower abdomen
- Week 2: left lower abdomen
- Week 3: right thigh
- Week 4: left thigh
- Week 5: return to abdomen, but choose a new point
The goal is not perfection. The goal is avoiding repeat injections into one tiny favorite patch of skin just because it feels familiar. Familiar is nice. Healthy rotation is nicer.
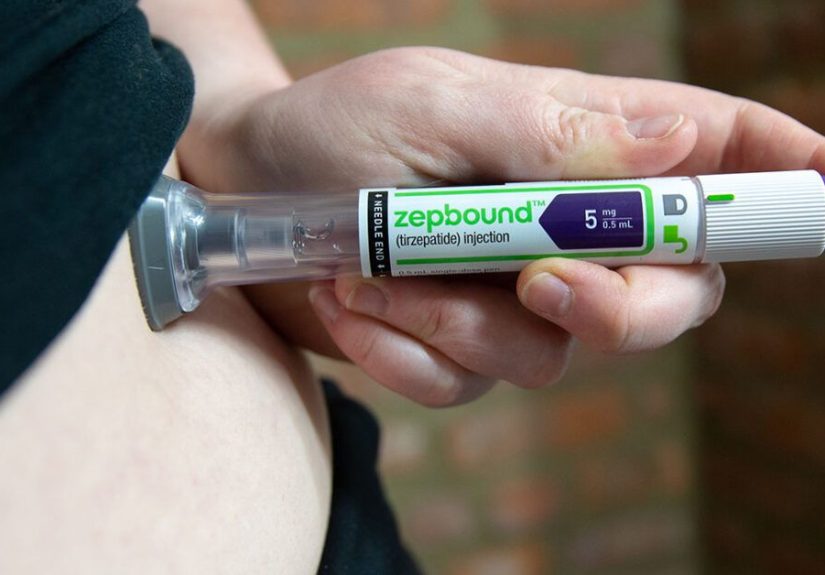
How to inject Zepbound step by step
Zepbound may come as a single-dose pen, a vial used with a syringe, or another approved presentation such as a KwikPen. The exact handling steps vary by device, so always follow the Instructions for Use that come with your prescription. Still, the basic injection flow is usually the same.
- Wash your hands. A classic for a reason.
- Check the label. Make sure you have the right medicine and the right dose.
- Inspect the medication. Zepbound should look clear and colorless to slightly yellow. Do not use it if it is cloudy, frozen, discolored, or has particles.
- Choose an approved injection site. Abdomen, thigh, or back of the upper arm if another person is helping.
- Avoid problem skin. Skip spots that are bruised, sore, scarred, hard, or irritated.
- Clean the skin. Use an alcohol swab and let the area dry.
- Prepare your device. This step depends on whether you are using a pen, vial, or KwikPen. Follow the official device directions exactly.
- Inject under the skin. Do not inject into muscle or vein.
- Dispose of the device or needle safely. Use a sharps container, not a random kitchen drawer that future-you will regret opening.
If you are new to Zepbound, ask your prescriber, pharmacist, or nurse to watch your technique the first time. Confidence goes up quickly once you know you are doing it correctly.
Best site for self-injection: abdomen vs. thigh vs. arm
Abdomen: easiest for many people
The abdomen is usually the easiest site for self-injection because it is visible and accessible. It also allows you to choose different points from week to week without too much contortion. For many people, this becomes the default site simply because it is straightforward.
Thigh: simple and steady
The thigh is another great option, especially if you like to sit down and keep everything stable. Some people feel more in control here because they can see the angle and position clearly. If your abdomen feels too sensitive or too crowded with waistbands, the thigh often feels less annoying.
Upper arm: helpful, but usually not for solo attempts
The back of the upper arm is approved, but it is usually more practical when another person gives the shot. For self-injection, it can be awkward to reach and harder to keep stable.
If you want the simplest answer, most people doing their own injections tend to prefer the abdomen or thigh. The arm is more of a team project.
When should you inject Zepbound?
Zepbound is used once weekly, at any time of day, with or without food. Morning, afternoon, or evening can all work. The best time is the one you will actually remember. In other words, choose consistency over creativity.
You can also change your weekly injection day if needed, as long as at least 72 hours have passed between doses. That flexibility is helpful if your schedule shifts, you travel, or your usual injection day suddenly becomes chaos in calendar form.
What if you miss a dose?
If you miss your scheduled Zepbound dose, take it as soon as possible within 4 days, or 96 hours, of the missed dose. If more than 4 days have passed, skip the missed dose and take your next one on your regular scheduled day.
Do not take two doses within 3 days, or 72 hours, of each other. That is not “catching up.” That is asking for trouble.
Tips to make Zepbound injections easier
- Pick a weekly routine. Same day, same rough time, fewer forgotten doses.
- Use a rotation plan. A notes app, calendar, or simple checklist can save you from guessing.
- Let the alcohol dry before injecting. Wet alcohol can sting more.
- Relax the muscle under the skin. Tension makes the whole thing feel more dramatic.
- Do not rush. Calm, steady technique usually feels better than panic-speed.
- Use a sharps container. Safety matters, and loose needles are not a personality trait.
Common injection-site reactions
Some people notice mild redness, itching, tenderness, or soreness near the injection site. These reactions are usually temporary. Rotating sites, avoiding irritated skin, and using proper technique can help reduce them.
If you get persistent swelling, a spreading rash, worsening pain, or signs of an allergic reaction, contact your healthcare provider right away. Zepbound can also cause non-skin side effects, especially digestive ones such as nausea, diarrhea, constipation, vomiting, or stomach discomfort. Injection site issues are only one piece of the picture.
Storage basics before injection day
Zepbound should generally be kept in the refrigerator and protected from light in its original carton. If needed, certain Zepbound presentations may be stored at room temperature up to 86°F for a limited period, and once stored at room temperature, they should not be returned to the refrigerator. Do not use Zepbound if it has been frozen.
Because packaging options can vary, it is smart to check the official Instructions for Use that come with your exact product. This is one of those moments where reading the label actually pays off.
Zepbound injection site experiences: what people commonly notice in real life
Once people move past the first injection, the most common experience is not “That was awful,” but “That was it?” Anticipation tends to be louder than the injection itself. Many first-time users expect a dramatic moment, only to realize the real challenge was the buildup, not the shot. That is especially true with the abdomen, which many people choose because it is easy to see, easy to reach, and simple to rotate. The stomach often feels practical and predictable, which can be a huge confidence booster when you are still learning the routine.
Others prefer the thigh because it feels more controlled. Sitting down, resting the leg, and injecting in a steady position can make the process feel calmer. Some people say the thigh feels more noticeable during the injection than the abdomen, while others feel the exact opposite. Human bodies, as always, refuse to cooperate with one-size-fits-all opinions. That is why personal comfort matters. If one approved site feels easier, cleaner, or less stressful, that is usually the site you are more likely to use correctly and consistently.
The upper arm tends to be the least popular site for people injecting themselves, mostly because it is awkward. When another person helps, though, some patients like it because it gives the abdomen and thighs a break. In real life, convenience wins often. The “best” site is usually the one that fits your routine without turning a one-minute task into a full production.
Many people also report becoming more aware of their skin after a few weeks. They start noticing which spots feel smoother, which areas are more sensitive, and which locations are easiest to rotate. That is a good thing. It means technique is becoming intentional rather than random. Mild redness or tenderness can happen, especially if you inject into the same area too often or choose a spot that is already irritated by clothing, friction, or a previous injection. People who keep a simple rotation log often say it helps more than they expected.
Another common experience is that routine lowers anxiety. The first injection might involve a pep talk, a deep breath, and maybe a tiny monologue about modern medicine. By week four, many people are doing it between regular evening tasks and moving on with the day. Familiarity helps. So does knowing the rules: use an approved site, rotate, avoid damaged skin, and do not overcomplicate it.
People also commonly say that injection day goes smoother when they prepare ahead of time. Having the alcohol swab ready, knowing which site they will use, and disposing of the device or needle immediately after the injection makes the process feel cleaner and less chaotic. In other words, the most helpful “experience tip” is boring but effective: a simple system beats a heroic last-minute scramble.
Finally, it is normal for preferences to change over time. Someone may start with the abdomen, switch to the thigh for a while, and later rotate back. That does not mean anything is wrong. It simply means they are paying attention to comfort and skin response. With Zepbound injection sites, success is not about loyalty to one body part. It is about using the medicine correctly, safely, and consistently enough that the routine becomes sustainable.
Final thoughts
If you are wondering where and how to inject Zepbound, the answer is reassuringly simple: inject it under the skin of the abdomen, thigh, or the back of the upper arm if another person is helping. Rotate sites every week, avoid irritated or damaged skin, follow the Instructions for Use for your exact device, and stick to your weekly schedule as closely as possible.
The learning curve is usually short. Once you know the approved Zepbound injection sites and the basic technique, the process becomes less intimidating and far more routine. That is the sweet spot: safe, consistent, and boring in the best possible way.


