Table of Contents >> Show >> Hide
- 1. Simple Wall-Mounted Bike Hooks
- 2. Vertical Bike Rack That Doubles as Wall Art
- 3. Ceiling Bike Hoist for Overhead Storage
- 4. DIY A-Frame Floor Rack for Multiple Bikes
- 5. Under-Stairs Bike Cubby or Nook
- 6. Furniture-Style Bike Shelf or Cabinet
- 7. Pegboard Bike Command Center
- 8. Outdoor Bike Shed or Locker
- 9. Entryway Display Rack for City Bikes
- 10. Mobile Bike Rack on Casters
- How to Choose the Right DIY Bike Storage for Your Space
- Safety Tips for DIY Bike Storage
- Real-Life DIY Bike Storage Experiences and Lessons (Extra Tips)
- Conclusion
If your hallway currently looks like a bike shop exploded, this article is for you.
Bikes are amazing for your health, your wallet, and the planetbut not so amazing
when they’re constantly falling over in the entryway, blocking the washing machine,
or playing dominoes in the garage. The good news? With a few clever
DIY bike storage ideas, you can reclaim your floors, protect your
bikes, and make your space look surprisingly stylish.
Below are 10 smart, realistic bike storage projects you can build with basic tools.
Whether you live in a tiny apartment, a gear-packed garage, or a family home with
too many bikes (if that’s even possible), you’ll find at least one solution you’ll
want to start this weekend.
1. Simple Wall-Mounted Bike Hooks
Let’s start with the classic: the humble wall hook. It’s cheap, fast to install,
and ideal for garages, sheds, and even utility rooms. The basic idea is simple:
screw heavy-duty hooks into a sturdy backing board or directly into the wall studs,
then hang your bikes by their front wheels.
For a sturdier, more polished look, mount a 2×4 or a small plywood strip horizontally
across two or more studs. Then screw in rubber-coated bike hooks at measured intervals
that match your handlebar widths. This protects your wall and spreads the weight
across multiple fasteners, making the whole setup more secure.
Want to level up? Turn the board into a mini floating shelf. Attach a top shelf board,
then add hooks below. You’ll get a spot for helmets, lights, and bike locks right
above your parked bikes. Just make sure you use lag screws or strong anchors designed
for studs, not tiny drywall screws that give up the moment a mountain bike looks at them.
2. Vertical Bike Rack That Doubles as Wall Art
If you’re short on floor space but long on tall walls, a vertical bike rack is your new
best friend. Instead of hanging the bike horizontally, you stand it upright so it hugs
the wall, using minimal width. This is perfect for studio apartments, narrow hallways,
or that weird corner in your living room that never quite worked with furniture.
The simplest DIY version uses a narrow panel of plywood or a 1×10 board secured into
wall studs. Add a wheel shelf or hook near the bottom for the back tire to rest on,
and a small hook or rubber cradle higher up for the front wheel. Roll the bike in,
tilt it upward, click the front wheel into place, and boom: instant vertical
indoor bike storage.
For extra style points, paint the backboard in a bold accent color, add a small
shelf for plants, or integrate LED strips behind the board for a subtle glow.
If you’re a design nerd and a cycling nerd, this is how you let both personalities win.
3. Ceiling Bike Hoist for Overhead Storage
When your floor space is gone and your walls are full, look up. A ceiling-mounted
bike hoist uses pulleys and hooks to lift your bike overhead, which is perfect for
garages with decent ceiling height. It keeps bikes out of the way but still accessible.
Most DIY hoists use two pulleys, a length of rope, and hooks that grab the handlebar
and seat. You can buy a ready-made kit or recreate the concept with hardware-store
parts, as long as you respect weight limits and use proper fasteners in joists or
beams. Avoid attaching into drywall alone unless you’re emotionally prepared for a
dramatic crash.
Safety is key here. Use locking pulleys or a cleat to tie off the rope, keep the
area under the bike clear, and inspect the rope and hardware occasionally. Overhead
garage bike storage is amazinguntil you walk under a poorly mounted
hoist and find out the hard way that it wasn’t installed correctly.
4. DIY A-Frame Floor Rack for Multiple Bikes
Have a small fleet of bikes? Time to build an A-frame rack. Imagine a beefed-up
sawhorse made from 2x4s. The bikes hang from the top beam by their saddles or
top tubes, all lined up in a neat row. It looks like a tiny bike parking lot
and works great for families or cycling-obsessed households.
The structure is simple: two pairs of angled legs attached to a long top beam.
You can cut the legs to create the height you want, then bolt or screw everything
together. Use metal brackets for extra stability if needed. Add hooks or padded
hangers along the top beam, spaced so handlebars don’t clash.
The trade-off? It uses more floor space than vertical storagebut you can pack a
surprising number of bikes onto one rack. If you organize group rides or have kids
who never met a bike they didn’t want, this DIY bike storage rack is a game changer.
5. Under-Stairs Bike Cubby or Nook
The space under your stairs might be secretly perfect for bikes. Instead of letting
that area collect dust bunnies and mystery boxes, turn it into a dedicated bike nook.
For interior stairs, you can remove the closet door (if there is one) and install
simple wall hooks and a floor runner to protect the surface. Shorter bikes or kids’
bikes can often roll right in. For exterior steps, you can build a small framed nook
or enclosure with a hinged door, basically a mini outdoor bike closet.
You can even add shelves or cubbies above the parked bike for shoes, helmets, and
panniers. The result is a compact small-space bike storage zone that
looks intentional instead of improvised.
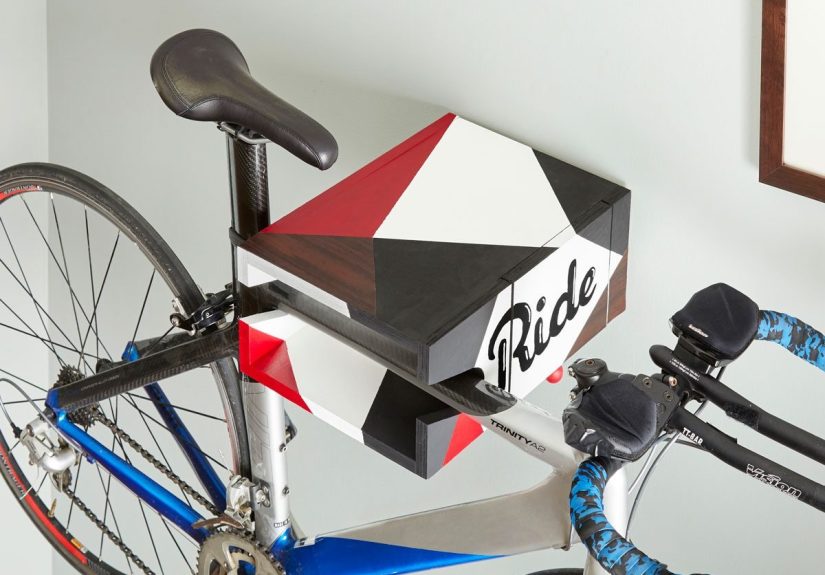
6. Furniture-Style Bike Shelf or Cabinet
If you’re short on space but big on aesthetics, consider turning your bike storage
into furniture. Think of a wall-mounted shelf that supports the top tube of your bike
while also working as a display ledge for books or plants. Or imagine a slim cabinet
that hides a bike inside, with doors that close to keep things tidy.
A classic DIY approach is a U-shaped wall bracket built from laminated plywood or
hardwood, sized to cradle your bike’s top tube. Mount it into studs and add a top
surface for decor. For a more advanced project, build a shallow cabinet with sliding
doors, hanging hardware inside for the bike and pegboard-style panels for accessories.
Furniture-style indoor bike storage ideas are especially handy in
open-plan apartments where your living space, dining space, and “bike garage” are
all basically the same room. This way, the bike becomes part of the design instead
of something you’re constantly apologizing for.
7. Pegboard Bike Command Center
If you like your gear organized and your walls functional, a pegboard-based bike
command center will make you very happy. Start with a large sheet of pegboard or
slatwall mounted to a garage or entryway wall. Then add hooks, shelves, and bins
not just for the bike, but for everything that travels with it.
The bike itself can hang from sturdy metal hooks or specialized bike brackets
mounted through the pegboard into studs. Around it, place hooks for helmets, locks,
bags, and rain gear. Add a small shelf for chain lube and tools, and maybe a metal
cup or magnetic strip for hex keys and a tire lever.
The best part of this DIY bike storage style is flexibility.
When your gear changes, you just move the hooks. No need to patch holes or rebuild
anythingyour wall simply evolves with your riding habit.
8. Outdoor Bike Shed or Locker
Not everyone has room indoors. If your bikes live outside, they deserve more than
a tarp and a prayer. A compact outdoor bike shed or locker protects them from rain,
sun, and curious passersby.
A simple DIY shed can be built from pressure-treated lumber and exterior-grade
plywood or siding panels. Think of it as a low, wide box with a sloped roof.
Inside, add wheel channels or a basic rail-and-hook system to keep bikes upright.
Lockable doors and a good hasp provide security, and you can add vents near the
top to reduce moisture buildup.
If you don’t want to build from scratch, you can also adapt a standard outdoor
storage cabinet into a bike storage locker. Just make sure the
interior dimensions fit your bike length and handlebar width before you start
cutting holes or adding hardware.
9. Entryway Display Rack for City Bikes
For those who ride stylish commuters, fixies, or vintage road bikes, hiding them
in the garage is practically a crime. Instead, turn your favorite bike into a
statement piece right in your entryway or living room.
One option is a narrow vertical rack that holds the bike at eye level, with a
small shelf or console table built around it. Another option is a floating
wall mount that suspends the bike horizontally like artwork, leaving space
below for shoes, baskets, or storage boxes.
Play with composition like you would with wall art: pair the bike with framed
prints, hooks for jackets, or a mirror. This approach combines
bike storage ideas with interior design, making your ride part
of the home’s personality instead of visual clutter.
10. Mobile Bike Rack on Casters
Sometimes the problem isn’t where to store the bikesit’s that the best location
keeps changing. Maybe you need the garage clear when guests come over, or you
occasionally roll your bikes outside to wash them. That’s where a mobile bike
rack on casters shines.
At its core, this is a low platform or narrow A-frame rack built on a base with
heavy-duty locking wheels. You can adapt a simple DIY floor rack or sawhorse-style
rack by adding a plywood base and bolting on casters that are rated for the total
weight of the bikes.
The result is a movable bike storage solution you can roll into
a corner, across the driveway, or into a different part of the garage. Just remember
to lock the wheels before you start loading or unloading bikesotherwise you might
end up chasing your entire bike collection down the driveway.
How to Choose the Right DIY Bike Storage for Your Space
With so many options, it helps to narrow things down by asking a few practical
questions before you grab your drill:
- How many bikes? One or two bikes may only need wall hooks. A whole family or riding group might justify an A-frame rack or outdoor shed.
- Do you own or rent? If you rent, focus on non-permanent options like freestanding racks or systems that use minimal holes. If you own, go ahead and commit to wall studs and ceiling joists.
- Who uses the bikes? If kids or less-strong riders need easy access, avoid very high mounts or heavy hoists they can’t manage safely.
- Indoor vs. outdoor? Indoor storage allows more delicate finishes and furniture-style designs. Outdoor options must handle weather, security, and ventilation.
- Future flexibility? Pegboards, slatwalls, and mobile racks are easier to adapt if your bike collection grows or changes.
Safety Tips for DIY Bike Storage
A good storage system should protect you as much as it protects your bike. Keep
these safety basics in mind while building and installing:
- Always anchor into something solid. Use studs, joists, or masonry for wall and ceiling mounts.
- Respect weight limits. Whether it’s hooks, pulleys, or casters, check the rated load and add a safety margin.
- Keep walkways clear. Don’t mount bikes where someone will constantly duck under pedals or handlebars.
- Use the right hardware. Lag screws, masonry anchors, and structural screws are your friends; flimsy fasteners are not.
- Check periodically. Inspect ropes, hooks, and joints once in a while for wear or loosening.
Real-Life DIY Bike Storage Experiences and Lessons (Extra Tips)
On paper, every bike storage idea looks flawless. In real life, you quickly learn
that handlebars are wider than you thought, kids don’t always hang bikes neatly,
and someone will absolutely try to pull a bike down without unhooking it correctly.
Here are some practical, experience-based lessons that don’t always show up in
polished project photos.
First, plan for “imperfect use.” If you have kids or housemates who aren’t going
to line bikes up with laser precision, leave a little extra spacing between hooks
or wheel channels. That extra inch or two can be the difference between smooth
parking and a daily tangle of handlebars and pedals.
Second, test your clearance with a real bike before permanently installing anything.
Temporarily tape a cardboard template or hold a hook in place and physically move
the bike through the motion of parking and removing it. This helps you catch surprises
like pedals hitting the wall, bars hitting shelves, or tires rubbing doors before
you drill a dozen holes.
Third, don’t underestimate the value of a “parking lane” on the floor. Even with
wall-mounted systems, a simple painted stripe or piece of tape on the floor shows
where the front wheel should land. This little visual cue makes it much easier for
everyone in the house to park bikes consistently and avoid them drifting across the
room over time.
Another surprisingly big factor is lighting. A beautifully built rack in a dark
corner of the garage is still annoying to use. Add a basic LED shop light or
battery-powered motion light above the bike area. Being able to clearly see hooks,
ropes, and pedals makes the system safer and more pleasant to use, especially when
you’re arriving home after dark.
It also helps to create a “one-stop zone” by storing related items nearby. Keep
helmets, locks, gloves, and bags within arm’s reach of the bikes. That way, your
storage solution doesn’t just hold bikes; it supports the whole riding routine.
You’re more likely to ride when everything you need is ready to grab and go.
Finally, be willing to adjust your system after living with it for a few weeks.
Maybe the ceiling hoist is overkill for a bike you ride daily, or maybe the entryway
rack needs to move a few inches away from the door. DIY storage is not a one-time
verdict; it’s allowed to evolve as your habits and gear change.
The big takeaway from real-world experience? The “best” DIY bike storage solution
isn’t just the most clever or the most space-savingit’s the one your household can
actually use easily, safely, and consistently. If your setup makes it simple to park
and grab a bike without gymnastics, you’ve officially won the storage game.
Conclusion
Bikes don’t have to take over your lifeor your living room. With the right
DIY bike storage ideas, you can protect your investment, free up
space, and even turn your bikes into part of your decor. Whether you hang them from
the wall, hoist them to the ceiling, tuck them under the stairs, or hide them in a
sleek cabinet, there’s a solution that fits your space, your budget, and your riding
style.
Pick one idea that matches your home, gather your tools, and give your bike the
parking spot it deserves. Your floorsand your shinswill thank you.


