Table of Contents >> Show >> Hide
- Why Ancient Greek Temples Fascinate Kids
- Key Features of Ancient Greek Temples (Kid-Friendly Version)
- Project 1: Shoebox Greek Temple Diorama
- Project 2: Straw-and-Paper Column Temple
- Project 3: Toilet Paper Tube Temple
- Project 4: Post-and-Lintel STEM Challenge with Cups
- Project 5: Draw-and-Decorate a Temple Frieze
- Project 6: Build a Human Temple
- Adapting Projects for Different Age Groups
- Connecting Art Projects to History and Literacy
- Classroom Management and Mess-Saving Tips
- Conclusion: Turning Kids into Temple Architects
- Real-Life Experiences and Tips with Ancient Greek Temple Projects
Ancient Greek temples might sound like something out of a dusty history book, but for kids they’re basically giant marble storybooks with columns. The good news for parents and teachers? You don’t need stone, slaves, or a mountain in Athens to bring this world to life. With cardboard, straws, glue, and a little imagination, you can turn your kitchen table or classroom into the Acropolis for an afternoon.
This guide walks you through kid-friendly art projects inspired by ancient Greek temple architecture. Along the way, children learn about columns, pediments, gods and goddesses, and basic engineering concepts, all while cutting, gluing, and getting pleasantly covered in bits of paper. These ancient Greek temple art projects are perfect for homeschoolers, elementary classrooms, after-school clubs, or a rainy weekend at home.
Why Ancient Greek Temples Fascinate Kids
Ancient Greek temples are the original “wow” buildings. They were designed to honor the gods and goddesses, but they also show off math, symmetry, and serious design skills. Kids naturally latch onto the drama: huge stone columns, colorful carvings, and stories of Zeus, Athena, and Poseidon swirling around these buildings.
A few simple facts help children connect with the topic:
- Temples were usually built on high ground, so everyone in the city could see them.
- They housed statues of gods and goddesses inside, while most worship actually happened outside.
- Greek architects loved balance, so temples are full of repeated patterns and straight lines that kids can easily spot and copy.
When you turn these ideas into hands-on art projects, kids aren’t just memorizing factsthey’re literally building what they’re learning.
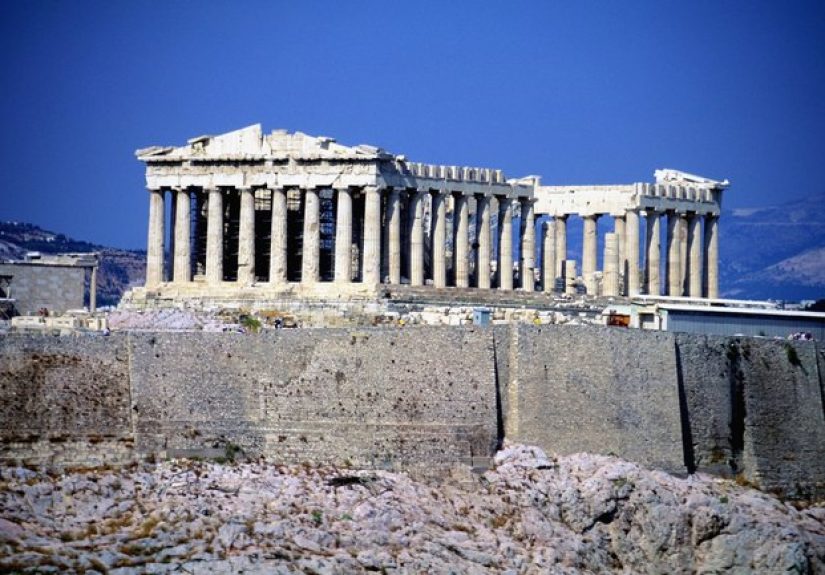
Key Features of Ancient Greek Temples (Kid-Friendly Version)
Before you bring out the glue sticks, introduce a few core parts of Greek temple architecture in a simple way:
-
Columns: Tall supports that hold up the roof. Show the three major types:
- Doric: Plain top, sturdy, no base. Think “strong and simple.”
- Ionic: Scrolls at the top that look like cinnamon rolls or ram’s horns.
- Corinthian: Fancy leafy designs; imagine a plant taking over the top of the column.
- Pediment: The triangle at the very top front and back of the temple. This often held sculpted scenes from myths.
- Frieze: A long strip above the columns that could be decorated with patterns, battle scenes, or processions.
- Steps and platform: Temples usually sat on a raised platform, giving them that “grand staircase” look.
Keep it visual. Sketch a simple temple on the board, label the parts, and let children practice saying “Doric,” “Ionic,” and “Corinthian” in their best historian voices.
Project 1: Shoebox Greek Temple Diorama
This project is a classic: kids transform a simple shoebox into a miniature Greek temple worthy of Athena herself. It’s a great introduction to basic temple parts and perfect for ages 7–12.
Materials
- Shoebox or small cardboard box
- White cardstock or construction paper
- Paper straws or wooden craft sticks
- Ruler and pencil
- Glue or tape
- Markers, crayons, or colored pencils
- Optional: small figurines to represent gods, goddesses, or worshippers
Steps
- Create the base: Turn the shoebox upside down so the flat bottom becomes the temple platform. Draw simple steps along the edges or glue strips of cardboard to build real steps.
- Add columns: Cut straws or sticks to the same height. Glue them along the front and sides of the box to create a colonnade. Challenge kids to keep them evenly spaced.
- Build the roof: Cut a rectangle of cardstock the size of the top of the box and tape or glue it on top of the columns.
- Make the pediment: Cut a triangle of paper for the front and another for the back. Glue them to the roof.
- Decorate the frieze and pediment: Kids can draw a procession, a myth, or simple patterns like zigzags and Greek key borders.
- Finish the scene: Add tiny figures, trees, or a small altar made from extra cardboard pieces.
This project reinforces vocabulary and lets children experiment with symmetry and pattern. For an extra challenge, ask older students to choose a specific templesuch as the Parthenonand try to match the number of columns on each side.
Project 2: Straw-and-Paper Column Temple
If you need a quick, low-mess activity, this straw temple is ideal. It focuses on columns and basic structure rather than detailed scenery.
Materials
- Paper straws or regular straws
- Heavy paper or cardboard base
- Cardstock for roof and pediment
- Glue gun with adult supervision or strong craft glue
- Markers or paint
Steps
- Plan the layout: Have children sketch where they want their columns on the base. Younger kids can do just a front row of columns; older ones can wrap them around all sides.
- Attach the columns: Cut straws to equal height and glue them standing upright on the base.
- Add the roof: Glue a flat rectangle of cardstock on top of the columns.
- Shape the pediment: Fold another piece of cardstock into a triangle and glue it to the front roof edge.
- Decorate: Kids can color the columns, add painted patterns, or even experiment with making Doric, Ionic, or Corinthian capitals at the tops.
This project doubles as a simple engineering challenge: if columns aren’t straight or evenly spaced, the roof leans. Ask students to troubleshootmove a column, reinforce a joint, or widen the base.
Project 3: Toilet Paper Tube Temple
Empty toilet paper tubes and paper towel rolls are surprisingly perfect as miniature columns. This project is budget-friendly and easy for younger children.
Materials
- Toilet paper or paper towel tubes
- Small box or foam board for base
- Cardboard rectangles for roof
- White paint or paper to wrap tubes
- Markers for details
- Glue or tape
Steps
- Prepare the columns: Paint or wrap the tubes in white paper. Kids can draw vertical lines to imitate the fluting on Greek columns.
- Arrange the colonnade: Set four tubes at the corners of the base and add more between them to form a row of columns.
- Attach the roof: Place a cardboard rectangle on top and glue it down.
- Decorate the pediment and frieze: Kids can create a mini-mythic scene or geometric patterns.
For a fun extension, divide the class into small groups and have each group design a temple for a different Greek god or goddess. They can label their temples and present them, explaining why they chose certain colors or decorations.
Project 4: Post-and-Lintel STEM Challenge with Cups
Greek temples use a post-and-lintel system: vertical supports (posts) hold up horizontal beams (lintels). This STEM-style challenge shows how strong that system can be using only paper cups and boards.
Materials
- Paper or plastic cups
- Two cookie sheets, foam boards, or sturdy books
- Textbooks or other heavy objects for testing
Steps
- Build the “temple”: Arrange rows of cups as columns on the floor. Lay a board or cookie sheet across the top as the lintel.
- Increase the challenge: Add more cups in different patterns and layers, then place another board on top.
- Test the strength: Slowly stack books or other weights on the top board. Count how many the “temple” can hold before it collapses.
Kids see firsthand why Greek architects loved columns. You can tie the activity back to real temples by showing pictures and pointing out similar post-and-lintel structure.
Project 5: Draw-and-Decorate a Temple Frieze
Not every project has to be 3D. A frieze drawing lesson works well when you’re short on time or supplies, and it brings storytelling into the mix.
Materials
- Long strips of paper
- Pencils, markers, or oil pastels
- Ruler (optional for neat borders)
Steps
- Explain the frieze: Show pictures of temple friezes and discuss what scenes they showprocessions, battles, animals, or gods.
- Design the story: Have kids choose a scene to illustrate. It can be based on a Greek myth or a modern “everyday hero” story in an ancient style.
- Draw and color: Students create their own continuous frieze with repeating patterns, figures, and decorative borders.
When displayed in a row on the classroom wall, these friezes create a modern “temple” hallway that kids love to walk down.
Project 6: Build a Human Temple
This project gets kids moving. They use their bodies to model different parts of the temple, which is a great option for kinesthetic learners or as a brain break between quieter crafts.
How It Works
- Divide children into groups of five to ten.
- Assign roles: some kids become “columns,” others form the “lintel,” and a few create the “pediment” with their arms making a triangle.
- Call out different temple types: Doric (stand strong and plain), Ionic (wiggle “scroll” hands at the top), Corinthian (add leafy arm movements).
- Have groups freeze in their temple pose, then walk around and compare designs.
This playful activity reinforces vocabulary and helps younger kids remember the difference between temple parts.
Adapting Projects for Different Age Groups
The same basic ideabuild a templecan look very different in kindergarten and in middle school. Here’s how to scale ancient Greek temple art projects up or down.
For Younger Children (Ages 5–8)
- Use big, pre-cut shapes for roof and pediments.
- Limit the number of columns so temples don’t collapse as easily.
- Focus on simple patterns and basic vocabulary like “column,” “steps,” and “roof.”
- Keep sessions short and allow plenty of time for free decorating.
For Older Children (Ages 9–12)
- Introduce the three classical orders and ask them to choose one for their temple.
- Challenge students to count and match realistic column numbers from famous temples.
- Incorporate measurement, scale, and simple ratios.
- Ask them to research and design a temple dedicated to a specific deity with meaningful symbols.
Connecting Art Projects to History and Literacy
Ancient Greek temple art projects are even more powerful when you connect them to stories and historical context. Pair building activities with short myths about gods and goddesses, stories about the Olympic Games, or simple readings on daily life in Athens.
Try these cross-curricular ideas:
- Myth-and-Temple Match: Students draw a card with a Greek myth and design a temple that reflects that story.
- Temple Travel Brochure: After building their model, kids create a brochure “advertising” their temple to ancient visitors.
- Compare and contrast: Have students compare Greek temples with a modern building in their city that uses columns or pediments, then present similarities and differences.
Classroom Management and Mess-Saving Tips
Art plus history plus twenty excited kids can either be magical or chaotic. A few practical strategies keep things leaning toward magical.
- Prep ahead: Pre-cut some basic shapes (triangles for pediments, rectangles for roofs) to save time.
- Use project trays: Give each child or group a tray or large paper plate to hold small pieces and reduce floor confetti.
- Set up “supply stations”: Instead of handing out everything at once, have kids visit a central table to get glue, extra columns, or decorations as needed.
- Build in drying space: Dedicate a shelf or windowsill as the “Acropolis” where finished temples can dry safely.
Conclusion: Turning Kids into Temple Architects
Ancient Greek temples can feel distant and complicated on the page, but once children start building, drawing, and acting them out, everything clicks. Columns become building blocks, pediments become storytelling spaces, and the idea of “architecture” suddenly feels accessible and fun. With simple materials and a bit of planning, you can transform your learning space into a miniature Greece, complete with shoebox Parthenons and straw-column shrines.
The best part? Kids walk away not just with a craft to show off, but with real understanding of how temples worked, what they looked like, and why they mattered. For them, history isn’t just something that happened long agoit’s something they’ve held in their hands, measured with rulers, and covered in glitter glue.
Real-Life Experiences and Tips with Ancient Greek Temple Projects
Teachers and parents who have tried ancient Greek temple art projects tend to say the same thing: the projects look complicated at first, but kids handle them better than adults expect. One fifth-grade teacher started with a quick slideshow of the Parthenon and a few other temples. At first, students only noticed the size. After building their own models from boxes and paper tubes, they started pointing out details insteadhow many steps there were, how the columns lined up, and how the triangle at the top framed the whole building. That shift from “Wow, it’s big” to “Look at how it’s designed” is exactly the kind of learning these projects encourage.
A homeschooling parent described using a shoebox temple project as a capstone to a month-long unit on Greek myths. Each child built a temple dedicated to a favorite deity. One child chose Athena and filled the pediment with tiny drawings of owls and olive branches. Another picked Poseidon and used blue markers and wavy lines across the frieze. During a family “museum night,” the kids walked their parents through the temple models, explaining why each design choice fit their chosen god. Those explanations showed deeper understanding than any multiple-choice quiz could.
In a community center art class, an instructor combined the post-and-lintel cup challenge with a more traditional craft. After kids had tested how many books their cup “temples” could hold, they talked about why columns mattered. Then they switched to building more permanent temples from recycled cardboard. Because they had just seen how structure affects strength, they were more careful about how far apart they placed columns, and more willing to adjust designs when roofs sagged. A few students even experimented with double rows of columns, rediscovering for themselves what ancient architects worked out centuries ago.
If you are planning to try these projects, a few experience-based tips can make the day smoother. First, always build and test one sample temple yourself ahead of time. You do not have to create a masterpiece, but you will quickly spot trouble areas: columns that fall over, roofs that are too heavy, or pediments that slide off. That practice run helps you suggest small tweaks, like adding a wider base or using lighter paper for the roof. Second, consider pairing students so that every child has a “design buddy.” When one builder gets frustrated, the other can hold pieces, offer ideas, or simply remind them that ancient builders did not work alone either.
Finally, remember that the goal is not perfect replicas but joyful engagement. Some temples will lean, some columns will be wildly uneven, and a few pediments will host scenes that look more like comic strips than classical sculpture. That’s fine. These imperfect temples still do the job: they pull kids into the world of ancient Greece in a way that feels playful and personal. When a child proudly carries a cardboard temple home and explains that “these are Ionic columns because they have little curls at the top,” you know the project has done more than fill an hourit has turned history into something they can claim as their own.


