Table of Contents >> Show >> Hide
- First, Know What You’re Cutting (Because Orchids Love Plot Twists)
- Tools, Cleanliness, and the Two-Second Step That Prevents Big Problems
- When to Prune Orchids (Timing Matters More Than Dramatic Music)
- How to Prune Orchid Flower Spikes the Right Way (By Type)
- Phalaenopsis (Moth Orchid): the “rebloom from the same spike” exception
- Cattleya and Oncidium: cut spent spikes, protect pseudobulbs
- Dendrobium: don’t “haircut” canes unless they’re truly dead
- Paphiopedilum (Lady Slipper): cut the spike after bloom, then let it regroup
- Cymbidium: once blooms fade, the stalk can go
- Pruning Leaves and General Cleanup (A.K.A. “What Not to Panic-Cut”)
- How to Prune Orchid Roots During Repotting (Without Causing a Soap Opera)
- Keikis and Propagation Pruning (Bonus: Orchid Babies)
- Post-Pruning Care: What to Do After You’ve Made the Cut
- Common Orchid Pruning Mistakes (So You Don’t Repeat Internet Folklore)
- Quick Reference: “Where Do I Cut?” Mini Cheat Sheet
- Conclusion (Plus of Real-World Pruning “Experiences” People Actually Run Into)
Orchids have a reputation for being “high maintenance,” which is unfair. They’re not difficultjust
particular. Think of them less like a houseplant and more like a tiny, glamorous roommate who will
absolutely file a complaint if you cut the wrong thing.
The good news: pruning orchids is simple once you understand what you’re pruning and
why. This guide walks you through the right cuts for common orchid types (especially the
classic grocery-store Phalaenopsis), how to trim roots safely, what not to cut,
and how to set your plant up to rebloomwithout turning your living room into a plant crime scene.
First, Know What You’re Cutting (Because Orchids Love Plot Twists)
Flower spike vs. root vs. new growth
Most pruning mistakes happen because orchid parts can look annoyingly similar. Before you snip,
identify the “thing” in question:
-
Flower spike (flower stem): Usually grows upward from between leaves (often from a node/“joint” area).
It may be staked and clipped. After blooming, it can stay green, turn yellow, or dry brown. -
Root (including aerial roots): Often silvery when dry and green when wet. It can grow outward and
look like a curious tentacle exploring your bookshelf. -
New growth (sympodial orchids): Cattleyas/Oncidiums/Dendrobiums often push new shoots near the base
(sometimes with new pseudobulbs). These new growths are future bloom factoriesprotect them.
Monopodial vs. sympodial: the pruning “rulebook” depends on this
Orchid pruning changes dramatically based on growth habit:
-
Monopodial orchids (like Phalaenopsis and Vanda) grow upward from a single stem.
Some can rebloom from a green flower spike if trimmed strategically. -
Sympodial orchids (like Cattleya, Oncidium, many Dendrobium, and Cymbidium)
bloom from new growth. Old flower spikes do not rebloomonce done, they’re done.
Tools, Cleanliness, and the Two-Second Step That Prevents Big Problems
Orchids can be vulnerable to infections and viruses spread by dirty tools. The fix is easy:
use a sharp cutting tool and sanitize it.
What you’ll want nearby
- Sharp scissors, pruning snips, or a razor blade (sharp = cleaner cut = faster healing)
- Isopropyl alcohol (70% is fine) and paper towels or cotton pads
- Disposable gloves (optional, but nice if you hate plant sap on your fingers)
- Cinnamon powder (optional, common hobbyist “drying” aid for small cutsuse sparingly and keep it off living roots)
How to sanitize tools quickly
- Wipe blades with alcohol before you start.
- If you’re cutting anything that looks diseased, wipe again between cuts.
- Let blades air-dry for a few seconds (alcohol works fast).
This isn’t paranoiait’s basic plant hygiene. Orchids would absolutely wear a tiny lab coat if they could.
When to Prune Orchids (Timing Matters More Than Dramatic Music)
The best time to prune most orchids is right after blooming ends or during
repotting, when you’re already inspecting roots. Many orchids enter a rest phase after flowering.
That’s normal, and it’s often when cleanup cuts make the most sense.
- After blooming: Remove spent flowers and decide what to do with the flower spike.
- During repotting: Trim dead/rotted roots and remove dead plant material.
- Anytime: Remove mushy, black, or clearly diseased tissue (carefully, with sanitized tools).
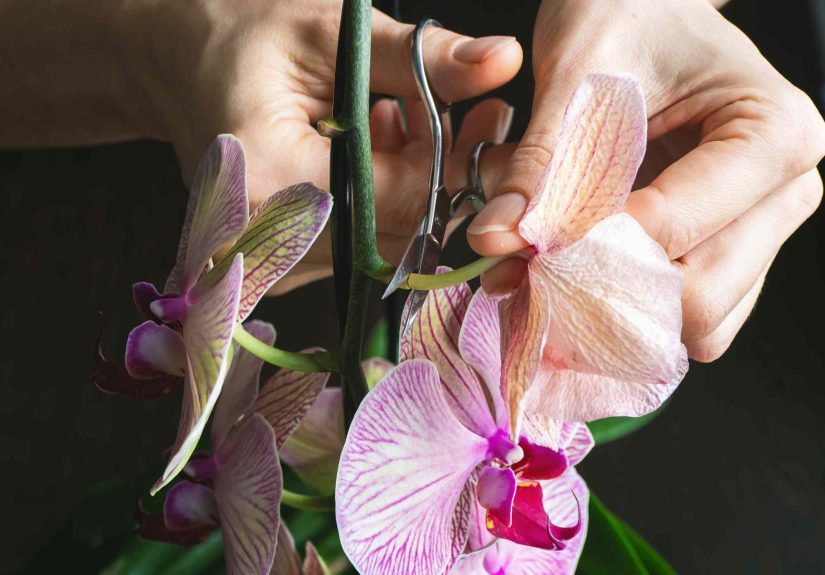
How to Prune Orchid Flower Spikes the Right Way (By Type)
Phalaenopsis (Moth Orchid): the “rebloom from the same spike” exception
Phalaenopsis are the most common indoor orchids in the U.S., and they’re famous for one special feature:
they can sometimes rebloom from an existing green spike. You typically have two pruning options
once the flowers drop.
Option A: Keep the spike and trim above a node (faster, smaller encore bloom)
If the spike is still green and healthy, you can trim it back to encourage a secondary branch.
Look for the little “bump” joints on the spikethose are nodes.
- Find an unused node below where the last flower bloomed.
- Make your cut just above a node (often recommended around the lower nodes, such as above the second node, depending on spike length and remaining nodes).
- Stake the remaining spike if it flops, then resume normal care.
This approach can produce blooms sooner, but they may be fewer or smaller. Think of it as a “bonus track,” not a full album.
Option B: Cut the spike to the base (slower, often stronger next bloom cycle)
If the spike is turning yellow, brown, or papery, or you want the plant to focus on roots and leaves,
cut the spike down close to where it emerges (near the plant’s base).
- Follow the spike down to where it starts.
- Cut cleanly, leaving a small stub (don’t gouge the main stem).
- Keep water out of the crown (the center where leaves meet) while the cut dries.
Many growers prefer this for long-term plant strengthespecially if the orchid is small, stressed, or recovering.
Cattleya and Oncidium: cut spent spikes, protect pseudobulbs
These are sympodial orchids. Translation: they don’t rebloom from old spikes. After flowers fade:
- Cut the spent flower spike close to its origin without damaging the pseudobulb or rhizome.
- Do not remove healthy pseudobulbseven old ones store water and energy.
Dendrobium: don’t “haircut” canes unless they’re truly dead
Many Dendrobiums store energy in their canes. Even if a cane has finished blooming, it may still help the plant.
Generally:
- Remove the spent flower stem if it’s clearly finished.
- Keep canes that are firm/greenish (or even leafless but still plump).
- Remove canes only if they’re brown, shriveled, and dead.
Paphiopedilum (Lady Slipper): cut the spike after bloom, then let it regroup
Paphiopedilums typically bloom for weeks, then the spike can be cut down after flowering is done.
Keep the plant in steady care afterwardthis type often focuses on growth before the next bloom cycle.
Cymbidium: once blooms fade, the stalk can go
Cymbidiums bloom on spikes that are meant to be temporary. When the flowers are finished, you can cut the stalk down near the base.
Pruning Leaves and General Cleanup (A.K.A. “What Not to Panic-Cut”)
A classic new-orchid-owner move is to remove green leaves because the plant “looks messy.”
Don’t. Healthy leaves are how orchids make energy.
Safe leaf rules
- Keep: Firm, green leaveseven if slightly imperfect. They’re the plant’s power supply.
- Remove: Leaves that are fully yellow and detach easily, or leaves that are clearly diseased (black, mushy, spreading spots).
- Never: Tear leaves off the crown. If something doesn’t come away gently, leave it.
If you must remove a damaged leaf, cut it away carefully and avoid cutting into healthy crown tissue.
How to Prune Orchid Roots During Repotting (Without Causing a Soap Opera)
Root pruning sounds scary, but it’s mostly about removing what’s already gone. Many reputable orchid care guides recommend repotting periodically (often around every couple of years, depending on media breakdown and root growth). A smart rule:
repot after blooming when possible, so you’re not disturbing buds and flowers.
Step-by-step root trimming
- Slide the orchid out of the pot and gently remove old media (bark/moss). If roots are stuck, don’t yankmassage the media away.
- Rinse or lightly mist roots to see what you’re working with.
- Identify healthy roots: They should feel firm. Many look silvery when dry and turn green when wet. (Color varies by type and growing conditions.)
- Identify dead/rotted roots: Mushy, hollow, or “brown string” roots that collapse when pinched are typically goners.
- Trim only the dead parts with sterilized snips. Make clean cuts back to firm tissue.
- Let cuts dry briefly before repotting. If you use a drying aid like cinnamon, apply it lightly to small surface cuts (avoid coating live roots).
- Repot in fresh orchid mix suited to your orchid type, using a pot with good drainage.
How much root is “too much” to remove?
If you’re trimming and suddenly feel like you’re giving the orchid a buzz cut, pause. In general, you want to preserve as many firm, functioning roots as possible.
If most roots are compromised, focus on removing only what’s mushy and leave borderline-but-firm roots to recover.
Keikis and Propagation Pruning (Bonus: Orchid Babies)
Some orchidsespecially Phalaenopsis, Vanda, and certain Dendrobiumscan produce a keiki
(Hawaiian for “baby”) on a spike or cane. It’s adorable. It’s also not ready for college immediately.
When to separate a keiki
A common guideline is to wait until the keiki has multiple leaves and roots that are a couple of inches longenough to support itself. If you separate too early, it may struggle because it can’t hydrate properly.
How to remove it safely
- Sanitize your blade.
- Cut the keiki free with a small section of the spike/cane attached if needed (don’t slice through its roots).
- Pot it into a small container with appropriate media, keep humidity slightly higher, and avoid waterlogging.
Post-Pruning Care: What to Do After You’ve Made the Cut
Pruning is not the finish lineit’s the reset button. After pruning, your goal is to help the orchid recover and build energy for the next bloom cycle.
Light
Bright, indirect light is usually the sweet spot for common indoor orchids (especially Phalaenopsis). Too dark slows recovery. Too bright can scorch leaves.
Water (the “don’t drown it, don’t dehydrate it” middle ground)
- Let media approach dryness before watering again (bark dries faster than moss).
- Don’t let the pot sit in standing water.
- If you’re unsure, look at the roots (silvery often means “dry,” greener often means “hydrated,” especially for Phals).
Fertilizer
During active growth, many growers use a diluted orchid fertilizer on a schedule (often “weakly, weekly” in spirit).
Avoid heavy feeding right after stressful repotting or if the plant is restingmore isn’t more; it’s just salt buildup with confidence.
Airflow
Gentle airflow helps prevent rot and fungal issuesespecially after you’ve made cuts. You don’t need a wind tunnel, just a non-stagnant spot.
Common Orchid Pruning Mistakes (So You Don’t Repeat Internet Folklore)
-
Cutting green aerial roots because they look “messy”: Those roots help the plant breathe and drink.
Let them live their best life. - Using unclean scissors: One dirty blade can spread problems fast.
-
Cutting all spikes the same way: Phalaenopsis can rebloom from old spikes; many others won’t.
Know your orchid type. - Over-pruning during repotting: Remove dead roots, yes. But keep firm rootseven if they’re not perfect.
- Letting water sit in the crown after cutting: This can invite crown rot in some orchids. Water around the media, not into leaf joints.
Quick Reference: “Where Do I Cut?” Mini Cheat Sheet
- Phalaenopsis spike green: Trim above a node for a possible quick rebloom, or cut to base for stronger long-term recovery.
- Phalaenopsis spike brown/yellow: Cut to the base.
- Cattleya/Oncidium: Cut spent spike to base; keep pseudobulbs.
- Dendrobium: Remove spent flower stems; keep firm canes unless truly dead.
- Paphiopedilum: After bloom ends, cut spike down and continue steady care.
- Cymbidium: After blooms fade, cut the stalk to the base.
Conclusion (Plus of Real-World Pruning “Experiences” People Actually Run Into)
Pruning orchids the right way isn’t about being fearless with scissorsit’s about making
intentional cuts that match your orchid’s growth style. When you remove what’s spent (old spikes, dead roots, yellow leaves),
you’re helping the plant redirect energy into the parts that matter: healthy roots, sturdy leaves, and the next bloom cycle.
Now, let’s talk about the real-life situations orchid owners commonly experiencebecause the “perfect” pruning diagram rarely shows the part where your orchid is leaning like it paid rent and owns the place.
Experience #1: The “Is that a root or a spike?” moment. Many people swear they can tell the differenceuntil the day they can’t.
A Phalaenopsis spike often looks flatter, with little node bumps, and it tends to reach upward with purpose. Roots are rounder, often silvery, and sometimes they grow sideways like they’re trying to escape the pot. The practical lesson:
when you’re unsure, wait a week. A spike becomes obvious as it elongates and heads for the light; a root usually keeps that blunt, rounded tip and starts doing root things (like clinging to anything within reach).
Experience #2: The “I cut the green spike and now I feel guilty” saga. This happens constantly with Phalaenopsis. The truth is: cutting a green spike isn’t automatically “wrong.”
If your plant needs recoveryfew leaves, weak roots, or it’s newly repottedcutting to the base can be a smart choice. The orchid may reward you later with a stronger spike.
The mental shift that helps: you didn’t “ruin a bloom,” you rebalanced the plant.
Experience #3: The surprise keiki that turns your orchid into a proud parent. People get excited and want to separate it immediately. But keikis need time to develop roots long enough to hydrate independently.
The common success story looks like this: you wait, you keep caring for the mother plant, the keiki adds leaves and roots, and then you separate it with a sterile blade when it’s robust enough. The common failure story:
separation happens too early, roots get damaged, and the keiki struggles. Patience here isn’t just a virtueit’s a survival strategy.
Experience #4: The “root pruning panic” during repotting. Many owners pull an orchid out of a pot and feel personally attacked by what they see:
moss packed too tightly, some mushy roots, some shriveled roots, and one root that’s apparently thriving out of spite. The best real-world approach is a calm triage:
remove only what’s clearly dead (mushy, hollow, collapsing), preserve what’s firm, and repot in fresh media that matches your watering habits.
Over-pruning often backfires because roots are how orchids drinkif you remove too much, recovery slows.
Experience #5: The “Why won’t it rebloom?” waiting game. After pruning, owners expect instant resultslike the orchid should clap and produce flowers on demand.
In reality, orchids often need a recharge period. Many do best with consistent bright, indirect light, appropriate watering, and gentle feeding during active growth.
If your plant is growing new roots or leaves, that’s progresseven if it’s not Instagram-famous yet.
If you take only one thing from this guide, let it be this: prune with a reason.
A clean tool, a clear goal (rebloom sooner vs. rebuild strength), and an understanding of your orchid type will keep you from making the two classic mistakescutting too much, or cutting the wrong thing.
Your orchid doesn’t need perfection. It needs consistency, good light, and you resisting the urge to “fix” healthy green parts.


