Table of Contents >> Show >> Hide
- Why rotating or flipping images in Word matters more than people think
- Way 1: Use the rotation handle for quick, visual control
- Way 2: Use the Rotate menu for fast 90-degree turns and instant flips
- Way 3: Use More Rotation Options for exact angles
- Troubleshooting: why your image will not cooperate
- Best practices for cleaner, more professional image formatting in Word
- Real-world experiences: what people usually run into when rotating or flipping images in Microsoft Word
- Final thoughts
If you have ever dropped a photo into Microsoft Word and thought, “Why is this thing leaning like it had a rough weekend?” you are not alone. One crooked screenshot, upside-down logo, or backward product photo can make an otherwise polished document look strangely chaotic. The good news is that Word already has the tools you need to fix it. No separate photo editor, no dramatic sighing, no tech support group chat required.
Whether you are formatting a school report, building a business flyer, designing a handout, or trying to make a recipe card look less like a ransom note, learning how to rotate or flip images in Microsoft Word is one of those small skills that saves a surprising amount of time. It also makes your document look more intentional, which is a fancy way of saying, “People can tell you knew what you were doing.”
In this guide, you will learn three easy ways to rotate or flip images in Microsoft Word, when each method works best, and how to avoid the common mistakes that make pictures jump, tilt, or rebel. We will also cover practical examples, troubleshooting tips, and real-world experiences so you can use these tools with confidence instead of random clicking and hope.
Why rotating or flipping images in Word matters more than people think
At first glance, rotating a picture in Word sounds like a tiny task. It is. But it is also the kind of tiny task that affects the whole look of a document. A photo aligned at the right angle can make a tutorial easier to follow. A flipped image can help create a mirrored graphic for labels, iron-on transfers, or design mockups. A precisely rotated diagram can make a report look clean and professional instead of “assembled five minutes before the deadline.”
Word is not Photoshop, and that is perfectly fine. It is built for practical formatting, not cinematic image wizardry. But for everyday editing, especially inside documents, the built-in image tools are usually more than enough. The trick is knowing which method to use for speed, which one to use for precision, and which one to use when you want a true mirror effect instead of a simple turn.
Way 1: Use the rotation handle for quick, visual control
What this method is best for
If you want to straighten a slightly crooked image, tilt a photo for visual style, or adjust a picture until it “just looks right,” the rotation handle is the easiest method. It is fast, intuitive, and perfect when precision to the exact degree is not your top priority.
How to rotate an image with the handle
- Insert your image into the Word document.
- Click the image once so it is selected.
- Look for the circular rotation handle above the picture.
- Click and drag the handle left or right to rotate the image.
- Release the mouse when the picture reaches the angle you want.
This is the most visual way to rotate a picture in Word because you can watch the image turn in real time. It is especially useful when you are working with photos, screenshots, or decorative graphics and you care more about appearance than exact measurements.
Pro tip: use small movements
The biggest mistake people make with the rotation handle is dragging too far, too fast, and then spending the next ten seconds chasing the correct angle like they are trying to park a boat in a narrow canal. Use gentle mouse movements. Tiny adjustments usually produce the cleanest results.
For example, if you are adding a photo of a whiteboard to meeting notes and it looks just a little crooked, the handle is ideal. You can nudge it into place visually without opening extra menus. This keeps your workflow quick and your blood pressure normal.
When to choose this option
Use the rotation handle when you are:
- straightening a slightly tilted image
- adding a casual angle to a flyer or poster
- formatting a newsletter with a more dynamic layout
- working quickly and do not need exact degrees
It is the easiest “fix it right now” option, and honestly, that is why so many Word users rely on it first.
Way 2: Use the Rotate menu for fast 90-degree turns and instant flips
What makes this method so useful
The Rotate menu is your best friend when you need clean, predictable changes. Instead of dragging by eye, you can tell Word exactly what to do: rotate left, rotate right, flip horizontally, or flip vertically. This is the method to use when you want speed and consistency.
How to find the Rotate menu
- Click the image to select it.
- Open the Picture Format tab in the Ribbon.
- Find the Rotate option.
- Choose one of the available commands.
The four commands you will use most
Rotate Right 90° turns the image clockwise. This is perfect for a phone photo that was inserted sideways.
Rotate Left 90° turns the image counterclockwise. Same problem, opposite fix. Word believes in balance.
Flip Horizontal creates a mirror image from left to right. This is useful for mirrored graphics, visual symmetry, or iron-on transfer designs that need to print backward before application.
Flip Vertical turns the image upside down from top to bottom. This is less common, but it can help with diagrams, design experiments, or correcting oddly oriented art.
Rotate versus flip: they are not the same thing
This part matters. A lot of people say they want to “rotate” an image when they actually want to flip it. Rotation changes the angle. Flipping creates a mirrored or inverted version. If you are trying to make text or a logo appear backward like a reflection, rotating the image will not do the job. You need Flip Horizontal.
Think of it like this: rotating changes the direction the picture faces. Flipping changes the side that is visible. One is a turn. The other is a mirror trick.
Practical examples
Let’s say you inserted a scanned receipt and it appears sideways. Use Rotate Right 90° or Rotate Left 90°. Done in two seconds.
Now imagine you are designing an iron-on graphic for a T-shirt. The image needs to be mirrored before printing so it transfers correctly. In that case, Flip Horizontal is the command you want. This is one of the most practical and overlooked uses of Word’s image tools.
Or maybe you are placing two product photos side by side and want one to mirror the other for visual balance in a brochure. Again, Flip Horizontal saves the day.
A common mix-up to avoid
Do not confuse page orientation with image rotation. Changing the page from portrait to landscape affects the document page, not the picture itself. If the image looks wrong, fix the image. If the whole page looks wrong, fix the page layout. Different problem, different button, same opportunity for accidental chaos.
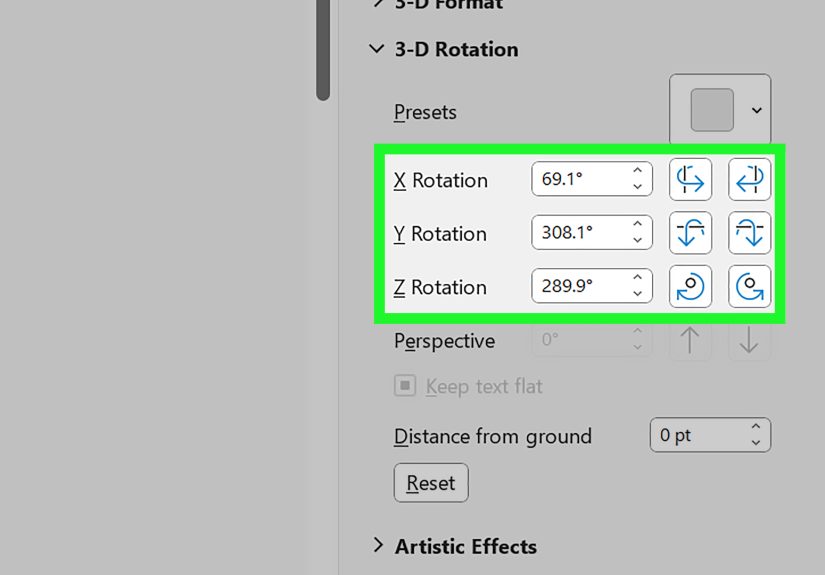
Way 3: Use More Rotation Options for exact angles
Why exact rotation matters
Sometimes “close enough” is not enough. If you are building a polished report, placing diagrams, aligning design elements, or formatting screenshots for a training manual, you may want the picture rotated to an exact angle like 15°, 30°, or 180°. This is where More Rotation Options becomes the grown-up tool in the room.
How to rotate an image by exact degrees in Word
- Select the image.
- Go to Picture Format.
- Choose Rotate.
- Click More Rotation Options.
- Enter the precise degree you want in the rotation box.
- Apply the change and review the result.
This method gives you controlled, repeatable results. If you need multiple images tilted the same way, using exact degrees is much smarter than trying to drag each one by hand and pretending your eyes are laser-calibrated. They are not. Mine are not either.
When exact degree rotation is the smartest choice
Use exact rotation when you are:
- matching the angle of several graphics in one layout
- building branded documents with strict design consistency
- aligning screenshots in tutorials or training content
- turning an image exactly 180° instead of guessing with the mouse
- creating neat, evenly tilted visual callouts
A specific example
Picture a user guide with three screenshots that each need to tilt slightly for a polished editorial look. If one is rotated 12°, the next 18°, and the third “somewhere in the neighborhood of 15°,” your page will feel subtly off. Exact rotation fixes that. It helps documents look intentionally designed instead of accidentally assembled.
Troubleshooting: why your image will not cooperate
You cannot see the Picture Format tab
This usually means the image is not selected. Click it once. If necessary, click the image border rather than the empty space around it. Word can be particular, and yes, that is the polite version.
You cannot find the Rotate button
On smaller screens or narrower windows, Ribbon commands can collapse. Expand the window or look in the Arrange group. Sometimes the button is there, just hiding like it owes you money.
The image moves awkwardly after rotating
This is often a text wrapping issue rather than a rotation issue. After you rotate the picture, check its layout or wrap settings. If text starts behaving strangely around the image, adjust wrapping so the picture sits where you actually want it.
The image still looks wrong after rotation
Make sure you are using the correct action. If you need a mirrored image, do not keep rotating it in circles. Use Flip Horizontal. If the image is upside down, use Flip Vertical or rotate it 180°.
Your text looks odd after flipping
If the image contains readable text, flipping it can make the words backward. That may be perfect for a transfer design, but not for a normal document. Always preview text-based graphics after flipping them so you do not accidentally create a brochure that looks like it was designed for a mirror dimension.
Best practices for cleaner, more professional image formatting in Word
First, rotate after inserting and sizing the image. If you resize first and rotate second, it is often easier to judge the final placement.
Second, keep consistency in mind. If one image on a page is tilted for style, think carefully before tilting six more at random. A little angle adds personality. Too many angles create visual turbulence.
Third, use flips with intention. Mirroring a photo can be useful, but it can also subtly change meaning. A logo, a directional sign, or a photo with visible text may look incorrect after a flip. Always double-check.
Fourth, use exact rotation for formal documents. Visual approximation is fine for casual layouts, but when you are preparing client materials, school submissions, or business documents, precision makes the page feel cleaner.
Finally, preview your document before sharing or printing. Images that looked fine while editing can sometimes feel too tilted, too large, or poorly positioned once the whole page is visible.
Real-world experiences: what people usually run into when rotating or flipping images in Microsoft Word
One of the most common experiences with rotating images in Word starts with a simple insert. You add a photo from your phone, expect it to appear upright, and instead Word drops it onto the page sideways like it just ignored gravity. Most people do the same thing at first: they resize the image, drag it around, click random tabs, and then finally discover that the fix was a 90-degree turn the whole time. It is a classic Word moment. The task is easy once you know it, but weirdly mysterious until then.
Another very common experience happens with screenshots. Someone is building a tutorial, a school assignment, or an internal company guide. The screenshots are technically correct, but one of them is a little crooked because it was copied from a camera photo or from a scan. At that point, the rotation handle becomes the hero. Not because it is fancy, but because it lets the user make a quick visual adjustment without leaving the document. That matters when you are editing on a deadline and do not want to open three more apps just to fix one image.
Then there is the flip confusion, which deserves its own tiny trophy. Many users say they want to rotate an image when what they actually want is a mirror effect. This shows up all the time with craft templates, iron-on shirt designs, classroom handouts, and logos placed on mockups. They keep rotating the picture 90 degrees, then 180 degrees, then back again, wondering why the graphic still is not mirrored. The moment they discover Flip Horizontal, everything clicks. It is one of those “Ohhh, so that is what this button is for” experiences.
People also run into layout surprises after rotating a picture. The image itself looks great, but suddenly the text wraps in a strange way, leaves awkward gaps, or shifts the page balance. That is when Word reminds you that picture formatting is not just about the image. It is also about where the image lives on the page. In real use, rotating and wrapping often go together. Once users understand that, their documents get much cleaner.
There is also the perfectionist experience, and yes, it is real. Some users want every graphic tilted at exactly the same angle in a flyer, portfolio, or branded report. Eyeballing the result with the mouse feels close, but not close enough. That is where exact degree rotation becomes incredibly satisfying. When everything lines up the same way, the document suddenly feels polished. Not louder. Not flashier. Just more intentional.
And finally, there is the quiet confidence that comes after learning these tools. Once people know the difference between rotate, flip, and exact rotation options, Word becomes much less annoying. They stop treating image formatting like a guessing game and start using it like a practical tool. That may not sound glamorous, but in everyday work, school, and content creation, that kind of confidence is worth a lot. It saves time, reduces frustration, and keeps you from muttering at your screen over a photo that is upside down for absolutely no good reason.
Final thoughts
If you want the simplest answer to how to rotate or flip images in Microsoft Word, here it is: use the rotation handle for quick visual tweaks, the Rotate menu for fast 90-degree turns and flips, and More Rotation Options when exact angles matter. That is the whole system. Once you know which tool matches which job, image formatting in Word becomes surprisingly painless.
So the next time a picture lands in your document sideways, backward, or just a little emotionally unstable, you will know exactly what to do. And that, in the world of Microsoft Word, is a beautiful thing.


