Table of Contents >> Show >> Hide
- What Is a Pony Bead Bracelet?
- What You Need to Make a Pony Bead Bracelet
- How to Make a Pony Bead Bracelet: 9 Easy Steps
- Step 1: Pick Your Beads and Your Color Theme
- Step 2: Measure Your Wrist
- Step 3: Cut the Stretch Cord
- Step 4: Pre-Stretch the Cord
- Step 5: Secure One End and Start Stringing
- Step 6: Check the Fit Before You Finish
- Step 7: Leave a Little Space for Tying
- Step 8: Tie a Secure Knot
- Step 9: Trim the Ends and Hide the Knot
- Tips to Make Your Pony Bead Bracelet Look Better and Last Longer
- Common Mistakes to Avoid
- Fun Pony Bead Bracelet Ideas to Try Next
- Why This Craft Never Really Goes Out of Style
- Experiences and Real-Life Lessons From Making Pony Bead Bracelets
- Final Thoughts
If you have a pile of colorful pony beads, a piece of stretchy cord, and the sudden urge to make something cute in under an hour, congratulations: you are already halfway to bracelet glory. A pony bead bracelet is one of the easiest DIY jewelry projects for beginners, but it still leaves plenty of room for creativity. You can make it bright, pastel, sporty, personalized, striped, smiley, or gloriously chaotic in a way that somehow still works.
This guide walks you through exactly how to make a pony bead bracelet in 9 easy steps, with practical tips to help it fit well, last longer, and avoid the classic beginner disasters. You know the ones: beads rolling off the table, a bracelet that only fits a hamster, or a knot that gives up on life five minutes after you put it on.
Whether you are making a DIY pony bead bracelet for yourself, a kids’ craft project, a party activity, or a stack of friendship bracelets to hand out like tiny colorful trophies, this beaded bracelet tutorial will help you get it right.
What Is a Pony Bead Bracelet?
A pony bead bracelet is a simple bracelet made by stringing large-hole plastic beads onto elastic cord or another type of string. Pony beads are popular because they are lightweight, easy to handle, and available in a ridiculous number of colors. In other words, they are the craft-world equivalent of a candy aisle: hard to leave alone and weirdly exciting.
Because the beads are larger than seed beads and easier to grip, pony bead jewelry is especially beginner-friendly. That makes it a favorite for kids, teens, teachers, camp leaders, parents, and adults who just want a relaxing craft that does not involve reading a 17-page instruction manual.
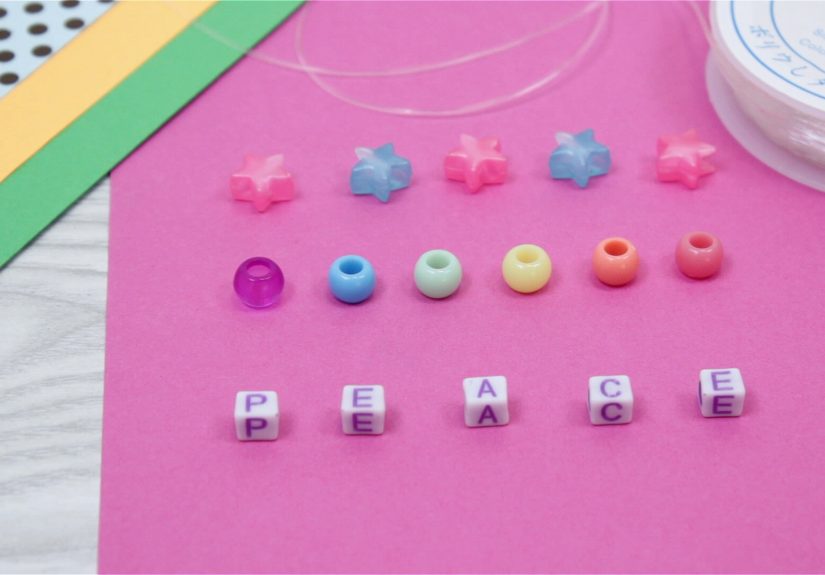
What You Need to Make a Pony Bead Bracelet
- Pony beads in your favorite colors
- Stretch cord or elastic jewelry cord
- Scissors
- Ruler or soft measuring tape
- Small binder clip, bead stopper, or tape
- Optional: alphabet beads, charms, clear-drying jewelry glue
If you are brand-new to bracelet making, stretchy cord is the easiest choice because it slips on and off without a clasp. That means fewer tools, fewer moving parts, and fewer opportunities to stare at a tiny metal finding and whisper, “What am I even supposed to do with this?”
How to Make a Pony Bead Bracelet: 9 Easy Steps
Step 1: Pick Your Beads and Your Color Theme
Start by choosing the look of your bracelet. This sounds simple, but it sets the whole mood. Do you want a rainbow bracelet, a name bracelet, a school-color bracelet, or something that looks like summer in bead form?
Some easy pattern ideas include:
- Alternating two colors
- Rainbow order
- Pastel mix
- Black and neon contrast
- Alphabet beads spelling a name or phrase
- Symmetrical pattern with the same colors mirrored on both sides
If you are making several bracelets, lay out a few bead combinations first. This saves time and keeps you from getting halfway through and realizing your “carefully planned design” is actually just random orange chaos.
Step 2: Measure Your Wrist
Wrap a measuring tape around your wrist where you want the bracelet to sit. A snug wrist measurement is a good starting point, but your finished bracelet should be slightly larger for comfort. For many people, bracelet sizing falls around small, medium, or large wrist ranges, but the best approach is to measure your actual wrist instead of guessing.
If you do not have a measuring tape, wrap a piece of string around your wrist, mark the spot, and then measure the string with a ruler. Old-school, effective, and zero drama.
Step 3: Cut the Stretch Cord
Cut a piece of stretch cord that is a few inches longer than your wrist measurement. That extra length gives you room to string the beads, hold the ends, and tie a secure knot without turning the final step into a wrestling match.
For example, if your bracelet will finish around 7 inches, cut significantly more than 7 inches of cord so you have tying room. Extra cord is your friend. Running out of cord when the bracelet is basically finished is not a character-building moment. It is just annoying.
Step 4: Pre-Stretch the Cord
This is the step many beginners skip, and then later they wonder why the bracelet starts sagging after a few wears. Gently stretch the elastic cord along its length before adding beads. Do not yank it like you are starting a lawn mower. Just give it a few gentle pulls.
Pre-stretching helps reduce loosening later, which makes your pony bead bracelet hold its shape better over time. It is a tiny step with a big payoff.
Step 5: Secure One End and Start Stringing
Clip, tape, or otherwise secure one end of the cord so the beads do not slide right off and scatter across the floor like confetti with an attitude. Then start threading your pony beads onto the cord in the pattern you planned.
If you are adding alphabet beads, place them near the center of the design. If your bracelet has a symmetrical pattern, build outward evenly from that center point. This is also a good time to decide whether you want spacer beads, charms, or special accent colors.
Most standard pony bead bracelets use a simple one-strand design, which keeps the project quick and easy. If you are aiming for a chunky look, you can use more beads or mix in a few larger focal beads.
Step 6: Check the Fit Before You Finish
Once most of the beads are on the cord, wrap the bracelet around your wrist to check the fit. This is important because the exact number of beads depends on bead size, cord thickness, and how snug or loose you want the bracelet.
A bracelet made with standard pony beads may need around 20 beads for a medium wrist, but that is only an estimate. Always test the fit instead of relying on bead math alone. Your wrist does not care what the estimate said.
If the bracelet feels tight, add a few more beads. If it looks too loose, remove a few. You want it comfortable enough to move, but not so loose that it slides halfway to your elbow every time you reach for a snack.
Step 7: Leave a Little Space for Tying
When the bracelet is the right size, stop stringing before the cord is packed completely full. Leave enough bare elastic at both ends to tie the knot comfortably. This makes the finishing step much easier and helps you tighten the knot properly.
If you overfill the bracelet with beads, the knot area becomes cramped, bulky, and harder to secure. It also increases the odds that you will mutter something dramatic at your craft table.
Step 8: Tie a Secure Knot
Bring the two ends together and tie a firm knot. Many jewelry makers prefer a secure knot style such as a surgeon’s knot for stretch bracelets because it helps the elastic stay tight. Pull slowly and evenly so the bracelet holds its shape and the beads stay snug without stretching the cord too much.
If you want extra security, add a tiny dab of clear-drying jewelry glue to the knot. Use only a small amount. This is a bracelet, not a home renovation project.
Step 9: Trim the Ends and Hide the Knot
After the knot is secure, trim the excess cord carefully. If one of your beads has a hole large enough, slide the knot inside the bead to hide it. This gives the bracelet a cleaner finish and makes it look more polished.
Then give the bracelet a gentle stretch test. Not a full superhero test, just enough to make sure the knot is holding. If everything looks good, you are done. Your DIY pony bead bracelet is ready to wear, stack, gift, or admire like the masterpiece it is.
Tips to Make Your Pony Bead Bracelet Look Better and Last Longer
- Use the thickest stretch cord that fits your bead holes. Thin cord can work, but sturdier elastic often lasts longer.
- Plan your pattern before stringing. A quick bead layout saves time and helps avoid weird color placement.
- Do not overstretch the elastic. Too much tension can weaken the bracelet over time.
- Keep the knot small but secure. A bulky knot can be harder to hide.
- Store bracelets flat. Tossing them into a crowded drawer with heavy jewelry is not exactly a spa day for elastic cord.
Common Mistakes to Avoid
Using too little cord
This is the number-one beginner mistake. Always give yourself extra cord for tying. “I can probably make this work” is not a reliable bracelet-making strategy.
Skipping the fit check
Even a pretty pattern is not helpful if the bracelet does not fit. Always wrap it around the wrist before tying the knot.
Ignoring bead order
A random design can be fun, but accidental randomness is different from intentional randomness. Lay out the beads first if you want a polished result.
Cutting the cord too soon
Wait until the knot is secure before trimming anything. Scissors are helpful right up until they become agents of regret.
Fun Pony Bead Bracelet Ideas to Try Next
- Name bracelets: Use alphabet beads for names, nicknames, or short phrases.
- Holiday bracelets: Red and green for Christmas, orange and black for Halloween, red-white-and-blue for summer celebrations.
- Team spirit bracelets: Match school or sports team colors.
- Best friend bracelets: Make two with reversed colors for a matching set.
- Stacking bracelets: Create several thin bracelets instead of one chunky design.
If you are crafting with kids, pony beads also work well for group activities, rainy-day projects, party tables, classroom crafts, and camp sessions. They are easy to sort, easy to thread, and colorful enough to keep attention longer than many other simple crafts.
Why This Craft Never Really Goes Out of Style
There is something satisfying about pony bead jewelry that fancier crafts sometimes forget. It is affordable, tactile, low-pressure, and playful. You do not need advanced skills, expensive tools, or a design degree. You just need a few supplies and a willingness to experiment.
That is part of the reason pony bead bracelets remain popular year after year. They are simple enough for beginners, customizable enough for creative people, and nostalgic enough to make adults say, “Wait, I used to make these all the time.” Then they sit down and make three more.
Experiences and Real-Life Lessons From Making Pony Bead Bracelets
One of the best things about learning how to make a pony bead bracelet is that the project teaches you more than just how to string beads. It teaches patience, planning, and how quickly your “simple little craft” can become a full-blown obsession with color palettes. You start with one bracelet in mind, and suddenly you are sorting beads into tiny rainbow families like a very committed jewelry librarian.
For beginners, the first bracelet is usually a mix of excitement and mild chaos. The colors look amazing on the table, but once they are on the cord, something feels off. Maybe the pattern is uneven. Maybe the alphabet beads are upside down. Maybe the bracelet somehow ends up big enough for an ankle. That is normal. In fact, it is part of the fun. The first attempt teaches you what works, and the second one usually looks noticeably better.
Many people discover that pony bead bracelet making becomes more enjoyable once they stop trying to make it perfect. The bracelets that get the most compliments are not always the most technically polished ones. Sometimes it is the bright, goofy, slightly unhinged color combinations that people love most. There is a lot of charm in a bracelet that feels handmade in the best possible way.
Another common experience is how relaxing the process becomes. Stringing beads one at a time can be surprisingly calming, especially after a long day of screens, noise, and general life chaos. It is repetitive without being boring, creative without being stressful, and productive without requiring a huge block of time. You can finish one bracelet in a short sitting and still get that satisfying “I made something” feeling.
If you make bracelets with kids, the experience changes again in the best way. Kids often care less about symmetry and more about excitement. They will pair neon green with glitter pink and call it the best bracelet ever made. Honestly, sometimes they are right. Bracelet making with children can also turn into a great conversation activity because hands stay busy while everyone talks, laughs, trades beads, and proudly shows off their finished work.
For adults, pony bead bracelets often tap into nostalgia. They bring back camp crafts, childhood summers, friendship bracelets, and the era when making something colorful felt like a major accomplishment. Revisiting that craft as an adult can be oddly satisfying. You get the fun of the original project, plus the bonus of better scissors and slightly improved decision-making.
People also love making pony bead bracelets as gifts because they feel personal without being expensive. A bracelet in someone’s favorite colors, with their initials or a tiny message, feels thoughtful in a way store-bought accessories sometimes do not. It says, “I made this for you,” which is sweet. It also says, “I spent time choosing these beads,” which is basically the crafting version of a love language.
In the end, the experience of making pony bead bracelets is really about small wins. You choose colors you love, turn loose supplies into something wearable, and finish with a project you can actually use. That is a nice feeling. And if the first one is a little crooked or the knot is not glamorous? Fine. Make another. Pony beads are forgiving, and practice is just a very respectable excuse to buy more colors.
Final Thoughts
Now that you know how to make a pony bead bracelet in 9 easy steps, you have everything you need to start creating colorful, fun, beginner-friendly jewelry at home. This is one of those rare crafts that is simple enough to start immediately but flexible enough to keep getting more creative the longer you do it.
So grab your beads, cut your cord, and make one bracelet. Then probably another. And maybe five more after that. Pony bead projects have a sneaky way of turning “just one quick craft” into a whole collection.


