Table of Contents >> Show >> Hide
- Why Homeowners Remove Granite Counters and Rehang Cabinets
- Safety First: Granite Is Not a Sheet of Plywood
- Tools and Materials You May Need
- Step 1: Clear and Inspect the Kitchen
- Step 2: Disconnect Plumbing, Appliances, and Fixtures
- Step 3: Score Caulk and Adhesive Lines
- Step 4: Remove Screws and Hidden Fasteners
- Step 5: Lift and Remove the Granite Countertop
- Step 6: Assess the Cabinets Before Rehanging
- Step 7: Mark Studs and Layout Lines
- Step 8: Use a Ledger Board for Upper Cabinets
- Step 9: Shim, Level, Plumb, and Secure
- Step 10: Reconnect Cabinets and Prepare for Countertops
- Common Mistakes to Avoid
- When to Hire a Professional
- Maintenance After the Project
- Conclusion
- Extra Field Notes: Real-World Experiences From Cabinet and Granite Projects
Rehanging cabinets and removing granite counters sounds like the kind of weekend project that begins with confidence, a fresh cup of coffee, and the phrase, “How hard could it be?” Then the granite refuses to move, one cabinet is hanging on by a mystery screw from 1998, and someone asks whether the wall is supposed to look like that. The good news: this project can be planned, organized, and handled safely when you understand the order of work, the weight of the materials, and the small details that keep a kitchen renovation from turning into a sitcom episode.
This guide walks through the practical side of removing granite countertops, preparing cabinets for rehanging, leveling and securing cabinet boxes, and avoiding the most common mistakes homeowners make during a kitchen refresh. It is written for readers who want clear, realistic guidancenot magical makeover talk. Granite is heavy. Cabinets need solid support. Walls are rarely perfect. But with patience, proper tools, and a healthy respect for gravity, the project becomes much less intimidating.
Why Homeowners Remove Granite Counters and Rehang Cabinets
There are several reasons a homeowner may need to remove granite counters and rehang cabinets. Sometimes the kitchen layout is changing. Other times the cabinets are still in decent shape, but they were installed unevenly, pulled away from the wall, or need to be repositioned after flooring, plumbing, or backsplash work. In older kitchens, cabinet boxes may sag because they were not properly fastened to wall studs. In newer remodels, cabinets may be rehung to improve alignment before new countertops are installed.
Granite counters are often removed when homeowners want to replace cabinets, repair water damage, modify the layout, reuse the stone, or switch to another countertop material. Because granite is a natural stone, it can sometimes be saved and reused, but only if it is removed carefully. The slab may be attached with adhesive, caulk, screws through cabinet supports, or a combination of all three. That means countertop removal should be treated as a slow, deliberate processnot a demolition derby with a pry bar.
Safety First: Granite Is Not a Sheet of Plywood
Before touching a screw or scoring a caulk line, remember this: granite is extremely heavy and can crack unexpectedly if it is flexed, dropped, or lifted unevenly. A small bathroom vanity top might be manageable with help, but a full kitchen slab often requires several strong adults or professional movers. Large granite pieces should be carried vertically, supported evenly, and never balanced casually on an edge like a giant stone pizza box.
Safety gear matters. Wear work gloves, eye protection, closed-toe shoes, and a dust mask if any cutting, scraping, or sanding is involved. Disconnect plumbing and electrical connections before removing sink areas, cooktops, garbage disposals, or outlets built into islands. If there is any uncertainty about gas lines, wiring, plumbing, or structural support, call a licensed professional. Saving money is nice. Saving your fingers, flooring, and kitchen wall is nicer.
Tools and Materials You May Need
A successful cabinet and countertop project depends on preparation. The right tools make the job smoother and reduce the temptation to “just yank it,” which is usually when expensive cracking noises happen.
Common tools for removing granite countertops
- Utility knife for cutting caulk lines
- Putty knife or painter’s tool for separating adhesive
- Small pry bar for gentle lifting
- Screwdriver or drill for removing fasteners
- Adjustable wrench for plumbing connections
- Moving blankets or cardboard to protect floors and cabinets
- Suction cup lifters if available
- Painter’s tape and marker for labeling pieces
Common tools for rehanging cabinets
- Stud finder
- Four-foot level or laser level
- Cabinet screws
- Clamps for joining cabinet boxes
- Shims for leveling and plumbing cabinets
- Drill and driver bits
- Measuring tape
- Ledger board for upper cabinets
- Wood filler, trim, and touch-up paint as needed
Step 1: Clear and Inspect the Kitchen
Start by removing everything from the cabinets and countertops. Take out drawers, cabinet doors, shelves, and loose organizers. This makes the cabinets lighter and reduces the chance of damaging hinges or door fronts during the work. Label doors and drawers if they will be reused. A simple piece of painter’s tape marked “left upper,” “sink base,” or “spice cabinet of mystery” can save a lot of confusion later.
Next, inspect how the granite is attached. Look underneath the countertop inside the base cabinets. You may find screws, plywood support strips, silicone adhesive, construction adhesive, or metal brackets. Around the backsplash, sink, and wall edges, check for caulk. Also look for seams in the granite. Seams are vulnerable spots, and they should not be forced apart aggressively.
Step 2: Disconnect Plumbing, Appliances, and Fixtures
If the granite includes a sink or cooktop, disconnect all related plumbing, electrical, or gas connections before attempting removal. Shut off water valves, disconnect supply lines, remove the drain assembly, and detach the garbage disposal if present. For a cooktop, follow the manufacturer’s instructions and use a licensed professional for gas connections. Do not work around live electrical wiring or active gas lines.
Drop-in sinks may be held by clips under the countertop, while undermount sinks are usually secured with adhesive and support hardware. Undermount sinks can be surprisingly stubborn. If you plan to reuse the sink, take extra care when cutting sealant around the rim. If the sink is staying attached to the granite during removal, remember that it adds weight and creates an awkward lifting point.
Step 3: Score Caulk and Adhesive Lines
Use a sharp utility knife to cut through caulk where the granite meets the wall, backsplash, side panels, or cabinets. Take your time. A clean cut reduces wall damage and makes it easier to separate the countertop from surrounding surfaces. If the granite has a separate backsplash piece, remove that first when possible. Backsplash sections are usually attached with adhesive or caulk and may come loose with careful scoring and light prying.
Work a thin putty knife into the seam between the granite and cabinet base. If you feel resistance, do not force the slab upward. The adhesive may need to be sliced gradually from multiple points. The goal is to release the bond, not launch the countertop into low orbit.
Step 4: Remove Screws and Hidden Fasteners
Look inside the base cabinets for screws driven upward into plywood underlayment or countertop supports. Remove all visible fasteners before lifting. Some installers use brackets, corner blocks, or support strips. Others rely heavily on adhesive. In older kitchens, you may discover an impressive collection of random fasteners that look like they were installed during three different presidential administrations.
Once fasteners are removed, gently test the countertop by applying light upward pressure at several locations. If it does not move, stop and search again for adhesive or screws. Granite should never be flexed hard to “see what happens.” What happens is usually expensive.
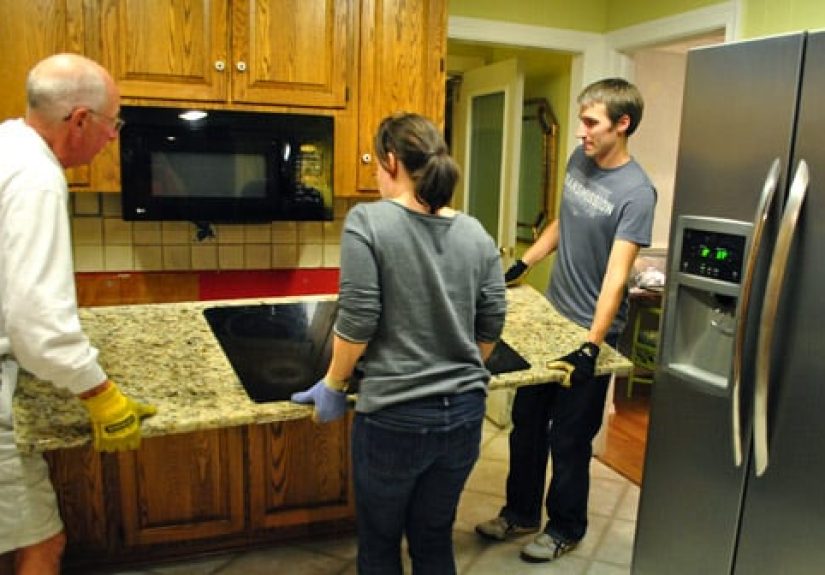
Step 5: Lift and Remove the Granite Countertop
When the slab is fully released, plan the lift before anyone touches it. Decide where the granite will go, clear the path, protect floors, and assign each person a position. Lift together, keep the slab supported, and avoid twisting. Long pieces are especially vulnerable near sink cutouts because those narrow stone sections can crack.
If the granite will be reused, store it vertically on padded supports in a safe location. Do not lay a large slab flat across uneven surfaces. If the stone is being discarded, check local disposal rules. Some stone fabricators, contractors, salvage stores, or reuse centers may accept certain countertop pieces, especially if they are intact and in good condition.
Step 6: Assess the Cabinets Before Rehanging
Once the counter is removed, inspect the cabinet boxes. Look for water damage, loose joints, cracked backs, stripped screw holes, swollen particleboard, or sagging rails. A cabinet that looks fine from across the room may reveal problems once the granite is gone. Pay special attention to sink bases, corners, and areas near dishwashers, where moisture often causes damage.
If cabinet boxes are weak, repair or replace them before rehanging. Rehanging cabinets that cannot hold fasteners securely is like putting new tires on a shopping cart with one wobbly wheel. Technically possible, emotionally unrewarding.
Step 7: Mark Studs and Layout Lines
For upper cabinets, locating wall studs is essential. Use a stud finder, then confirm stud positions with small test holes where they will be hidden by cabinets. Mark stud centers clearly. Cabinet screws should bite into solid framing, not just drywall. Drywall anchors alone are not appropriate for heavy kitchen wall cabinets loaded with dishes, mugs, and that one fondue set nobody has used since 2007.
Use a level or laser level to mark layout lines. Standard upper cabinets are often installed with the bottom edge around 54 inches from the floor, but the correct height depends on ceiling height, base cabinet height, countertop thickness, backsplash plans, and user preference. If you are reinstalling existing cabinets, mark their original locations before removal when possible.
Step 8: Use a Ledger Board for Upper Cabinets
A ledger board is a temporary support board fastened to the wall along the bottom line of the upper cabinets. It helps hold cabinets in place while they are being screwed into studs. This is especially useful when rehanging cabinets because even a modest wall cabinet becomes awkward when you are trying to hold it level, find the stud, drive a screw, and maintain your dignity at the same time.
Fasten the ledger securely and check it with a level. Set the first cabinet in position, usually starting at a corner or high-visibility endpoint. Clamp neighboring cabinets together before joining them with screws. This helps keep face frames flush and reveals even.
Step 9: Shim, Level, Plumb, and Secure
Walls and floors are rarely perfectly straight. Shims are your friends. Use them behind cabinets to fill gaps, correct alignment, and prevent cabinet boxes from twisting when screws are tightened. Check each cabinet for level from side to side, plumb from front to back, and alignment with adjacent cabinets.
Drive cabinet screws through sturdy hanging rails into wall studs. Do not overtighten, because that can pull the cabinet out of square or damage the cabinet back. For base cabinets, start at the highest point of the floor and shim the lower cabinets until they are level across the entire run. This step matters because countertops require a flat, stable base. Granite especially does not enjoy being asked to bridge uneven cabinets.
Step 10: Reconnect Cabinets and Prepare for Countertops
After cabinets are rehung, connect adjacent boxes with clamps and screws through the face frames or cabinet sides, depending on cabinet construction. Reinstall doors and drawers only after the boxes are secured and aligned. Adjust hinges so doors reveal evenly. If a door swings open by itself, the cabinet may not be level or plumb.
Before reinstalling granite or ordering new counters, confirm that base cabinets are level, securely attached, and properly supported. Check appliance openings, sink base placement, overhang areas, and corner alignment. Any unsupported stone overhang should be evaluated carefully and may require corbels, brackets, posts, or other structural support.
Common Mistakes to Avoid
Trying to remove granite alone
Even small granite pieces can be heavier than expected. Large slabs should never be lifted by one person. The risk of injury, breakage, and property damage is too high.
Forcing the countertop before cutting adhesive
If the stone does not lift, something is still holding it. Continue checking for caulk, silicone, screws, brackets, or adhesive. Gentle patience beats aggressive prying.
Skipping the stud layout
Cabinets must be fastened into studs or suitable structural framing. Guessing where the studs are is not a strategy. It is a suspense film.
Ignoring uneven floors and walls
Cabinets need shims because houses move, settle, and occasionally behave like they were measured with cooked spaghetti. Leveling is not optional.
Reusing damaged cabinet boxes
If a cabinet is swollen, cracked, or structurally weak, rehanging it will not magically restore strength. Repair first or replace the cabinet.
When to Hire a Professional
Some homeowners can handle cabinet rehanging and small countertop removal tasks, but professional help is wise for large granite slabs, complex seams, undermount sinks, gas cooktops, electrical changes, structural repairs, or expensive stone you plan to reuse. Professionals have lifting equipment, stone-handling experience, and insurance. That last one is not glamorous, but it matters when a slab weighs hundreds of pounds.
Hiring a cabinet installer may also save time if your kitchen has long cabinet runs, tall pantry units, crown molding, uneven floors, or custom trim. Proper installation affects how doors close, how countertops sit, and how the entire kitchen feels. A beautiful countertop on poorly installed cabinets is like a tuxedo over pajamas: technically dressed, but not convincing.
Maintenance After the Project
Once cabinets are rehung and countertops are installed or reused, keep an eye on the details. Check cabinet screws after the cabinets are loaded. Watch for gaps between the wall and cabinet backs. Adjust hinges after doors settle. For granite counters, clean with mild dish soap and water or a stone-safe cleaner, and avoid harsh acidic products. Depending on the stone and sealer, resealing may be needed periodically to help resist stains.
Use cutting boards, trivets, and common sense. Granite is durable, but it is not invincible. Cabinets are strong, but they are not meant to support climbing children, overloaded shelves, or someone standing on the counter to change a lightbulb because “it’ll only take a second.” Famous last words usually come with a repair bill.
Conclusion
Rehanging cabinets and removing granite counters is a serious kitchen project, but it is not mysterious when approached in the right order. Clear the space, disconnect fixtures, release caulk and fasteners, move granite carefully, inspect the cabinet boxes, mark the studs, use a ledger board, level everything, and secure cabinets properly. The heart of the project is patience. Every careful measurement, every shim, and every labeled cabinet door saves frustration later.
The biggest lesson is simple: cabinets and countertops work as a system. Cabinets provide the structure; countertops add function, weight, and visual impact. If the cabinets are poorly hung, the countertop installation suffers. If the granite is removed carelessly, the cabinets, walls, or stone can be damaged. A good result comes from respecting both parts of the kitchen equation.
Extra Field Notes: Real-World Experiences From Cabinet and Granite Projects
One of the most useful experiences homeowners share about rehanging cabinets and removing granite counters is that the project almost always takes longer than expected. Not because the work is impossible, but because kitchens hide surprises. A cabinet may be fastened with screws you cannot see until you remove a drawer. A countertop may have adhesive in places that make no logical sense. A wall may bow outward just enough to make a perfectly square cabinet look crooked. The best mindset is flexible, calm, and slightly suspicious of everything.
A common real-world example involves upper cabinets that slowly pull away from the wall. At first, the gap may look tiny. Then dishes start rattling when the door closes. When the cabinet is removed, the homeowner discovers that previous installers used short screws or missed the studs entirely. The repair is not just “put it back.” The right fix is to locate solid framing, use proper cabinet screws, shim behind the cabinet where needed, and secure the box without twisting it. Once rehung correctly, the cabinet feels completely differentsolid, aligned, and no longer dramatic.
Another frequent lesson comes from granite removal around sink cutouts. The narrow stone strips in front of and behind a sink are vulnerable. People often assume granite is strong everywhere because it feels like a boulder in countertop form. But cutouts change the way weight moves through the slab. During removal, those thin areas need extra support. If the slab is lifted unevenly, cracks may appear near the sink. Experienced installers usually support the stone near cutouts, lift with multiple people, and avoid bending or twisting the slab.
Homeowners also learn quickly that labeling matters. During a cabinet rehanging project, doors and drawers may seem obvious when they are sitting in the kitchen. Two hours later, after the room is full of tools, shims, screws, and snacks, everything starts looking suspiciously similar. Labeling each piece prevents a frustrating puzzle at the end. It also helps preserve the original fit of older cabinets, where one slightly warped door may only behave nicely in its original location.
Protecting the floor is another lesson worth repeating. Granite removal can scratch hardwood, crack tile, or dent softer flooring if slabs or tools are set down carelessly. Heavy cardboard, moving blankets, and plywood paths can prevent damage. The same goes for cabinet rehanging: setting cabinet boxes directly on finished floors without protection is asking for scuffs. A few minutes of prep can prevent the kind of mark that catches your eye forever.
Many DIYers underestimate the emotional power of shims. At first, shims feel like a workaround. In reality, they are part of professional-quality cabinet installation. Floors slope. Walls curve. Corners are not always square. Shims allow cabinets to sit level and plumb despite those imperfections. The trick is to use them thoughtfully, check alignment often, and trim them cleanly after fastening.
The final experience is about knowing when to stop. If a granite slab refuses to move, if a cabinet back crumbles, if the wall framing seems questionable, or if plumbing and wiring become confusing, pausing is not failure. It is smart project management. The best kitchen renovations are not the ones completed with the most confidence; they are the ones completed with the fewest avoidable disasters. A careful homeowner can do a lot, but a wise homeowner also knows when the project has crossed into professional territory.
Note: This article is designed for general educational and publishing purposes. Granite countertops and wall cabinets can be heavy and hazardous to handle, so homeowners should use proper safety equipment, work with capable adult helpers, and hire qualified professionals for large slabs, structural issues, electrical work, plumbing, or gas connections.


