Table of Contents >> Show >> Hide
- Why Mini Sea Urchin Vases Look So Good (Even When You’re Not Trying)
- Responsible Sourcing: Real Shells vs. Faux “Vase Filler”
- Materials List
- How to Make DIY Mini Sea Urchin Vases
- Build the Eclectic Tray Vignette (Without Making It Look Like Clutter)
- Flower and Greenery Picks That Work Especially Well
- Three Style Recipes You Can Copy
- Practical Tips: Keep It Pretty and Livable
- Troubleshooting: Common Problems and Quick Fixes
- Experience Notes: The Stuff You Only Learn After You Make These (Extra Detail)
- Conclusion
If your coffee table currently looks like it’s hosting a tiny garage sale (remote, receipts, random charger,
one lonely sockno judgment), you’re going to love this project. We’re making mini sea urchin vases
using simple craft supplies, then grouping them into an eclectic tray vignette that looks intentional,
elevated, andmost importantlystill usable in real life.
This idea has big “I found this in a sunny beach house” energy, but it’s actually a smart styling trick:
you’re combining small sculptural objects (the sea-urchin texture) with a tray that corrals the chaos.
The result is coastal-meets-curated, with just enough quirk to feel personal rather than showroom sterile.
Why Mini Sea Urchin Vases Look So Good (Even When You’re Not Trying)
Sea urchins are nature’s little design flex: radial symmetry, texture for days, and that “found-object” vibe.
In biology, the rigid outer skeleton is called a test. In home décor, it’s called
“wait… where did you buy that?” Either way, the shape reads as sculptural, even before you add flowers.
The genius move is going mini. A single big centerpiece can feel formal (or like you’re trying to impress
someone who already left). But a cluster of tiny bud vases feels relaxed and collectedplus it lets you use
just a few stems, which is budget-friendly and kinder to your future self when you have to change the water.
Responsible Sourcing: Real Shells vs. Faux “Vase Filler”
Before we get craft-happy: please don’t collect living marine life. In many places, taking live shells or
protected species is illegal, and it can harm coastal ecosystems. If you’re using real sea urchin tests,
buy from reputable sellers who source legally and ethicallyor choose faux urchins made for décor.
Best option for most people: faux sea-urchin “vase filler” (often resin or lightweight molded material).
It gives the look, is consistent in size, and you don’t have to worry about fragility or sharp spines.
It also makes drilling and gluing far less stressfulbecause nothing ruins a relaxing DIY like
turning a delicate shell into sad confetti.
Materials List
- Sea urchin forms: faux sea urchin vase filler spheres OR real cleaned tests
- Mini glass vessels: bud vases, small glass vials, test tubes, or floral water tubes
- Adhesive: clear epoxy (two-part) for strength, or a strong craft adhesive suitable for glass/resin
- Drill + bit: a step bit or small hole saw (for faux/resin); for real shells, go slow and gentle
- Painter’s tape (helps prevent slipping while drilling)
- Sandpaper (fine grit) or an emery board
- Rubbing alcohol (surface prep for better adhesion)
- Optional paint: matte white, soft sand, or muted coastal tones
- Tray: wood, woven rattan, lacquer, metalwhatever fits your room’s vibe
- Styling pieces: 2–4 books, a candle, small dish, matches, a “found” object (stone, coral-look piece, etc.)
- Flowers/greens: a few sturdy stems (real or faux), or even clipped yard greenery
How to Make DIY Mini Sea Urchin Vases
Step 1: Choose the “water strategy”
Decide how you want these to function:
- Real water: use a glass vial/test tube inside the urchin so flowers stay fresh.
- Faux stems: skip the water vessel and use floral foam or a tiny dab of hot glue (easy mode).
If you want real flowers, don’t rely on the urchin itself to hold water. Even faux/resin pieces can be leaky,
and real tests are porous and fragile. A hidden glass insert is the cleanest, safest approach.
Step 2: Mark and prep the opening
- Pick which side will be the “top.” For symmetry, choose the flattest/most stable area.
- Use painter’s tape over the drilling spot (this reduces slipping and chipping).
- Mark the center with a pen or pencil.
Step 3: Drill (slowly, like you’re defusing a tiny décor bomb)
For faux/resin: start with a small pilot hole, then widen using a step bit until your glass vial fits.
For real shells/tests: go extra slow, use minimal pressure, and widen gradually. If it starts to crack,
stop and reassessshells do not respect confidence.
Step 4: Test-fit the glass insert
Insert the vial/test tube. You want a snug fit where the glass sits straight and doesn’t wobble.
If it’s tight, sand the opening lightly. If it’s loose, don’t panicadhesive can bridge small gaps,
and a thin “collar” of clear epoxy can stabilize the glass.
Step 5: Clean, then glue for real
- Wipe both surfaces (glass + urchin opening) with rubbing alcohol and let dry.
- Mix epoxy (if using) and apply a thin, even bead around the opening.
- Insert the glass and adjust until vertical.
- Let cure fully before adding water (check your adhesive cure time; “mostly dry” is how disasters are born).
Step 6: Optional finish (paint or keep natural)
A soft matte spray paint can make faux urchins look more ceramic and less “I came from the craft aisle.”
Keep it subtle: warm white, bone, sand, pale gray, or a muted sea-glass tone. If you paint, do it
before attaching the glass insert, and let the paint off-gas fully in a ventilated area.
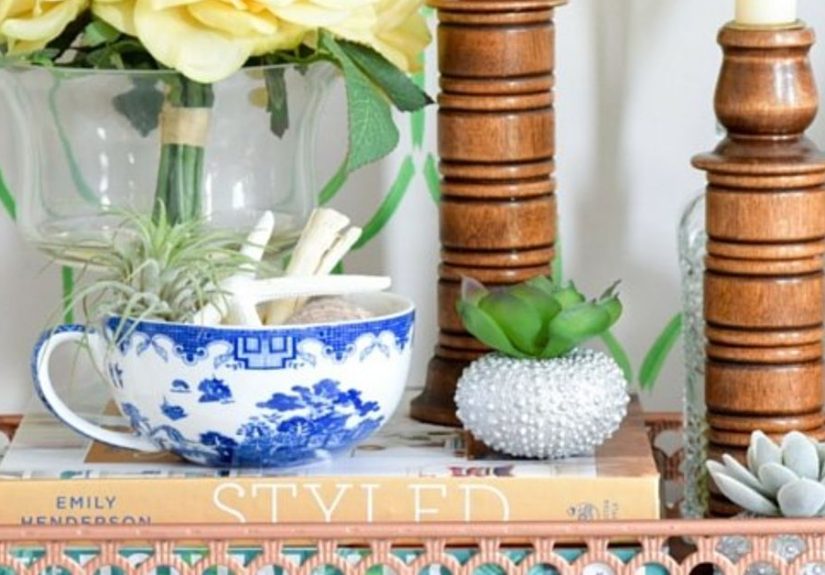
Build the Eclectic Tray Vignette (Without Making It Look Like Clutter)
Styling a tray is basically organizing… but with better lighting. The goal is a mix of
height, texture, and negative space, so the arrangement feels curated
instead of crowded.
The easy formula: Base + height + glow + “odd little thing”
- Base: the tray (it frames the scene and prevents “object sprawl”)
- Height: books, a small vase, or a taller candleholder (keeps the eye moving)
- Glow: a candle (instant atmosphere, minimal effort)
- Odd little thing: a sculptural object, small dish, or found element (this is where personality lives)
Step-by-step tray styling
-
Start with the tray placement.
Move it slightly off-center so the table still feels usable, not staged for a museum tour. -
Anchor with books.
Stack 2–4 coffee table books (or one chunky book plus a slimmer one). This gives you a platform for smaller items. -
Add your mini sea urchin vases.
Group 2–5 together. Odd numbers often look more natural, but don’t force itif four looks right, four is right. -
Introduce one taller element.
A candle, a small lamp, or a taller bud vase adds vertical contrast so everything isn’t the same height. -
Finish with a functional object.
Coasters, a match striker, a small dish for ringsthis keeps the vignette from being “pretty but pointless.”
Flower and Greenery Picks That Work Especially Well
Mini vases need stems that look good in small doses. A few reliable options:
- Hydrangea snips (one head can be divided into multiple mini arrangements)
- Ranunculus or spray roses (small blooms, big impact)
- Eucalyptus or olive branches (adds airy structure)
- Herbs like rosemary or mint (smells great and feels casually fancy)
- Single statement stems (one bloom per vase looks intentional and modern)
If you’re using faux stems, lean into realism: fewer stems, better quality, and a quick dusting now and then.
Nothing ruins coastal elegance like a fake flower that looks like it has a static electricity problem.
Three Style Recipes You Can Copy
1) Coastal-but-not-cliché
- Woven tray
- Two white books + one blue book
- 3 mini sea urchin vases with white blooms
- One sandy-colored candle
- Small dish with sea-glass-colored accents
2) Eclectic vintage mix
- Brass or dark wood tray
- Art book stack
- Mini urchin vases painted matte cream
- One quirky object (tiny sculpture, vintage paperweight)
- Two taper candles in mismatched holders
3) Modern minimal
- Black or white lacquer tray
- One large book, open to a favorite page
- Two mini urchin vases with single stems
- One sculptural candle
- Leave deliberate empty space (yes, empty space is allowed to exist)
Practical Tips: Keep It Pretty and Livable
Make it easy to move
A tray vignette wins because it’s portable. Need space for snacks or a laptop? Pick up the tray, move it,
live your life, put it back. The best décor works with your routines, not against them.
Candle common sense
If your vignette includes candles, keep them away from droopy greenery, trim wicks, and don’t leave them burning
unattended. A cozy glow is great; a surprise smoke alarm solo is not.
Water without regret
Use the glass insert as the water barrier and change water regularly. If you’re nervous about spills,
use water tubes or go faux. There is no shame in a fake stem if it prevents a real stain.
Troubleshooting: Common Problems and Quick Fixes
-
The vase leans. Fix: re-seat the glass insert while adhesive is still workable,
or add a thin “shim” of clear epoxy on the low side. - It looks too busy. Fix: remove one small item, then remove another. Negative space is décor.
- Everything is the same height. Fix: add one taller candle or a short pedestal under a small object.
- The tray feels random. Fix: repeat one material or color 2–3 times (brass, white ceramic, blue glass).
- Flowers flop over. Fix: use fewer stems, shorter stems, or sturdier varieties better suited to bud vases.
Experience Notes: The Stuff You Only Learn After You Make These (Extra Detail)
Here’s the funny thing about mini sea urchin vases: the first one makes you feel like a coastal design wizard,
and the second one makes you realize you’ve been holding the drill like it’s a microphone. By the third,
you’ll have a whole systembecause this DIY is less about raw crafting talent and more about tiny, practical
adjustments that add up to a polished result.
One of the most common “aha” moments is discovering how much the opening size changes the entire look.
If the hole is too wide, the glass insert becomes visually obvious and the urchin stops feeling sculptural.
Too small, and you’re wrestling a stem into a space that clearly does not want roommates. A snug fit is the sweet spot,
and it’s worth widening the opening slowly rather than overshooting it in one heroic drill moment. (Heroic drill moments
are how people end up painting “design flaws” as “intentional character.”)
Another experience-based lesson: your tray is the real MVP. When DIYers say, “It still looks messy,”
it’s usually because the tray is either too small (everything stacks vertically like a decorative traffic jam)
or too large (it becomes a stage for twenty unrelated objects auditioning for attention). The best tray size gives you
room for a book stack, a little cluster of vases, and one glow elementthen stops you from adding “just one more thing”
like an overconfident shopping cart in the Target seasonal aisle.
You’ll also notice the magic of imperfect matching. If every mini vase is identicalsame color,
same height, same flowerthe arrangement can look like a store display. Eclectic styling gets its charm from
small variations: two vases in warm white, one left unpainted; one with a single stem, one with a tiny bunch;
one slightly taller insert that creates a gentle rhythm. Those tiny differences are what make the vignette feel collected
rather than manufactured.
If you try fresh flowers, the “experience” factor comes in fast: mini arrangements are surprisingly forgiving.
You don’t need florist-level skills. A clipped hydrangea head split into smaller pieces can fill multiple tiny vases.
A sprig of rosemary can look chic in a way that says, “Yes, I decorate,” while also saying, “Yes, I might roast potatoes later.”
And because the scale is small, you can experiment without wasting a whole bouquet. If something looks off, you swap one stem
and the entire vibe changes.
Finally, there’s the satisfaction of the “reset.” People who live with this kind of tray vignette often mention how it acts like
a visual button that restores calm. When the room feels cluttered, you straighten the books, nudge the vases back into their cluster,
and suddenly the space reads as orderly. It’s the home décor equivalent of smoothing a wrinkled shirt before a video call:
the chaos might still exist elsewhere, but the part in frame looks confident. And honestly, sometimes that’s all we need.
Conclusion
DIY mini sea urchin vases are the perfect small project: quick to make, easy to customize, and instantly “designer-looking”
when grouped on a tray. Pair them with a few books, a candle, and one personal object, and you’ve got an eclectic tray vignette
that feels both styled and livable. Coastal? Yes. Copy-paste beach theme? Nope. This is texture-forward, playful, and just polished
enough to look like you meant to do it all along.