Table of Contents >> Show >> Hide
- Why This Recipe Works
- Ingredients
- Equipment You’ll Want
- Step-by-Step: Apple Crisp Toaster Pastries
- 1) Make the Streusel First (So It’s Ready to Crunch)
- 2) Make the Apple Filling (Thick, Cozy, Not Soupy)
- 3) Choose Your Dough Path
- 4) Roll, Cut, and Set Up Your Pastry “Assembly Line”
- 5) Fill Like a Pro (Aka: Don’t Overfill)
- 6) Chill Before Baking (Yes, Even 15 Minutes Helps)
- 7) Bake Until Golden and Smells Like You Should Open a Bakery
- 8) Optional: Add a Crunchy Top (Without Streusel Chaos)
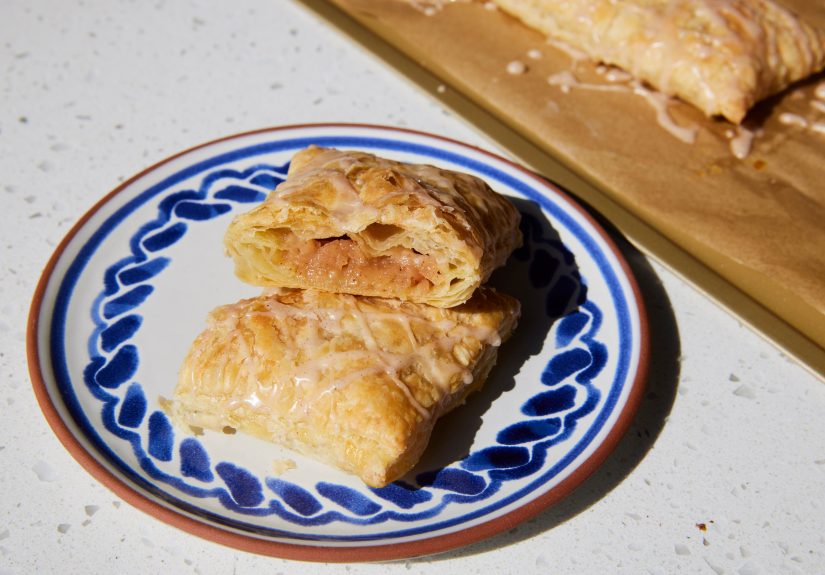
- 9) Glaze (Or Don’tBut You’ll Probably Glaze)
- How to Toast and Serve
- Make-Ahead, Storage, and Freezing
- Flavor Variations (Because Apples Love Attention)
- Troubleshooting Tips (Aka “How to Avoid Pastry Drama”)
- of Real-Life “Experience” Notes (What Making These Is Actually Like)
- Conclusion
If apple crisp and a toaster pastry had a delicious little baby, this would be it: flaky handheld pastries stuffed with warmly spiced apples and tiny pockets of crunchy oat streusel, finished with a simple vanilla glaze (optional, but come on). These taste like fall weekend mornings, even if it’s July and your AC is fighting for its life.
This apple crisp toaster pastries recipe is designed for real life: you can make the dough from scratch for maximum “I bake now” energy, or use store-bought pie crust/puff pastry when you want the flavor without the full cardio. Either way, the goal is the samethick apple filling (no soggy pastry!), crisp topping crunch, and a pastry that actually fits in your hand (and, if you’re brave, your toaster).
Why This Recipe Works
- Thick apple filling: We macerate the apples briefly and use a little starch so the filling sets instead of leaking.
- Chill = flaky: Cold dough and a quick pre-bake chill help keep the pastry layered and tidy.
- Steam vents: A few fork pricks prevent “puffy pillow pastries” and keep them toaster-friendly.
- Streusel in the right place: Some goes inside for crunch; a little can go on top for sparkle without raining oatmeal everywhere.
Ingredients
Option A: Easy Shortcut Dough (Recommended for Busy Humans)
- 2 boxes refrigerated pie crusts (typically 4 crust rounds total) or 2 sheets puff pastry (thawed)
- 1 egg (for egg wash)
- 1 tablespoon milk or water (to mix with egg wash)
Option B: Homemade Pastry Dough (Flakier, Brag-ier)
- 2 cups all-purpose flour
- 1 tablespoon granulated sugar
- 1 teaspoon fine salt
- 1 cup (2 sticks) cold unsalted butter, cubed
- 1 large egg
- 2–4 tablespoons cold milk (as needed)
Apple Filling
- 3 medium apples (about 3 cups diced), peeled or unpeeled (your call)
- 2–3 tablespoons brown sugar (adjust to taste)
- 1 tablespoon lemon juice
- 1 teaspoon ground cinnamon
- Pinch of salt
- 1 teaspoon vanilla extract
- 1 tablespoon cornstarch or 1 1/2 tablespoons tapioca starch
- 2 tablespoons apple cider or water
- 1 tablespoon butter
Mini Crisp Streusel
- 1/3 cup rolled oats
- 1/4 cup all-purpose flour
- 1/4 cup brown sugar
- 1/2 teaspoon cinnamon
- Pinch of salt
- 3 tablespoons cold unsalted butter, cubed
Simple Glaze (Optional, But Encouraged)
- 1 cup powdered sugar
- 1–2 tablespoons milk
- 1/2 teaspoon vanilla extract
- Pinch of salt
Equipment You’ll Want
- Baking sheet + parchment paper
- Rolling pin
- Sharp knife or pizza cutter
- Fork (for crimping and ventingforks are overachievers here)
- Small saucepan (for filling)
Step-by-Step: Apple Crisp Toaster Pastries
1) Make the Streusel First (So It’s Ready to Crunch)
In a bowl, mix oats, flour, brown sugar, cinnamon, and salt. Cut in the cold butter with your fingers or a fork until you get pea-sized crumbs. Pop the bowl in the fridge while you make the filling. Cold streusel = better texture.
2) Make the Apple Filling (Thick, Cozy, Not Soupy)
Dice apples into small cubes (about 1/4-inch) so they cook quickly and don’t punch through the pastry like tiny fruit boulders. Toss apples with brown sugar, lemon juice, cinnamon, salt, and vanilla. Let sit 10 minutesthis pulls out juice and concentrates flavor.
In a small saucepan over medium heat, melt 1 tablespoon butter. Add the apples and any released juices. Stir in cornstarch (or tapioca starch) and add 2 tablespoons cider/water. Cook 3–5 minutes, stirring, until the mixture thickens and the apples are just barely tender. You want “spoonable jammy,” not “apple soup.” Transfer to a bowl and cool completely.
3) Choose Your Dough Path
If using store-bought pie crust: Let it sit at room temp 5–10 minutes so it unrolls without cracking. You’ll roll it slightly thinner for a neat seal.
If using puff pastry: Keep it cold. Thawed but chilled is perfect. Too warm and it turns into a sticky existential crisis.
If making homemade dough:
- Whisk flour, sugar, and salt in a bowl.
- Work in cold butter until you have visible lumps (about pecan-sized).
- Whisk egg with 2 tablespoons cold milk; add and mix just until the dough comes together. Add 1–2 more tablespoons milk only if needed.
- Divide dough in half, shape into rectangles, wrap, and chill 30 minutes.
4) Roll, Cut, and Set Up Your Pastry “Assembly Line”
Heat oven to 350°F. Line a baking sheet with parchment. On a lightly floured surface, roll dough to about 1/8-inch thick. Cut into rectangles about 3 x 4 inches (classic toaster pastry vibes) or slightly larger if you want more filling. You need an even number: bottoms and tops.
5) Fill Like a Pro (Aka: Don’t Overfill)
- Place half the rectangles on the prepared sheet (these are the bottoms).
- Whisk egg with 1 tablespoon milk/water. Brush a 1/2-inch border around each bottom rectangle.
- Spoon 1 to 1 1/2 tablespoons cooled apple filling into the center.
- Sprinkle 1–2 teaspoons of cold streusel over the filling (inside the pastry).
- Top with remaining rectangles. Press from the center outward to push out air, then crimp edges with a fork.
- Prick the tops several times with a fork so steam can escape (very important).
6) Chill Before Baking (Yes, Even 15 Minutes Helps)
Refrigerate assembled pastries uncovered for 15–30 minutes. This firms the fat in the dough, helping the pastries hold their shape and bake up flakier.
7) Bake Until Golden and Smells Like You Should Open a Bakery
Bake at 350°F for 25–35 minutes, depending on dough thickness and whether you used pie crust or homemade. You’re looking for light golden tops and browned edges. Cool on the pan 10 minutes, then move to a rack to cool completely.
8) Optional: Add a Crunchy Top (Without Streusel Chaos)
If you want a little crisp topping on the outside, lightly brush the tops with egg wash right before baking and sprinkle with cinnamon sugar or a tiny pinch of streusel pressed on gently. Keep it minimal so it doesn’t burn or fall off.
9) Glaze (Or Don’tBut You’ll Probably Glaze)
Whisk powdered sugar, 1 tablespoon milk, vanilla, and salt. Add a few drops more milk until it’s thick but drizzleable. Drizzle or spread over fully cooled pastries. Let set 10–15 minutes.
How to Toast and Serve
- Toaster oven: Best option. Toast at a low setting until warm and crisp.
- Regular toaster: Only if pastries are fully cooled and lightly glazed (heavy glaze can melt). Use a low setting and keep an eye on it.
- Oven reheat: 325°F for 6–8 minutes brings back crispness.
Serve with coffee, hot chai, or a scoop of vanilla ice cream if you’re feeling dessert-for-breakfast bold (I support this decision).
Make-Ahead, Storage, and Freezing
Make-Ahead
- Filling: Make up to 3 days ahead; keep refrigerated.
- Streusel: Make up to 1 week ahead; refrigerate (or freeze for longer).
- Assembled, unbaked pastries: Chill up to 24 hours before baking for fresh results the next day.
Storage
Store cooled pastries in an airtight container at room temperature for 1–2 days (especially if unglazed). If your glaze includes dairy-heavy additions (like cream cheese), refrigerate.
Freezing
Freeze baked, cooled pastries (unglazed is easiest) in a single layer, then transfer to a freezer bag. Reheat from frozen in a toaster oven or 325°F oven until warmed through.
Flavor Variations (Because Apples Love Attention)
- Caramel apple: Stir 1 tablespoon caramel sauce into the cooled filling, or drizzle on top instead of glaze.
- Apple pie spice: Swap cinnamon for 1 1/2 teaspoons apple pie spice.
- Maple glaze: Replace vanilla with 1 teaspoon maple extract (or use maple syrup and reduce milk accordingly).
- Cheddar twist: Add a pinch of sharp cheddar inside (tiny amount!) for a sweet-salty apple-cheddar vibe.
- Oat-free: Replace oats in streusel with chopped pecans for a praline-ish crunch.
Troubleshooting Tips (Aka “How to Avoid Pastry Drama”)
My filling leaked everywhere
- Use less filling (seriously, restraint is a baking superpower).
- Make sure the filling is fully cooled and thick.
- Seal edges twice: press with fingers, then crimp with a fork.
My pastries are soggy
- Cook the filling until it’s jammy and not watery.
- Vent the tops so steam can escape.
- Cool on a rack so the bottoms don’t steam themselves into sadness.
My dough cracked or tore
- If store-bought: let it warm slightly so it’s pliable.
- If homemade: add only enough liquid to bring it together and chill before rolling.
of Real-Life “Experience” Notes (What Making These Is Actually Like)
Here’s what tends to happen when people make apple crisp toaster pastries for the first time: confidence starts high, usually right around the moment the phrase “How hard can it be?” is spoken out loud. Then the apples get diced, and suddenly everyone has opinions about peel-on versus peel-off. Peel-on folks argue it’s “rustic.” Peel-off folks argue it’s “smooth.” The truth is the pastry does not care. The pastry wants only one thing: thick filling.
The maceration step (letting the apples sit with sugar and spice) feels almost too easy to matterlike a self-help tip that’s suspiciously simple. But it’s one of those small moves that pays off, because you can literally see the apple juice come out. That juice is flavor gold… and also the exact liquid that would’ve made your pastry soggy if you didn’t handle it. When people skip thickening, the filling tends to behave like it’s trying to escape a tiny pastry prison.
Assembly is where the kitchen comedy really kicks in. Rectangles look straightforward until you realize your “3 x 4 inches” rectangles are more like “creative trapezoids with personality.” A ruler helps, but so does accepting that homemade means slightly imperfect. And honestly, a slightly lopsided pastry still tastes like apple crisp. Nobody bites into a toaster pastry and complains about geometryif they do, offer them a ruler and send them to a different brunch.
The most common “aha” moment is learning how little filling you actually need. People want these stuffed like a pie that’s trying to prove a point, but toaster pastries are more like well-packed suitcases: if you overstuff, the zipper will betray you. Once you try a conservative spoonful (plus a sprinkle of streusel inside), you get the ideal ratioflaky crust, tender apples, and little crisp pockets that taste like the best bite of apple crisp, but portable.
Then there’s the fork crimp. It looks cute, it seals edges, and it makes you feel like you’re starring in a cozy baking show. The vent holes are less glamorous, but they’re the difference between a sleek pastry and a ballooned-up “pastry pillow.” People who vent properly usually get that classic toaster pastry flatnessperfect for toasting, glazing, and shamelessly eating with one hand while answering emails with the other.
Glazing is pure joy, with one caution: impatience. If you glaze warm pastries, the icing slides off like it’s late for an appointment. Once the pastries cool, the glaze stays put, sets nicely, and gives you that nostalgic “frosted” finish. And if you’re the type who likes extra crunch, a tiny sprinkle of streusel on top after glazing feels like putting a crunchy crown on a very deserving dessert.
Finally, the toast test: toaster oven wins for crispness and control, and most people who try it once never go back. Regular toasters can work, but they’re a little unpredictablekind of like trusting a cat to keep a houseplant alive. Reheating in a low oven is also excellent when you want the pastry crisp again, not just warm. The overall vibe? These pastries feel like a weekend project that pays you back all week longespecially when you find one in the freezer and realize Past You made breakfast for Future You. That’s not just baking. That’s time travel.
Conclusion
This apple crisp toaster pastries recipe is the sweet spot between nostalgic and homemade: flaky pastry, cozy spiced apples, and a crisp topping crunch that makes every bite interesting. Whether you go full homemade or take the shortcut route, the key is thick filling, solid sealing, and a quick chill before baking. Make a batch, freeze a few, and enjoy the smug satisfaction of having “fancy toaster pastries” ready whenever your morning needs a win.