Table of Contents >> Show >> Hide
- What Does It Mean to Publish a Game on Steam?
- Step 1: Make Sure Your Game Is Actually Ready for Steam
- Step 2: Create a Steamworks Partner Account
- Step 3: Understand the Steam Direct Fee
- Step 4: Create Your App and Build the Store Page
- Step 5: Prepare Store Assets, Screenshots, and Trailers
- Step 6: Upload Your Build and Configure Technical Details
- Step 7: Complete Content, Mature, and AI Disclosures
- Step 8: Launch a Coming Soon Page and Build Wishlists
- Step 9: Use Steam Playtest, Demos, and Events
- Step 10: Set Pricing, Regional Strategy, and Launch Discounts
- Step 11: Submit for Valve Review
- Step 12: Release Your Game
- Common Mistakes Developers Make When Getting on Steam
- Practical Example: A Small Indie Launch Timeline
- Field Notes: Real-World Experience From Preparing a Game for Steam
- Conclusion: Getting on Steam Is a Process, Not a Portal
Putting your game on Steam can feel like walking into a giant convention hall with a backpack full of dreams, a slightly unstable demo build, and one question written in permanent marker across your brain: “Where do I even start?” The good news is that publishing a game on Steam is far more accessible than it used to be. The less-good news is that accessibility does not mean “upload a ZIP file, press a shiny button, and immediately become the next indie success story.” Steam is a professional storefront, a distribution platform, a marketing channel, a community hub, and occasionally a very humbling mirror.
This detailed guide explains how to get your game on Steam from the first Steamworks registration step to the big release button. We will cover the Steam Direct process, store page setup, build review, marketing preparation, pricing, demos, playtesting, launch timing, common mistakes, and what developers should realistically expect. Whether you are launching a spooky pixel-art roguelike, a cozy farming simulator where every carrot has emotional depth, or a strategy game with more menus than a diner, the core process is the same: prepare carefully, communicate clearly, and treat your Steam page like your game’s front door.
What Does It Mean to Publish a Game on Steam?
Publishing a game on Steam means making your title available through Valve’s Steam platform, where players can discover, wishlist, buy, download, review, update, and discuss it. Steam is not just a file host. It gives developers access to tools for store pages, achievements, cloud saves, depots, demos, community forums, beta branches, analytics, regional pricing, discounts, and more. That is wonderful. It is also a lot. Think of Steamworks as a toolbox: powerful, flexible, and slightly intimidating until you learn which wrench does what.
The most important thing to understand is that Steam has a release process. You need to create a partner account, complete paperwork, pay the Steam Direct fee for your app, create your product page, upload required assets, submit your store page and build for review, maintain a Coming Soon page for the required period, and then release when everything is approved. You control the final launch timing, but Valve must review key materials before your game can go live.
Step 1: Make Sure Your Game Is Actually Ready for Steam
Before you open Steamworks, look at your game with the cold, honest eyes of a player who has 400 other games in their library and just enough patience to click “refund.” Your game does not need to be enormous, but it does need to be understandable, playable, stable, and honestly represented. If your trailer shows a dragon boss, players should not launch the game and find only a placeholder cube named “dragon_final_FINAL2.”
Start with a practical readiness checklist. Can a new player understand the goal within the first few minutes? Does the game launch reliably on the operating systems you plan to support? Are crashes rare and reproducible enough to fix? Do menus work with the input methods you advertise? Is the save system dependable? Are your screenshots current? Does your store description describe the real game, not the dream version you imagined after three coffees and a motivational YouTube video?
Minimum Viable Professionalism
A small indie game can look modest and still feel professional. Professionalism means players can tell what they are buying, install it smoothly, play without immediate technical disasters, and understand what type of experience they are getting. If your game is intentionally weird, excellent. Just make sure the weirdness is a feature, not a bug wearing a funny hat.
Step 2: Create a Steamworks Partner Account
To publish on Steam, you need access to Steamworks, Valve’s developer portal. During onboarding, you will provide identity, business, tax, and banking information. This matters because Steam needs to know who is selling the game and where payments should go. If you are a solo developer, you can usually register as an individual. If you have a company, use the company’s legal information consistently across tax and bank documents.
Take this step seriously. A surprising number of launch delays begin with boring paperwork: mismatched names, incorrect bank details, tax forms that were rushed, or accounts created under the wrong legal entity. It is not glamorous, but neither is losing a launch week because your bank account name does not match your partner profile.
Step 3: Understand the Steam Direct Fee
Steam uses a Steam Direct fee for each new app you want to distribute. The fee is commonly referred to as a $100 app fee, though equivalent local amounts may apply depending on region and currency. It is not a marketing payment and it does not guarantee visibility, sales, or approval of low-quality content. It is a gateway fee for creating and distributing an app on Steam. Valve states that the fee is recoupable after the product reaches the required adjusted gross revenue threshold.
Budget for this fee early, especially if you plan multiple releases, demos, soundtrack apps, or separate products. For most commercial games, the fee is not the largest cost in the launch process. Your real expenses may include art, localization, trailer editing, QA, capsule design, music licensing, ratings, legal review, and marketing. In other words, the $100 is not the mountain. It is the sign at the bottom of the mountain that says, “Good luck, bring water.”
Step 4: Create Your App and Build the Store Page
Once you are inside Steamworks, you will create an app for your game. This gives your product its own AppID and access to configuration tools. Your store page is where many players will make their first decision about your game, often in seconds. That means your store page should answer three questions quickly: What is this game? Why is it interesting? Is it for me?
The best Steam pages are clear, specific, and visually confident. Avoid vague descriptions like “an unforgettable adventure through a mysterious world.” That could describe anything from a 90-hour RPG to looking for your keys in a dark apartment. Instead, say what the player does. For example: “Build a floating village, defend it from sky pirates, and manage a crew of chaotic bird people in a turn-based strategy adventure.” Specific beats poetic fog almost every time.
Write a Store Description That Sells Honestly
Your short description should deliver the hook. Your long description should explain the core loop, features, setting, and player fantasy. Use bullet points when they help scanning, but do not turn the whole page into a grocery list. Strong store copy usually includes genre, main mechanics, tone, progression, replay value, and what makes the game different. If your game combines deckbuilding with restaurant management, say that early. Players who love that mashup need to know they have found their oddly specific treasure.
Step 5: Prepare Store Assets, Screenshots, and Trailers
Steam requires graphical assets for your game’s store presence. These include capsule images that appear across the platform in search results, category pages, wishlists, recommendations, and other discovery surfaces. Capsule art is not decoration; it is packaging. If your capsule is muddy, unreadable, or overloaded with tiny text, players may scroll past before your game gets a fair chance.
Use strong key art, a readable logo, and a visual identity that fits your genre. A horror game should not look like a mobile puzzle app unless the twist is truly spectacular. A cozy game should communicate warmth, charm, and approachability. A tactics game should suggest depth and conflict. Steam’s asset rules are also important: base capsule images should focus on game artwork, the game name, and official subtitle rather than review scores, discount claims, or award clutter.
Your Trailer Is Your Elevator Pitch With Explosions
Steam requires a trailer for the release process, and players often watch it before reading much of your description. Put gameplay near the beginning. Do not spend 25 seconds on logos, slow fades, or moody clouds unless your game is literally about competitive cloud appreciation. Show the player what they do, what choices they make, what the game feels like, and why the next click should be “Add to Wishlist.”
Screenshots should also show real gameplay variety. Include user interface where relevant, but do not make every image a chaotic wall of menus. Aim for a mix: one screenshot that explains the core loop, one that shows scale, one that shows a dramatic moment, one that shows progression, and one that highlights atmosphere or character.
Step 6: Upload Your Build and Configure Technical Details
Uploading a game to Steam involves more than dragging a folder into a magical cloud. You will configure depots, packages, launch options, supported operating systems, branches, and builds. SteamPipe is the system used to upload and manage game content. You will need to test installation, launching, updates, file paths, save locations, and platform-specific behavior.
If you support Windows, macOS, or Linux, test each platform separately. Do not simply check a box because the engine export completed once on your cousin’s laptop. If you advertise controller support, test controller navigation from launch to gameplay to quitting. If you use Steam Cloud, make sure saves sync correctly and do not overwrite player progress in strange ways. Players can forgive a missing feature more easily than a corrupted save file. Losing progress is how you turn a fan into a tiny thunderstorm.
Use Branches for Testing
Steam branches are useful for beta testing and internal QA. You can keep a public default branch stable while using private branches for experimental builds, press versions, or hotfix candidates. This is especially helpful after launch, when you may need to test patches quickly without tossing unfinished changes at your entire audience.
Step 7: Complete Content, Mature, and AI Disclosures
Steam requires developers to complete content-related information, including mature content details and disclosures around certain kinds of AI-generated content. Be honest. If your game contains violence, sexual content, gambling-like mechanics, strong language, or user-generated content risks, disclose accurately. If you used generative AI tools in development or your game generates AI content during play, review the current Steamworks content survey and disclosure requirements carefully.
This is not the place for creative interpretation. Store platforms, payment processors, and players all care about accurate content labeling. Misrepresenting your game can lead to review problems, player complaints, or worse. A useful rule: if you would feel nervous explaining the content to Valve, your players, or a platform reviewer, document it more clearly.
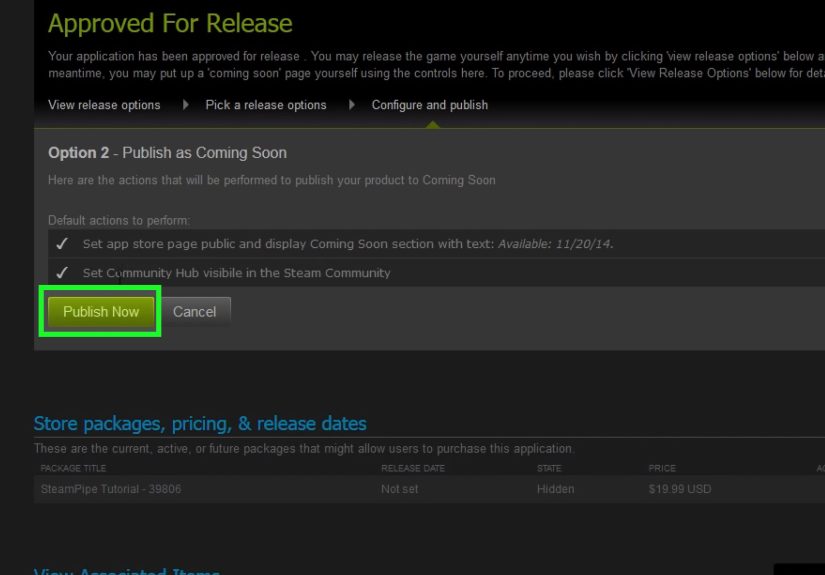
Step 8: Launch a Coming Soon Page and Build Wishlists
Steam requires new products to have a Coming Soon page visible for at least two weeks before release. Treat that as the minimum, not the ideal marketing plan. Many successful indie teams launch their Steam page months before release so they can collect wishlists, test messaging, run demos, pitch creators, and participate in events. Wishlists matter because they represent players who have raised their hands and said, “Tell me when this exists.”
A Coming Soon page is also a testing ground. If players are not wishlisting, clicking, or understanding the game, your page may need work. Maybe the capsule is unclear. Maybe the trailer waits too long to show gameplay. Maybe your genre tags are too broad. Maybe your first screenshot looks like a tax spreadsheet from space. The earlier you publish your page, the more time you have to fix these problems before launch day.
How to Improve Wishlist Conversion
Focus on positioning. “A roguelike deckbuilder” is understandable but crowded. “A roguelike deckbuilder where every card is a suspicious kitchen appliance” is at least memorable. Use your hook consistently in your capsule, trailer, short description, social posts, press emails, and demo page. Players should not need detective skills to understand why your game is different.
Step 9: Use Steam Playtest, Demos, and Events
Steam Playtest gives developers a way to invite players into testing without disrupting the main game’s store page, reviews, or wishlist flow. It can be useful for stress testing, balance feedback, onboarding improvements, and community building. A separate playtest setup lets you gather data before your actual release build is judged by paying customers.
Demos can also be powerful, especially for games that feel better in motion than in screenshots. If your game has a satisfying core loop, a demo can convert curiosity into commitment. Steam Next Fest and other platform events can bring attention to demos, but they work best when the demo is polished, short enough to respect players’ time, and strong enough to end with the feeling, “I need more.”
Do not use a demo as a junk drawer for unfinished mechanics. A great demo is not necessarily a huge demo. It is a focused promise. Show the core fantasy, create a satisfying arc, and end before the player gets bored. Leave them hungry, not exhausted.
Step 10: Set Pricing, Regional Strategy, and Launch Discounts
Pricing your game is part math, part market research, and part emotional wrestling match. Start by comparing similar games in your genre, scope, production quality, replay value, and audience expectations. A short narrative game, a 200-hour survival sandbox, and a local co-op party game may all be wonderful, but they do not carry the same pricing logic.
Steam supports regional pricing tools, and developers should think globally. A price that feels fair in one country may be unrealistic in another. Regional pricing can help your game reach more players while reducing friction in markets with different purchasing power. Also consider launch discounts. Steam allows launch discounts within a defined release window, and many developers use a modest discount to encourage early buyers. The goal is not to train players to wait forever; it is to create a clear launch moment.
Choose a Price You Can Defend
If players ask why your game costs what it costs, you should have a confident answer. Maybe it offers deep replayability, handcrafted content, strong multiplayer, a unique art style, or a polished short experience. Do not apologize for charging money. Just make sure the value is visible.
Step 11: Submit for Valve Review
Before release, your store page and game build must go through Valve’s review process. You will mark items as ready for review in Steamworks after completing the required checklists. Valve checks whether your store materials and build are ready for release, whether the game functions as represented, and whether required information is complete.
Build review is not a substitute for your own QA. Valve may catch release-blocking issues, but your job is to avoid sending them a build held together by hope and duct tape. Test a clean installation. Test the first launch. Test a new save. Test quitting. Test achievements if you use them. Test offline behavior if relevant. Test different screen resolutions. Test the store page links. Test the thing you are “sure is fine,” because that is where bugs enjoy nesting.
Step 12: Release Your Game
Once your store page is approved, your Coming Soon requirement is satisfied, and your build is approved, Steam gives you control over releasing your game. This is a major advantage: you are not forced into a mysterious automatic launch at 3:17 a.m. while you are asleep and your keyboard is under a cat. You choose when to press the release button.
Plan launch day like an event. Prepare patch notes, social posts, a mailing list announcement, press emails, community updates, creator keys, Discord moderation, and a support plan. Watch your forums and reviews, but do not panic-refresh every 11 seconds. If players report bugs, acknowledge issues quickly and communicate clearly. A calm developer response can turn a rough edge into a trust-building moment.
Common Mistakes Developers Make When Getting on Steam
Publishing the Store Page Too Late
Waiting until two weeks before release to launch your Coming Soon page gives you very little time to build wishlists or improve messaging. Steam requires a minimum window, but marketing benefits from a longer runway.
Using Weak Capsule Art
Your capsule is often the first impression. If it looks generic, blurry, or hard to read, your click-through rate may suffer before players even see your trailer.
Writing Vague Store Copy
Players should know the genre, hook, and core gameplay quickly. Beautiful adjectives cannot replace clear information.
Skipping External Marketing
Steam can help surface games, but it is not a magic vending machine. Build an audience through social media, creator outreach, devlogs, newsletters, festivals, communities, and press where appropriate.
Launching Without a Support Plan
Even a well-tested game can break in the wild. Have a plan for bug reports, hotfixes, FAQs, and player communication.
Practical Example: A Small Indie Launch Timeline
Imagine you are releasing a $14.99 puzzle adventure game in October. A practical timeline might look like this: six months out, open Steamworks, pay the app fee, create your store page, and publish Coming Soon once approved. Five months out, improve capsule art and trailer based on early feedback. Four months out, start creator outreach and collect newsletter subscribers. Three months out, release a polished demo and run a Steam Playtest for onboarding feedback. Two months out, submit festival applications if eligible. One month out, finalize price, achievements, localization, store assets, and launch discount. Two weeks out, submit the release build with buffer time for review. Launch week, send keys, post updates, monitor bugs, and keep communication steady.
This timeline is not universal. Some games need a year of pre-launch marketing. Others are smaller and can move faster. The principle is simple: do not let administrative tasks, store assets, or review timing collide with your launch date at the last possible moment. Panic is not a project management methodology, no matter how popular it becomes near deadlines.
Field Notes: Real-World Experience From Preparing a Game for Steam
The experience of getting a game on Steam is usually less like a dramatic movie montage and more like assembling a spaceship while reading documentation, answering tax questions, resizing images, and discovering that your “final” trailer file is named final_trailer_real_final_USE_THIS_maybe.mp4. The developers who handle Steam best are not always the ones with the biggest teams. They are the ones who respect the process early.
One useful lesson is that your Steam page teaches you how strangers understand your game. Developers are often too close to their projects. You know the lore, the mechanics, the inside jokes, and why the raccoon merchant has unresolved family drama. New players know nothing. When they land on your page, they need immediate clarity. If testers describe your game differently than you do, listen carefully. They may have found the real hook.
Another common experience is underestimating visual presentation. Many developers polish gameplay for years, then create capsule art in one rushed weekend. That is like baking a perfect cake and serving it in a shoebox. Store visuals do not need to be expensive, but they must be intentional. The capsule should read at small sizes, the logo should be legible, and the screenshots should show why the game is fun. A player scrolling through Steam is making fast decisions. Your art must earn a pause.
Testing also becomes more serious once Steam is involved. A build that works on your development machine is not automatically release-ready. Clean installs reveal missing files. Different controllers reveal menu problems. Different resolutions reveal user interface chaos. Fresh players reveal tutorial confusion. A playtest can be emotionally uncomfortable because people will get stuck in places you thought were obvious. That discomfort is useful. Every confused tester before launch is potentially one fewer negative review after launch.
Marketing is another reality check. Many first-time developers believe launch day is when promotion begins. In practice, launch day is when earlier promotion gets tested. Wishlists, demos, community posts, creator coverage, and press outreach all work better with time. A Steam page sitting quietly with no traffic is not “building hype” by existing. You need to send people there. Think of Steam as the stage, not the street team.
Finally, launching on Steam teaches patience. Not every good game explodes immediately. Some build momentum through updates, discounts, word of mouth, festivals, localization, and community trust. Your first release can also become the foundation for your second. The store page skills, build pipeline, QA habits, trailer instincts, and player communication lessons you learn are reusable. Even a modest launch can be a serious professional step if you study what happened, improve the game, and keep building.
Conclusion: Getting on Steam Is a Process, Not a Portal
Getting your game on Steam is absolutely achievable for indie developers, small studios, and solo creators, but it rewards preparation. You need more than a finished build. You need a clear store page, strong assets, honest disclosures, a tested upload pipeline, a wishlist strategy, a pricing plan, and enough launch support to respond when real players arrive. Steam gives you powerful tools, but it does not replace the work of positioning, polishing, testing, and marketing your game.
If you treat Steam as a professional launch platform instead of a last-minute upload destination, you give your game a much better chance. Start early, explain your game clearly, show real gameplay, test everything, build wishlists before release, and communicate like a developer players can trust. The release button may be small, but the preparation behind it is the real game.
Note: Steam’s tools, rules, fees, review expectations, discount options, and content disclosure requirements can change. Before publishing, developers should review the latest Steamworks documentation inside their partner account and leave extra time for review, corrections, and launch preparation.


