Table of Contents >> Show >> Hide
- Why Charging Cords Turn Into a Tangled Soap Opera
- The One Hack That Fixes 80% of Cord Chaos: Build a “Cord Library” With Labeled Compartments
- Quick Upgrades That Keep Cords From Escaping (Optional, but weirdly satisfying)
- Charging Station vs. Storage: Know What You’re Solving
- Safety + Cable Health (Because Sparks Are Not an Aesthetic)
- Troubleshooting: If Your Household Won’t Follow the System
- Maintenance: The 60-Second Weekly Reset
- What It’s Like Living With the System (Experiences & Real-World Moments ~)
- Conclusion: One Small System, A Lot Less Daily Annoyance
If your “cord drawer” is less a drawer and more a chaotic ecosystem where chargers go to evolve into knots… welcome.
You’re not messy. You’re just living in the modern era, where every device comes with its own noodle and a tiny box
that loves to disappear exactly when you’re at 2% battery.
Let’s fix it with one simple, repeatable system that takes about 20 minutes to set up and saves you from the
daily scavenger hunt. We’ll start with the main hack (the one that does most of the work), then add a few optional
upgrades for nightstands, desks, and travel. No weird DIY contraptions. No “buy a $300 bamboo charging monastery.”
Just practical organization that sticks.
Why Charging Cords Turn Into a Tangled Soap Opera
Cords tangle for three boring reasons and one petty reason:
(1) they’re flexible and slide around, (2) they’re different lengths and shapes,
(3) we toss them in a pile because life is happening, and
(4) they take it personally.
The real issue isn’t storage spaceit’s identification and containment.
If you can’t instantly answer, “What cord is this?” you’ll either:
(a) buy a duplicate, (b) keep mystery cords forever, or (c) plug random things into random bricks and hope for the best.
Your goal is a system that makes each cord (1) easy to spot, (2) hard to tangle, and (3) quick to put back.
Which brings us to the hack.
The One Hack That Fixes 80% of Cord Chaos: Build a “Cord Library” With Labeled Compartments
The easiest charging-cord storage isn’t a fancy wrap techniqueit’s a small compartment case where each cord has its own home.
Think “photo case,” “craft organizer,” “tackle box,” or “tea organizer,” but for chargers.
When cords live in individual compartments, they can’t mingle, tangle, or stage a coup.
What you’ll need (keep it simple)
- A compartment organizer (photo case with mini boxes, craft organizer, or small tackle-style case)
- Hook-and-loop (Velcro-style) cable ties (reusable = less rage later)
- Labels (label maker, masking tape, or pre-made cable tags)
- A marker (fine tip works best)
- Optional: a zip-top bag for “unknown cords,” and a small pouch for travel spares
Step-by-step: set it up once, enjoy forever
-
Round up every charging cord you own.
Do a fast sweep: desk, nightstand, couch area, car, backpack, kitchen counter (a.k.a. the Charging Plains). -
Match each cord to a deviceright now.
Plug it in and confirm it charges the device you think it does. If you can’t identify it after a reasonable attempt,
it goes into the “mystery cord quarantine” bag (we’ll deal with it later). -
Declutter ruthlessly but safely.
If a cord is frayed, bent at the connector, or has that “I’m about to spark” vibe, recycle/dispose responsibly.
If it belongs to a device you no longer own, it’s not a collectible. -
Coil the cord in a gentle loop.
Avoid sharp bends near the connector. A loose coil protects the cable and keeps it from springing back into chaos.
Secure it with a hook-and-loop tie. -
Label it like Future You is a stranger.
Write what it is AND what it’s for. Examples:
“USB-C 6ft – Laptop,” “Lightning – iPhone,” “Micro-USB – Speaker,” “Watch Charger – Garmin,” “USB-A to C – Power Bank.” -
File it into a compartment.
One cord per compartment whenever possible. If you must group, group by type (all USB-C together, etc.) and keep it consistent.
A labeling system that actually works (and doesn’t require a spreadsheet)
Pick one of these methods and stick to it:
- By connector type: USB-C, Lightning, Micro-USB, barrel plugs, specialty chargers.
- By location: “Desk,” “Bedroom,” “Travel,” “Car,” “Living Room.”
- By device category: “Phones/Tablets,” “Laptop,” “Audio,” “Wearables,” “Camera/Gaming.”
My favorite for most households is connector type + a short “used for” note. It’s fast and future-proof.
The goal is: if someone else opens the case, they can still find the right cord without summoning you like tech support.
Pro tip: store “bricks” separately
Charging bricks (USB-C PD adapters, multi-port cubes, etc.) are bulky and don’t play nicely with cords.
Give them a dedicated section or a small bin next to the organizer.
Label bricks too: “65W laptop,” “20W phone,” “multi-port travel.”
Quick Upgrades That Keep Cords From Escaping (Optional, but weirdly satisfying)
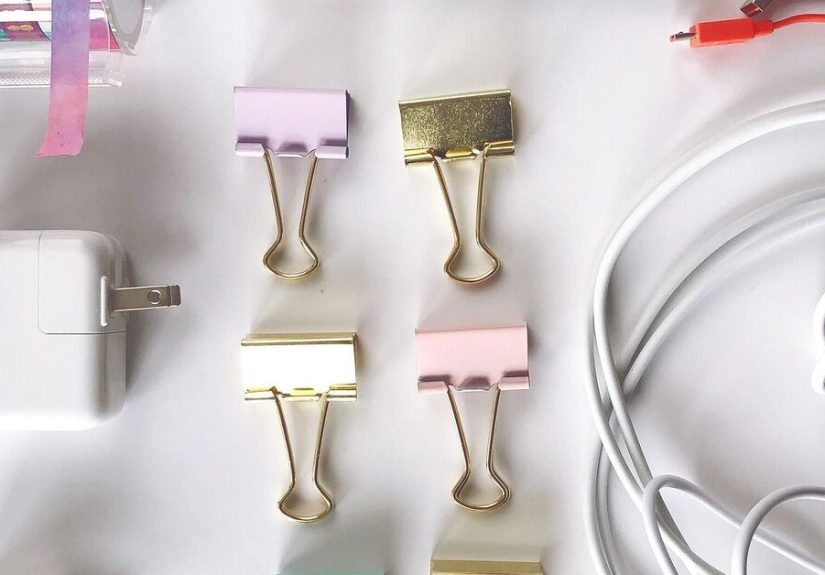
1) Desk-edge cord holders (a.k.a. stop the daily floor dive)
If your charging cable regularly swan-dives behind your nightstand, you need a “parking spot.”
Two easy solutions:
- Binder clip trick: clip it to the edge of a desk or shelf and thread the cable through the metal loop.
- Adhesive cord clips: stick to the side/back of a desk so the cable stays where you left it.
This doesn’t replace storageit prevents the everyday annoyance that makes people abandon systems.
2) A cable management box for the “power strip octopus”
If your cords are mostly “in use” (TV console, desk setup, kitchen charging zone), a cable management box hides the power strip
and lets cords exit neatly. It’s the difference between “I live here” and “my cables live here and I am their roommate.”
3) One travel pouch that’s always packed
Choose 2–4 cords you actually travel with, add a small wall adapter, and keep them in a pouch that never gets emptied.
That way your main “Cord Library” stays intact, and travel doesn’t trigger cord extinction events.
Charging Station vs. Storage: Know What You’re Solving
There are two different problems people call “cord clutter”:
- Storage clutter: extra cords you keep “just in case.” The compartment organizer solves this.
- Active-use clutter: cords plugged in every day (desk, nightstand, family device zone). A charging station solves this.
If you’re mostly dealing with active-use clutter, consider a simple charging station approach:
a basket, a drawer setup, a dedicated shelf, or a hidden box with a power strip insideanything that corrals devices
into one predictable place. Your goal is “charging lives here,” not “charging happens wherever we collapse.”
Safety + Cable Health (Because Sparks Are Not an Aesthetic)
Organization isn’t just about looksit’s also about reducing tripping hazards, preventing accidental yanks, and
keeping cords away from pets and kids who see cables as spicy noodles.
- Inspect cords for damage before storing or using.
- Don’t crank down zip ties like you’re securing cargo on a spaceship. Tight ties can strain cables.
- Avoid sharp bends near connectors; that’s where failures love to happen.
- Don’t overload power strips and avoid daisy-chaining extension cords/power strips.
If you’re hiding cords on walls or baseboards, use purpose-made solutions (clips, raceways) and follow product instructions.
“Stick it with mystery tape” is how you end up with peeled paint and regrets.
Troubleshooting: If Your Household Won’t Follow the System
If you live with other humans, the system must be easier than chaos. Here are fixes that work in real homes:
Problem: “Nobody puts cords back.”
Make the organizer visible and reachable. If it lives in a hard-to-reach closet, it becomes a museum piece.
Put it in a desk drawer, entry cabinet, or the spot where charging already happens.
Problem: “We still have mystery cords.”
Add a small “Quarantine” bag. Once a month, test what’s inside. If you still can’t identify it, it’s probably safe to let it go.
Mystery cords are like leftover screws after furniture assembly: technically important, emotionally exhausting.
Problem: “Cords tangle inside the compartment anyway.”
That usually means cords weren’t secured. Add a tie to each cord before it goes in. Also, one cord per compartment is the gold standard.
Maintenance: The 60-Second Weekly Reset
The best organization system is the one you can maintain while tired.
Once a week (or whenever you remember), do this:
- Put stray cords back in their compartment.
- Move unidentified cords into quarantine.
- Check for damage on frequently used cords.
- Replace missing ties/labels immediately (future you will thank present you).
Bonus rule: One-in, one-out. If a new cord enters the house, an old or unused cord leaves.
Your storage should not become a retirement village for obsolete chargers.
What It’s Like Living With the System (Experiences & Real-World Moments ~)
The first experience most people have after setting up a cord library is a weird sense of calm… followed by
immediate suspicion. “This feels too tidy. What’s the catch?” The catch is that you’ll start noticing how often
cords used to steal your time. Not in dramatic “I missed my flight” waysmore like “I lost seven minutes and my patience
because the one USB-C cable I needed was disguised as a lasso.”
Week one is the honeymoon phase. You open the organizer and suddenly everything is obvious:
USB-C cables are together, watch chargers aren’t playing hide-and-seek, and you no longer have to perform the ancient ritual of
plugging in random cables until something lights up. If you share a home, this is often the moment someone says,
“Oh, this is where they go,” with the tone of a person discovering fire.
Then comes the second experience: the system gets tested by real life.
A friend borrows a charger. A kid “helpfully” uncoils everything to measure it against the cat.
Someone shoves a cord into the wrong compartment because “they’re all basically the same,” which is a statement that should be
illegal in at least three states.
Here’s what tends to happen next (and why the system still wins): the organizer makes mistakes visible.
When cords are loose in a drawer, disorder blends into the background. In a compartment case, one wrong cord looks out of place,
like a pineapple in a sock drawer. That visual feedback is powerful. It nudges people back toward doing it correctly without you
having to become the Household Cable Manager (an unpaid position with terrible benefits).
Another common experience: you’ll discover duplicates you didn’t realize you owned. Two identical Lightning cables.
Three micro-USB cords from devices you no longer have. A “mystery barrel plug” that seems to belong to a router from 2012.
This is normal. The organizer doesn’t just store cordsit reveals your buying history.
Most people end up creating a small “extras” section for backups and donating/recycling the rest.
The biggest quality-of-life change is how fast you can reset the space. If cords are labeled and tied, cleanup is almost mindless:
coil, strap, file. That’s it. No fighting knots. No “I’ll deal with it later” pile. And because the system is easy,
it survives busy weeks. You might not put every single cable back perfectly every timebut you can recover in two minutes,
which is the real secret to staying organized.
Finally, there’s the unexpectedly satisfying experience of being “the person with the charger.”
Someone asks, “Do you have a USB-C cable?” and you don’t have to answer with, “Maybe? Give me ten minutes and a flashlight.”
You just open the case, grab the labeled cord, and hand it over like a responsible adult with a functional life.
It’s a small winbut those are the wins that add up.
Conclusion: One Small System, A Lot Less Daily Annoyance
The simplest way to win the charging-cord battle is to stop storing cords like spaghetti and start storing them like supplies:
labeled, tied, and separated. A compartment organizer turns “cord chaos” into a quick grab-and-go library.
Add a cord clip at the desk or nightstand, and you’ve eliminated the two biggest pain points:
tangled storage and runaway daily-use cables.
Set it up once. Maintain it in under a minute a week. And enjoy the rare modern luxury of finding the right charger
before your phone hits 1% and starts bargaining with you.