Table of Contents >> Show >> Hide
- Why Turtle Eye Medication Is Tricky (and Why Technique Matters)
- Before You Start: A Quick Prep Checklist
- The 10 Steps
- Step 1: Wash up and set up a stable “treatment station.”
- Step 2: Read the label like it’s the final boss fight.
- Step 3: Safely pick up and support your turtle (two hands, always).
- Step 4: Use a towel wrap to reduce stress and stop the wiggles.
- Step 5: Patiently encourage the head to come outno pulling.
- Step 6: If there’s crust or discharge, gently clean only the outer area.
- Step 7: Position the medication tip correctly (close, but never touching).
- Step 8: Apply eye drops the turtle-safe way.
- Step 9: Apply ointment as a thin ribbon inside the lower lid.
- Step 10: Time multiple medications correctly, then reward and record.
- Aftercare: Help the Medication Actually Work
- Common Mistakes (So You Don’t Have to Learn the Hard Way)
- When to Stop Home Treatment and Call the Vet ASAP
- Conclusion
- Extra: Real-World Experiences (What Caretakers Commonly Run Into)
Putting eye medication on a turtle is a little like trying to politely deliver room service to a guest who keeps
slamming the door… with their face… and their door is also a shell. It’s doable, thoughand when it’s done calmly
and cleanly, it can make a big difference in comfort and healing.
This guide walks you through 10 practical, turtle-friendly steps for applying vet-prescribed
eye drops or ointment. We’ll keep it real, keep it safe, and keep your fingers out of the “turtle bite zone.”
Important: Only use medication that was prescribed or specifically approved by a reptile veterinarian. Turtle eye issues often involve underlying problems (like diet, water quality, vitamin deficiencies, infection, or abscesses), and the wrong productespecially human medscan delay treatment or cause harm.
Why Turtle Eye Medication Is Tricky (and Why Technique Matters)
Unlike dogs and cats, turtles can retract their heads, clamp their jaws, and hold still for long stretches like a
statue in a museum that absolutely does not want to be touched. Eye medication works best when it:
- actually lands on the eye or inside the lower eyelid “pocket” (not on the face like a sad cosmetic tutorial),
- is not contaminated by touching the tube tip to skin/eye,
- is given on schedule long enough to do its job,
- and is paired with correct husbandry (heat, UVB where appropriate, clean water, good diet).
Also, swollen/closed eyes can be more than “just irritation.” In pet turtles, eyelid swelling and discharge can be
associated with vitamin A deficiency, respiratory disease, ear abscesses, or bacterial infections. If your turtle
won’t eat, seems lethargic, is wheezing/bubbling at the nose, or can’t open its eyes, that’s a “call an experienced reptile vet” situationnot a DIY moment.
Before You Start: A Quick Prep Checklist
Supplies
- Vet-prescribed eye drops and/or ointment
- Clean towel (a “turtle burrito” towel)
- Non-lint gauze or cotton pads (use gently)
- Sterile saline (if your vet said it’s okay for wiping away discharge)
- Disposable gloves (optional but helpful, especially with ointment)
- Timer or phone alarm
- A helper (highly recommended)
- Paper towel or washable mat for traction
Set the mood (yes, really)
Turtles do better with slow movements, minimal noise, and fewer “surprise hands.” Plan to work in a quiet spot with
good lighting and a stable surface. If you’re stressed, your turtle will notice and become extra uncooperativelike
a tiny, grumpy detective.
The 10 Steps
Step 1: Wash up and set up a stable “treatment station.”
Wash your hands and dry them. Lay a towel or non-slip mat on a table or counter so the turtle has traction.
Keep the medication uncapped only when you’re ready to use it. Have everything within reach so you’re not doing a
one-person scavenger hunt while your turtle plots its escape.
Step 2: Read the label like it’s the final boss fight.
Confirm which eye (left, right, or both), how often, and how much.
If the label says “shake well” (common with suspensions), gently shake it. If you have multiple eye meds, keep caps
organized so you don’t mix them up. This is also the moment to decide your plan: drops first, ointment last, and a
timer between them if you’re giving more than one medication.
Step 3: Safely pick up and support your turtle (two hands, always).
Scoop from below and support the shell with both hands. Don’t grab from above like a bird of preyyour turtle
will panic. Keep the turtle low over the surface so there’s no drop risk if it squirms. If your turtle is a biter,
keep fingers away from the front end and respect the “chomp radius.”
Step 4: Use a towel wrap to reduce stress and stop the wiggles.
Wrap the turtle in a towel like a snug burrito, leaving the head area accessible (when the head is out). The goal
is gentle restraint, not a wrestling match. A towel can also block some visual stimulation, which often helps reptiles
calm down. If you have a helper, one person can hold the turtle steady while the other applies medication.
Step 5: Patiently encourage the head to come outno pulling.
Many turtles retract when they feel pressure or surprise. Instead of pulling (which can injure the neck), try:
- Wait quietly with steady supportpatience is often the best tool.
- Cover the eyes lightly with the towel edge for a moment to help the turtle relax, then uncover when ready.
- Slightly tip forward (just a bit) while keeping the body supportedsome turtles extend their head more readily this way.
If your turtle absolutely will not extend its head, stop and talk to your vet. Forcing the issue can cause harm.
Step 6: If there’s crust or discharge, gently clean only the outer area.
If your veterinarian approved cleaning, moisten gauze with sterile saline and gently wipe away discharge from the
eyelids/skin. Wipe outward (away from the eye surface). Don’t scrape, don’t “dig,” and don’t push debris into the eye.
If the eye looks severely swollen, ulcerated, or very painful, skip the cleaning and call your vet for guidance.
Step 7: Position the medication tip correctly (close, but never touching).
Hold the bottle/tube close enough to be accurateabout a few millimeters to a centimeter awaybut
do not touch the eye, eyelids, or skin with the tip. Touching contaminates the medication and can irritate or injure
the eye. Angle the tip so it’s not pointed like a dart directly into the eyeball.
Step 8: Apply eye drops the turtle-safe way.
With your non-dominant hand, gently pull down the lower eyelid to create a small “pocket.”
Place one drop into the inner corner or the lower lid pocket (as directed). Then pause for a moment so the drop can spread.
Let the turtle blink naturally. If the turtle retracts immediately, don’t chase the eye with the bottlereset, breathe,
and try again.
Step 9: Apply ointment as a thin ribbon inside the lower lid.
Ointment usually goes inside the lower eyelid, not smeared across the outside like frosting.
Pull the lower lid down slightly and squeeze a thin strip along the inner edge. Then let the turtle blink.
If you can, allow the eyelids to close naturally for a moment so the ointment melts and spreads.
Remember: more is not bettermore is just messier.
Step 10: Time multiple medications correctly, then reward and record.
If you’re giving more than one eye medication:
- Use them in order of thickness: drops first, gels next, ointments last.
- Wait 5–10 minutes (or your vet’s instructions) between different products so they don’t dilute or block each other.
When you’re done, recap the medication, wash your hands, and give your turtle a calm “cool down.”
If your turtle associates treatment with immediate chaos, it will get harder every time. A small rewardlike returning
to a warm basking area or offering food if your vet allowshelps. Finally, write down the time you dosed the eye so you
don’t accidentally double-dose later.
Aftercare: Help the Medication Actually Work
Keep conditions supportive
Eye problems often improve faster when the habitat is dialed in:
correct temperatures, proper basking access, appropriate UVB (species-dependent), and clean water with effective filtration.
Poor conditions can keep the immune system struggling, even if you’re doing the medication part perfectly.
Ask your vet if “dry docking” is needed
For aquatic turtles, some vets recommend temporary “dry docking” (keeping the turtle warm and dry for part of the day)
so topical medication isn’t immediately washed off. Don’t guessfollow your veterinarian’s instructions, because drying
routines must be done correctly to avoid dehydration or temperature stress.
Common Mistakes (So You Don’t Have to Learn the Hard Way)
- Touching the tube tip to the eye: contaminates the medication and can injure the eye.
- Skipping the schedule: antibiotics/anti-inflammatories may fail if they’re not given consistently.
- Using human products: some ingredients are unsafe for reptiles; always confirm with a reptile vet.
- “Mega-dosing” vitamin A at home: vitamin A overdose is a real risk; supplementation should be veterinarian-guided.
- Forcing the head out: can injure the neck and turns treatment into a trauma event.
When to Stop Home Treatment and Call the Vet ASAP
Contact a reptile veterinarian promptly if you notice:
- Eyes swollen shut or “balloon-like” swelling
- Thick pus-like discharge, bleeding, or a cloudy/blue-looking cornea
- Not eating, lethargy, weight loss
- Wheezing, open-mouth breathing, bubbles/mucus at the nose or mouth
- Facial lumps near the ears or behind the eyes (possible abscess)
- No improvement after 48–72 hours of treatment (or worsening at any time)
Conclusion
Applying eye medication to a turtle is mostly a game of calm handling, clean technique, and good timing.
Set up your station, secure your turtle gently, avoid contaminating the medication tip, apply drops and ointment correctly,
and stick to the schedule. Just as important: fix the conditions that may have contributed to the problem in the first place,
and involve a reptile-savvy veterinarian earlyespecially when swelling, discharge, or appetite changes show up.
If you take away only one thing, make it this: don’t rush. The slower and steadier you are, the safer it is for your turtle,
and the easier it becomes the next time you have to do it.
Extra: Real-World Experiences (What Caretakers Commonly Run Into)
People who keep turtles often expect the hard part to be the medication itselfsqueezing a bottle, aiming a tube, and calling it a day.
In reality, the hard part is usually the turtle management: timing, patience, and keeping the situation from turning into
a daily “capture-and-escape” action movie.
One of the most common experiences caretakers report is the “now you see me, now you don’t” head retreat. The turtle comes out to investigate,
you lift the bottle, andpoofhead disappears like it got sucked into a turtle-shaped black hole. The fix is rarely force. Instead,
caretakers who succeed tend to do two things: they set the turtle down on a stable surface (so it feels supported), and they
pause. After 30–90 seconds of calm, many turtles extend their head again. Some owners also find that draping a towel edge to block
the turtle’s view for a moment can reduce the “incoming predator!” reaction.
Another common learning moment: aiming too high. If you hold the bottle above the eye like a dramatic movie scene,
the turtle may jerk backward, and the drop lands on the foreheador the towelor your hand. People who get more consistent results usually
shift to the “lower lid pocket” approach: gently pull down the lower lid, hold the bottle close (without touching), and place the drop into
the inner corner. It’s less dramatic, more accurate, and your turtle won’t need a shower afterward.
Ointment brings its own “experience.” First-timers often apply too much because it feels like more should work faster.
What actually happens is a goo mustache that smears on the skin and picks up debris. Caretakers who get the hang of it learn that a
thin ribbon inside the lower lid is plenty. The turtle blinks, the ointment melts, and you’re not wasting medication or creating
an all-day face-slick.
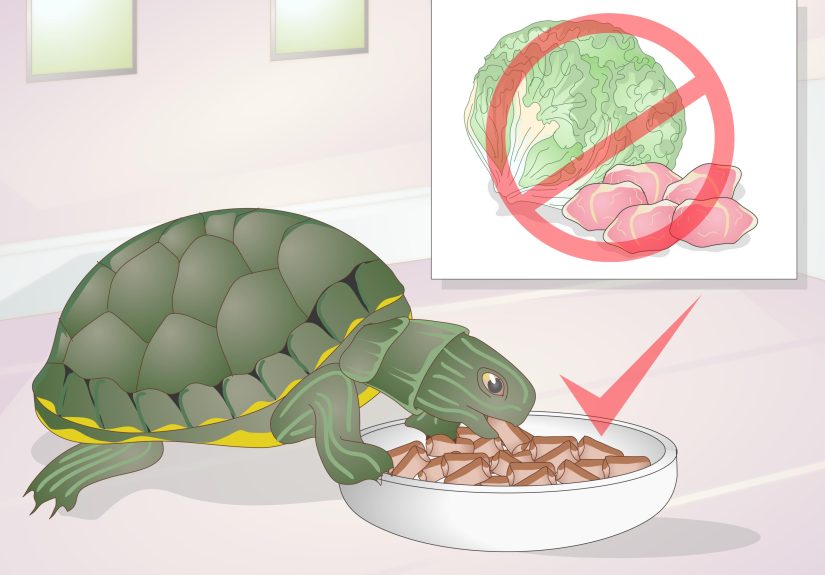
A very practical experience people mention is realizing that habitat issues can sabotage progress. Someone may do the medication perfectly,
but the turtle’s water stays cloudy, the basking area is too cool, or the diet is mostly low-nutrient treats. In those cases, improvement can stall
until husbandry is corrected. Many keepers describe a “turning point” when they improve filtration, make basking reliable, and upgrade the dietthen
the eyes start looking less irritated and the turtle becomes more active and hungry.
Finally, a lot of caretakers discover the power of a routine. The first few days can be rough, but turtles often become less reactive when the sequence
is predictable: same place, same towel, same gentle hold, then back to warmth. Some people even set a calm timer between multiple medications to avoid rushing.
Over time, the turtle may never “love” eye meds, but it can stop treating you like a daily supervillain.


