Table of Contents >> Show >> Hide
- Why Compost Horse Manure Instead of Leaving It in a Pile?
- What You Need Before You Start
- How to Compost Horse Manure: 7 Steps
- Step 1: Choose the Right Composting Site
- Step 2: Build a Balanced Mix
- Step 3: Make the Pile Big Enough to Heat Up
- Step 4: Adjust Moisture and Airflow
- Step 5: Monitor Temperature Like It Is Your Compost Report Card
- Step 6: Turn the Pile and Keep Simple Records
- Step 7: Cure the Compost Before Using It
- Common Problems and Easy Fixes
- Best Uses for Finished Horse Manure Compost
- Conclusion
- Experience and Lessons from Real-World Horse Manure Composting
- SEO Tags
If you own horses, you already know the barn produces three things on a reliable schedule: manure, more manure, and the sudden realization that there is somehow even more manure than yesterday. The good news is that horse manure does not have to become a permanent mountain behind the fence. With the right composting system, it can become a dark, crumbly, earthy-smelling soil amendment that is far more useful than a soggy muck pile and much easier to live with.
Composting horse manure is not just about tidiness. It can reduce pile volume, make nutrients more stable, cut down on weeds and parasites when the process gets hot enough, and turn bedding-heavy stall waste into something your garden, trees, ornamentals, or pastures can actually appreciate. Better yet, it helps you manage manure more responsibly by lowering the odds of runoff, odor headaches, and neighbor side-eye. In other words, composting is part science, part routine, and part “please stop letting the back corner of the property look like a medieval moat.”
This guide walks you through how to compost horse manure in 7 steps, with practical advice for small farms, backyard barns, and horse owners who want a compost pile that behaves like a well-run operation instead of an organic mystery blob.
Why Compost Horse Manure Instead of Leaving It in a Pile?
Fresh horse manure is rarely “ready to use” as-is, especially when it is mixed with bedding such as straw, sawdust, or wood shavings. Raw stall waste may contain weed seeds, parasites, bacteria, and too much unfinished carbon for direct use in many planting areas. It can also smell stronger, attract flies, and release nutrients at the wrong time or in the wrong place.
By contrast, properly finished horse manure compost is more stable, easier to spread, and friendlier to soil structure. It can improve aeration, water retention, and texture while adding organic matter. It also shrinks the original volume of waste, which is wonderful news if your current manure strategy is “try not to look directly at the pile.”
What You Need Before You Start
Before building your compost pile, gather the basics: horse manure, bedding material, a pitchfork or front-end loader, a compost thermometer, a hose or sprinkler, and enough space for an active pile plus a curing pile. Many horse owners do well with a simple two-bin setup: one area for active composting and another for curing. You do not need a fancy system to get good results, but you do need consistency.
It also helps to know what kind of bedding you are dealing with. Straw usually breaks down faster than heavy wood shavings. Sawdust and shavings can work, but they often slow the process because they add a lot of carbon. That means your “horse manure compost” may really be a “horse manure plus tiny wooden confetti management program.”
How to Compost Horse Manure: 7 Steps
Step 1: Choose the Right Composting Site
Start with location, because even a well-built pile can become a problem in the wrong spot. Pick an area that is convenient enough to use every day, but not somewhere that floods, sits next to a well, or drains toward streams, ditches, wetlands, or neighboring property. A level or gently sloped area with good access for carts, tractors, or wheelbarrows is ideal.
If possible, compost on an impermeable surface such as concrete or asphalt. That helps prevent nutrient-rich liquids from leaching into the ground and makes cleanup easier. Walls are optional, but bins made from pallets, slatted boards, or other sturdy materials can help contain the pile while still allowing airflow. Also think about prevailing winds. Compost smells much less when it is managed well, but there is still no reason to aim your “earthy farm fragrance experience” directly at the patio next door.
Step 2: Build a Balanced Mix
The secret to fast, effective composting is balance. Microbes need carbon, nitrogen, air, and water. Horse manure contains nitrogen, and bedding adds carbon. In some cases, manure mixed with bedding is already close to workable, but very shavings-heavy stall waste can become too carbon rich and compost slowly.
A good target for active composting is a blended carbon-to-nitrogen ratio in the rough range of 25:1 to 40:1. If your pile contains lots of wood shavings or sawdust, add some higher-nitrogen materials such as fresh grass clippings, greener plant material, or manure with less bedding mixed in. If the pile is too wet or smells sour, add more dry carbon sources such as straw or dry leaves.
Mix materials thoroughly instead of layering giant blocks of one thing at a time. Compost microbes are efficient, but they are not miracle workers. A pile with one zone of wet manure and another zone of dry shavings is basically two bad piles sharing an address.
One more thing: ask questions about hay, bedding, and pasture management if materials come from outside sources. Persistent herbicides used on some hay or forage crops can survive digestion and composting, then damage sensitive garden plants later. If you do not know the material history, test carefully before using that compost around vegetables, tomatoes, beans, or flowers.
Step 3: Make the Pile Big Enough to Heat Up
Size matters in composting. A pile that is too small loses heat too quickly and may never reach active composting temperatures. For many home and small-farm setups, a pile roughly 4 to 6 feet high and 3 to 5 feet wide works well. Another useful rule of thumb is to build at least about half a cubic yard of fresh material if you want reliable heating, though larger piles often perform better.
This is where a two-bin system shines. Put fresh stall waste into the first bin and manage it actively there. Once the hot phase slows down, move the material to a second bin or separate curing area. That keeps the process organized and prevents you from accidentally remixing finished compost with brand-new manure like a very unfortunate layer cake.
Step 4: Adjust Moisture and Airflow
Moisture should feel like a wrung-out sponge: damp, but not dripping. If you squeeze a handful and water pours out, the pile is too wet. If it feels dusty and lifeless, it is too dry. Most successful piles stay in the neighborhood of 40% to 60% moisture.
Air is just as important. Composting horse manure is an aerobic process, which means the microbes doing the heavy lifting need oxygen. Without enough air, the pile gets compacted, turns smelly, and slows down. Turning the pile helps, but so does building it with enough structure and porosity from bedding, coarse material, or even perforated pipes in some systems.
Here is the quick troubleshooting version:
- Too wet: add dry material and turn the pile.
- Too dry: add water while mixing.
- Bad odor: improve airflow, reduce compaction, and add dry browns if needed.
- No heat: check moisture, pile size, oxygen, and whether the mix is too woody.
Step 5: Monitor Temperature Like It Is Your Compost Report Card
If you are serious about getting good compost, buy a compost thermometer. Guessing the temperature by waving your hand over the pile is charmingly optimistic, but not especially accurate. Under good conditions, active compost piles commonly run in the range of 130°F to 160°F. That heat helps reduce pathogens and weed seeds and tells you the microbial crew is on the job.
For horse manure, temperature also matters because the center of the pile is usually hotter than the outer edges. That means a pile that heats in the middle but is never turned may leave colder pockets unfinished. If you are composting for general home or landscape use, the goal is not perfect laboratory drama; it is a consistently hot, well-managed pile that heats, cools, and reheats after turning.
If you produce compost for organic crop systems, there are stricter process standards for temperature, time, and turning. Even for non-commercial composters, these standards are useful benchmarks because they remind you that heat plus turning is what turns manure from “fresh barn output” into safer, more mature compost.
Step 6: Turn the Pile and Keep Simple Records
Turning mixes outer material into the hot center, adds oxygen, redistributes moisture, and helps the whole pile finish more evenly. During the first month, turn the pile several times if possible, especially when the temperature begins to fall or if the pile smells off. Many well-managed systems get through the active phase faster with regular turning than with pure neglect and optimism.
You do not need a scientific journal, but you should keep simple notes: when you built the pile, how hot it got, when you turned it, whether you added water, and whether anything strange happened. Those notes help you fix problems faster the next time. They also reveal patterns, like “the pile never heats when I overdo the shavings” or “rain turns my open pile into barnyard soup unless I cover it.”
A tarp can help protect a pile from heavy rain, especially during wet seasons, but do not smother the compost so tightly that airflow disappears. Think breathable protection, not plastic burrito.
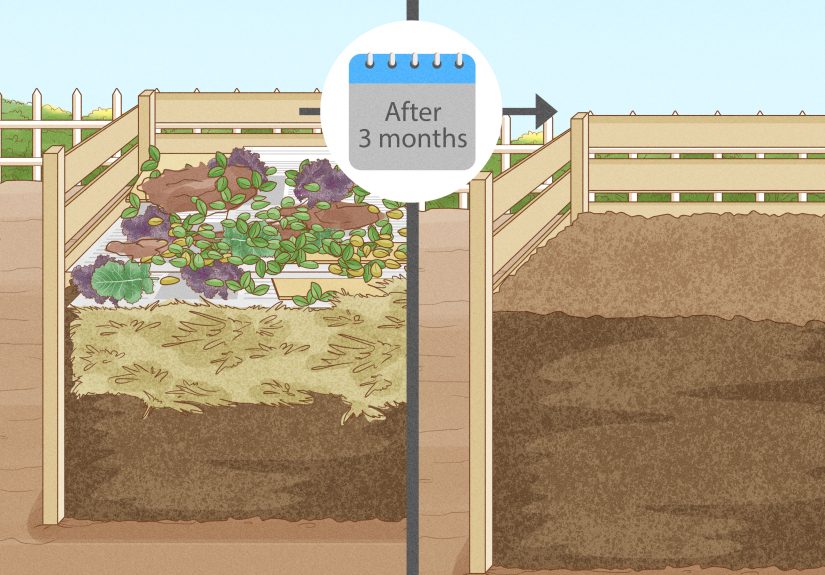
Step 7: Cure the Compost Before Using It
The hot phase is only part of the story. After active composting slows down, the material needs time to cure. This is when the pile stabilizes, finishes decomposing resistant bits, and matures into a product that is less likely to steal nitrogen from the soil or stress plants.
A good curing period may last one to three months, though some small-farm horse manure composts need longer overall, especially when the original mix includes lots of wood products. Under excellent management, horse manure compost may be usable in about 3 to 6 months. More wood-heavy, less frequently turned piles can take much longer.
Finished compost should be dark, loose, crumbly, and earthy-smelling. It should no longer reheat after mixing. If it still smells strongly of manure, still has obvious fresh bedding, or gets hot again after turning, it is not done.
Common Problems and Easy Fixes
The pile is not heating up
Usually the pile is too small, too dry, too compacted, or too carbon heavy. Add moisture, remix the contents, and add a little more nitrogen-rich material if the bedding load is high.
The pile smells awful
That is often a sign of too much moisture or not enough oxygen. Turn the pile, loosen it up, and add dry carbon materials.
The compost takes forever
Horse manure with lots of shavings is notorious for moving at the pace of a horse who knows you are heading to the wash stall. Reduce the proportion of wood bedding in future batches, chop bulky materials smaller, and turn more consistently.
Plants look twisted after using compost
Consider persistent herbicide contamination. Do not use questionable compost on sensitive crops until you know the history or run a simple bioassay test.
Best Uses for Finished Horse Manure Compost
Once the compost is mature, it can be used as a soil conditioner, mulch, or supplemental nutrient source. It works especially well around ornamental beds, shrubs, trees, and pastures when used thoughtfully. In garden beds, a thin layer of about 1/2 inch to 1 inch mixed into the soil is often plenty. More is not always better, especially if phosphorus levels are already high.
If you are growing edible crops, be conservative. Unfinished compost and raw manure are not the same thing as finished, stable compost. If raw manure is used at all in food-growing systems, timing rules matter. For small horse farms and backyard setups, it is smart to reserve the best, most mature compost for ornamental or non-sensitive uses unless you are confident in how the pile was managed from start to finish.
Conclusion
Learning how to compost horse manure is less about chasing perfection and more about controlling a few important variables: site, mix, size, moisture, oxygen, temperature, and patience. When those pieces come together, the result is not just less waste. It is a useful product that can support healthier soil, cleaner barn management, and fewer headaches all around.
The biggest mistake is assuming manure composting happens automatically. It does not. A random heap of stall waste is just a random heap of stall waste. But a managed pile with the right ingredients, regular turning, and enough curing time can become a valuable resource. That is a pretty good trade: less mess behind the barn, more organic matter where you actually want it, and a compost pile that finally earns its keep.
Experience and Lessons from Real-World Horse Manure Composting
One of the most common experiences horse owners report is that composting looks easy from a distance and weirdly educational up close. At first, many people assume manure plus time equals compost. Then they discover that manure plus time often equals a larger, wetter, smellier pile that refuses to turn into the fluffy “black gold” promised in gardening photos. The learning curve usually starts the same way: the pile is placed wherever there is room, fresh stall waste gets tossed on top every day, and everyone hopes nature will handle the rest. Nature, meanwhile, shrugs and sends flies.
The first real breakthrough usually comes when people begin treating the pile like a system instead of a dumping spot. Moving it to a better location, keeping runoff away, and using a dedicated active bin makes a surprisingly big difference. Another classic lesson is the wood-shavings problem. Horse owners who use lots of shavings often find the pile sits there looking respectable but decomposes at the speed of a historical monument. The fix is not glamorous: mix better, add some nitrogen-rich material, and stop pretending the pile will magically self-correct out of politeness.
Thermometers also change people’s understanding fast. A pile that looks quiet may be cooking beautifully inside, while another that looks massive may be doing absolutely nothing. Once owners start checking temperature, they get more confident about when to turn, when to water, and when to stop adding fresh material. Many say the thermometer becomes the most honest tool in the barn. It has no feelings, no agenda, and no interest in your excuses.
Weather teaches its own lessons. Rain can drown a pile, and drought can stall one. A tarp helps, but only when used with common sense. Too loose and it blows away. Too tight and the pile turns into a steamy, airless mess. Then there is neighbor diplomacy. Turning a pile on a cool weekday morning tends to go over much better than turning it on a humid holiday afternoon while everyone nearby is grilling dinner outdoors.
Perhaps the most valuable experience is learning patience. Good compost rarely happens overnight, especially on horse properties where bedding is part of the equation. The owners who get the best results are usually not the ones doing anything flashy. They are the ones who keep the pile the right size, pay attention to moisture, turn it when needed, let it cure, and do not spread it too early just because they are tired of looking at it. In the end, horse manure composting rewards steady habits more than heroic effort. It is not glamorous work, but when the pile finally turns dark, crumbly, and earthy, it feels a little like winning an argument with chaos.


